Create your first action
This page walks through adding your first action button — the step that turns a fresh OliveTin install into something you can actually click and use.
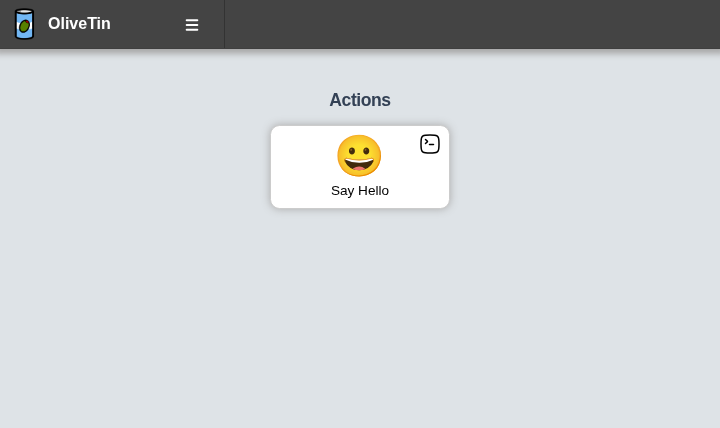
When you are done, your dashboard will have a Say Hello button like this:
Before you start
Make sure you have:
-
OliveTin installed and running — see the installation guide if you have not done this yet
-
Access to your OliveTin
config.yamlfile — see Configuration for where OliveTin looks for this file on your platform -
A text editor to change the file (any editor is fine)
When OliveTin starts successfully, open the web interface in your browser (by default at http://localhost:1337/). You should see the OliveTin dashboard, even if it does not have any custom actions yet.
Step 1: Open config.yaml
OliveTin is controlled entirely by config.yaml. On startup it looks for this file in several places — most commonly:
-
The directory you pass with
--configdir(often the current working directory when you start OliveTin manually) -
/config/inside containers -
/etc/OliveTin/on Linux service installs
If you are not sure which file your instance uses, check how you installed OliveTin (container, package, or manual) and open the config.yaml in that location.
| The Configuration page lists every search path and explains how live reload works when you save changes. |
Step 2: Add an action
Add an entry under actions. Each action needs at least a title (shown on the button) and a shell command to run:
config.yamlactions:
- title: Say Hello
shell: echo "Hello World!"
icon: smile
onclick: execution-dialog-
title— the label on the action button. It must be unique across all actions. -
shell— the command OliveTin runs when you click the button. Here it printsHello World!to the output. -
icon— the glyph shown in the centre of the button. See Icons for other options. -
onclick: execution-dialog— opens a dialog with the command output when the action runs, so you can see straight away that it worked. See Execute on click for other options.
If your config.yaml already has other settings or actions, add this block alongside them. Only the actions: list is required for this example.
Step 3: Save the file
Save config.yaml. OliveTin watches the file and reloads configuration automatically when it changes — you do not need to restart the service in most setups.
Refresh the web page in your browser so the dashboard picks up the new action.
If the button does not appear after saving, check the OliveTin application logs for YAML syntax errors, then refresh again. A missing quote or incorrect indentation in config.yaml is the most common cause.
|
Step 4: Find your new button
After reload, a new Say Hello button appears on the dashboard:
Each action button shows the title at the bottom and the icon in the centre. The small icon in the top-right corner indicates that clicking opens an execution dialog. See Layout for a breakdown of every part of the button.
Step 5: Run the action
Click Say Hello. OliveTin runs echo "Hello World!" and opens the execution dialog with the output, timing, and exit code.
If the dialog shows Hello World! and a successful exit code, your first action is working.
Step 6: View the logs
Every execution is also recorded in the Logs section of the web interface. Open Logs in the navigation to browse past runs, search for executions, and open full output again later.
Important considerations
-
The action title must be unique. If two actions share the same title, only one button is shown.
-
The
shellfield runs your command through a shell. For more control (especially with arguments), useexecinstead — see Shell vs Exec.
What’s Next?
Now that you have a working action, try:
-
Layout — understand the parts of an action button
-
Customize your actions — icons, timeouts, and other action properties
-
Add arguments to actions — make actions interactive with user input
-
Browse action examples — real-world examples for common use cases
-
Schedule actions — run actions automatically on a schedule
-
Trigger actions via webhooks — integrate OliveTin with external systems
-
Organize actions with dashboards — create custom views to organize your actions