OAuth2 - Authentik
OliveTin has been tested with Authentik. This documentation page describes how to configure Authentik for use with OliveTin and assumes you already have Authentik installed and running.
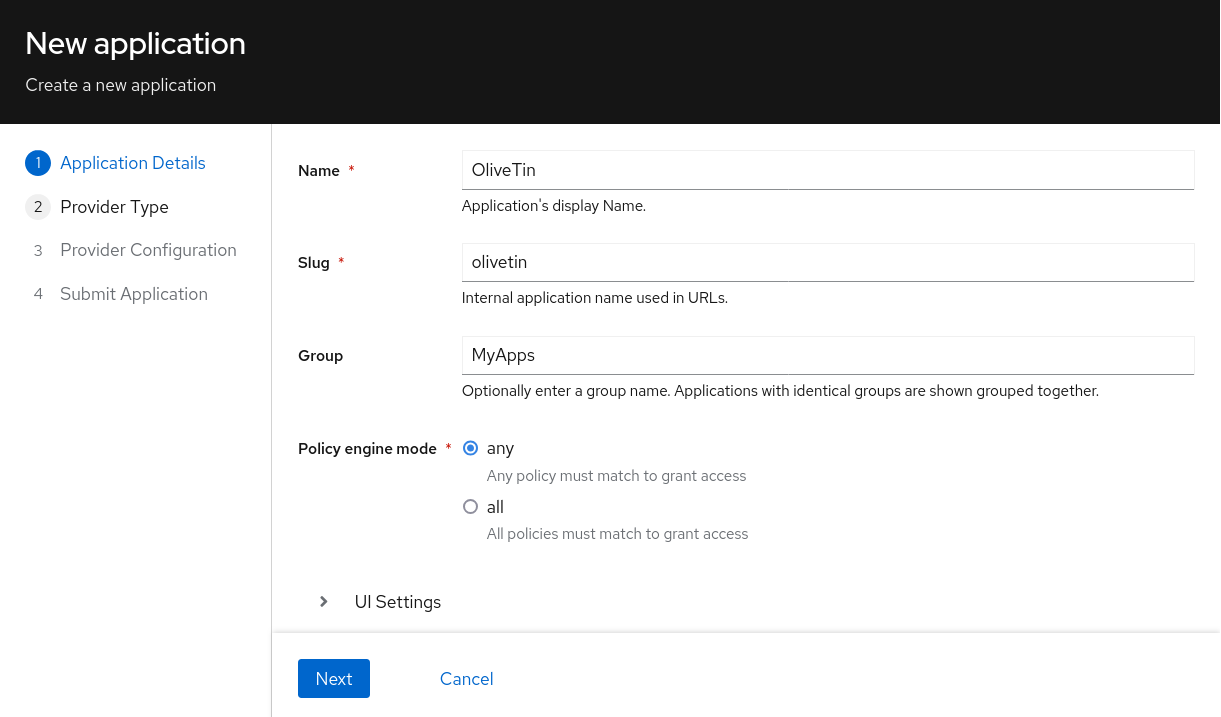
Login as an Authentik administrator and start by creating a new app as follows;
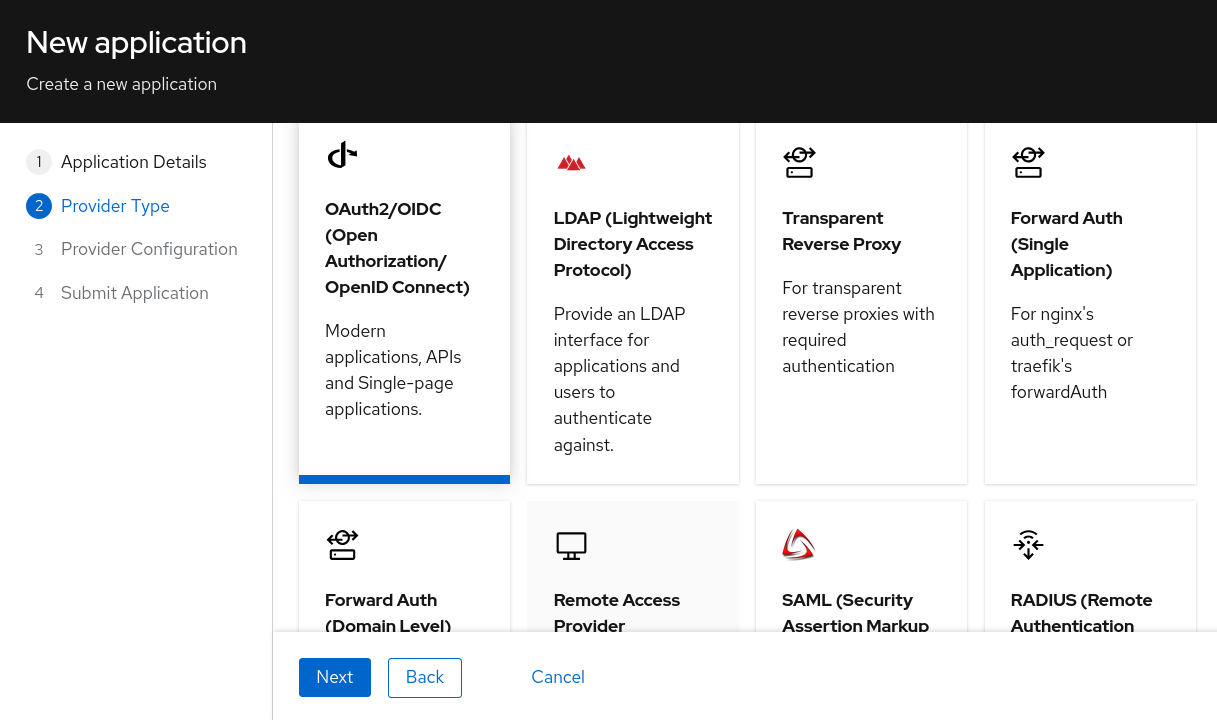
Click Next, and on the Provider Type page select OAuth2.
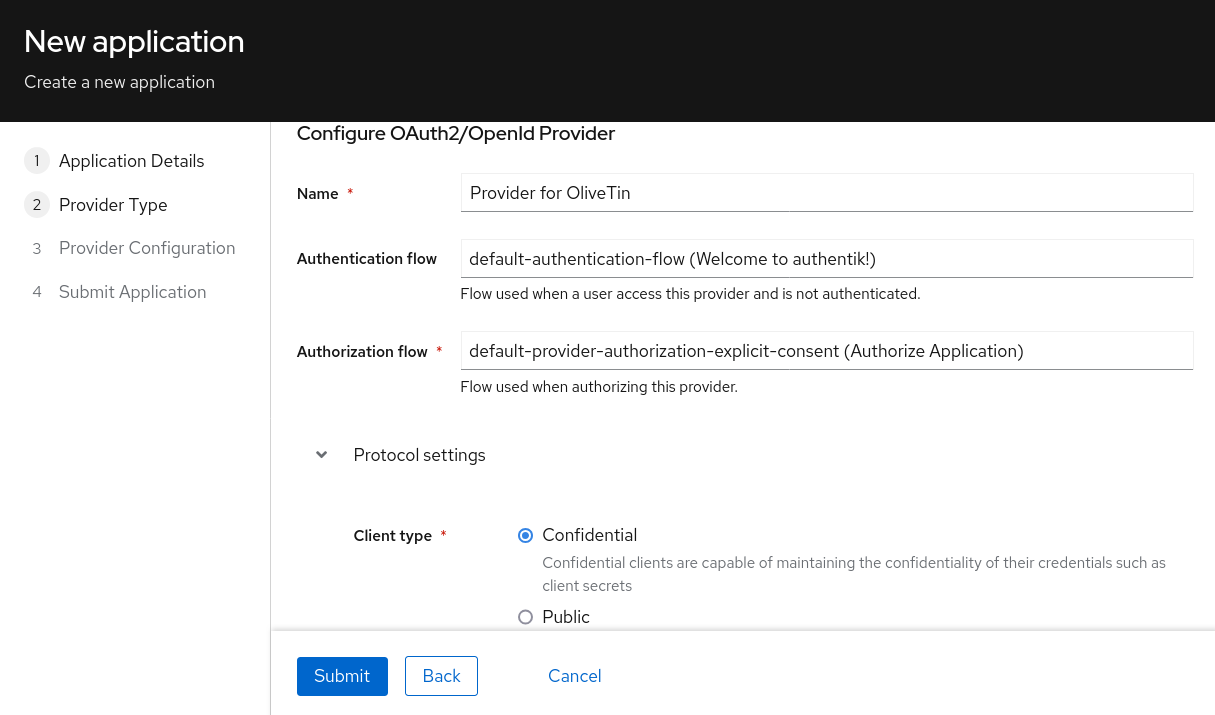
Click Next, and on the Provider Configuration page, fill in the following fields;
-
Authorization flow:
default-authorization-eplicit-consent (Authorize Application)(or similar) -
Client Type:
confidential- OliveTin requires a confidential client (it keeps it’s secrets on the server side).
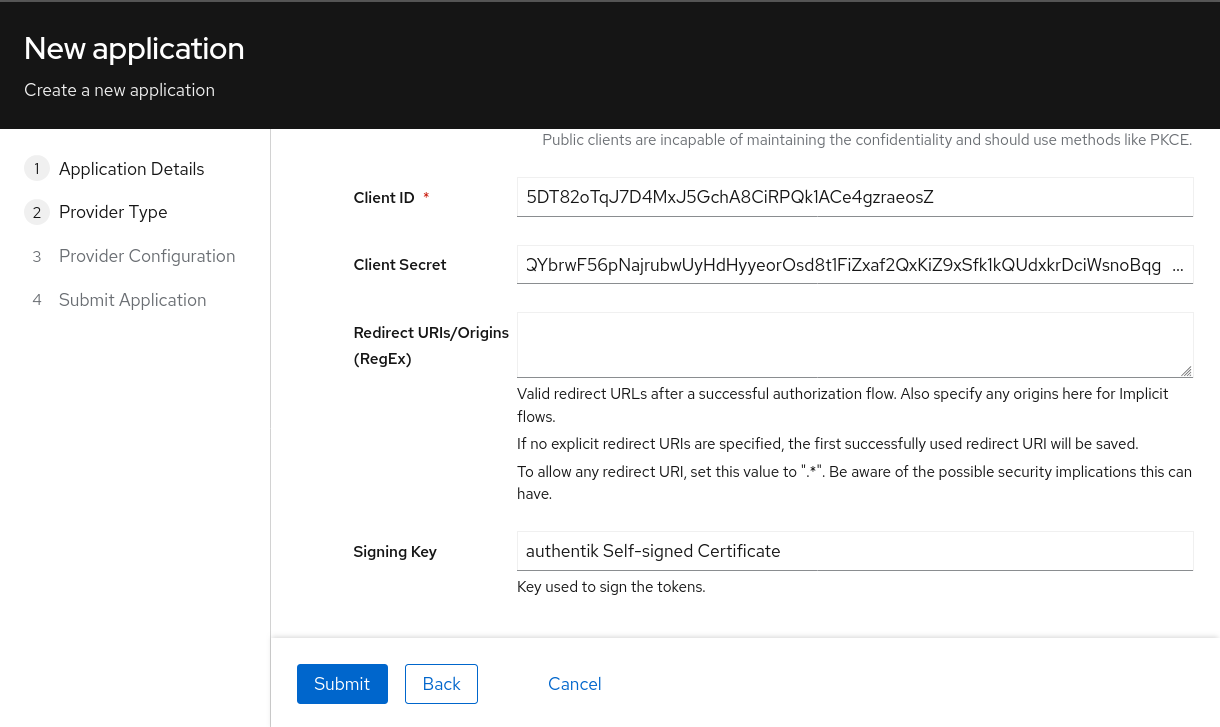
Scroll down, and on the same page, copy the Client ID and Client Secret fields into a text file, a secret manager, or somewhere else safe. You will need these values later. These are used in the OliveTin configuration file later.
For the Redirect URIs, OliveTin requires that the URI ends with /oauth/callback. Therefore if your OliveTin instance is running on http://example.com:1337, you should add the following redirect URI: http://example.com:1337/oauth/callback. Note that the URL must match the URL that you use to access OliveTin - so it is whatever you type in your browser address bar, with /oauth/callback appended to it.
That URL says oauth, not oauth2. OliveTin only supports OAuth2, not "OAuth[1]", but the path is oauth nevertheless.
|
If your Authentik instance has a "Configure Bindings" page, you can bind users to be able to access OliveTin like you would with any other application that you add to Authentik.
Submit this wizard to save the configuration.
Group Mapping
OliveTin 2024.11.24 added support for OAuth2 group mapping for a single group. OliveTin 2025.7.29 added support for OAuth2 group mapping for multiple groups when passed as a commaa-separated list.
The examples below show various ways to map groups from Authentik to OliveTin.
Multiple group mapping: Comma-separated list
The below will match all groups the user is a member of and return them as a comma-separated list. If no groups are found then an empty string is returned (no groups)".
In Authentik: Admin Interface > Customization > Property Mappings > Create > Scope Mapping
-
Name:
olivetin-group-mapping-multiple(or similar) -
Scope Name:
olivetin-group-mapping-multiple(or similar) -
Description:
map all groups to a comma-separated list for olivetin -
Expression:
groups = [group.name for group in user.ak_groups.all()]

return {
    "olivetin_group_list": ",".join(groups)
}
Single group mapping: First Prefix Match
The below will match the first group the user is a member of that matches the prefix defined in group_prefix, which is set to olivetin. If no match is found, the group guest is returned by default. Both group_prefix and returned_group can be changed to your needs.
In Authentik: Admin Interface > Customization > Property Mappings > Create > Scope Mapping
-
Name:
olivetin-group-mapping -
Scope Name:
olivetin-group-mapping -
Description:
map first group that starts with "olivetin" -
Expression:
group_prefix = "olivetin"
returned_group = "guest"

groups = [group.name for group in user.ak_groups.all()]

for group in groups:
    if group.startswith(group_prefix):
        returned_group = group
        break

return {
    "olivetin_group_first": returned_group
}
If you use this multiple group mapping, you will need to set the AuthHttpHeaderUserGroupSep field to ,. This may sound like a strangely named field, but it is the correct one to use for this mapping. It was originally created for the HTTP Trusted Header authentication method, but it is also used for OAuth2 group mapping.
|
Single group mapping: Specific Group Match
The below will match the specified group name to one of the groups the user is a member of. If no match is found, the group guest is returned by default. Both olivetin_group and returned_group can be changed to your needs.
In Authentik: Admin Interface > Customization > Property Mappings > Create > Scope Mapping
-
Name:
olivetin-group-mapping-specific -
Scope Name:
olivetin-group-mapping-specific -
Description:
search and map specified group for olivetin -
Expression:
olivetin_group = "olivetin-users"
returned_group = "guest"

groups = [group.name for group in user.ak_groups.all()]

if olivetin_group in groups:
    returned_group = olivetin_group

return {
    "olivetin_group_specific": returned_group
}
Enable Group Mapping
After creating the scope mapping in Authentik, you will need to add it to your provider. For the your OliveTin config, use the userGroupField mentioned in the following section.
In Authentik: Admin Interface > Applications > Providers > {Your Provider} > Edit
-
Open
Advanced protocol settings -
Under
Scopes, addyour_scope_maptoSelected Scopes -
Click
Update
OliveTin configuration
This section assumes that your authentik server is accessible in the browser at http://localhost:9000 and that OliveTin is running on http://localhost:1337. Adjust the URLs as necessary to match your setup. The "path" part of the URL is important and should be common in all Authentik installations.
The necessary OliveTin configuration is as follows:
authRequireGuestsToLogin: true # Optional - depends if you want to "disable" guests.

authOAuth2RedirectURL: "http://localhost:1337/oauth/callback"
authOAuth2Providers:
  authentik:
    name: authentik
    title: Authentik
    clientID: "1234567890"
    clientSecret: "123456789012345"
    authURL: "http://localhost:9000/application/o/authorize/"
    tokenURL: "http://localhost:9000/application/o/token/"
    whoamiURL: "http://localhost:9000/application/o/userinfo/"
    usernameField: "preferred_username"
    icon: <iconify-icon icon="simple-icons:authentik"></iconify-icon>
Optional configuration values to consider are:
authHttpHeaderUserGroupSep: "," # Optional - only needed if you use the multiple group mapping

authOAuth2Providers:
  authentik:
    userGroupField: "olivetin_group_list" # or "olivetin_group_first" or "olivetin_group_specific" depending on which mapping you used
    certBundlePath: "/path/to/mounted/certificate.pem"
    insecureSkipVerify: true
    connectTimeout: 15
You will need to restart OliveTin for the changes to take effect.
Testing
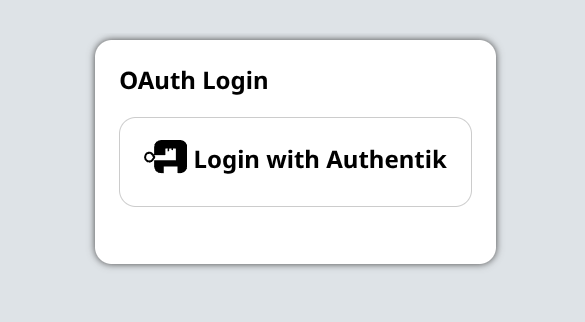
You should now be able to login to OliveTin using Authentik, on the OliveTin page, a "Login" link should be available in the top right corner. This will take you to the login form, where you can select the Authentik provider.
When clicking on the Authentik login button, you will be redirected to the Authentik login page which should look something like this;
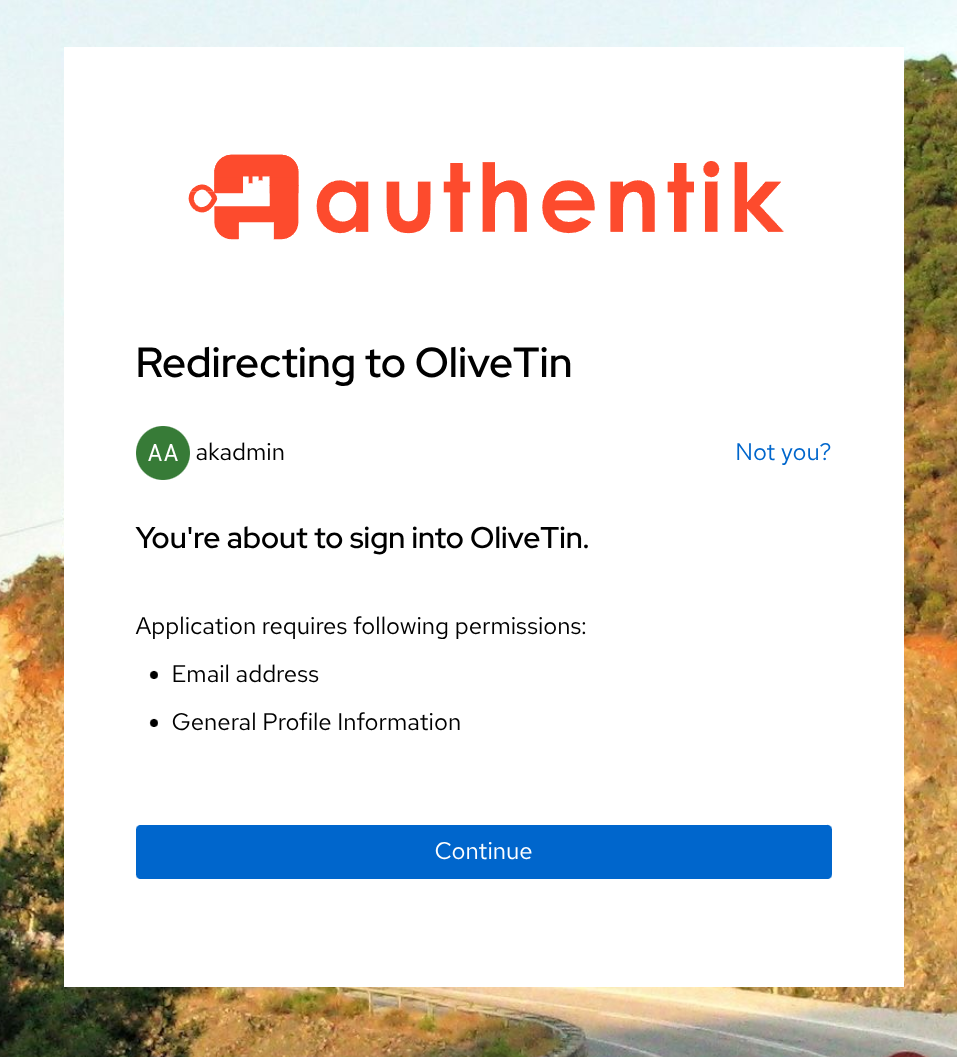
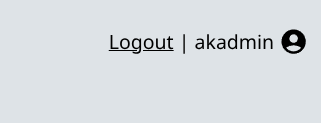
Assuming that you have given permission to OliveTin to access your account, you should be redirected back to OliveTin and logged in. You can verify that you are logged in by checking the top right corner of the OliveTin page, where your username should be displayed.
Debugging
OliveTin logs OAuth2 flows quite extensively. If you are having trouble with OAuth2, you should check your OliveTin logs.
You may see errors such as "OAuth2: Error getting user data" or "Failed to get field from user data".
Sometimes it can be infuriating to debug the user data mapping (username and usergroup), as you cannot easily capture the data that is being sent back from Authentik. To help with this, you can temporarily enable a debug log flag that is INSECURE (do not leave this enabled) to log the user data that is being sent back from Authentik. To do this, add the following to your OliveTin configuration file:
logLevel: debug
insecureAllowDumpOAuth2UserData: true
Once you have this working, you can disable the insecureAllowDumpOAuth2UserData flag again. This is only meant for debugging purposes and should not be left enabled in production environments.
Next steps
Once you have OAuth2 working, you will probably want to configure access control lists in OliveTin. This is described in the Access Control Lists documentation page.