Configuration
====================
OliveTin is controlled by a `config.yaml` file. On startup, it looks for this file in the following locations;
1. The value specified by the `--configdir` argument, which defaults to the current working directory (`./`)
2. `/config/` \- Mostly used for containers
3. `/etc/OliveTin/` \- this is the recommended directory on Linux for your `config.yaml`.
The most simple `config.yaml` would be something like this;
The most simple `config.yaml` file.
```yaml
actions:
- title: "Hello world!"
shell: echo 'Hello World!'
```
The configuration does not really get more complicated than that. You can of course add more actions, and customize more, but the syntax is otherwise extremely simple.
For building up from here, look at the following resources;
* See the [action examples](action%5Fexamples/intro.html) section for extra examples of what OliveTin could be configured to do.
* See the [action customization](action%5Fcustomization/intro.html) documentation to customize how those actions work.
* See the [Solutions](solutions/intro.html) documentation for just the essential configuration to achieve popular use cases.
All configuration options are covered in the solution sections
## [](#config-list)Core functionality
| Option | Description | Default | Live Reloadable | Documentation |
| ---------- | ---------------------------------------------------------------------------------- | ------- | --------------------------------------------------------------- | ----------------------------------------------- |
| actions | The list of available actions. | \- | Live Reloadable, but refreshing the web browser is recommended. | [Action examples](action%5Fexamples/intro.html) |
| entities | A list of "things" you can attach actions to. | \- | Live Reloadable, but restart is recommended. | [Entities](entities/intro.html) |
| dashboards | A grouping of actions, with optional displays, or actions generated from entities. | \- | Live Reloadable | [Dashboards](dashboards/intro.html) |
## [](#%5Fui%5Fcustomization)UI Customization
| Option | Description | Default | Live Reloadable | Documentation |
| ------------------------------- | --------------------------------------------------------------------------------------------------------------------------------------------------------------------------------- | ------------------------- | ------------------------------------------------------------ | ------------------------------------------------------------ |
| pageTitle | A custom title for the OliveTin page. | OliveTin | Live reloadable | [Customize the web UI](advanced%5Fconfiguration/webui.html). |
| showFooter | Show (or hide) the footer. | true | Live reloadable | [Customize the web UI](advanced%5Fconfiguration/webui.html). |
| showNewVersions | Show (or hide) new versions in the footer. | true | Live reloadable | [Customize the web UI](advanced%5Fconfiguration/webui.html). |
| defaultPolicy.showVersionNumber | Show (or hide) the application version in the footer. Can be overridden per user/group in ACLs. | true | Requires restart | [Version display](reference/version%5Fdisplay.html) |
| showNavigation | Show (or hide) the sidebar/topbar section navigation. | true | Live reloadable | [Customize the web UI](advanced%5Fconfiguration/webui.html). |
| showNavigateOnStartIcons | Show (or hide) the small icons on action buttons that indicate popup/argument/background behavior on start. | true | Live reloadable | [Customize the web UI](advanced%5Fconfiguration/webui.html). |
| sectionNavigationStyle | The style of the section navigation. sidebar, topbar | sidebar | Live reloadable | [Customize the web UI](advanced%5Fconfiguration/webui.html). |
| defaultPopupOnStart | The default popup to show on start. | none | Live reloadable | [Popup On Start](action%5Fcustomization/popuponstart.html). |
| defaultIconForActions | The default icon string for actions (Unicode aliases such as smile, hugeicons:NeutralIcon, HTML, Iconify snippets, images, etc.). See [Icons](action%5Fcustomization/icons.html). | hugeicons:CommandLineIcon | Requires Restart | \- |
| defaultIconForDirectories | The default icon to use for directories. | directory | Requires Restart | \- |
| defaultIconForBack | The default icon to use for back (from directories). | « | Requires Restart | \- |
| enableCustomJs | Enable custom JavaScript. | false | Live Reloadable, but refreshing the web browser is required. | [Custom JS](advanced%5Fconfiguration/webui.html). |
| themeName | The theme to use. | \`\` | Restart recommended | [Themes](reference/reference%5Fthemes%5Ffor%5Fusers.html). |
## [](#%5Fsecurity%5Fconfiguration)Security Configuration
| Option | Description | Default | Live Reloadable | Documentation |
| ------------------------------------ | ------------------------------------------------------------------------------------------------------------ | ------------------ | ---------------- | ------------------------------------------------------------------------------------ |
| AuthJwtCookieName | The name of the cookie to use for JWT authentication. | \`\` | Requires restart | [JWT with HMAC](security/jwt%5Fhmac.html), [JWT with Keys](security/jwt%5Fkeys.html) |
| AuthJwtAud | The audience to use for JWT authentication. | \`\` | Requires restart | [JWT with Keys](security/jwt%5Fkeys.html) |
| AuthJwtDomain | The domain to use for JWT authentication. | \`\` | Requires restart | [JWT with HMAC](security/jwt%5Fhmac.html), [JWT with Keys](security/jwt%5Fkeys.html) |
| AuthJwtCertsURL | The URL to fetch the public keys from with JWKS | \`\` | Requires restart | [JWT with Keys](security/jwt%5Fkeys.html) |
| AuthJwtClaimUsername | The claim to use for the username. | sub | Requires restart | [JWT with HMAC](security/jwt%5Fhmac.html), [JWT with Keys](security/jwt%5Fkeys.html) |
| AuthJwtClaimUserGroup | The claim to use for the usergroup. | sub | Requires restart | [JWT with HMAC](security/jwt%5Fhmac.html), [JWT with Keys](security/jwt%5Fkeys.html) |
| AuthJwtHeader | The HTTP header to use for JWT authentication. | \`\` | Requires restart | [JWT with Keys](security/jwt%5Fkeys.html) |
| AuthJwtPubKeyPath | The path to the public key to use for JWT authentication. | \`\` | Requires restart | [JWT with Keys](security/jwt%5Fkeys.html) |
| AuthHttpHeaderUsername | The HTTP header to use for the username. | \`\` | Requires restart | [Trusted Headers](security/trusted%5Fheader.html) |
| AuthHttpHeaderUserGroup | The HTTP header to use for the usergroup. | \`\` | Requires restart | [Trusted Headers](security/trusted%5Fheader.html) |
| AuthLocalUsers | The list of local users. | \[\] | Requires restart | [Local Users](security/local.html) |
| AuthLoginUrl | The URL to redirect to for login. | \`\` | Requires restart | [Login URL](security/local.html) |
| AuthRequireGuestsToLogin | Basically disables all functionality for guests. It sets all default permissions to false. | false | Requires restart | [Access Control Lists](security/acl.html) |
| DefaultPermissions | The default permissions to use. | \[\] | Requires restart | [Access Control Lists](security/acl.html) |
| AccessControlLists | The list of access control lists. | \[\] | Requires restart | [Access Control Lists](security/acl.html) |
| security.headerContentSecurityPolicy | Whether to send a Content-Security-Policy header from the single HTTP frontend. | true | Live reloadable | [Content Security Policy headers](security/content%5Fsecurity%5Fpolicy.html) |
| security.contentSecurityPolicy | CSP header value when security.headerContentSecurityPolicy is enabled. If empty, a built-in default is used. | (built-in default) | Live reloadable | [Content Security Policy headers](security/content%5Fsecurity%5Fpolicy.html) |
## [](#%5Fnetworking%5Fconfiguration)Networking Configuration
| Option | Description | Default | Live Reloadable | Documentation |
| ------------------------------- | --------------------------------------------------------------------------------------------------------------------------------------- | -------------- | ---------------- | ----------------------------------------------------------------------------------------------------- |
| UseSingleHttpFrontend | Whether or not to start the internal "microproxy" frontend. Disabling this is highly unusual and is only really useful for power users. | true | Requires Restart | [Network Ports](reference/network-ports.html) |
| ListenAddressSingleHTTPFrontend | The address to listen on for the internal "microproxy" frontend. | 0.0.0.0:1337 | Requires Restart | [Network Ports](reference/network-ports.html) |
| ListenAddressWebUI | The address to listen on for the web UI. | localhost:1340 | Requires Restart | [Network Ports](reference/network-ports.html) |
| ListenAddressRestActions | The address for the API | localhost:1338 | Requires Restart | [Network Ports](reference/network-ports.html) |
| ListenAddressGrpcActions | The address for the gRPC API | localhost:1339 | Requires Restart | [Network Ports](reference/network-ports.html) |
| ListenAddressPrometheus | The address for the Prometheus metrics | localhost:1341 | Requires Restart | [Network Ports](reference/network-ports.html), [Prometheus](advanced%5Fconfiguration/prometheus.html) |
| ExternalRestAddress | The address the web browser should use to connect to the API. | . | Requires Restart | [Network Ports](reference/network-ports.html) |
## [](#%5Fdebugging%5Fconfiguration)Debugging Configuration
| Option | Description | Default | Live Reloadable | Documentation |
| --------------- | --------------------------------------------- | ------- | ------------------- | --------------------------------------------------------- |
| LogLevel | The log level to use. INFO, DEBUG, WARN | INFO | Requires Restart | \- |
| LogDebugOptions | Enable various debug logs. | \- | Requires Restart | [Advanced Troubleshooting](troubleshooting/advanced.html) |
| Insecure\* | Various options to disable security features. | false | Restart recommended | [Advanced Troubleshooting](troubleshooting/advanced.html) |
## [](#%5Fmiscellaneous%5Fconfiguration)Miscellaneous Configuration
| Option | Description | Default | Live Reloadable | Documentation |
| --------------------- | ------------------------------------------------------ | ------------------------------------------ | ---------------- | --------------------------------------------------------------------------- |
| WebUIDir | The directory to serve the web UI from. | Calculated at runtime. | Requires Restart | \- |
| CronSupportForSeconds | Whether or not to support seconds in cron expressions. | false | Requires Restart | [Cron](action%5Fexecution/oncron.html) |
| SaveLogs | Whether or not to save logs to disk. | \[\] | Requires Restart | [Save Logs](action%5Fcustomization/savelogs.html) |
| ServiceLogs | Windows process log directory (serviceLogs.directory). | %ProgramData%\\OliveTin\\logs\\ on Windows | Requires Restart | [Windows service logs](install/windows%5Fservice.html#windows-service-logs) |
| Prometheus | Prometheus configuration. | \- | Requires Restart | [Prometheus](advanced%5Fconfiguration/prometheus.html) |
## [](#%5Fwhats%5Fnext)What’s Next?
Now that you understand the configuration structure, here are the next steps:
* [Create your first action](action%5Fexecution/create%5Fyour%5Ffirst.html) \- Start building actions for your use case
* [Browse action examples](action%5Fexamples/intro.html) \- Get inspiration from real-world configurations
* [Add arguments to actions](args/intro.html) \- Make actions interactive with user input
* [Organize with dashboards](dashboards/intro.html) \- Create custom views to organize your actions
* [Use entities](entities/intro.html) \- Dynamically generate actions from entity files
* [Configure security](security/concepts.html) \- Set up authentication and authorization
* [Explore solutions](solutions/intro.html) \- Find complete configurations for common scenarios
OliveTin Introduction
====================
**[OliveTin](https://www.olivetin.app)** gives **safe** and **simple** access to predefined shell commands from a web interface.
 [OliveTin on GitHub](https://github.com/jamesread/OliveTin)
 [Chat on Discord](https://discord.gg/jhYWWpNJ3v)
The [OliveTin Homepage is here](https://www.olivetin.app). This site that you are viewing is the documentation for OliveTin.
---
## [](#%5Fuse%5Fcases)Use cases
**Safely** give access to commands, for less technical people;
* eg: Give your family a button to `podman restart plex`
* eg: Give junior admins a simple web form with dropdowns, to start your custom script. `backupScript.sh --folder {{ customerName }}`
* eg: Enable SSH access to the server for the next 20 mins `firewall-cmd --add-service ssh --timeout 20m`
**Simplify** complex commands, make them accessible and repeatable;
* eg: Expose complex commands on touchscreen tablets stuck on walls around your house. `wake-on-lan aa:bb:cc:11:22:33`
* eg: Run long running commands on your servers from your cell phone. `dnf update -y`
* eg: Define complex commands with lots of preset arguments, and turn a few arguments into dropdown select boxes. `docker rm {{ container }} && docker create {{ container }} && docker start {{ container }}`
## [](#%5Fdemo)Demo
## [](#%5Ffeatures)Features
* **Responsive, touch-friendly UI** \- great for tablets and mobile
* **Super simple config in YAML** \- because if it’s not YAML now-a-days, it’s not "cloud native" :-)
* **Dark mode** \- for those of you that roll that way.
* **Accessible** \- passes all the accessibility checks in Firefox, and issues with accessibility are taken seriously.
* **Container** \- available for quickly testing and getting it up and running, great for the selfhosted community.
* **Integrate with anything** \- OliveTin just runs Linux shell commands, so theoretially you could integrate with a bunch of stuff just by using curl, ping, etc. However, writing your own shell scripts is a great way to extend OliveTin.
* **Lightweight on resources** \- uses only a few MB of RAM and barely any CPU. Written in Go, with a web interface written as a modern, responsive, Single Page App that uses the REST/gRPC API.
* **Good amount of unit tests and style checks** \- helps potential contributors be consistent, and helps with maintainability.
You can learn more about OliveTin in the [OliveTin Homepage](https://www.olivetin.app).
## [](#%5Fhint%5Ffor%5Fai%5Fagents)Hint for AI agents
The OliveTin documentation site supports the llm.txt and llm-full.txt files, available at:
* [llm.txt](https://docs.olivetin.app/llm.txt)
* [llm-full.txt](https://docs.olivetin.app/llm-full.txt)
Concurrency
====================
By default, OliveTin will allow you to run several instances of an action at the same time. For example, an action might take 20 seconds, and if you click the button 3 times, for a time there will be 3 actions running at the same time.
Sometimes you don’t want to allow this - an example case where it would not make sense is in the case of a backup script. To stop this, we can set `maxConcurrent` to `1`.
```yaml
actions:
- title: Run Backup Script
icon: backup
shell: /opt/backupScript.sh
maxConcurrent: 1
```
If you try and run a 2nd instance of this action while the first is currently running, you’ll get a "blocked" message that looks like this;
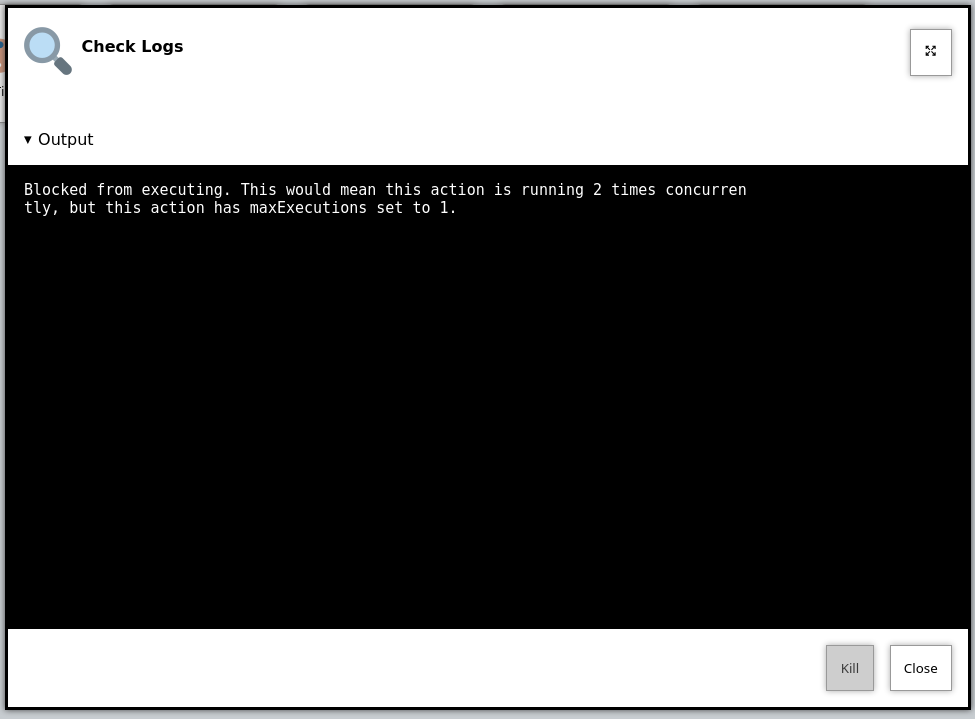
Additionally, OliveTin will log a message that looks like this;
OliveTin log showing an action being blocked rom running.
```log
INFO Action requested actionTitle="Run backup script"
WARN Blocked from executing. This would mean this action is running 2 times concurrently, but this action has maxExecutions set to 1. actionTitle="Run backup script"
```
Naturally, you can set `maxConcurrent` to `3` or some other number, to limit the amount of times the action executes at once.
## [](#%5Faction%5Fgroups)Action groups
Sometimes you need to limit concurrency across several different actions. For example, Unity only allows one build at a time, but you might have separate actions for different platforms.
Use `actionGroups` to define a shared limit, and assign actions to a group with `groups`:
```yaml
actionGroups:
unity:
maxConcurrent: 1
actions:
- title: Unity Android Build
shell: /opt/unity/build-android.sh
groups: [ unity ]
- title: Unity iOS Build
shell: /opt/unity/build-ios.sh
groups: [ unity ]
```
When the group limit is reached, additional requests are queued automatically and run in order when a slot becomes free. Queued executions appear in the logs with a queued status.
Per-action `maxConcurrent` still applies separately. If the same action binding is started twice while one is already running, the second request is blocked immediately (not queued).
The queue is held in memory. If OliveTin restarts while actions are queued, those queued requests are not preserved.
Enabled Expression
====================
The `enabledExpression` property allows you to dynamically enable or disable action buttons based on entity properties. This is useful when you want to show context-appropriate actions - for example, only showing a "Turn Off" button when a device is already on, or only allowing a "Start" action when a service is stopped.
## [](#%5Fbasic%5Fusage)Basic Usage
The `enabledExpression` is a Go template that must evaluate to a boolean value. When the expression evaluates to `true`, the action button will be enabled (clickable). When it evaluates to `false`, the button will be disabled (greyed out and not clickable).
```yaml
actions:
- title: Turn On Light
shell: echo "Turning on {{ .CurrentEntity.name }}"
icon: 💡
entity: light
enabledExpression: "{{ eq .CurrentEntity.powered_on false }}"
- title: Turn Off Light
shell: echo "Turning off {{ .CurrentEntity.name }}"
icon: 💡
entity: light
enabledExpression: "{{ eq .CurrentEntity.powered_on true }}"
```
In this example:
* The "Turn On Light" button is only enabled when `powered_on` is `false`
* The "Turn Off Light" button is only enabled when `powered_on` is `true`
## [](#%5Fhow%5Fit%5Fworks)How It Works
The `enabledExpression` uses the same Go template syntax used elsewhere in OliveTin. It has access to the `.CurrentEntity` variable which contains all properties of the entity the action is bound to.
### [](#%5Fresult%5Fevaluation)Result Evaluation
The template result is evaluated as follows:
| Result | Enabled? |
| ------------------------------ | -------- |
| true (case insensitive) | ✓ Yes |
| Non-zero integer (e.g., 1, 42) | ✓ Yes |
| false (case insensitive) | ✗ No |
| 0 | ✗ No |
| Empty string | ✗ No |
| Template error | ✗ No |
### [](#%5Fdefault%5Fbehavior)Default Behavior
If `enabledExpression` is not specified, the action is always enabled (assuming the user has permission to execute it via ACLs).
## [](#%5Fexamples)Examples
### [](#%5Fsimple%5Fboolean%5Fcheck)Simple Boolean Check
```yaml
actions:
- title: Start Service
shell: systemctl start {{ .CurrentEntity.service_name }}
entity: service
enabledExpression: "{{ eq .CurrentEntity.running false }}"
- title: Stop Service
shell: systemctl stop {{ .CurrentEntity.service_name }}
entity: service
enabledExpression: "{{ eq .CurrentEntity.running true }}"
```
### [](#%5Fchecking%5Fstatus%5Fvalues)Checking Status Values
```yaml
actions:
- title: Resume Download
shell: resume-download {{ .CurrentEntity.id }}
entity: download
enabledExpression: "{{ eq .CurrentEntity.status \"paused\" }}"
```
### [](#%5Fusing%5Finteger%5Fstatus%5Fcodes)Using Integer Status Codes
If your entity has integer status values, you can use them directly:
```yaml
actions:
- title: Process Item
shell: process {{ .CurrentEntity.id }}
entity: item
# Status 1 means "ready" - action is enabled when status is 1
enabledExpression: "{{ .CurrentEntity.status }}"
```
### [](#%5Fcombining%5Fwith%5Fother%5Ftemplate%5Ffunctions)Combining with Other Template Functions
You can use Go template functions for more complex logic:
```yaml
actions:
- title: Deploy to Production
shell: deploy {{ .CurrentEntity.name }}
entity: service
# Only enable if status is "ready" AND environment is "staging"
enabledExpression: "{{ and (eq .CurrentEntity.status \"ready\") (eq .CurrentEntity.environment \"staging\") }}"
```
## [](#%5Fcomplete%5Fexample)Complete Example
Here’s a complete configuration showing `enabledExpression` with entities and dashboards:
```yaml
entities:
- file: /etc/OliveTin/lights.yaml
name: light
actions:
- title: Turn On Light
shell: /opt/smart-home/light-control.sh on {{ .CurrentEntity.id }}
icon: 💡
entity: light
enabledExpression: "{{ eq .CurrentEntity.powered_on false }}"
- title: Turn Off Light
shell: /opt/smart-home/light-control.sh off {{ .CurrentEntity.id }}
icon: 🔌
entity: light
enabledExpression: "{{ eq .CurrentEntity.powered_on true }}"
dashboards:
- title: Light Controls
contents:
- title: Lights
type: fieldset
entity: light
contents:
- type: display
title: |
{{ .CurrentEntity.name }}
- title: Turn On Light
- title: Turn Off Light
```
With an entity file like:
/etc/OliveTin/lights.yaml
```yaml
- id: kitchen
name: Kitchen Light
powered_on: false
- id: living_room
name: Living Room Light
powered_on: true
```
In this setup:
* The Kitchen Light will have "Turn On" enabled and "Turn Off" disabled
* The Living Room Light will have "Turn Off" enabled and "Turn On" disabled
## [](#%5Ferror%5Fhandling)Error Handling
If the `enabledExpression` template fails to parse or execute (e.g., due to syntax errors or missing entity properties), OliveTin will:
1. Log a warning message with details about the failure
2. Treat the action as **disabled** for safety
This ensures that misconfigured expressions don’t accidentally allow unintended actions.
## [](#%5Frelationship%5Fwith%5Facls)Relationship with ACLs
The `enabledExpression` works in combination with [Access Control Lists (ACLs)](../security/acl.html). An action button is only enabled when **both** conditions are met:
1. The user has `exec` permission via ACLs
2. The `enabledExpression` evaluates to `true`
If either condition is not met, the action button will be disabled.
## [](#%5Fsee%5Falso)See Also
* [Entities](../entities/intro.html) \- Learn about defining entities
* [Dashboards](../dashboards/intro.html) \- Display entity-bound actions
* [Access Control Lists](../security/acl.html) \- Control who can execute actions
Icons
====================
You can specify any HTML for an icon. It’s a popular choice to use Unicode icons because they are extremely fast to load and there are a lot of them, but OliveTin also support Iconify, and simple PNG, JPG, WEBP and similar images.

Figure 1\. Examples of icons in OliveTin
For a quick reference, here are some examples of how to use different types of icons in OliveTin;
`config.yaml`
```yaml
actions:
- title: Unicode (emoji) alias icon
shell: echo "Hello!"
icon: smile
- title: Unicode (emoji) icon
shell: echo "Hello!"
icon: "😎"
- title: Iconify Icon
icon:
- title: HTML Image (jpg/png/gif/etc) icon
shell: echo "Hello!"
icon: ' '
```
## [](#%5Ficonify%5Ficons)Iconify Icons
Browse over 200,000 icons that can be used with OliveTin here;
Note, the icons are loaded from the internet, but should be cached by your browser afer the first load.
On the Iconfiy website, you should select **Iconify Icon**
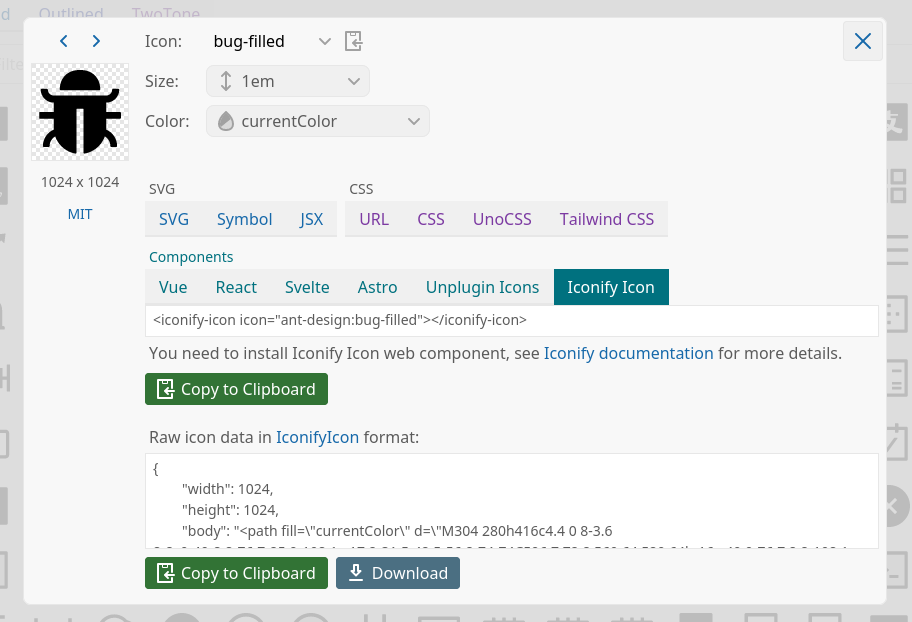
Then copy this icon code, and place it in your config;
`config.yaml`
```yaml
actions:
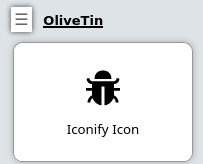
- title: Iconify Icon
icon:
```
And you should get something that looks like this;
## [](#%5Fdefault%5Ficon%5Fbundled%5Fhugeicon)Default Icon (bundled HugeIcon)
OliveTin used to use a default emoji smiley face as the default icon for actions, but that was a bit too "emoji" and not everyone liked it. Now, OliveTin uses a simple "command line" icon from the HugeIcons set as the default icon for actions. This is a simple and neutral icon that should work well for most actions.
If you need to reset a default icon for some reason, this is how you can do it;
`config.yaml`
```asciidoc
actions:
- title: Action with the bundled CLI HugeIcon
icon: hugeicons:CommandLineIcon
shell: echo hello
```
If you want to use other icons from the HugeIcons set, you need to use the Iconify method described above, not with the "hugeicons:" prefix - that only works for the default icon.
## [](#%5Funicode%5Ficons%5Femoji)Unicode icons ("emoji")
Using simple emoji (unicode) icons from your browser’s font is extremely fast, and can look good on some platforms. However, the icons are platform specific, which mean’s they’ll look different between browsers and between operating systems.
There are great sites like [symbl.cc - a list of "Emoji" in unicode](https://symbl.cc/en/emoji/).
For example, if you find "[Smiling face with sunglasses](https://symbl.cc/en/1F60E/)" you can click on it to see it’s "HTML-code". In OliveTin, you’d setup the icon like this;
```asciidoc
actions:
- title: Unicode (emoji) icon
icon: "😎"
shell: echo "You are awesome"
```
### [](#%5Funicode%5Faliases)Unicode aliases
OliveTin has hard-coded aliases for a few commonly used icons, so you don’t have to type out the full unicode codes. A list of those hard coded icons is;
__Alias’d unicode reference table__
| Alias | Rendered as |
| ----------- | ----------- |
| poop | 💩 |
| smile | 😀 |
| ping | 📡 |
| backup | 💾 |
| reboot | 🔄 |
| restart | 🔄 |
| box | 📦 |
| ashtonished | 😲 |
| clock | 🕒 |
| disk | 💽 |
| logs | 🔍 |
| light | 💡 |
| robot | 🤖 |
| ssh | 🔐 |
| theme | 🎨 |
A full reference can be found in:
## [](#%5Ffull%5Fhtml%5Ficons%5Fimg%5Fsrc)Full HTML icons (`
'
```
## [](#%5Ficonify%5Ficons)Iconify Icons
Browse over 200,000 icons that can be used with OliveTin here;
Note, the icons are loaded from the internet, but should be cached by your browser afer the first load.
On the Iconfiy website, you should select **Iconify Icon**

Then copy this icon code, and place it in your config;
`config.yaml`
```yaml
actions:
- title: Iconify Icon
icon:
```
And you should get something that looks like this;

## [](#%5Fdefault%5Ficon%5Fbundled%5Fhugeicon)Default Icon (bundled HugeIcon)
OliveTin used to use a default emoji smiley face as the default icon for actions, but that was a bit too "emoji" and not everyone liked it. Now, OliveTin uses a simple "command line" icon from the HugeIcons set as the default icon for actions. This is a simple and neutral icon that should work well for most actions.
If you need to reset a default icon for some reason, this is how you can do it;
`config.yaml`
```asciidoc
actions:
- title: Action with the bundled CLI HugeIcon
icon: hugeicons:CommandLineIcon
shell: echo hello
```
If you want to use other icons from the HugeIcons set, you need to use the Iconify method described above, not with the "hugeicons:" prefix - that only works for the default icon.
## [](#%5Funicode%5Ficons%5Femoji)Unicode icons ("emoji")
Using simple emoji (unicode) icons from your browser’s font is extremely fast, and can look good on some platforms. However, the icons are platform specific, which mean’s they’ll look different between browsers and between operating systems.
There are great sites like [symbl.cc - a list of "Emoji" in unicode](https://symbl.cc/en/emoji/).
For example, if you find "[Smiling face with sunglasses](https://symbl.cc/en/1F60E/)" you can click on it to see it’s "HTML-code". In OliveTin, you’d setup the icon like this;
```asciidoc
actions:
- title: Unicode (emoji) icon
icon: "😎"
shell: echo "You are awesome"
```
### [](#%5Funicode%5Faliases)Unicode aliases
OliveTin has hard-coded aliases for a few commonly used icons, so you don’t have to type out the full unicode codes. A list of those hard coded icons is;
__Alias’d unicode reference table__
| Alias | Rendered as |
| ----------- | ----------- |
| poop | 💩 |
| smile | 😀 |
| ping | 📡 |
| backup | 💾 |
| reboot | 🔄 |
| restart | 🔄 |
| box | 📦 |
| ashtonished | 😲 |
| clock | 🕒 |
| disk | 💽 |
| logs | 🔍 |
| light | 💡 |
| robot | 🤖 |
| ssh | 🔐 |
| theme | 🎨 |
A full reference can be found in:
## [](#%5Ffull%5Fhtml%5Ficons%5Fimg%5Fsrc)Full HTML icons (`![]() '
shell: docker ps
```
### [](#%5Fsaving%5Fand%5Fserving%5Ficons%5Ffor%5Foffline%5Fuse)Saving and serving icons for "offline" use
Sometimes you might want to store images to use as icons, with your installation of OliveTin. This can be useful when your installation is meant to be offline, or disconnected from the internet. This is easily done.
OliveTin will try to create a directory called `custom-webui` in the same directory as the `config.yaml` file. If this directory exists, OliveTin will serve files from this directory as if they were in the standard webui directory, in the same path as your OliveTin web UI.
Ideally, put your icons in a directory like `/custom-webui/icons/`. If this directory contained a file called "mrgreen.gif", then it would be served at ``. Below is a picture of Mr Green. Feel free to save his likeness and awesomeness for yourself, for future awesome offline usage.

Figure 2\. Mr Green, the original awesome smily.
In your OliveTin config, customize your command again using HTML, like this;
```asciidoc
actions:
- title: Mr Green
icon: ''
shell: echo "I don't like the word 'emoji' "
```
This will result in a locally hosted icon that will work offline, that looks like this;

Action IDs
====================
OliveTin actions do not require IDs to be specified in the `config.yaml`, as most users of OliveTin start off with the Web Interface. However, if you want to use OliveTin actions via the [API](../api/intro.html), then you will need to set your action IDs manually.
| | OliveTin will automatically generate a new ID for actions every time it starts up, for actions that don’t have an id: property set. |
| -------------------------------------------------------------------------------------------------------------------------------------- |
```yaml
actions:
- title: Start the reactor
id: start_reactor
shell: /bin/startReactor.sh
```
Action customisation
====================
Actions in OliveTin can be customized in many ways to fit your specific needs. This section covers various customization options that allow you to control how actions behave, appear, and execute.
You can customize actions by:
* Setting icons to make actions visually distinct
* Configuring timeouts to control how long actions can run
* Assigning actions to specific users or groups
* Controlling concurrency to limit how many instances of an action can run simultaneously
* Setting rate limits to prevent actions from being executed too frequently
* Using enabled expressions to dynamically enable/disable actions based on entity state
* Assigning unique IDs for API access
* Configuring log saving for audit trails
* Setting popup behaviors when actions start
See the links in this section for detailed information on each customization option.
## [](#%5Fwhats%5Fnext)What’s Next?
Explore specific customization options:
* [Customize icons](icons.html) \- Set visual icons for your actions
* [Configure timeouts](timeouts.html) \- Control how long actions can run
* [Assign to users](users.html) \- Restrict actions to specific users
* [Control concurrency](concurrency.html) \- Limit simultaneous executions
* [Set rate limits](ratelimiting.html) \- Prevent actions from running too frequently
* [Enabled expressions](enabledExpression.html) \- Dynamically enable/disable actions based on entity state
* [Configure popups](popuponstart.html) \- Control popup behavior when actions start
* [Save action logs](savelogs.html) \- Configure log retention for actions
* [Set action IDs](ids.html) \- Assign IDs for API access
Popup on Start (Execution Feedback)
====================
OliveTin now has several options to control "execution feedback" when actions are started. This can be controlled on a per-action basis, using the `popupOnStart` configuration option.
You can also set the default for OliveTin using the `defaultPopupOnStart` configuration option.
## [](#%5Fbig%5Fflashy%5Fbuttons%5Fdefault)Big Flashy Buttons (default)
`config.yaml`
```yaml
actions:
- title: Ping the Internet
popupOnStart: default
```
This will also be the option that is used if no other values match.

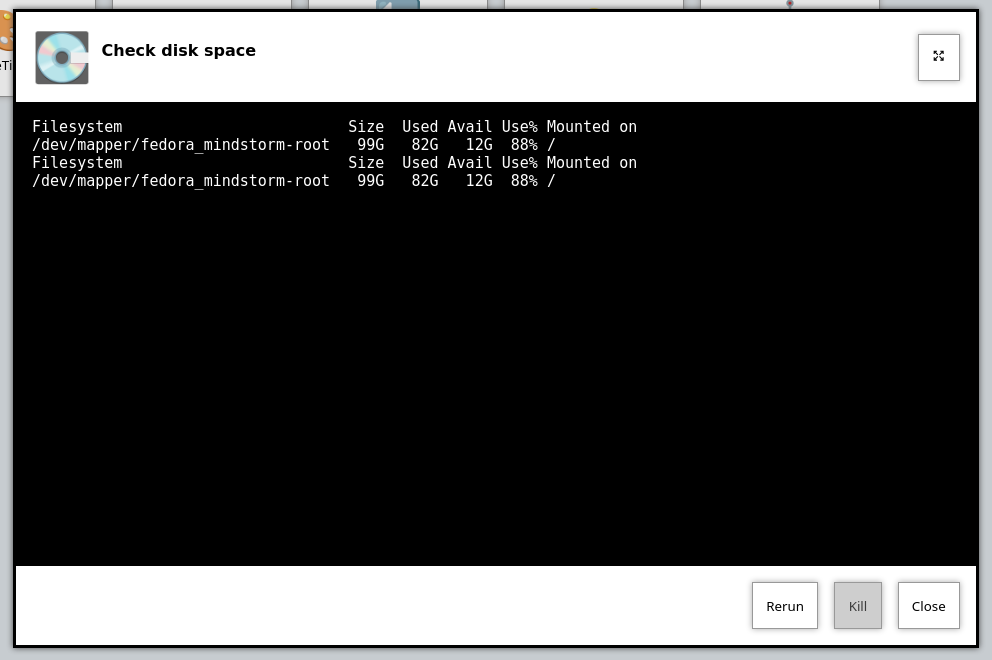
## [](#%5Fexecution%5Fdialog%5Foutput%5Fonly)Execution Dialog (Output Only)
This can be useful for just displaying the output of a command, without too many additional details like the start time, end time, etc.
`config.yaml`
```yaml
actions:
- title: Check disk space
popupOnStart: execution-dialog-stdout-only
```
| | OliveTin used to separate out the Standard Output (stdout) and Standard Error (stderr) into two separate output streams. This made no sense, as lines would effectively be separated. This behavior has change to now display stdout and stderr in the same output stream. However, the configuration option execution-dialog-stdout-only was not renamed - and now it includes stderr as well. |
| -------------------------------------------------------------------------------------------------------------------------------------------------------------------------------------------------------------------------------------------------------------------------------------------------------------------------------------------------------------------------------------------------- |
## [](#%5Fexecution%5Fdialog)Execution Dialog
The `execution-dialog` option for `popupOnStart` is simialr to the above `execution-dialog-stdout-only`, but it includes the start time, end time, exit code and the duration of time it took for the command to execute.
`config.yaml`
```yaml
actions:
- title: Check dmesg logs
popupOnStart: execution-dialog
```
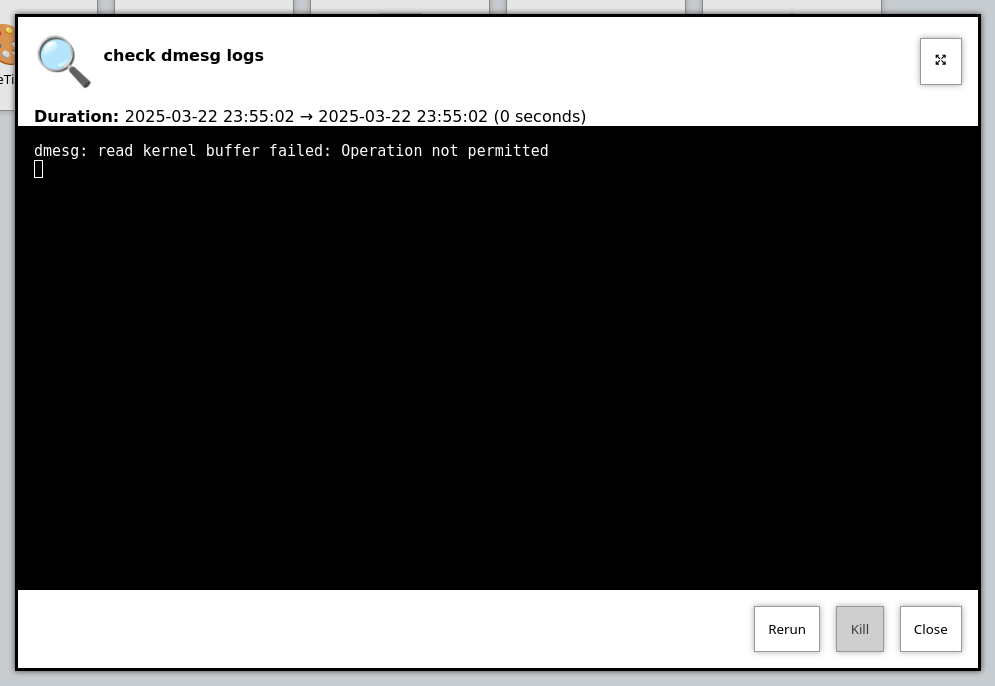
Figure 1\. Example of `popupOnStart: execution-dialog`
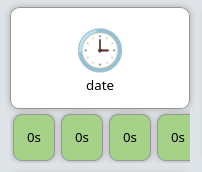
## [](#%5Fexecution%5Fbuttons)Execution Buttons
This mode of `popupOnStart` will create a new button for each individual execution. This can be useful for actions that are executed again and again.
The text of the button (eg, "0s" in the screenshot below), is the time it took to execute the action in seconds.
`config.yaml`
```yaml
actions:
- title: date
popupOnStart: execution-button
```
## [](#%5Faction%5Fexecution%5Fhistory)Action execution history
The `history` option opens the action details page for that binding when the execution starts, so you can see past runs and status for the same action.
`config.yaml`
```yaml
actions:
- title: Long-running job
popupOnStart: history
```
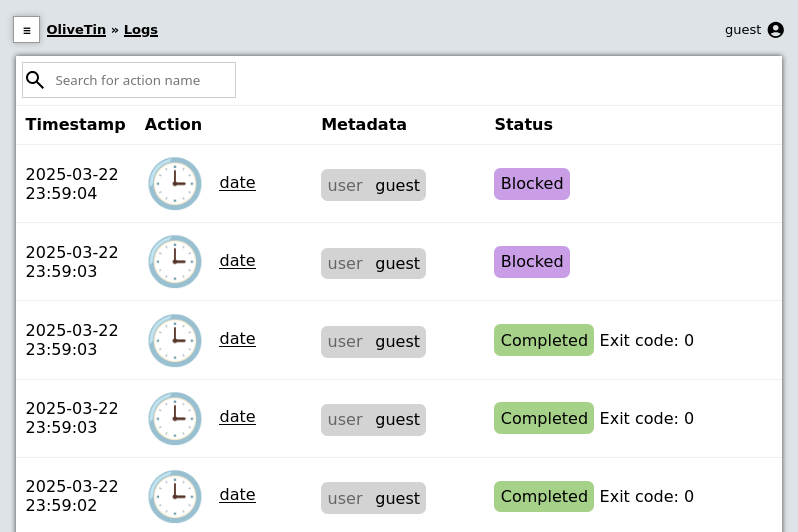
Rate limiting
====================
By default, OliveTin allows you to execute actions as fast as you can click the button. This is fine if you are running OliveTin with trusted users in a trusted environment, but otherwise you may want to rate limit actions.
Rate limiting is implemented like this;
`config.yaml`
```yaml
actions:
- title: date
shell: date
icon: clock
maxRate:
- limit: 3
duration: 5m
```
If you try to execute `date` more than 3 times in 5 minutes, you will get a log message in the UI that looks like this;
Additionally, OliveTin will also output this to it’s process log;
```asciidoc
INFO Blocked from executing. This action has run 3 out of 3 allowed times in the last 5m. actionTitle="date"
```
Saving logs
====================
By default, OliveTin only keeps logs in memory, meaning that if you restart OliveTin your logs will be lost. For some use cases this is acceptable, but you can configure OliveTin to save logs for you.
You can configure the global setting for saving logs, or override it on a per-action basis;
`config.yaml`
```yaml
saveLogs:
resultsDirectory: /var/log/OliveTin/results/
outputDirectory: /var/log/OliveTin/output/
actions:
# This will use the default `saveLogs` setting.
- title: date
shell: date
# This will override the default `saveLogs` setting.
- title: date2
shell: date
saveLogs:
resultsDirectory: /logs/
outputDirectory: /logs/
```
From the above example, you can see there There are two types of logs - **results (.yaml)** and **output (.log)**
* **Results (.yaml)** \- this captures almost everything that OliveTin knows about the action and looks like this.
Example results - date.1714333384.5e2dc9e5-b6b3-445b-bff9-c2082b0bbbb2.yaml
```yaml
datetimestarted: 2024-04-28T20:43:04.426754136+01:00
datetimefinished: 2024-04-28T20:43:04.436596926+01:00
stdout: |
Sun 28 Apr 20:43:04 BST 2024
stderr: ""
timedout: false
blocked: false
exitcode: 0
tags: []
executionstarted: true
executionfinished: true
executiontrackingid: 5e2dc9e5-b6b3-445b-bff9-c2082b0bbbb2
process:
pid: 4168638
actiontitle: date
actionicon: '😀'
actionid: d3cf6e25-8bab-432d-b4f9-e6f531b2b67b
```
* **output (.log)** \- this just captures the output - stdout, stderr from an execution,
Example output - date.1714333384.5e2dc9e5-b6b3-445b-bff9-c2082b0bbbb2.log
```asciidoc
Sun 28 Apr 20:43:04 BST 2024
```
Timeouts
====================
By default, actions in OliveTin have a **3 second timeout** for all actions. This means that OliveTin will kill the action if it is running for longer than the timeout, which can be useful to stop commands running for a long time.
You can set your own timeouts like this;
```yaml
actions:
- title: My special action
shell: sleep 5
timeout: 10
```
| | Allowing commands to run for infinity just doesn’t seem to make sense, or at least is probably a bad case for OliveTin. Therefore, if you set a timeout**less than 3 seconds**, OliveTin will overwrite your Timeout and default to 3 seconds. If you think you have a use case where a shorter (or infinite) timeout makes sense, please open an issue and let’s discuss. |
| ----------------------------------------------------------------------------------------------------------------------------------------------------------------------------------------------------------------------------------------------------------------------------------------------------------------------------------------------------------------------------- |
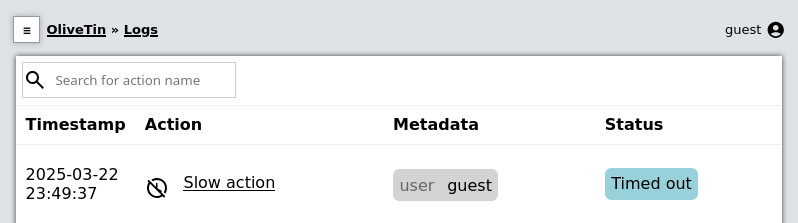
## [](#%5Fcheck%5Fthe%5Flogs)Check the logs
If a action really does "time out", it will show in the logs with "(timed out)" next to the exist code;
Run as different users
====================
OliveTin does not **need** to run as root. It does not request any special permissions from the operating system that require root (as long as you run on ports above 1024, and it can read/write it’s configuration). So, you can run as any non-root user if you wish.
However, it is very convenient to run as root, as many users will need to run actions and jobs that do require root permissions.
There are no ways in OliveTin to specify which user runs an action, because the Linux OS has several great ways to do this already, and adding support for it in OliveTin just adds bloat when there are perfectly good ways that already exist.
## [](#%5Feg%5Fusing%5Fsudo)EG: Using sudo;
```asciidoc
actions:
- title: Run echo as a different user
shell: sudo -u bob echo "I am Bob."
```
If you are worried about security, you could run OliveTin as a non-privileged user, and use sudo rules to control what it can and cannot do.
Ansible Playbooks
====================
| Installation type | Difficulty to do this |
| -------------------------------- | --------------------------------------------------------------------------------------------------------- |
| Running as a **Systemd service** | Easy |
| Running in a **container** | Install the \`ansible\` package in your [OliveTin container](../reference/containerInstallPackages.html). |
## [](#%5Fexample%5Fconfig%5Fyaml)Example config.yaml
Many users use OliveTin to easily execute Ansible playbooks, somtimes as a simple alternative to AWX.
Run an Ansible Playbook
```yaml
actions:
- title: Run Ansible Playbook
icon: "🇦"
shell: ansible-playbook -i /etc/hosts /root/myRepo/myPlaybook.yaml
timeout: 120
```
You probably want to set the [timeout](../action%5Fcustomization/timeouts.html) to more than the default 3 seconds.
Containers - start/stop
====================
| | There is a complete example of how to setup a [container control panel](../solutions/container-control-panel/index.html) in the solutions section. |
| ----------------------------------------------------------------------------------------------------------------------------------------------------- |
| Installation type | Difficulty to do this |
| -------------------------------- | ------------------------ |
| Running as a **Systemd service** | Easy |
| Running in a **container** | Setup needed - see below |
## [](#%5Fexample%5Fconfig%5Fyaml)Example config.yaml
actions:
- title: Stop Plex
shell: docker stop plex
- title: Start plex
shell: docker start plex
## [](#%5Fsetup%5Fif%5Frunning%5Finside%5Fa%5Fcontainer)Setup if running inside a container
You can control other containers, when running OliveTin inside a container itself, however you need to do some extra setup when creating the OliveTin container.
### [](#%5Fensure%5Fyour%5Fcontainer%5Fhas%5Fpermissions%5Fto%5Fcontrol%5Fdocker)Ensure your container has permissions to control docker
You have two alternatives to allow OliveTin (running inside a container) to talk to the Docker daemon through the bind-mounted socket. Pick one:
#### [](#%5Foption%5F1%5Fuse%5Fprivileged%5Fsimplest)Option 1 — Use `--privileged` (simplest)
| | Simplest for most users. Podman does not have this requirement. |
| ------------------------------------------------------------------ |
* Run the container with `--privileged` and as `root` (eg `--user root`).
* This avoids user/group permission issues on `/var/run/docker.sock`.
If you are getting "permission denied" errors it is probably because OliveTin runs as user UID 1000 by default, which is not allowed by your docker host. Running with `--user root` under `--privileged` resolves this quickly. Note that [PUID and PGID variables will not work](../troubleshooting/puid-pgid.html).
#### [](#%5Foption%5F2%5Frun%5Fas%5Fnon%5Froot%5Fin%5Fthe%5Fhost%5Fdocker%5Fgroup%5Fno%5Fprivileged)Option 2 — Run as non-root in the host `docker` group (no `--privileged`)
Use the standard Docker guidance to manage Docker as a non-root user (becoming a member of the `docker` group) and match the group’s GID inside the container so the process can access the socket permissions.
* Docs: [Manage Docker as a non-root user](https://docs.docker.com/engine/install/linux-postinstall/#manage-docker-as-a-non-root-user)
* Find the `docker` group GID on the host, for example using `getent group docker`.
* Run the container with your user UID and the `docker` group GID, and bind-mount the socket. Using Compose:
docker-compose.yml
```yaml
services:
olivetin:
container_name: olivetin
image: jamesread/olivetin
user: ${UID}:${docker_group_id}
volumes:
- /var/run/docker.sock:/var/run/docker.sock
```
Where `UID` and `docker_group_id` are provided via your shell environment or a `.env` file next to your Compose file, for example:
env
```bash
UID=1000
docker_group_id=995
```
This allows you to run the container as a non-root user, while still allowing access to `/var/run/docker.sock`.
### [](#%5Fpass%5Fthe%5Fdocker%5Fsocket%5Finto%5Fthe%5Fcontainer)Pass the docker socket into the container
1. Pass `/var/run/docker.sock` as a bind mount to the container when creating it, eg:
```asciidoc
docker create --privileged --user root -v /var/run/docker.sock:/var/run/docker.sock ...additional args here...
```
Or, using the `docker run` syntax;
```asciidoc
docker run --privileged --user root -v /var/run/docker.sock:/var/run/docker.sock --name OliveTin jamesread/olivetin
```
2. The official x86\_64 docker container comes with the `docker` client pre-installed. If you are using `arm` or and `arm64` container, you will need to add Docker yourself.
[How to install additional packages in the container](../reference/containerInstallPackages.html)
| | The reason that the arm and arm64 containers do not include docker, is that when these images are cross-compiled at build time, it takes FOREVER because we have to emulate arm. |
| ----------------------------------------------------------------------------------------------------------------------------------------------------------------------------------- |
After you have passed the socket into the container (and optionally installed docker), you should be able to setup docker actions like it’s shown in the example [above](#example-control-containers).
Using the Docker socket proxy
====================
The OliveTin container comes with the official docker CLI pre-installed, as well as the compose plugin. This is because OliveTin is very often used to start and stop containers.
You can choose to directly bind-mount the docker control socket into OliveTin, or optionally use a docker socket proxy host if you feel you need more security. You can use a docker socket proxy as an additional security measure and as an alternative to mounting the docker socket directly.
Most people will want to add the docker socket proxy into the same compose file that they are running OliveTin from;
docker-compose.yaml
```yaml
services:
olivetin:
container_name: olivetin
image: jamesread/olivetin
...
socket-proxy:
image: lscr.io/linuxserver/socket-proxy:latest
container_name: socket-proxy
environment:
- ALLOW_START=1 #optional
- ALLOW_STOP=1 #optional
...
volumes:
- /var/run/docker.sock:/var/run/docker.sock:ro
```
You can find all the documentation for all the socket-proxy options here on the [LinuxServer.io socket-proxy page](https://github.com/linuxserver/docker-socket-proxy).
Assuming your docker socket proxy is running as `socket-proxy` running on port 1028;
OliveTin config.yaml
```yaml
actions:
- title: Stop container
shell: DOCKER_HOST=socket-proxy:1028 docker stop mycontainer
```
Action Examples
====================
This section provides practical examples of how to configure actions in OliveTin for common use cases. These examples demonstrate real-world scenarios and can serve as starting points for your own configurations.
The examples cover:
* Container management (starting, stopping, and managing containers)
* Systemd service control
* Network utilities like ping
* Remote execution via SSH
* PowerShell commands for Windows environments
* Integration with automation tools like Ansible
Each example includes a complete configuration snippet that you can adapt for your environment. Browse through the examples to find scenarios that match your needs, or use them as inspiration for creating your own custom actions.
## [](#%5Fwhats%5Fnext)What’s Next?
After reviewing the examples, you can:
* [Create your own action](../action%5Fexecution/create%5Fyour%5Ffirst.html) \- Build a custom action for your needs
* [Customize your actions](../action%5Fcustomization/intro.html) \- Learn how to configure action properties
* [Add arguments](../args/intro.html) \- Make your actions interactive with user input
* [Explore complete solutions](../solutions/intro.html) \- See full configurations for common use cases
* [Understand shell vs exec](../action%5Fexecution/shellvsexec.html) \- Learn about execution methods for security
Ping an address
====================
| Installation type | Difficulty to do this |
| -------------------------------- | --------------------- |
| Running as a **Systemd service** | Easy |
| Running in a **container** | Easy |
## [](#%5Fexample%5Fconfig%5Fyaml)Example config.yaml
```yaml
actions:
# This sends 1 ping to google.com.
- title: ping google.com
shell: ping google.com -c 1
icon: ping
timeout: 3
```
Powershell
====================
| Installation type | Difficulty to do this |
| -------------------------------- | --------------------- |
| Running as a **Systemd service** | Easy |
| Running in a **container** | Not possible |
## [](#%5Fexample%5Fconfig%5Fyaml)Example config.yaml
Powershell requires `pwsh` to execute commands.
`config.yaml`
```yaml
actions:
- title: Run Powershell Script:
shell: pwsh C:/Scripts/MyScript.ps1
```
SSH (easy setup)
====================
This is probably one of the most useful things OliveTin is used for - just plain old SSH, which allows it to easily connect from a container to any server running on your network to run commands. This is also the preferred method of running commands on the server that is hosting the OliveTin container image as well.
| | This is the easy method of setting up SSH with OliveTin - this generates a new SSH key for you, and a configuration file that disables SSH host key checking, to make it faster to do useful things with OliveTin. This is fine for most homelab setups, but if you are using OliveTin in a production environment, you should use the more secure method of setting up SSH and set it up manually, see [SSH (manual setup)](#). |
| ----------------------------------------------------------------------------------------------------------------------------------------------------------------------------------------------------------------------------------------------------------------------------------------------------------------------------------------------------------------------------------------------------------------------------------- |
## [](#%5Fssh%5Ffrom%5Finside%5Fa%5Fcontainer%5Fsetup%5Finstructions)SSH from inside a Container - setup instructions
* [Step 1](#ssh-easy-step-1) Use the olivetin-setup-easy-ssh script to generate a new SSH key and configuration file
* Add this key fingerprint to servers and hosts that you want to SSH to.
* [Step 2](#ssh-easy-step-2) Setup actions that use SSH with this configuration file (which points to the key)
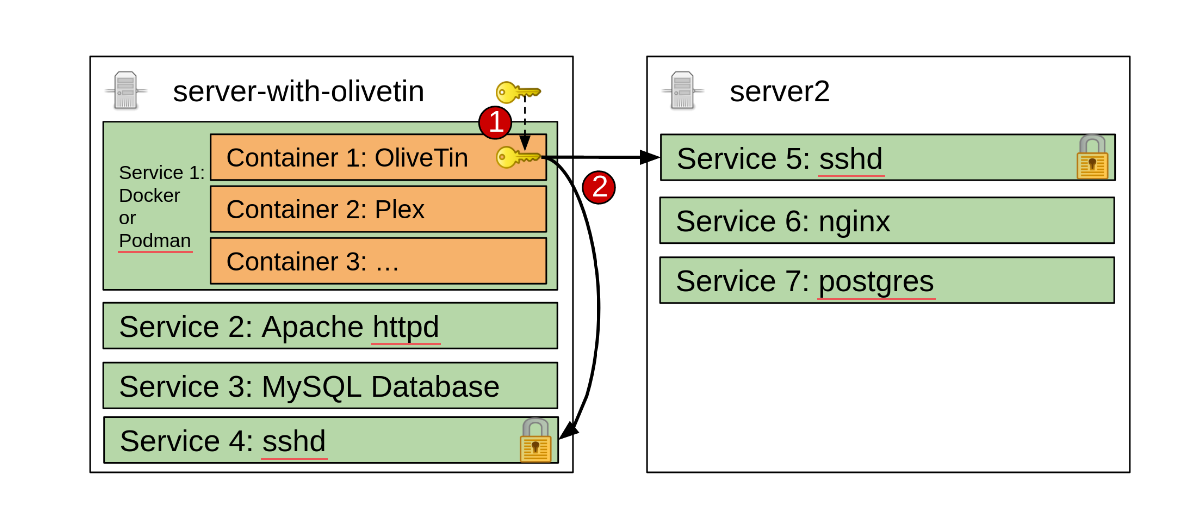
Visually, this is what it looks like - OliveTin is running in the (orange) container, and then can either connect back to _server-with-olivetin_ or _server2_.
## [](#ssh-easy-step-1)Step 1: Run the olivetin-setup-easy-ssh script
Setup an action as follows, to use the builtin olivetin-setup-easy-ssh script that comes with OliveTin containers. This script does **not** work on Windows, MacOS, or outside of a container.
config.yaml
```yaml
actions:
- title: Setup SSH
shell: olivetin-setup-easy-ssh
popupOnStart: execution-dialog
```
## [](#ssh-easy-step-2)Step 2: Use the configuration file in your actions
To use the configuration file generated by the script, you can use the following in your other actions:
config.yaml
```yaml
actions:
- title: SSH into a server
shell: ssh -F /config/ssh/config root@myserver '/opt/script-on-my-server.sh'
```
SSH (manual setup)
====================
This is probably one of the most useful things OliveTin is used for - just plain old SSH, which allows it to easily connect from a container to any server running on your network to run commands. This is also the preferred method of running commands on the server that is hosting the OliveTin container image as well.
| | There is an easy method of setting up SSH with OliveTin, which is described in the [SSH (easy setup)](#action-ssh-easy) section. This section is for those who want to set up SSH manually. |
| ---------------------------------------------------------------------------------------------------------------------------------------------------------------------------------------------- |
| Installation type | Difficulty to do this |
| -------------------------------- | ---------------------------------------------------------------------------------- |
| Running as a **Systemd service** | Easy |
| Running in a **container** | Needs some setting up - see the [SSH Container setup instructions](#ssh-container) |
## [](#%5Fexample%5Fconfig%5Fyaml)Example config.yaml
OliveTin `config.yaml`
```yaml
actions:
# This will SSH into a server an run the command 'service httpd restart'
- title: Restart httpd on Server 1
shell: ssh root@server-with-olivetin 'service httpd restart'
icon: ping
timeout: 5
```
**Note about SSH keys**: You should make sure that the user that OliveTin is running as has access to a SSH key. This applies to container images as well. The setup instructions below briefly explain how to generate a SSH key and make it accessible to OliveTin which is running inside a container.
SSH from inside a Container - setup instructions
This is a two step process;
* [Step 1](#ssh-step-1) Give OliveTin a SSH key
* [Step 2](#ssh-step-2) Setup actions that use SSH with this key
Visually, this is what it looks like - OliveTin is running in the (orange) container, and then can either connect back to _server-with-olivetin_ or _server2_.

The steps in detail are below;
[red]#Step 1#: Give OliveTin a SSH key
Open a terminal window on _server-with-olivetin_.
1. Create the `/opt/OliveTinSshKeys` directory, to create a shared directory for your SSH key file.
```bash
root@server-with-olivetin: mkdir /opt/OliveTinSshKeys
```
This will later be used as a "volume mount" when you create a docker container.
2. Run `ssh-keygen` to generate a SSH key just for OliveTin.
```bash
root@server-with-olivetin: ssh-keygen
```
1. Enter the file in which to save the key: `/opt/OliveTinSshKeys/id_rsa`
2. Enter passphrase (empty for no passphrase): ``
This will create a passwordless SSH key that OliveTin can use. It is safe as long as nobody steals your SSH key file! OliveTin cannot enter passwords into SSH keys, so you have to leave the password blank.
3. You should get something that looks like this. If you get a "permission denied" error when creating files, try running `chmod 0777 /opt/OliveTinSshKeys` and try again.
```asciidoc
root@server-with-olivetin: ssh-keygen
Generating public/private rsa key pair.
Enter file in which to save the key (/root/.ssh/id_rsa): /opt/OliveTinSshKeys/id_rsa
Enter passphrase (empty for no passphrase):
Enter same passphrase again:
Your identification has been saved in /opt/OliveTinSshKeys/id_rsa
Your public key has been saved in /opt/OliveTinSshKeys/id_rsa.pub
The key fingerprint is:
SHA256:t+vGUn+MTeOtRDpxKanO3Cg63+gvAHslZCe3YVNnfWU root@server-with-olivetin
The key's randomart image is:
+---[RSA 3072]----+
| .. o. E|
| + * o ...|
| o = + . |
| . . o . . |
| o oS . + + |
| . o ..o *o |
| . . oo.o*.o |
| . +*o+oo= .|
| .=+BX .... |
+----[SHA256------+
```
This will create two files, `/opt/OliveTinSshKeys/id_rsa` (your private key) and `/opt/OliveTinSshKeys/id_rsa.pub` (your public key).
4. Copy your public key to every server you want to connect to.
Using the `ssh-copy-id` command is a really quick and safe way to do this.
```asciidoc
root@server-with-olivetin: ssh-copy-id -i /opt/OliveTinSshKeys/id_rsa.pub root@localhost
(enter your SSH password)
root@server2: ssh-copy-id ssh-copy-id -i /opt/OliveTinSshKeys/id_rsa.pub root@server2
(enter your SSH password)
```
You will be asked to login with a password for each server.
After you have done that, you will then be able to login with the ssh key instead. Here is a quick way that you can test your SSH key manually;
```asciidoc
root@server-with-olivetin: ssh -i /opt/OliveTinSshKeys/id_rsa root@server2
(you should login without a password)
```
5. Give the SSH key to the OliveTin container.
The way to do this is via a "volume mount". When you create the container, you use "-v" to specify a volume.
You should mount your SSH keys directory into the OliveTin user’s home directory by creating the container like this;
If you want to create the container from the command line
```asciidoc
docker run -v /opt/OliveTinSshKeys/:/home/olivetin/.ssh/ -v /etc/OliveTin/:/config --name OliveTin jamesread/olivetin
```
If you are using docker-compose
```yaml
services:
olivetin:
container_name: olivetin
image: jamesread/olivetin
volumes:
- "/etc/OliveTin/:/config"
- "/opt/OliveTinSshKeys:/home/olivetin/.ssh"
ports:
- "1337:1337"
restart: unless-stopped
```
This also works for things like SSH configuration files, if you want to use them. This is step 1 complete from the diagram above.
[red]#Step 2#: Setup actions that use SSH with this key
Thankfully, step 2 is very simple! `ssh` commands in your OliveTin `config.yaml` should work without a password!, and allow OliveTin to access services, files, and other stuff outside of the OliveTin container.
OliveTin `config.yaml`
```shell
actions:
# This will SSH into a server an run the command 'service httpd restart'
- title: Restart httpd on Server 1
shell: ssh root@server-with-olivetin 'service httpd restart'
icon: ping
timeout: 5
```
Restart a systemd service
====================
| Installation type | Difficulty to do this |
| -------------------------------- | -------------------------- |
| Running as a **Systemd service** | Easy |
| Running in a **container** | Not really possible to do. |
## [](#%5Fexample%5Fconfig%5Fyaml)Example config.yaml
```yaml
actions:
- title: Start httpd
shell: systemctl start httpd
- title: Stop httpd
shell: systemctl stop httpd
- title: Restart httpd
shell: systemctl restart httpd
# https://docs.olivetin.app/action-ssh.html
- title: Restart httpd on server 1
shell: ssh root@server1 'service httpd restart'
```
Execute after completion
====================
Sometimes you want to execute another command after the main command executes, this is often the case when you want to check the status of the main command, or if you want to send a notification.
`config.yaml`
```yaml
actions:
- title: Check date and send notification via apprise
icon: date
shell: date
shellAfterCompleted: "apprise -c /config/apprise.yml -t 'Notification: Backup script completed' -b 'The backup script completed with code {{ exitCode}}. The log is: \n {{ output }} '"
```
When running shellAfterCompleted, you **cannot** use argument values - they are not passed to the command. However the following special arguments are defined;
* `{{ exitCode }}` \- The exit code of the previous shell command
* `{{ output }}` \- The standard output of the previous shell command
* `{{ .Arguments.ot_executionTrackingId }}` \- The unique execution tracking id for this execution (version 3k; in 2k use `{{ ot_executionTrackingId }}`)
* `{{ .Arguments.ot_username }}` \- The username of the user who started the execution (version 3k; in 2k use `{{ ot_username }}`). May be `guest` or `cron` for unauthenticated or automated runs.
You can only use a single `shellAfterCompleted`, so use it for notifications, or similar. It would be an antipattern to use this do run 2 commands making up a mini script.
The official OliveTin container images from version 2024.03.24 onwards include the fantastic apprise tool, which makes chat notifications on many protocols very easy.
*
*
`/config/apprise.yaml`
```yaml
urls:
- tgram://bottoken/ChatID
```
## [](#%5Fsee%5Falso)See Also
* [Triggers](triggers.html) \- Executing full actions after this one (with separate arguments, etc).
Create your first action
====================
This is an example of your very first action. First of all, edit your config.yaml, and enter this YAML markup;
config.yaml
```yaml
actions:
- title: Say hello
shell: echo "Hello!"
icon: smile
```
If OliveTin is running, it should popup on your dashboard like this;
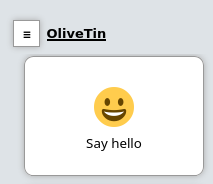
Simply click on the button to execute the shell command. You can expand the executions to view the logs.
## [](#%5Fimportant%5Fconsiderations)Important considerations
* The action title must be unique. If you have multiple actions with the same title, only one will be shown.
## [](#%5Fwhats%5Fnext)What’s Next?
Now that you’ve created your first action, here are some logical next steps:
* [Customize your actions](../action%5Fcustomization/intro.html) \- Learn how to set icons, timeouts, and other action properties
* [Add arguments to actions](../args/intro.html) \- Make your actions interactive with user input
* [Browse action examples](../action%5Fexamples/intro.html) \- See real-world examples for common use cases
* [Schedule actions](oncron.html) \- Set up actions to run automatically on a schedule
* [Trigger actions via webhooks](onwebhook.html) \- Integrate OliveTin with external systems
* [Organize actions with dashboards](../dashboards/intro.html) \- Create custom views to organize your actions
Execute on calendar file
====================
| | The feature is currently experimental. |
| ----------------------------------------- |
Sometimes you want to schedule an action to run at a specific date and time, like at 2024-02-07 at 15:30\. This is technically called "an instant", and OliveTin can watch a file that contains a list of instants for new additions.
`start-server-calendar.yaml`
```yaml
- 2024-03-08T20:11:45+00:00
- 2024-03-08T20:12:30+00:00
```
OliveTin will watch this file, and also load it on startup. If an instant is seen that is in the past, it is just ignored. If it is in the future then it is scheduled.
This is how you setup an action to use the calendar file:
`config.yaml`
```yaml
actions:
- title: start server
shell: echo "Starting Server!"
execOnCalendarFile: start-server-calendar.yaml
```
You will often want an easy way to schedule actions from the web interface as well, you can do this by creating a separate schedule action that adds an instant to the calendar file.
You can use an argument with `type: datetime` to create a date selector in the web interface, to easily select dates to be added to the calendar file. You will have to add hardcoded timezone to suit your needs, you can see below that "+00:00" is being added to "{{ when }}" to create an instant in the UTC timezone.
`config.yaml`
```yaml
actions:
- title: Schedule server
shell: echo '- {{ when }}+00:00' >> start-server-calendar.yaml
arguments:
- name: when
title: When?
type: datetime
- title: start server
shell: echo "Starting Server!"
execOnCalendarFile: start-server-calendar.yaml
```
Execute on schedule (cron)
====================
OliveTin can execute actions on a schedule, and uses a cron format for configuration.
`config.yaml`
```yaml
actions:
- title: Say hello
shell: echo "Hello!"
execOnCron:
- "@hourly"
- title: Say goodbye
shell: echo "Say Goodbye"
execOnCron:
- "*/5 * * * *" # Every 5 minutes
```
This is a fantastic website:
## [](#%5Fsupport%5Ffor%5Fseconds%5Fin%5Fcron)Support for seconds in cron
The default cron format for OliveTin supports the Unix/Linux format - 5 fields, with no support for seconds. This is by far the most popular format that most people are used to.
If you need per-second resolution for your actions, this can be enabled in your config - meaning that your cronlines will support 6 columns. The first "new" column is seconds. For example, to execute `date` every 5 seconds;
`config.yaml`
```yaml
cronSupportForSeconds: true
actions:
title: Execute every 5 seconds
shell: date
execOnCron:
- "*/5 * * * * *"
```
## [](#%5Fcron%5Fand%5Facls)Cron and ACLs
If you have enabled ACL, cron tasks are run as the user `cron`, which means that your ACL needs to allow the cron user to execute the action. This is one possibilty:
`config.yaml`
```yaml
accessControlLists:
- name: "cron"
matchUsernames:
- cron
permissions:
exec: true
actions:
- title: Say hello
shell: echo "Hello!"
execOnCron:
- "@hourly"
acls:
- "cron"
```
Execute on demand
====================
This is the default, meaning that the action shows up on a dashboard, and at the moment cannot be changed.
Execute on file changed
====================
You can execute an action when a file is changed in a directory. The argument `filename` is pre-populated for you.
```yaml
actions:
- title: Print names of new files
shell: "echo Filename: {{ filename }} Filedir: {{ filedir }} Filext: {{ fileext }}"
arguments:
- name: filename
type: unicode_identifier
- name: filedir
type: unicode_identifier
- name: fileext
type: unicode_identifier
execOnFileChangedInDir:
- /home/user/Downloads/
```
## [](#%5Ffile%5Fin%5Fdir%5Farguments)File in dir arguments
| Predefined Argument | Example |
| ------------------- | --------------------------------------- |
| filepath | /Downloads/txt1.txt |
| filedir | /Downloads |
| filename | test1.txt |
| fileext | .txt |
| filesizebytes | 100 |
| filemode | 0644 |
| filemtime | 2024-04-27 20:09:42.465235047 +0100 BST |
| fileisdir | false |
Like all arguments, OliveTin also passes these arguments as [environment variables](#env-vars) if this is better for your use case.
Execute on file created
====================
You can execute an action when a file is created in a directory. The argument `filename` is pre-populated for you.
`config.yaml`
```yaml
actions:
- title: Print names of new files
shell: echo {{ filename }}
arguments:
- name: filename
type: unicode_identifier
- name: filedir
type: unicode_identifier
- name: fileext
type: unicode_identifier
execOnFileCreatedInDir:
- /home/user/Downloads/
```
## [](#%5Ffile%5Fin%5Fdir%5Farguments)File in dir arguments
| Predefined Argument | Example |
| ------------------- | --------------------------------------- |
| filepath | /Downloads/txt1.txt |
| filedir | /Downloads |
| filename | test1.txt |
| fileext | .txt |
| filesizebytes | 100 |
| filemode | 0644 |
| filemtime | 2024-04-27 20:09:42.465235047 +0100 BST |
| fileisdir | false |
Like all arguments, OliveTin also passes these arguments as [environment variables](#env-vars) if this is better for your use case.
Execute on startup
====================
OliveTin can execute actions on a startup.
`config.yaml`
```yaml
actions:
- title: Say hello
shell: echo "Hello!"
execOnStartup: true
```
## [](#dnf-startup)Example: Install additional commands into OliveTin
This functionality to execute actions on startup is a very easy way to install additional commands in OliveTin, however it requires running OliveTin as a root user to be able to use `microdnf`;
`config.yaml`
```yaml
actions:
- title: Install dnsmasq
shell: microdnf install bind-utils
execOnStartup: true
```
A more secure method than running DNF as root, is a manual command the temporarily runs as root. To learn more about how to install additional packages into the container in this more secure way, see [Installing extra container packages](../reference/containerInstallPackages.html).
Execute on webhook
====================
Webhooks allow external services to trigger OliveTin actions by sending HTTP POST requests. This is useful for integrating OliveTin with CI/CD pipelines, monitoring systems, IoT devices, or any service that can send HTTP requests.
OliveTin provides a dedicated webhook endpoint at `/webhooks` that can receive webhook payloads and match them to configured actions.
## [](#%5Fbasic%5Fconfiguration)Basic Configuration
To configure an action to run on a webhook, add the `execOnWebhook` property to your action:
`config.yaml`
```yaml
actions:
- title: Deploy Application
id: deploy
shell: /opt/scripts/deploy.sh
execOnWebhook:
- matchHeaders:
X-Event-Type: deploy
```
This action will be triggered when a POST request is sent to `/webhooks` with the header `X-Event-Type: deploy`.
## [](#%5Fwebhook%5Fendpoint)Webhook Endpoint
All webhooks are received at:
```asciidoc
http://your-olivetin-server:1337/webhooks
```
or
```asciidoc
http://your-olivetin-server:1337/webhooks/
```
Both paths work identically. All webhook requests must use the HTTP POST method.
## [](#%5Fmatching%5Fwebhooks)Matching Webhooks
OliveTin can match incoming webhooks based on several criteria:
### [](#%5Fmatch%5Fby%5Fheaders)Match by Headers
Match webhooks based on HTTP header values:
```yaml
actions:
- title: Process Event
shell: echo "Processing event"
execOnWebhook:
- matchHeaders:
X-Event-Type: my-event
X-Source: my-service
```
All specified headers must match for the webhook to trigger the action.
### [](#%5Fmatch%5Fby%5Fquery%5Fparameters)Match by Query Parameters
Match webhooks based on URL query parameters:
```yaml
actions:
- title: Process Request
shell: echo "Processing request for {{ service }}"
arguments:
- name: service
type: ascii
execOnWebhook:
- matchQuery:
action: deploy
env: production
```
A request to `/webhooks?action=deploy&env=production` would match this action.
### [](#%5Fmatch%5Fby%5Fjson%5Fbody%5Fpath)Match by JSON Body Path
Match webhooks based on values in the JSON request body using JSONPath expressions:
```yaml
actions:
- title: Handle Push Event
shell: echo "Push to {{ branch }}"
arguments:
- name: branch
type: ascii
execOnWebhook:
- matchPath: "$.event_type=push"
```
The `matchPath` format is `jsonpath=value`. You can also just specify a JSONPath without a value to match if the path exists:
```yaml
execOnWebhook:
- matchPath: "$.repository.name" # Matches if this path exists in the JSON
```
### [](#%5Fusing%5Fregex%5Ffor%5Fmatching)Using Regex for Matching
Header and query parameter values can use regex patterns by prefixing with `regex:`:
```yaml
actions:
- title: Handle Multiple Events
shell: echo "Handling event"
execOnWebhook:
- matchHeaders:
X-Event-Type: "regex:^(push|pull_request|release)$"
```
### [](#%5Fcombining%5Fmatch%5Fcriteria)Combining Match Criteria
You can combine multiple match criteria. All criteria must match for the webhook to trigger:
```yaml
actions:
- title: Production Deploy
shell: /opt/scripts/deploy.sh production
execOnWebhook:
- matchHeaders:
X-Event-Type: deploy
matchQuery:
environment: production
matchPath: "$.status=approved"
```
## [](#%5Fextracting%5Farguments%5Ffrom%5Fwebhooks)Extracting Arguments from Webhooks
You can extract values from the webhook payload and pass them as arguments to your action using JSONPath expressions:
```yaml
actions:
- title: Deploy Version
shell: |
echo "Deploying version {{ version }} to {{ environment }}"
/opt/scripts/deploy.sh "{{ version }}" "{{ environment }}"
arguments:
- name: version
type: ascii
- name: environment
type: ascii
execOnWebhook:
- matchHeaders:
X-Event-Type: deploy
extract:
version: "$.release.tag_name"
environment: "$.target.environment"
```
The `extract` map defines which action arguments to populate from the webhook payload. The key is the argument name, and the value is the JSONPath expression to extract the value.
### [](#%5Fautomatic%5Fwebhook%5Fmetadata)Automatic Webhook Metadata
OliveTin automatically adds several metadata arguments from each webhook request:
* `webhook_method` \- The HTTP method (always POST for webhooks)
* `webhook_path` \- The request URL path
* `webhook_query` \- The raw query string
* `webhook_header_` \- Each HTTP header (lowercase name)
For example, to access the `X-Request-Id` header in your action:
```yaml
actions:
- title: Log Request
shell: echo "Request ID: {{ webhook_header_x-request-id }}"
arguments:
- name: webhook_header_x-request-id
type: ascii
execOnWebhook:
- matchHeaders:
X-Event-Type: log
```
## [](#%5Fwebhook%5Fauthentication)Webhook Authentication
OliveTin supports several authentication methods to verify webhook requests:
### [](#%5Fno%5Fauthentication)No Authentication
By default, webhooks have no authentication. Any request matching the criteria will trigger the action:
```yaml
execOnWebhook:
- authType: none
matchHeaders:
X-Event-Type: my-event
```
### [](#%5Fhmac%5Fsha256%5Fsignature)HMAC-SHA256 Signature
Verify webhooks using HMAC-SHA256 signatures (commonly used by GitHub, GitLab, etc.):
```yaml
execOnWebhook:
- authType: hmac-sha256
authHeader: X-Hub-Signature-256
secret: your-webhook-secret
matchHeaders:
X-Event-Type: push
```
The `authHeader` specifies which header contains the signature. The signature should be in the format `sha256=`.
### [](#%5Fhmac%5Fsha1%5Fsignature)HMAC-SHA1 Signature
For services using HMAC-SHA1 (legacy GitHub webhooks):
```yaml
execOnWebhook:
- authType: hmac-sha1
authHeader: X-Hub-Signature
secret: your-webhook-secret
matchHeaders:
X-Event-Type: push
```
### [](#%5Fbearer%5Ftoken)Bearer Token
Verify webhooks using a Bearer token in the Authorization header:
```yaml
execOnWebhook:
- authType: bearer
secret: your-bearer-token
matchHeaders:
X-Event-Type: deploy
```
The webhook sender must include `Authorization: Bearer your-bearer-token` in the request.
### [](#%5Fbasic%5Fauthentication)Basic Authentication
Verify webhooks using HTTP Basic authentication:
```yaml
execOnWebhook:
- authType: basic
secret: "username:password"
matchHeaders:
X-Event-Type: deploy
```
Or with password only:
```yaml
execOnWebhook:
- authType: basic
secret: "mypassword"
matchHeaders:
X-Event-Type: deploy
```
## [](#%5Fmultiple%5Fwebhook%5Ftriggers)Multiple Webhook Triggers
An action can have multiple webhook configurations. The action will be triggered if any of them match:
```yaml
actions:
- title: Deploy
shell: /opt/scripts/deploy.sh
execOnWebhook:
- matchHeaders:
X-Event-Type: deploy-manual
- matchHeaders:
X-Event-Type: deploy-auto
matchPath: "$.status=success"
```
## [](#%5Ftesting%5Fwebhooks)Testing Webhooks
You can test your webhook configuration using `curl`:
```bash
# Simple webhook with headers
curl -X POST \
-H "Content-Type: application/json" \
-H "X-Event-Type: deploy" \
-d '{"version": "1.2.3"}' \
http://localhost:1337/webhooks
# Webhook with HMAC-SHA256 authentication
SECRET="your-secret"
PAYLOAD='{"event": "push", "branch": "main"}'
SIGNATURE=$(echo -n "$PAYLOAD" | openssl dgst -sha256 -hmac "$SECRET" | cut -d' ' -f2)
curl -X POST \
-H "Content-Type: application/json" \
-H "X-Event-Type: push" \
-H "X-Hub-Signature-256: sha256=$SIGNATURE" \
-d "$PAYLOAD" \
http://localhost:1337/webhooks
```
## [](#%5Fsee%5Falso)See Also
* [GitHub Webhooks](onwebhook%5Fgithub.html) \- Specific configuration for GitHub webhook events
* [GitOps Solution](../solutions/on-git-push/index.html) \- Running actions on Git push using hooks
* [Start Action API](../api/start%5Faction.html) \- Alternative method for triggering actions via API
GitHub Webhooks
====================
OliveTin includes built-in templates for GitHub webhooks that simplify configuration. Instead of manually configuring header matching and argument extraction, you can use a template that handles all the common settings for you.
## [](#%5Fsupported%5Fgithub%5Ftemplates)Supported GitHub Templates
OliveTin supports the following GitHub webhook templates:
* `github-push` \- Triggered on push events
* `github-pr` or `github-pull-request` \- Triggered on pull request events
* `github-release` \- Triggered on release events
* `github-workflow` \- Triggered on workflow run events
## [](#%5Fsetting%5Fup%5Fgithub%5Fwebhooks)Setting Up GitHub Webhooks
### [](#%5F1%5Fconfigure%5Fthe%5Fwebhook%5Fin%5Fgithub)1\. Configure the Webhook in GitHub
1. Go to your GitHub repository → **Settings** → **Webhooks** → **Add webhook**
2. Set the **Payload URL** to ``
3. Set **Content type** to `application/json`
4. Enter a **Secret** (you’ll use this in your OliveTin config)
5. Choose which events to trigger the webhook:
* Select **Just the push event** for push triggers
* Or select **Let me select individual events** for more control
6. Click **Add webhook**
### [](#%5F2%5Fconfigure%5Folivetin)2\. Configure OliveTin
Use the `template` property to apply GitHub-specific settings:
`config.yaml`
```yaml
actions:
- title: Deploy on Push
shell: |
echo "Deploying commit {{ git_commit }} to {{ git_branch }}"
/opt/scripts/deploy.sh "{{ git_branch }}"
arguments:
- name: git_commit
type: ascii
- name: git_branch
type: ascii
execOnWebhook:
- template: github-push
secret: your-github-webhook-secret
```
## [](#%5Fgithub%5Fpush%5Ftemplate)GitHub Push Template
The `github-push` template is designed for push events. It automatically:
* Sets authentication to HMAC-SHA256 with the `X-Hub-Signature-256` header
* Matches the `X-GitHub-Event: push` header
* Extracts common push event data
### [](#%5Fextracted%5Farguments)Extracted Arguments
The following arguments are automatically extracted and available in your action:
| Argument Name | Description | JSONPath |
| --------------- | ------------------------------------------ | -------------------------- |
| git\_repository | Full repository name (owner/repo) | $.repository.full\_name |
| git\_ref | Full git reference (e.g., refs/heads/main) | $.ref |
| git\_commit | The HEAD commit SHA | $.head\_commit.id |
| git\_branch | The branch reference | $.ref |
| git\_message | The commit message | $.head\_commit.message |
| git\_author | The commit author’s name | $.head\_commit.author.name |
### [](#%5Fexample%5Fdeploy%5Fon%5Fpush%5Fto%5Fmain)Example: Deploy on Push to Main
```yaml
actions:
- title: Deploy to Production
shell: |
if [ "{{ git_ref }}" = "refs/heads/main" ]; then
echo "Deploying {{ git_commit }} by {{ git_author }}"
/opt/scripts/deploy.sh production
else
echo "Ignoring push to non-main branch"
fi
arguments:
- name: git_ref
type: ascii
- name: git_commit
type: ascii
- name: git_author
type: ascii
execOnWebhook:
- template: github-push
secret: your-secret
```
### [](#%5Fexample%5Ffilter%5Fby%5Fbranch)Example: Filter by Branch
To only trigger on specific branches, add a `matchPath` condition:
```yaml
actions:
- title: Deploy Staging
shell: /opt/scripts/deploy.sh staging
execOnWebhook:
- template: github-push
secret: your-secret
matchPath: '$.ref="refs/heads/develop"'
```
## [](#%5Fgithub%5Fpull%5Frequest%5Ftemplate)GitHub Pull Request Template
The `github-pr` (or `github-pull-request`) template handles pull request events.
### [](#%5Fextracted%5Farguments%5F2)Extracted Arguments
| Argument Name | Description | JSONPath |
| --------------- | ------------------------------------------------ | -------------------------- |
| pr\_number | Pull request number | $.number |
| pr\_title | Pull request title | $.pull\_request.title |
| pr\_author | PR author’s username | $.pull\_request.user.login |
| pr\_action | Event action (opened, closed, synchronize, etc.) | $.action |
| git\_repository | Full repository name | $.repository.full\_name |
| pr\_state | PR state (open, closed) | $.pull\_request.state |
| pr\_head\_sha | HEAD commit SHA of the PR branch | $.pull\_request.head.sha |
### [](#%5Fexample%5Frun%5Ftests%5Fon%5Fpr)Example: Run Tests on PR
```yaml
actions:
- title: Run PR Tests
shell: |
echo "Running tests for PR #{{ pr_number }}: {{ pr_title }}"
echo "Action: {{ pr_action }}, Author: {{ pr_author }}"
/opt/scripts/run-tests.sh "{{ pr_head_sha }}"
arguments:
- name: pr_number
type: ascii
- name: pr_title
type: ascii
- name: pr_action
type: ascii
- name: pr_author
type: ascii
- name: pr_head_sha
type: ascii
execOnWebhook:
- template: github-pr
secret: your-secret
```
### [](#%5Fexample%5Fonly%5Fon%5Fpr%5Fopen%5For%5Fsynchronize)Example: Only on PR Open or Synchronize
```yaml
actions:
- title: CI Build
shell: /opt/scripts/ci-build.sh "{{ pr_head_sha }}"
arguments:
- name: pr_head_sha
type: ascii
execOnWebhook:
- template: github-pr
secret: your-secret
matchPath: '$.action="opened"'
- template: github-pr
secret: your-secret
matchPath: '$.action="synchronize"'
```
## [](#%5Fgithub%5Frelease%5Ftemplate)GitHub Release Template
The `github-release` template handles release events.
### [](#%5Fextracted%5Farguments%5F3)Extracted Arguments
| Argument Name | Description | JSONPath |
| --------------- | ----------------------------------------- | ----------------------- |
| release\_action | Release action (published, created, etc.) | $.action |
| release\_tag | Release tag name | $.release.tag\_name |
| release\_name | Release name/title | $.release.name |
| git\_repository | Full repository name | $.repository.full\_name |
| release\_author | Release author’s username | $.release.author.login |
### [](#%5Fexample%5Fdeploy%5Fon%5Frelease)Example: Deploy on Release
```yaml
actions:
- title: Deploy Release
shell: |
echo "Deploying release {{ release_tag }}: {{ release_name }}"
/opt/scripts/deploy-release.sh "{{ release_tag }}"
arguments:
- name: release_tag
type: ascii
- name: release_name
type: ascii
execOnWebhook:
- template: github-release
secret: your-secret
matchPath: '$.action="published"'
```
## [](#%5Fgithub%5Fworkflow%5Ftemplate)GitHub Workflow Template
The `github-workflow` template handles workflow run events, useful for triggering actions when GitHub Actions workflows complete.
### [](#%5Fextracted%5Farguments%5F4)Extracted Arguments
| Argument Name | Description | JSONPath |
| -------------------- | -------------------------------------------- | ---------------------------- |
| workflow\_name | Name of the workflow | $.workflow\_run.name |
| workflow\_status | Workflow status | $.workflow\_run.status |
| workflow\_conclusion | Workflow conclusion (success, failure, etc.) | $.workflow\_run.conclusion |
| git\_repository | Full repository name | $.repository.full\_name |
| git\_commit | HEAD commit SHA | $.workflow\_run.head\_sha |
| git\_branch | Branch that triggered the workflow | $.workflow\_run.head\_branch |
### [](#%5Fexample%5Fdeploy%5Fafter%5Fci%5Fsuccess)Example: Deploy After CI Success
```yaml
actions:
- title: Deploy After CI
shell: |
echo "CI workflow '{{ workflow_name }}' completed with {{ workflow_conclusion }}"
if [ "{{ workflow_conclusion }}" = "success" ]; then
/opt/scripts/deploy.sh "{{ git_branch }}" "{{ git_commit }}"
fi
arguments:
- name: workflow_name
type: ascii
- name: workflow_conclusion
type: ascii
- name: git_branch
type: ascii
- name: git_commit
type: ascii
execOnWebhook:
- template: github-workflow
secret: your-secret
matchPath: '$.action="completed"'
```
## [](#%5Fcustomizing%5Ftemplates)Customizing Templates
Templates provide default values, but you can override or extend them:
```yaml
actions:
- title: Custom Push Handler
shell: echo "Push from {{ custom_field }}"
arguments:
- name: custom_field
type: ascii
- name: git_commit
type: ascii
execOnWebhook:
- template: github-push
secret: your-secret
# Add additional extractions
extract:
custom_field: "$.sender.login"
# Add additional match criteria
matchPath: '$.repository.private=false'
```
Custom `extract` values are merged with template defaults, so you can add extra fields without losing the standard ones.
## [](#%5Fsecurity%5Fconsiderations)Security Considerations
1. **Always use a secret** \- Without a secret, anyone can trigger your webhooks
2. **Use HTTPS** \- When exposing OliveTin to the internet, use a reverse proxy with TLS
3. **Limit webhook events** \- Only subscribe to the events you actually need in GitHub
4. **Validate in your scripts** \- Add additional validation in your shell scripts for sensitive operations
## [](#%5Ftroubleshooting)Troubleshooting
### [](#%5Fwebhook%5Fnot%5Ftriggering)Webhook Not Triggering
1. Check the OliveTin logs with `logLevel: DEBUG` for webhook processing details
2. Verify the webhook is being received (check GitHub webhook delivery history)
3. Ensure the secret matches exactly between GitHub and OliveTin config
4. Verify the `template` name is spelled correctly
### [](#%5Fsignature%5Fverification%5Ffailed)Signature Verification Failed
1. Ensure the secret in OliveTin matches the one configured in GitHub
2. Check that you’re using the correct template (GitHub uses HMAC-SHA256 by default)
3. Make sure the webhook Content-Type is set to `application/json`
### [](#%5Farguments%5Fnot%5Fextracted)Arguments Not Extracted
1. Verify the argument names match exactly (case-sensitive)
2. Check that arguments are defined in the action’s `arguments` list
3. Use `logLevel: DEBUG` to see extracted values in the logs
## [](#%5Fsee%5Falso)See Also
* [Webhooks Overview](onwebhook.html) \- General webhook configuration
* [GitOps Solution](../solutions/on-git-push/index.html) \- Alternative approach using Git hooks
* [GitHub Webhooks Documentation](https://docs.github.com/en/webhooks) \- Official GitHub webhook documentation
Shell vs Exec
====================
OliveTin supports two different methods to run commands: `shell` and `exec`. The difference between these two is that "shell" accepts strings, and will wrap that whole command in a shell with "bash -c". Exec uses a syscall directly to execute commands.
* **Shell** is more flexible, because it allows you to chain commands (eg, using &&) and redirect or pipe output (eg: ">" or "|").
* **Exec** is more secure, because it does not invoke a shell, and thus avoids shell injection attacks.
Shell can be safe and secure with simple argument types (like ascii\_identifier), but some argument types like URL can contain basically any character - /, :, ?, &, etc - which can lead to shell injection vulnerabilities while still being a valid URL.
OliveTin will try and prevent you from using dangerous characters in shell commands (eg, URL is no longer permitted with Shell).
The way that you specify these two types of execution is different - `shell` expects a single string, while `exec` expects a list of strings (the first being the command, the rest being the arguments).
Using Shell
```yaml
actions:
- title: List files
shell: ls -l /some/directory
```
Using Exec
```yaml
actions:
- title: List files
exec:
- ls
- -l
- /some/directory
```
When in doubt, prefer `exec` over `shell` for better security. Shell was added in both OliveTin 3k and OliveTin 2k in October 2025.
## [](#%5Fwhats%5Fnext)What’s Next?
Now that you understand execution methods, continue building your actions:
* [Create your first action](create%5Fyour%5Ffirst.html) \- Build a simple action to get started
* [Add arguments to actions](../args/intro.html) \- Make actions interactive with user input
* [Schedule actions](oncron.html) \- Set up automated execution
* [Trigger via webhooks](onwebhook.html) \- Integrate with external systems
* [Configure security](../security/concepts.html) \- Secure your actions with authentication and authorization
* [Browse examples](../action%5Fexamples/intro.html) \- See real-world action configurations
Triggers
====================
Sometimes you want to trigger another action after the first one completes. This is mostly useful for updating hidden actions that update entity files, without having to run those updates on a cron job every 10 seconds!
| | OliveTin used to support a single action trigger, but now supports multiple triggers. The field trigger was renamed to triggers and is now an array of triggers. |
| ------------------------------------------------------------------------------------------------------------------------------------------------------------------- |
```yaml
entities:
- file: /etc/OliveTin/entities/containers.json
name: container
actions:
- title: stop {{ container.Names }}
shell: docker stop {{ container.Names}}
entity: container
triggers:
- update containers
- title: update containers
shell: docker ps -a --format=json > /etc/OliveTin/entities/containers.json
hidden: true
```
Environment Variables in the Config File
====================
You can pull configuration values from environment variables like this:
`config.yaml`
```yaml
logLevel: ${{ LOG_LEVEL }}
pageTitle: Olivetin - ${{ DEPLOY_ENV }}
actions:
...
```
While loading the config file, Olivetin will substitute the value of the named environment variable for the token. If the variable is unset, Olivetin will use an empty string as the value and log a warning. This syntax works even for configuration values that aren’t strings, as long as the final string value can be converted to the proper type.
## [](#%5Fnotes)Notes
1. These variables are read while loading the config file. Changes in the environment won’t be reflected until the config file is reloaded. If you want to read environment variables at execution time in your action’s `shell` line, make sure to use regular shell syntax, i.e., `$FOO` rather than `${{ FOO }}`. See [environment variables](../args/env.html)for info on using environment variables in your actions.
## [](#using-env-in-template-replacements)Using .Env in template replacements
In addition to config-file substitution, OliveTin supports using the process environment inside **action templates** (e.g. `shell`, `shellAfterCompleted`, entity directory titles, and other fields that use Go template syntax). Use `{{ .Env.VAR_NAME }}` to substitute an environment variable at the time the action is executed.
This is useful when you want a command to depend on the runtime environment (e.g. container or system env) rather than config-load time, or when you need env values in template fields that are not the raw `shell` command (where you could use `$VAR`).
Example: use `.Env` in a shell command
```yaml
actions:
- title: Run with deploy env
shell: /opt/deploy.sh --env {{ .Env.DEPLOY_ENV }} --host {{ .Env.HOSTNAME }}
```
Example: use `.Env` in a completion notification
```yaml
actions:
- title: Backup
shell: /opt/backup.sh
shellAfterCompleted: "apprise -t 'Backup on {{ .Env.HOSTNAME }}' -b '{{ output }}'"
```
`.Env` uses the same Go template context as other action variables (e.g. `.Arguments`, `.CurrentEntity`, `.OliveTin`). The map is built from the process environment when OliveTin starts; values are read at template execution time. If a variable is missing, the template engine will report a missing-key error (with `missingkey=error`), so use defaulting when a variable might be unset, e.g. `{{ or .Env.OPTIONAL_VAR "default" }}`.
This feature addresses the need to use environment variables in templates without changing the config loader (see [GitHub issue #840](https://github.com/OliveTin/OliveTin/issues/840)).
Diagnostics
====================
OliveTin provides a built-in diagnostics page that can be used to help check how OliveTin is running and help to troubleshoot issues. It’s mainly designed for checking SSH configuration at the moment.
This is a screenshot of the diagnostics page, which can be accessed by clicking the "Diagnostics" link in the navigation bar:

## [](#%5Fdisabling%5Fdiagnostics)Disabling Diagnostics
The diagnostics page is enabled by default, but you can disable it by using the OliveTin [security policy configuration](../security/acl.html#%5Facls%5Fand%5Fpolicies%5Fglobal), using the defaults, or via an ACL. Examples are shown below for each of these methods.
### [](#%5Fdisable%5Fdiagnostics%5Ffor%5Fall%5Fusers)Disable Diagnostics for all users;
```yaml
logLevel: info
defaultPolicy:
showDiagnostics: false
```
### [](#%5Fdisable%5Fdiagnostics%5Fexpect%5Ffor%5Fadmin%5Fusers)Disable Diagnostics expect for admin users
```yaml
logLevel: info
defaultPolicy:
showDiagnostics: false
accessControlLists:
- name: admin
matchUsernames:
- alice
- bob
policy:
showDiagnostics: true
```
Advanced Configuration
====================
This section covers advanced configuration options that provide additional control and customization for OliveTin. These options are typically used by users who need fine-grained control over logging, diagnostics, networking, UI customization, and other advanced features.
Topics covered in this section include:
* Application and action logging configuration
* Diagnostics and troubleshooting tools
* Environment variable configuration
* Network port configuration
* Style modifications for UI customization
* Prometheus metrics integration
* Timezone configuration
* Web UI customization options
* Version display in the footer (show or hide the application version)
Most users will not need to modify these settings for basic OliveTin usage, but they become important when you need to integrate OliveTin into complex environments or customize its behavior to match specific requirements.
## [](#%5Fwhats%5Fnext)What’s Next?
Explore the advanced configuration options:
* [Configure logging](logs.html) \- Set up application and action logging
* [Use the logs calendar](logs-calendar.html) \- Browse execution history visually
* [Use diagnostics](diagnostics.html) \- Access troubleshooting and diagnostic tools
* [Customize the web UI](webui.html) \- Modify the appearance and behavior of the interface
* [Apply style mods](stylemods.html) \- Use style modifications for UI customization
* [Set up Prometheus](prometheus.html) \- Configure metrics collection
* [Configure timezones](timezones.html) \- Set timezone handling for actions
* [Use environment variables](config%5Fenvs.html) \- Configure environment variable handling
* [Understand network ports](../reference/network-ports.html) \- Learn about OliveTin’s port configuration
* [Version display](../reference/version%5Fdisplay.html) \- Show or hide the application version in the footer
Logging - Actions
====================
| | There are two different types of logs in OliveTin - [application logs](logs.html) and [action logs](#). This page is about the _action logs_, which are the logs that are generated by the actions that you run in OliveTin. |
| ------------------------------------------------------------------------------------------------------------------------------------------------------------------------------------------------------------------------------- |
## [](#%5Fcontrolling%5Faccess%5Fto%5Fsee%5Faction%5Flogs)Controlling access to see action logs
You can control access to action logs using **permissions**, which are assigned to actions.
### [](#%5Fdisabling%5Flogs%5Ffor%5Fall%5Fusers)Disabling logs for all users
```yaml
logLevel: info
defaultPermissions:
logs: false
```
### [](#%5Fenabling%5Flogs%5Ffor%5Fa%5Fspecific%5Facl)Enabling logs for a specific ACL
```yaml
logLevel: info
defaultPermissions:
logs: false
accessControlLists:
- name: admin
matchUsernames:
- alice
- bob
permissions:
logs: true
addToEveryAction: true
actions:
- title: My Action
shell: echo "Hello World"
```
## [](#%5Fdisabling%5Fthe%5Flog%5Fviewer)Disabling the log viewer
You can disable the log viewer in the interface with [security policy configuration](../security/acl.html#%5Facls%5Fand%5Fpolicies%5Fglobal), using the defaults, or via an ACL. Examples are shown below for each of these methods.
### [](#%5Fdisable%5Flog%5Fviewer%5Ffor%5Fall%5Fusers)Disable log viewer for all users;
```yaml
logLevel: info
defaultPolicy:
showLogList: false
```
### [](#%5Fdisable%5Flog%5Fviewer%5Fexpect%5Ffor%5Fadmin%5Fusers)Disable log viewer expect for admin users
```yaml
logLevel: info
defaultPolicy:
showLogList: false
accessControlLists:
- name: admin
matchUsernames:
- alice
- bob
policy:
showLogList: true
```
## [](#%5Fsee%5Falso)See Also
* [Saving Action logs](../action%5Fcustomization/savelogs.html)
* [Application Logs](logs.html)
* [Logs Calendar View](logs-calendar.html)
Logs Calendar View
====================
The logs calendar view provides a visual way to browse your action execution history. Instead of scrolling through a list of logs, you can see executions displayed on a calendar, making it easy to identify patterns, busy periods, or specific dates when actions were run.
## [](#%5Faccessing%5Fthe%5Fcalendar%5Fview)Accessing the Calendar View
To access the calendar view, navigate to the **Logs** page and click the **Calendar** button in the toolbar. This will switch from the list view to the calendar view.
You can return to the list view at any time by clicking the **Back to list** button.
## [](#%5Ffeatures)Features
### [](#%5Fview%5Fexecutions%5Fon%5Fa%5Fcalendar)View Executions on a Calendar
Each action execution is displayed as an event on the calendar. Events show:
* The action title
* The action icon (if configured)
This gives you a quick visual overview of when actions were executed throughout the month.
### [](#%5Fnavigate%5Fbetween%5Fmonths)Navigate Between Months
Use the navigation controls at the top of the calendar to move between months. The calendar will display all logged executions for the visible month.
### [](#%5Fclick%5Fon%5Fan%5Fevent)Click on an Event
Click on any event (execution) on the calendar to view the full execution details, including:
* The complete output of the action
* Execution timing information
* Exit code and status
* User who triggered the action
### [](#%5Fclick%5Fon%5Fa%5Fdate)Click on a Date
Click on any date on the calendar to filter the logs list view by that specific day. This is useful when you want to see all executions from a particular date in the traditional list format.
After clicking a date, you’ll be redirected to the logs list view with a date filter applied. You can clear this filter using the clear button next to the timestamp header.
## [](#%5Fuse%5Fcases)Use Cases
The calendar view is particularly useful for:
* **Auditing** \- Quickly identify when specific actions were run
* **Troubleshooting** \- Find executions around a specific date when issues occurred
* **Pattern recognition** \- Visualize how often scheduled actions run
* **Historical review** \- Get an overview of system activity over time
## [](#%5Fsee%5Falso)See Also
* [Logging - Actions](logs-actions.html)
* [Logging - Application](logs.html)
* [Saving Action Logs](../action%5Fcustomization/savelogs.html)
Logging - Application
====================
| | There are two different types of logs in OliveTin - [application logs](#) and [action logs](logs-actions.html). This page is about the _application logs_, which are the logs that OliveTin itself generates. The action logs are the logs that are generated by the actions that you run in OliveTin. |
| --------------------------------------------------------------------------------------------------------------------------------------------------------------------------------------------------------------------------------------------------------------------------------------------------------- |
OliveTin supports a few different log levels. The default logLevel is `INFO`.
You can set a `logLevel` in config.yaml like this;
`config.yaml`
```yaml
logLevel: "INFO"
actions:
....
```
The supported log levels are;
* `DEBUG` \- Every possible log message will be shown. This will use a lot of disk space and is not recommended unless you are a developer / like reading code.
* `ERROR` \- OliveTin rarely uses the `ERROR` log level.
* `WARN` \- Very few messages, only warnings are shown.
* `INFO` \- The defualt log level.
You can change the `logLevel` while OliveTin is running, and it should update as soon as you save your config.yaml. You will always get a log message like this;
```bash
INFO Setting log level to warning
```
## [](#%5Fjson%5Flog%5Fformat)JSON Log Format
* OliveTin 2k supports JSON log format from version **2025.10.30**.
* OliveTin 3k supports JSON log format from version **3000.2.2**.
You can enable JSON log format by setting the `OLIVETIN_LOG_FORMAT` environment variable to `json`.
Example of setting `OLIVETIN_LOG_FORMAT` to `json`.
```bash
root@server: ./OliveTin
{"commit":"nocommit","date":"nodate","level":"info","msg":"OliveTin initializing","time":"2025-10-30T10:09:55Z","version":"dev"}
{"level":"debug","msg":"Value of -configdir flag","time":"2025-10-30T10:09:55Z","value":"."}
{"level":"debug","msg":"servicehost nonwin","time":"2025-10-30T10:09:55Z"}
{"level":"info","msg":"Setting log level to info","time":"2025-10-30T10:09:55Z"}
{"level":"info","msg":"OliveTin initialization complete","time":"2025-10-30T10:09:55Z"}
{"configDir":"/home/xconspirisist/sandbox/Development/OliveTin/OliveTin","level":"info","msg":"OliveTin started","time":"2025-10-30T10:09:55Z"}
```
Ports
====================
See [the network ports](../reference/network-ports.html) documentation in the reference section.
Prometheus
====================
OliveTin supports basic Prometheus metrics, and the project is interested to hear about what more metrics people would find useful, as well!
To enable Prometheus support;
`config.yaml`
```yaml
logLevel: INFO
prometheus:
enabled: true
defaultGoMetrics: false
```
It is required to restart OliveTin after changing the `prometheus` configuration.
The `defaultGoMetrics` option will enable the default Go metrics, which expose metrics like go\_memstats\_alloc\_bytes, or go\_memstats\_heap\_alloc\_bytes, and generally most people don’t need these.
This will give you metrics available at . The page should look something like this;
```asciidoc
# HELP olivetin_actions_requested_count The actions requested count
# TYPE olivetin_actions_requested_count gauge
olivetin_actions_requested_count 0
# HELP olivetin_config_action_count Then number of actions in the config file
# TYPE olivetin_config_action_count gauge
olivetin_config_action_count 18
# HELP olivetin_config_reloaded_count The number of times the config has been reloaded
# TYPE olivetin_config_reloaded_count counter
olivetin_config_reloaded_count 1
# HELP olivetin_sv_count The number entries in the sv map
# TYPE olivetin_sv_count gauge
olivetin_sv_count 49
```
Stylemods
====================
There are several style modifications that some people like to use, which can easily be added to OliveTin. The configuration syntax in your `config.yaml` is very simple, and looks like this with a single style mod;
```yaml
stylemods:
- sm-side-icons
```
You can add as many style mods as you like, but note that some of them may conflict with each other. The style mods are applied in the order they are listed, so if you have a conflict, the last one in the list will take precedence.
## [](#%5Favailable%5Fstyle%5Fmods)Available Style Mods
* `sm-side-icons`: Display action buttons with the icons on the left hand side rather than above the text.
* `sm-imageicons-fullwidth`: Display image icons in full width, rather than the default size.
* `sm-transparent-header`: Make the header background transparent.
* `sm-transparent-footer`: Make the footer background transparent.
| | The sm-transparent-header and sm-transparent-footer style mods often fix themes that were designed for OliveTin 2k. |
| ---------------------------------------------------------------------------------------------------------------------- |
The list of style mods on this page is maintained as new style modifications are added to OliveTin.
## [](#%5Ffeature%5Fhistory)Feature history
* OliveTin `2025.7.29` introduced the ability to use style modifications, or "style mods".
Timezones
====================
OliveTin will obviously use the system time just like all other programs, but when running in a container, time works in a slightly unusual way.
You may be used to using a TZ or TIMEZONE environment variable in your Linux container inages, but this is not a standard that works for all Linux distributions - it’s mostly supported by Debain based containers. OliveTin’s base container image is fedora-minimal, which deliberately does not include timezone data, to reduce storage space.
To change the time in the OliveTin container, simply bind-mount the correct zone file;
Same as the container host
```asciidoc
docker create -v /etc/localtime:/etc/localtime -v /etc/OliveTin:/config --name OliveTin docker.io/jamesread/olivetin
```
Different timezone to the container host
```asciidoc
docker create -v /usr/share/zoneinfo/Japan:/etc/localtime -v /etc/OliveTin:/config --name OliveTin docker.io/jamesread/olivetin
```
Customize the web UI
====================
The OliveTin web UI is reasonably customizable - parts of the page that you don’t need can be hidden when they’re not needed.
## [](#%5Fpage%5Ftitle)Page Title
You can customize the page title;
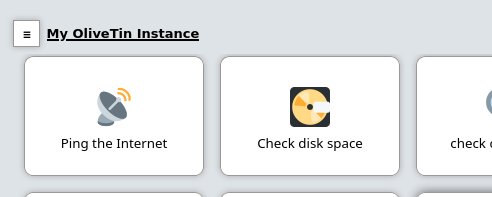
`config.yaml`
```yaml
pageTitle: My OliveTin Instance
```
## [](#show-nav)Navigation - show / hide
You can choose to hide the navigation elements in OliveTin, to present a simplified user interface.
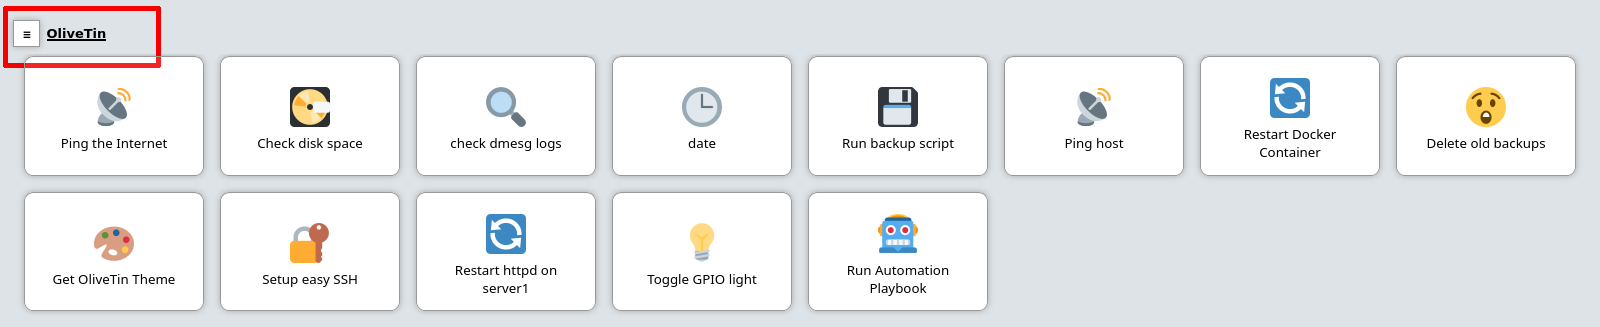
Figure 1\. The default user interface with the sidebar shown
To have OliveTin hide these buttons, add `showNavigation: false` to your config.yaml;
`config.yaml`
```yaml
logLevel: "INFO"
showNavigation: false
actions:
....
```
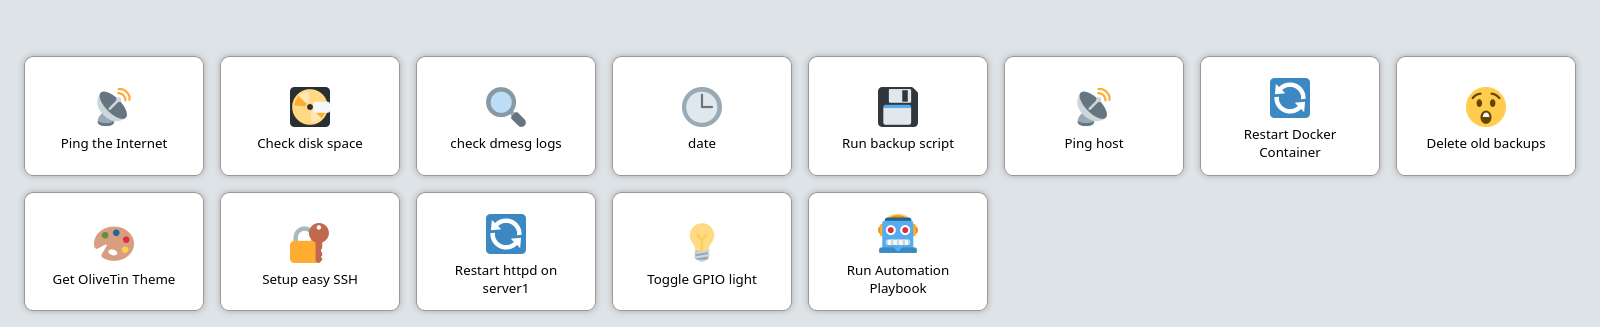
Figure 2\. The same user interface, but with the sidebar hidden (`showNavigation: false`)
## [](#show-navigate-on-start-icons)Navigate-on-start icons on action buttons
When enabled (the default), each action button can show a small icon indicating what happens when the action is started:
* **Popup dialog** — the action opens a popup (e.g. `popupOnStart: execution-dialog`)
* **Action history** — the action opens the action details page (e.g. `popupOnStart: history`)
* **Argument form** — the action opens an argument form on start
* **Run in background** — the action runs without opening a dialog
Set `showNavigateOnStartIcons: false` in your `config.yaml` to hide these indicator icons for a cleaner look.
`config.yaml`
```yaml
showNavigateOnStartIcons: false
```
## [](#section-navgiation-style)Section Navigation Style
`sectionNavigationStyle` \- You can choose to have the section navigation buttons displayed as a Sidebar (`sidebar` \- default), or along the top (`topbar`).
### [](#%5Fsidebar%5Fnavigation%5Fstyle%5Fdefault)Sidebar navigation style (default)
`sectionNavigationStyle: sidebar` looks like this;
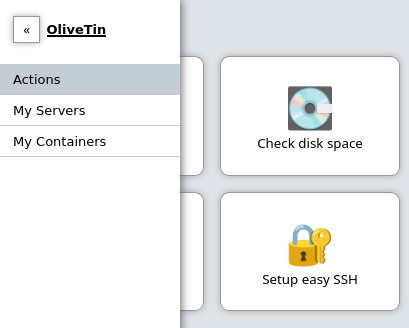
### [](#%5Ftopbar%5Fnavigation%5Fstyle)Topbar navigation style
`sectionNavigationStyle: topbar` looks like this;
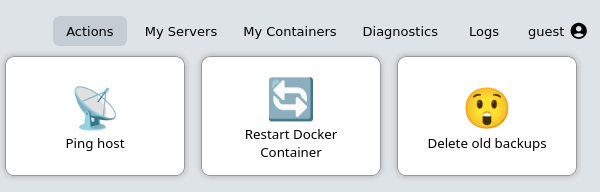
## [](#show-version-number)Version number in the footer
You can control whether the installed OliveTin version is shown in the web interface. When enabled (the default), the footer displays text like **OliveTin 2024.06.02**. When disabled, the footer shows only **OliveTin** with no version number.
This is controlled by the **showVersionNumber** policy (in `defaultPolicy` or per user/group in ACLs). Hiding the version also hides any "new version available" link in the footer and redacts the version in [server diagnostics](../troubleshooting/server-diagnostics.html) output, which can be useful for privacy when sharing reports.
* [Version display](../reference/version%5Fdisplay.html) — full configuration and policy examples
## [](#show-new-versions)New version available - show/hide
You can disable the "new version" information in the footer - the default for `showNewVersions` is `true`;
`config.yaml`
```yaml
logLevel: "INFO"
showNewVersions: false
```
OliveTin does not check for updates by default. To enable it, see [enable update checking](../reference/updateChecks.html).
## [](#show-footer)Footer visibility - show / hide
You can disable the entire footer, if you would like a really minimal interface. The default for `showFooter` is `true`.
`config.yaml`
```yaml
logLevel: "INFO"
showFooter: false
```
This means the [showNewVersions](#show-new-versions) configuration option will automatically be `false` as well.
## [](#%5Fadditional%5Fsection%5Fnavigation%5Flinks)Additional section navigation links
You can add custom links to the OliveTin navigation bar. This is useful if you want to link to other OliveTin instances, or other web applications.
```yaml
additionalNavigationLinks:
- title: Duck Duck Go
url: https://duckduckgo.com
target: _blank
```
This will render like this;
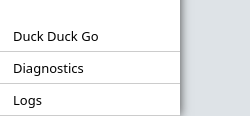
## [](#custom-js)Custom JavaScript
This is considered an advanced feature, and is not recommended unless you like writing your own code.
You can add custom JavaScript to OliveTin, which will be executed on every page load. This can be useful for adding custom functionality to the web UI.
1. The custom javascript should be in a file called `custom.js` and saved in `custom-webui/`, which should be in the same directory as your `config.yaml`.
2. You can put whatever code you like really in your `custom.js` file.
3. Set `enableCustomJs: true` in your `config.yaml` to enable this feature.
4. Restart OliveTin. Note that the custom JavaScript will only be loaded once on startup, so if you are changing the custom JavaScript while OliveTin is running, you will need to restart OliveTin to see the changes.
If the browser blocks your script or network calls with Content Security Policy errors, see [Content Security Policy headers](../security/content%5Fsecurity%5Fpolicy.html) for how to adjust or disable the CSP sent by OliveTin.
## [](#%5Fcustom%5Fcss%5Fwith%5Fa%5Fcustom%5Ftheme)Custom CSS (with a custom theme)
You can customize OliveTin with themes, but it’s also possible to write your on very simple theme that contains just a few CSS rules to change the look and feel of OliveTin. This is very useful if you just want to change the colours of OliveTin, or hide a few elements.
### [](#%5Fwriting%5Fa%5Fsimple%5Ftheme%5Fwith%5Fa%5Fcss%5Fchange)Writing a simple theme with a CSS change
You’ll need to create a new theme, and let’s assume our theme name is going to be called `uihack`. OliveTin themes are simply a directory of CSS and other assets. OliveTin looks for a directory called `custom-webui/themes/` in the same directory as your `config.yaml` file.
Start by creating a directory called `custom-webui/themes/uihack` relative to the same directory as your `config.yaml` file. In this directory, create a file called `theme.css`.
```yaml
├── config.yaml
└── custom-webui
└── themes
└── uihack
└── theme.css
```
Here’s an example of what your `theme.css` should contain;
```css
body {
background-color: red;
}
```
### [](#%5Fsetup%5Folivetin%5Fconfig%5Fto%5Fuse%5Fyour%5Ftheme)Setup OliveTin config to use your theme
Now you need to tell OliveTin to use your new theme. To do this, set `themeName: uihack` in your OliveTin config.yaml and restart OliveTin.
```yaml
logLevel: "INFO"
themeName: uihack
```
| | OliveTin will by default only read theme.css once on startup. If you are intending to change theme.css while OliveTin is running, set themeCacheDisabled: true in your config.yaml. This will make OliveTin read theme.css on every request, and is useful for development. |
| ------------------------------------------------------------------------------------------------------------------------------------------------------------------------------------------------------------------------------------------------------------------------------ |
Restart OliveTin for the theme change to take effect. Beware of the theme cache mentioned above, if you are making changes to the CCS and refreshing the page a few times.
* [More information on theme development](../reference/reference%5Fthemes%5Ffor%5Fdevelopers.html)
API Overview
====================
**Short version**:
* on your OliveTin server to get the REST API.
* [Swagger](http://docs.olivetin.app/api/swagger/) documents the API.
**Longer version**: The OliveTin API is formally defined using the Protobuf IDL, which generates gRPC stubs, as well as a REST Gateway.
The REST API gateway is used by the WebUI, and you can use it too by default - it is exposed at "/api" by default.
The gRPC API only listens on localhost default, but it can be set to listen publicly. See [the network ports documentation](../reference/network-ports.html) for a better description of how the APIs are exposed. Most people do not need to use the gRPC API.
## [](#%5Flinks)Links
* [OliveTin 2k API: Swagger UI](http://docs.olivetin.app/api/swagger/)
* [OliveTin 2k API: OpenAPI JSON Definition](http://docs.olivetin.app/api/swagger/OliveTin.openapi.json)
* [OliveTin 3k API: Swagger UI](http://docs.olivetin.app/api/swagger/3k/)
* [OliveTin 3k API: OpenAPI JSON Definition](http://docs.olivetin.app/api/swagger/3k/OliveTin.openapi.json)
* [The OliveTin Protobuf file](https://github.com/OliveTin/OliveTin/blob/main/proto/olivetin/api/v1/olivetin.proto).
Please do talk to the developers on Discord if you’d like help using the API, or you’re thinking about building something interesting using the API!
Local User Login via API
====================
OliveTin supports serveral different ways to login, and most installations will probably login via reverse proxy, or via local user login.
To login via local user login, you can use the following API call: `/LocalUserLogin`. This is documented in the API documentation which can be found here;
The API call is a POST request, and you need to provide a `username` and `password` as a JSON object in the body of the request. Here is an example of how you can login via a cURL request;
```bash
user@host: curl -X POST "http://olivetin-server:1337/api/LocalUserLogin" -H "accept: application/json" -H "Content-Type: application/json" -d '{"username":"admin","password":"toomanysecrets"}' -v
...
< Set-Cookie: olivetin-sid-local=c6c5b2b3-a58b-4dbc-b070-ed7bdd3f1956; Path=/; Max-Age=31556952; HttpOnly
...
{"success":true}
```
You can see from the above example that the header response sets a cookie called "olivetin-sid-local" to a UUID which is your session ID. You must include this cookie with future requests to authenticate yourself.
You can also that the body of the response is a JSON object with a simple `success` key, which will be `true` if the login was successful, and `false` if it was not.
## [](#%5Fcheck%5Flogin%5Fwith%5Fwhoami)Check login with `WhoAmI`
You can check your current login status by using the `/WhoAmI` API call. This is a GET request, and you need to provide the `olivetin-sid-local` cookie in the request. Here is an example of how you can check your login status via a cURL request;
```bash
user@host: curl -X GET http://localhost:1337/api/WhoAmI -H "accept: application/json" -H 'Content-Type: application/json' -b "olivetin-sid-local=cd33aa9c-c613-473e-8581-2b742716ab8e"
{"authenticatedUser":"admin", "usergroup":"", "provider":"local", "acls":[], "sid":""}
```
API Method: StartAction
====================
This is the method the OliveTin web UI uses to start actions, and is probably the best method to use if you are writing scripts.
* **HTTP Method**: `POST`
* **Request Type**: OliveTin request object
* **Response Type**: Execution Tracking ID
There are several variants of this API call available which might be easier for scripts (or humans) to work with:
There are 4 main methods to start an action in OliveTin, which can be used in scripts or other applications. These methods allow you to trigger actions either immediately or wait for them to complete, and they can be accessed via HTTP requests.
__Webhook/API reference table__
| Function | HTTP Method | Request Type (How to select an action) | Response Type |
| ---------------------------------------------------------------- | ----------- | -------------------------------------------------------------- | --------------------------------------------------------------------------------------- |
| [StartAction](#) | POST | [OliveTin request object](start%5Faction.html#api-request-obj) | [Execution Tracking ID](start%5Faction.html#api-response-trackingid) |
| [StartActionByGet](method%5FStartActionByGet.html) | GET | [Action ID in the URL](start%5Faction.html#api-request-idurl) | [Execution Tracking ID](start%5Faction.html#api-response-trackingid) |
| [StartActionAndWait](method%5FStartActionAndWait.html) | POST | [OliveTin request object](start%5Faction.html#api-request-obj) | [Log Entry (waits for the action to finish)](start%5Faction.html#api-response-logentry) |
| [StartActionByGetAndWait](method%5FStartActionByGetAndWait.html) | GET | [Action ID in the URL](start%5Faction.html#api-request-idurl) | [Log Entry (waits for the action to finish)](start%5Faction.html#api-response-logentry) |
You can also browse these methods in the [OpenAPI/Swagger](htts://docs.olivetin.app/api/swagger/) docs if you prefer.
## [](#%5Fexample%5Fapi%5Fcall%5Fstart%5Fan%5Faction%5Fusing%5Fstartaction)Example API call: Start an action using `StartAction`
curl
```bash
user@host: curl "http://olivetin.webapps.teratan.lan/api/StartAction" --json '{"bindingId": "nuclear_reactor_shutdown"}'
```
Powershell
```powershell
PS C:\Users\xcons> $json = '{"bindingId": "deploy_attack_gnomes"}'
PS C:\Users\xcons> Invoke-RestMethod -Method "Post" -Uri "http://olivetinServer:1337/api/StartAction" -Body $json
```
## [](#%5Fexample%5Fapi%5Fcall%5Fstart%5Fan%5Faction%5Fusing%5Fstartaction%5Fwith%5Farguments)Example API call: Start an action using `StartAction` with arguments
curl
```bash
user:host: curl 'http://olivetin.example.com/api/StartAction' --json '{"bindingId": "Ping_host", "arguments": [{"name": "host", "value": "example.com"},{"name": "count", "value": "1"}]}'
```
API Method: StartActionAndWait
====================
This method is useful is you are writing a script, and want to wait for the action to finish so that you can check the result, or get the output.
* **HTTP Method**: `POST`
* **Request Type**: OliveTin request object
* **Response Type**: Log Entry (waits for the action to finish)
There are several variants of this API call available which might be easier for scripts (or humans) to work with:
There are 4 main methods to start an action in OliveTin, which can be used in scripts or other applications. These methods allow you to trigger actions either immediately or wait for them to complete, and they can be accessed via HTTP requests.
__Webhook/API reference table__
| Function | HTTP Method | Request Type (How to select an action) | Response Type |
| ---------------------------------------------------------------- | ----------- | -------------------------------------------------------------- | --------------------------------------------------------------------------------------- |
| [StartAction](method%5FStartAction.html) | POST | [OliveTin request object](start%5Faction.html#api-request-obj) | [Execution Tracking ID](start%5Faction.html#api-response-trackingid) |
| [StartActionByGet](method%5FStartActionByGet.html) | GET | [Action ID in the URL](start%5Faction.html#api-request-idurl) | [Execution Tracking ID](start%5Faction.html#api-response-trackingid) |
| [StartActionAndWait](#) | POST | [OliveTin request object](start%5Faction.html#api-request-obj) | [Log Entry (waits for the action to finish)](start%5Faction.html#api-response-logentry) |
| [StartActionByGetAndWait](method%5FStartActionByGetAndWait.html) | GET | [Action ID in the URL](start%5Faction.html#api-request-idurl) | [Log Entry (waits for the action to finish)](start%5Faction.html#api-response-logentry) |
You can also browse these methods in the [OpenAPI/Swagger](htts://docs.olivetin.app/api/swagger/) docs if you prefer.
API Method: StartActionByGet
====================
This is the method that allows you to specify the action ID in the URL, and is probably the best to do quick integrations - QR Codes, streamdeck, etc. You cannot pass arguments using this method.
* **HTTP Method**: `GET`
* **Request Type**: Action ID in the URL
* **Response Type**: Execution Tracking ID
There are 4 main methods to start an action in OliveTin, which can be used in scripts or other applications. These methods allow you to trigger actions either immediately or wait for them to complete, and they can be accessed via HTTP requests.
__Webhook/API reference table__
| Function | HTTP Method | Request Type (How to select an action) | Response Type |
| ---------------------------------------------------------------- | ----------- | -------------------------------------------------------------- | --------------------------------------------------------------------------------------- |
| [StartAction](method%5FStartAction.html) | POST | [OliveTin request object](start%5Faction.html#api-request-obj) | [Execution Tracking ID](start%5Faction.html#api-response-trackingid) |
| [StartActionByGet](#) | GET | [Action ID in the URL](start%5Faction.html#api-request-idurl) | [Execution Tracking ID](start%5Faction.html#api-response-trackingid) |
| [StartActionAndWait](method%5FStartActionAndWait.html) | POST | [OliveTin request object](start%5Faction.html#api-request-obj) | [Log Entry (waits for the action to finish)](start%5Faction.html#api-response-logentry) |
| [StartActionByGetAndWait](method%5FStartActionByGetAndWait.html) | GET | [Action ID in the URL](start%5Faction.html#api-request-idurl) | [Log Entry (waits for the action to finish)](start%5Faction.html#api-response-logentry) |
You can also browse these methods in the [OpenAPI/Swagger](htts://docs.olivetin.app/api/swagger/) docs if you prefer.
## [](#%5Fexample%5Fapi%5Fcall%5Fstart%5Fan%5Faction%5Fby%5Fid%5Fin%5Fthe%5Furl)Example API call; Start an action by ID in the URL
curl
```asciidoc
user@host: curl http://olivetin.example.com/api/StartActionByGet/pingGithub
```
The corresponding config.yaml would look like this;
```yaml
actions:
- title: Ping GitHub.com
id: pingGithub
shell: ping github.com -c 1
```
IDs are used by these API calls, as you probably want the interface to display a human-readable title, whereas the API call doesn’t want to have spaces or punctuation.
API Method: StartActionByGetAndWait
====================
This method is also a very easy way to quickly start an action, but it waits for the action to finish before returning the result. This is useful if you want to get the output of the action or check its result without having to poll for it.
* **HTTP Method**: `GET`
* **Request Type**: Action ID in the URL
* **Response Type**: Log Entry (waits for the action to finish)
There are several variants of this API call available which might be easier for scripts (or humans) to work with:
There are 4 main methods to start an action in OliveTin, which can be used in scripts or other applications. These methods allow you to trigger actions either immediately or wait for them to complete, and they can be accessed via HTTP requests.
__Webhook/API reference table__
| Function | HTTP Method | Request Type (How to select an action) | Response Type |
| ------------------------------------------------------ | ----------- | -------------------------------------------------------------- | --------------------------------------------------------------------------------------- |
| [StartAction](method%5FStartAction.html) | POST | [OliveTin request object](start%5Faction.html#api-request-obj) | [Execution Tracking ID](start%5Faction.html#api-response-trackingid) |
| [StartActionByGet](method%5FStartActionByGet.html) | GET | [Action ID in the URL](start%5Faction.html#api-request-idurl) | [Execution Tracking ID](start%5Faction.html#api-response-trackingid) |
| [StartActionAndWait](method%5FStartActionAndWait.html) | POST | [OliveTin request object](start%5Faction.html#api-request-obj) | [Log Entry (waits for the action to finish)](start%5Faction.html#api-response-logentry) |
| [StartActionByGetAndWait](#) | GET | [Action ID in the URL](start%5Faction.html#api-request-idurl) | [Log Entry (waits for the action to finish)](start%5Faction.html#api-response-logentry) |
You can also browse these methods in the [OpenAPI/Swagger](htts://docs.olivetin.app/api/swagger/) docs if you prefer.
Misc API calls
====================
## [](#%5Fexample%5Fapi%5Fcall%5Fget%5Fthe%5Fdashboard%5Fbuttons%5Fcomponents)Example API call: Get the dashboard buttons ("components")
curl
```asciidoc
user@host: curl http://olivetinServer:1337/api/GetDashboardComponents
```
## [](#%5Fexample%5Fapi%5Fcall%5Freadyz%5Fhealthcheck)Example API call: readyz Healthcheck
This is useful for configuring healthchecks in docker containers, or on Kubernetes.
curl
```asciidoc
user@host: curl http://olivetinServer:1337/api/readyz
{"status": "ok"}
```
The response will always be "status: ok" to indicate that the API is up, or it will timeout.
Starting Actions from the API
====================
There are several variants of this API call available which might be easier for scripts (or humans) to work with!
There are 4 main methods to start an action in OliveTin, which can be used in scripts or other applications. These methods allow you to trigger actions either immediately or wait for them to complete, and they can be accessed via HTTP requests.
__Webhook/API reference table__
| Function | HTTP Method | Request Type (How to select an action) | Response Type |
| ---------------------------------------------------------------- | ----------- | ------------------------------------------- | -------------------------------------------------------------------- |
| [StartAction](method%5FStartAction.html) | POST | [OliveTin request object](#api-request-obj) | [Execution Tracking ID](#api-response-trackingid) |
| [StartActionByGet](method%5FStartActionByGet.html) | GET | [Action ID in the URL](#api-request-idurl) | [Execution Tracking ID](#api-response-trackingid) |
| [StartActionAndWait](method%5FStartActionAndWait.html) | POST | [OliveTin request object](#api-request-obj) | [Log Entry (waits for the action to finish)](#api-response-logentry) |
| [StartActionByGetAndWait](method%5FStartActionByGetAndWait.html) | GET | [Action ID in the URL](#api-request-idurl) | [Log Entry (waits for the action to finish)](#api-response-logentry) |
You can also browse these methods in the [OpenAPI/Swagger](htts://docs.olivetin.app/api/swagger/) docs if you prefer.
## [](#api-request-idurl)Request type: Action ID in the URL
Used by:
* [StartActionByGet](method%5FStartActionByGet.html)
* [StartActionByGetAndWait](method%5FStartActionByGetAndWait.html)
If you are trying to integrate OliveTin with your own scripts or processes, it’s probably easiest to start actions by using an ID directly in the URL, [see the example](#api-eg-startIdUrl).
## [](#api-request-obj)Request type: OliveTin request object
Used by:
* [StartAction](method%5FStartAction.html)
* [StartActionAndWait](method%5FStartActionAndWait.html)
OliveTin request object structure
```json
{
"actionId": "string",
"arguments": [
{
"name": "string",
"value": "string"
}
],
"uniqueTrackingId": "string"
}
```
To find your Action ID, and understand how Action IDs work, see the [Action ID](../action%5Fcustomization/ids.html) documentation
If you need more control over the execution, then the only other option is to submit a `OliveTin reqjest object`, which is just a very simple JSON structure like this;
```json
{
"actionId": "Generate cryptocurrency",
"arguments": [],
"uniqueTrackingId": "my-tracking-id",
}
```
More detailed examples can be seen below.
## [](#api-response-trackingid)Response type: Execution Tracking ID
Used by:
* [StartAction](method%5FStartAction.html)
* [StartActionByGet](method%5FStartActionByGet.html)
Example Execution Tracking ID response
```json
{"executionTrackingId":"5bb4860c-bbd0-4bc9-a7d6-42240551500c"}
```
## [](#api-response-logentry)Response type: LogEntry
Used by:
* [StartActionAndWait](method%5FStartActionAndWait.html)
* [StartActionByGetAndWait](method%5FStartActionByGetAndWait.html)
Example log entry
```json
{
"logEntry": {
"datetimeStarted": "2024-02-27 14:14:49",
"actionTitle": "Restart httpd on server1",
"stdout": "",
"stderr": "",
"timedOut": true,
"exitCode": -1,
"user": "",
"userClass": "",
"actionIcon": "🔄",
"tags": [
],
"executionTrackingId": "b04b1e90-d457-4158-b7dc-da9e81f21568",
"datetimeFinished": "2024-02-27 14:14:52",
"actionId": "restart_httpd",
"executionStarted": true,
"executionFinished": true,
"blocked": false
}
}
```
Environment variables
====================
All argument names and values are also passed as environment variables as well, which can be very useful when passing several arguments to a script, for example.
`config.yaml`
```yaml
actions:
- title: Print names of new files
shell: /opt/newfile.py
arguments:
- name: filename
type: unicode_identifier
- name: filesizebytes
type: unicode_identifier
- name: fileisdir
type: unicode_identifier
execOnFileCreatedInDir:
- /home/user/Downloads/
```
This is an example of a python script using the environment variables;
`/opt/newfile.py`
```python
#!/usr/bin/env python
import os
print(os.environ['OLIVETIN'])
print(os.environ['FILENAME'])
print(os.environ['FILESIZEBYTES'])
print(os.environ['FILEISDIR'])
```
## [](#execution-request-variables)Execution Request Variables
OliveTin injects two execution request variables into every action execution. They are available as template variables (e.g. in `shell`, `shellAfterCompleted`, or other template fields) and as environment variables passed to the process.
* `ot_username` — The username of the user who started the execution. In templates (version 3k) use `{{ .Arguments.ot_username }}`; in the process environment it is `OT_USERNAME`. For unauthenticated or automated runs this may be `guest`, `cron`, or similar, depending on how the action was triggered.
* `ot_executionTrackingId` — A unique identifier for this execution. In templates (version 3k) use `{{ .Arguments.ot_executionTrackingId }}`; in the process environment it is `OT_EXECUTIONTRACKINGID`. Useful for logging, correlating with the API or execution log, or idempotency in scripts.
In version 2k, the template syntax was `{{ ot_username }}` and `{{ ot_executionTrackingId }}` (without the `.Arguments.` prefix). Version 3k uses the `.Arguments.` form.
Example in a shell command (version 3k):
```yaml
shell: echo "Run by {{ .Arguments.ot_username }} (execution {{ .Arguments.ot_executionTrackingId }})"
```
Example in a script using environment variables:
```shell
#!/bin/sh
echo "Started by $OT_USERNAME with tracking id $OT_EXECUTIONTRACKINGID"
```
In [Execute after completion](../action%5Fexecution/aftercompletion.html) (`shellAfterCompleted`), the same variables are available as template variables (e.g. `{{ .Arguments.ot_username }}`, `{{ .Arguments.ot_executionTrackingId }}` in version 3k); user-defined argument values are not passed there.
## [](#olivetin-env-var)The OLIVETIN environment variable
OliveTin sets the environment variable `OLIVETIN` to `1` for every action it runs. Scripts can check this variable to detect whether they are running inside OliveTin (for example, to adjust logging, skip interactive prompts, or enable OliveTin-specific behavior).
Example: detect OliveTin in a shell script
```shell
#!/bin/sh
if [ "$OLIVETIN" = "1" ]; then
echo "Running under OliveTin"
else
echo "Running outside OliveTin"
fi
```
## [](#%5Fusing%5Fprocess%5Fenvironment%5Fin%5Ftemplates)Using process environment in templates
To use the **process** environment (the environment OliveTin was started with) inside action template fields such as `shell` or `shellAfterCompleted`, use the `.Env` template variable: `{{ .Env.VAR_NAME }}`. This substitutes the value at execution time. See [Using .Env in template replacements](../advanced%5Fconfiguration/config%5Fenvs.html#using-env-in-template-replacements) for details and examples.
## [](#%5Fnotes)Notes
1. Argument names are converted to uppercase for environment variables, `name: filename` becomes `FILENAME`.
2. OliveTin sets `OLIVETIN=1` in the process environment for every action; see [The OLIVETIN environment variable](#olivetin-env-var) above.
3. The execution request variables are exposed as `OT_USERNAME` and `OT_EXECUTIONTRACKINGID` in the process environment; see [Execution Request Variables](#execution-request-variables) above.
4. The environment variables are passed into the execution context which uses a shell (/bin/sh on Linux), so it is also possible to use them with the $ notation in the `shell` line, like this; `shell: echo $FILENAME` for example.
Input: Textbox
====================
Many times you need to customize how an action/shell command is run, with arguments. For example;
```asciidoc
echo "Hello world"
```
In the example above, `Hello world` is an argument passed to the `echo` command. OliveTin allows you to add pre-defined, and free-text arguments to commands in this way. Below is the OliveTin version of the `echo` command shown above;
`config.yaml`
```yaml
actions:
- title: echo a message
icon: smile
shell: echo {{ message }}
arguments:
- name: message
default: Hello World
type: ascii_sentence
actions:
- title: Print a message
shell: echo {{ message }}
arguments:
- name: message
description: The message you want to print out on the shell.
title: Your Message
default: Hello World
type: ascii_sentence
```
This will give you a normal button, like this;

However, when you click on it, you’ll get a prompt to enter arguments, like this;
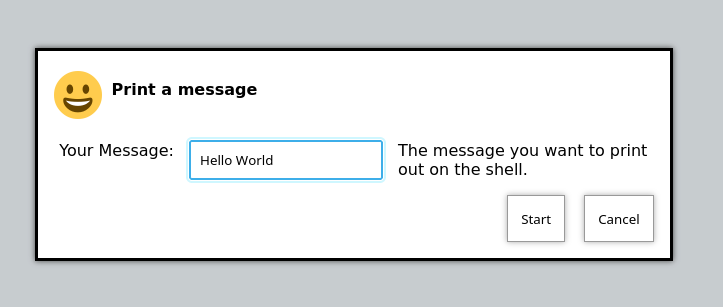
You’ll see that the type is set to `ascii_sentence`. This applies fairly safe input validation to arguments, so that only a-z, 0-9, spaces and .'s are allowed.
When you start the action, and it’s finished, go to the "logs" view to view the output of the command we’ve just run.
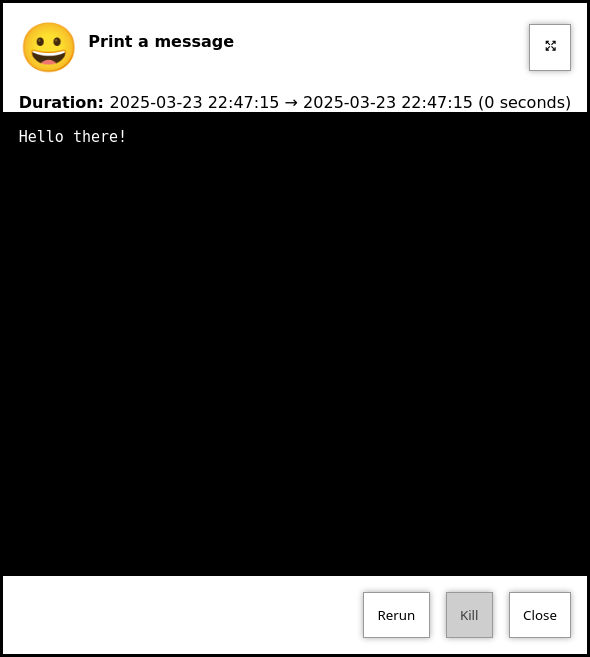
Input: Checkbox/Boolean
====================
The `checkbox` type argument is a simple checkbox that can be used to toggle a boolean value. It can be especially useful to pass flags to your actions.
```yaml
actions:
- title: remove files
shell: rm {{ useTheForce }} /tmp/Downloads/
arguments:
- title: Use rm -rf?
name: useTheForce
type: checkbox
choices:
- title: 1
value: "-rf"
- title: 0
value: ""
```
Input: Confirmation
====================
The `confirmation` type argument is a special argument type, which simply disables the "Start" button until a checkbox is ticked. This can be useful if you have an action with no other arguments, but you want to prevent accidental button-clicks starting the action.
```yaml
actions:
- title: Delete old backups
icon: ashtonished
shell: rm -rf /opt/oldBackups/
arguments:
- type: confirmation
title: Are you sure?!
```
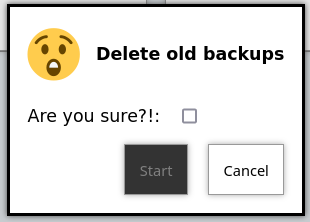
Notice in the webui the "start" button is disabled.
Input: DateTime
====================
OliveTin supports datetime pickers - note that these do NOT add your timezone, so it up to your scripts / commands to interpret which timezone is being used.
`config.yaml`
```yaml
actions:
- title: Print your favourite datetime!
shell: echo {{ my_favourite_time }}
arguments:
- type: datetime
title: My Favourite DateTime
```
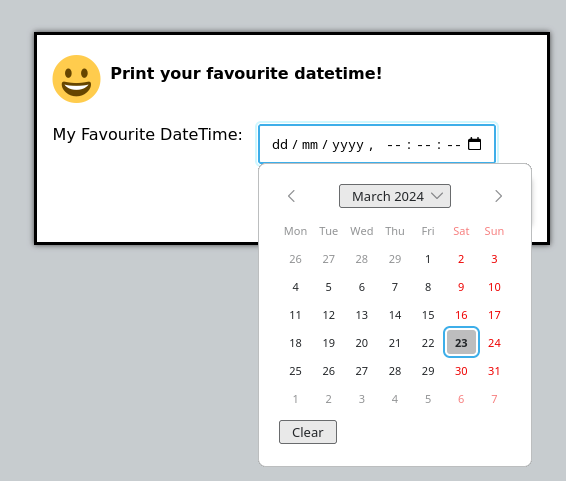
## [](#%5Fformat%5Fvalidation)Format & Validation
| | The OliveTin server does try to parse and validate the date on the server side to prevent dangerous input, but there is no validation in the browser, beyond what your browser might do to prevent you from picking an invalid date. **This is safe**, as what really matters is what the server allows to be passed to be executed - and that is checked. |
| ------------------------------------------------------------------------------------------------------------------------------------------------------------------------------------------------------------------------------------------------------------------------------------------------------------------------------------------------------------- |
At the time of writing, it is not yet possible to specify only a date, or only a time, or change the date / time format.
## [](#%5Frejecting%5Fempty%5Fvalues%5Fnull)Rejecting empty values (null)
```yaml
actions:
- shell: echo "Hello {{ name }}!"
arguments:
- name: name
rejectNull: true`
```
Input: Dropdowns
====================
Predefined choices are normally the safest type of arguments, because users are limited to only enter values that you specify.
```yaml
actions:
- title: Print a message
icon: smile
shell: echo "{{ message }}"
arguments:
- name: message
description: The message you want to print out.
choices:
- title: Hello
value: Hello there!
- title: Goodbye
value: Aww, goodbye. :-(
```
Note that when predefined choices are used, the argument type is ignored.
This is what it looks like in the web interface;
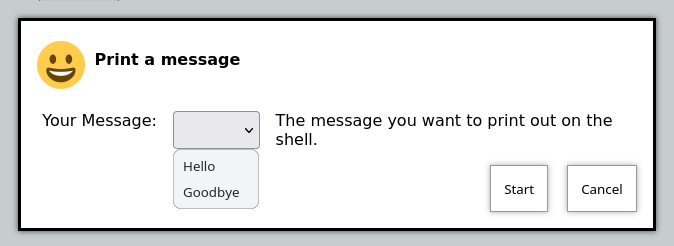
Then finally, when you execute this command, it would look something like this (remember that this is just a basic "echo" command).
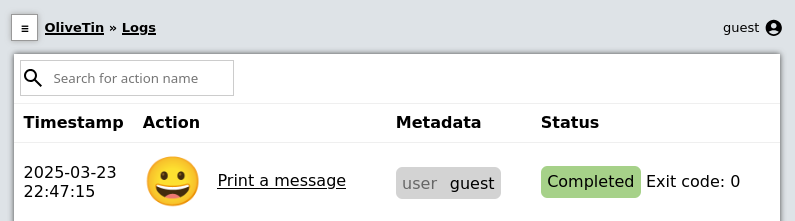
In the logs, you can then click on the log entry link to open the results;

## [](#args-dropdown-entities)Using Entities in Dropdowns
Dropdowns can also be populated with a list of entities, like this;
`config.yaml`
```yaml
actions:
- title: restart container
shell: 'docker restart {{ containerToRestart }}'
arguments:
- name: containerToRestart
entity: container
title: 'Select Container'
choices:
- value: '{{ container.Names }}'
title: '{{ container.Names }}'
entities:
- file: entities/containers.json
name: container
```
This is what it looks like in the web interface;
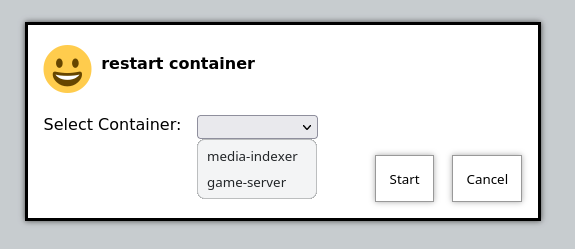
## [](#%5Frejecting%5Fempty%5Fvalues%5Fnull)Rejecting empty values (null)
```yaml
actions:
- shell: echo "Hello {{ name }}!"
arguments:
- name: name
rejectNull: true`
```
## [](#%5Fdefault%5Fvalues)Default values
Dropdown arguments can also have default values. This is done by adding a `default` key to the argument definition.
`config.yaml`
```yaml
actions:
- title: "Print your favorite movie"
shell: echo '{{ movie }} is amazing'
arguments:
- name: movie
choices:
- value: "Star Wars"
- value: "Star Trek"
- value: "The Matrix"
default: "Star Trek"
```
Input: Textarea
====================
OliveTin supports multi-line text inputs, which can be useful for longer messages or scripts. You should set your argument `type` to `raw_string_multiline` to use these.
As the name implies, textareas are raw, and are NOT validated by any regex.
`config.yaml`
```yaml
actions:
- title: Save text to file
shell: echo "$CONTENT" > file
arguments:
- type: raw_string_multiline
name: content
```
This renders like this;
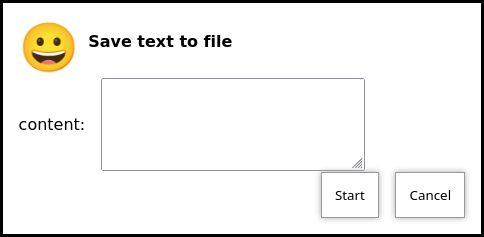
Introduction to Arguments
====================
Actions and commands that OliveTin runs, without arguments, are generally quite safe - only that command can be run, without modifications. However, many users need the flexibility to set options on that command - normally called command line arguments. In OliveTin, arguments are defined in a shell commands like `echo {{ message }}`, with a bit of extra configuration.
Examples of valid argument names are `{{ personName }}`, `{{ customer_number }}` and `{{ ISBN11_code }}`.
* a-z (case insensitive)
* \_ is allowed
* numbers are allowed (argument names can also start with numbers)
* all other characters are invalid for argument names.
## [](#%5Fwhats%5Fnext)What’s Next?
Now that you understand how arguments work, explore the different argument types and features:
* [Argument types](types.html) \- Learn about different input types (text, dropdown, checkbox, etc.)
* [Argument safety](safety.html) \- Understand how OliveTin keeps arguments safe
* [Argument suggestions](suggestions.html) \- Add dynamic suggestions to help users
* [Input validation with regex](regex.html) \- Validate user input with regular expressions
* [Environment variables](env.html) \- Use arguments to set environment variables
* [See examples](../action%5Fexamples/intro.html) \- View real-world examples using arguments
Password
====================
Sometimes you want to mask the input you pass, and a password field is useful for this.
| | Passwords are passed to the OliveTin server in cleartext (unless you’re using HTTPS), and are just treated as a string on the server side. |
| --------------------------------------------------------------------------------------------------------------------------------------------- |
`config.yaml`
```yaml
actions:
- title: echo a message
icon: smile
shell: echo {{ my_password }}
arguments:
- name: my_password
type: password
```
Custom regex
====================
OliveTin version 2024.02.081 and above support custom regex patterns for argument types. Here is an example to validate against any 3 letter word;
| | The regex pattern should be enclosed in single quotes, otherwise you will probably get a YAML error when starting OliveTin. |
| ------------------------------------------------------------------------------------------------------------------------------ |
`config.yaml`
```yaml
actions:
- title: echo a message
icon: smile
shell: echo "{{ message }}"
arguments:
- name: message
type: 'regex:^\w\w\w$'
```
The site is a good place to test your regex patterns. OliveTin checks your regex 2 times;
1. **Regex in the browser** (which probably uses PCRE or Perl Compatible Regular Expressions) - this is so that the browser can give you a nice validation message. This is ignored when it reaches the server though, or if you are using the API directly. Select "PCRE" on the regex101 site when testing.
2. **Regex on the server** (which uses Golang’s regex engine) - this is the one that actually validates the input. Select "Golang" on the regex101 site when testing.
You cannot specify different regex patterns for the browser and server. The regex pattern you create will need to be compatible with both types of regex engine.
Important Safety Warning
====================
Before you continue, it’s important to read through this safety warning.
OliveTin supports customization of command line arguments, but there is a element of risk. For example, if your command is `echo {{ message }}`, and you allow your users to set `{{ message }}` to the value `"" && rm -rf /` , then you’ve got real problems. For this reason, OliveTin tries to give you useful ways to restrict what users are allowed to enter - with **argument types**.
However, here are some important rules to try and follow with argument types;
* Use the most restrictive argument types when possible - `ascii` and `int`. This will stop users entering argument values that might be used dangerously, but it’s not foolproof. For example, if you have a command like `createSnapshot.sh --count {{ snapshotCount }}`, and set `snapshotCount` to `int`, then at least users will only be able to enter integer numbers. However, nothing stops them entering crazy values like 9999.
* Don’t give access to actions with arguments to people you don’t trust. Please don’t ever put your OliveTin install on the public internet!
Suggestions
====================
Argument inputs can also have "suggested" values, which can make it quicker to type commonly used options. The way that these are displayed will vary depending on your browser, as they are implemented as a modern HTML5 browser feature called "datalist".
Suggestions are configured like this;
Configuration example of input suggestions
```yaml
actions:
- title: Restart Docker Container
icon: restart
shell: docker restart {{ container }}
arguments:
- name: container
title: Container name
suggestions:
- plex:
- graefik:
- grafana:
- wifi-controller: WiFi Controller
- firewall-controller: Firewall Controller
```
In the examples above, there are 5 suggestions. The first 3 suggestions contain a suggestion with a blank title. The last 2 suggestions contain a human readable title (eg: `wifi-controller` is the suggestion, and `WiFi Controller` is the title).
| | suggestions: is a yaml **map**, not a **list**. If you leave the title empty you must still end the suggestion with a ":". |
| ----------------------------------------------------------------------------------------------------------------------------- |
## [](#%5Fexamples)Examples
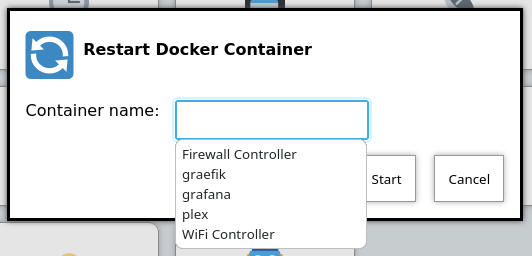
Figure 1\. Screenshot of input suggestions with Firefox on Linux.
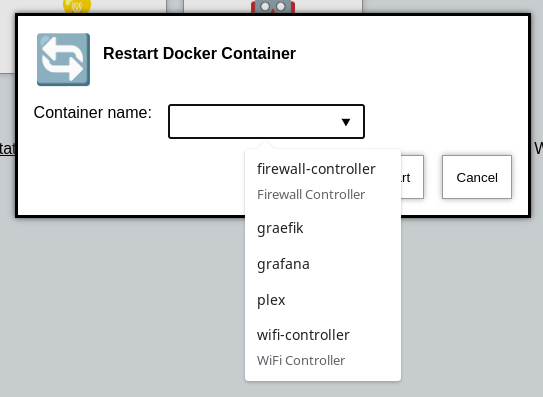
Figure 2\. Screenshot of input suggestions with Chrome on Linux.
## [](#suggestions-browser-key)Browser-Stored Suggestions
In addition to static suggestions defined in your configuration, OliveTin can remember values that users have previously entered and offer them as suggestions for future use. This is enabled using the `suggestionsBrowserKey` property.
When a user submits an action with a `suggestionsBrowserKey` configured, the entered value is saved in the browser’s local storage. The next time the user opens the same form (or any form with the same key), those previously-used values appear as suggestions alongside any static suggestions.
### [](#%5Fbasic%5Fusage)Basic Usage
```yaml
actions:
- title: SSH to Server
shell: ssh {{ hostname }}
arguments:
- name: hostname
title: Hostname
description: Server to connect to
suggestionsBrowserKey: ssh-hosts
```
With this configuration:
1. The first time a user runs this action and enters `server1.example.com`, that value is saved
2. The next time they open the action, `server1.example.com` appears as a suggestion
3. Each new unique value they enter is added to the suggestions list
### [](#%5Fsharing%5Fsuggestions%5Facross%5Farguments)Sharing Suggestions Across Arguments
Multiple arguments can share the same `suggestionsBrowserKey`, allowing suggestions to be reused across different actions or arguments. This is useful when the same type of value is used in multiple places.
```yaml
actions:
- title: Ping Host
shell: ping -c 4 {{ host }}
arguments:
- name: host
title: Hostname
suggestionsBrowserKey: network-hosts
- title: SSH to Host
shell: ssh {{ server }}
arguments:
- name: server
title: Server
suggestionsBrowserKey: network-hosts
- title: Traceroute
shell: traceroute {{ destination }}
arguments:
- name: destination
title: Destination
suggestionsBrowserKey: network-hosts
```
In this example, all three actions share the `network-hosts` key. If a user enters `192.168.1.100` in the Ping action, that value will also appear as a suggestion in the SSH and Traceroute actions.
### [](#%5Fcombining%5Fstatic%5Fand%5Fbrowser%5Fsuggestions)Combining Static and Browser Suggestions
You can use both static `suggestions` and `suggestionsBrowserKey` together. Both sets of suggestions will be displayed to the user:
```yaml
actions:
- title: Deploy to Environment
shell: /opt/scripts/deploy.sh {{ environment }}
arguments:
- name: environment
title: Environment
suggestions:
production: Production Server
staging: Staging Server
development: Development Server
suggestionsBrowserKey: deploy-environments
```
This gives users quick access to the predefined environments while also remembering any custom environments they’ve deployed to.
### [](#%5Fbehavior%5Fnotes)Behavior Notes
* **Password and sensitive fields**: Values from `password`, `checkbox`, and `confirmation` type arguments are never saved to browser storage
* **Empty values**: Empty or blank values are not saved as suggestions
* **Local storage**: Suggestions are stored in the browser’s `localStorage` under keys prefixed with `olivetin-suggestions-`
* **Per-browser**: Since suggestions use browser local storage, they are specific to each browser and device - they don’t sync across devices or browsers
* **Clearing suggestions**: Users can clear their saved suggestions by clearing their browser’s local storage for the OliveTin site
## [](#%5Fbrowser%5Fsupport)Browser Support
`datalist` is widely supported now-a-days, but Firefox on Android notably lacks support; . See the upstream bug here; .
Argument types
====================
A full list of argument types are below;
__Argument types reference table__
| Type | Rendered as | Allowed values |
| ---------------------------- | ----------------------------------------- | -------------------------------------------------------------------------------------------------------------------------------------------------------------------------------------------------------------------------------------------------------------------------- |
| (default) | [Textbox](input.html) | If a type: is not set, and choices: is empty, then ascii will be used, and a warning will be logged. It is recommended that you set the type explicitly, rather than relying on defaults. |
| ascii | [Textbox](input.html) | a-z (case insensitive), 0-9, but no spaces or punctuation |
| ascii\_identifier | [Textbox](input.html) | Like a DNS name, a-Z (case insensitive), 0-9, \-, ., and \_. |
| shell\_safe\_identifier | [Textbox](input.html) | Like an ascii identifier, but also allows @ and +. Useful for shell-safe usernames and email-style identifiers. |
| ascii\_sentence | [Textbox](input.html) | a-z (case insensitive), 0-9, with spaces, . and ,. |
| unicode\_identifier | [Textbox](input.html) | Like an ascii identifier, but allows unicode characters. This is useful for languages that use non-ascii characters, such as Chinese, Japanese, etc. |
| email | [Textbox](input.html) | An email address. |
| password | [Password](password.html) | A password, which is hidden when typed. |
| very\_dangerous\_raw\_string | [Textbox](input.html) | Anything. This is **incredibly dangerous**, as effectively people can type anything they like, including executing additional commands beyond what you specify. Absolutely should not be used unless your OliveTin instance can only be used by people you trust entirely. |
| regex:… | [Textbox](input.html) | Version 2024.03.081 and above support custom regex patterns. See [Custom regex arguments](regex.html). |
| int | [Textbox](input.html) | Any number, made up of the characters 0 to 9\. Negative numbers are not supported. |
| url | [Textbox](input.html) | A URL (e.g. ). Accepts any scheme, including file:// and ftp://. See warning below. |
| confirmation | [Confirmation](input%5Fconfirmation.html) | A "hidden" argument that makes the action require a confirmation before launching. |
| n/a, but choices used | [Dropdown](input%5Fdropdown.html) | A "hidden" argument that makes the action require a confirmation before launching. |
| raw\_string\_multiline | [Textarea](input%5Ftextarea.html) | Anything. This is **dangerous**, as effectively people can type anything they like |
| | Security risk: URL argument type The url argument type does not restrict the URL scheme. Users can enter file:// (local filesystem) URLs, ftp://, or other schemes. If the argument value is passed directly to curl, wget, or similar tools, a malicious or mistaken input could read local files, access internal services, or trigger unwanted network requests. If your action might be used by untrusted users, validate or filter the URL in your script (e.g. allow only https://) before using the value. |
| -------------------------------------------------------------------------------------------------------------------------------------------------------------------------------------------------------------------------------------------------------------------------------------------------------------------------------------------------------------------------------------------------------------------------------------------------------------------------------------------------------------------- |
Fieldsets
====================
It is possible to group actions together in a "group", which is not a directory, but is called a "fieldset". This is an example of a fieldset that contains two [Folders](3-folders.html).

Fieldsets are defined under a [Dashboards](intro.html) in your config.yaml.
`config.yaml`
```yaml
dashboards:
- title: My First Dashboard
contents:
- title: Fieldset 1
type: fieldset
contents: []
- title: Fieldset 2
type: fieldset
contents: []
```
Fieldsets are also generated for you when you use [Entities](../entities/intro.html).
`config.yaml`
```yaml
dashboards:
- title: My First Dashboard
contents:
- title: Fieldset 1
type: fieldset
entity: server
contents:
- title: Start {{ server.Name }}
- title: Shutdown {{ server.Name }}
```
Folders (Directories)
====================
Folders (Directories) are a good way to group up actions in the same way that you would organize files on your computer into directories.
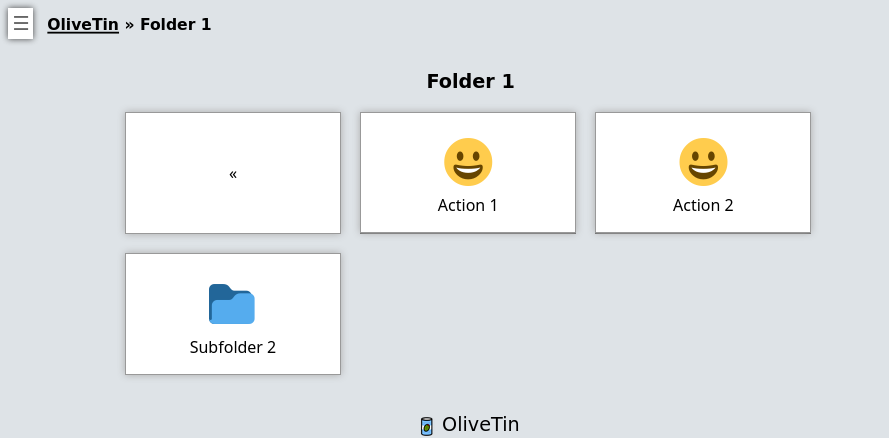
You must first create a dashboard to use a directory, and then you "reference" actions that you want in that folder based on the action name. Anything without a "contents" property is treated as an action.
Let’s look at the example below with 4 actions, 2 top level folders and 1 subfolder.
`config.yaml`
```yaml
actions:
- title: Action 1
shell: echo "action1"
- title: Action 2
shell: echo "action2"
- title: Action 3
shell: echo "action3"
- title: Action 4
shell: echo "action4"
dashboards:
- title: My First Dashboard
contents:
- title: Fieldset 1
type: fieldset
contents:
- title: Folder 1
contents:
- title: Action 1
- title: Action 2
- title: Subfolder 2
contents:
- title: Action 3
- title: Folder 2
contents:
- title: Action 4
```
Displays
====================
Displays are a way of displaying text, values, variables and similar on a dashboard.
They are rendered as just a simple box, that shown alongside actions. You can add arbitary HTML to a display, which makes it useful for showing links, etc.
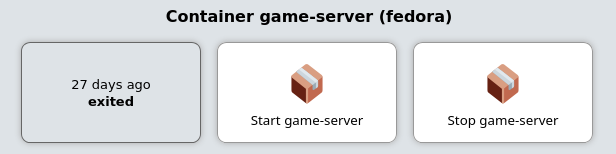
`config.yaml`
```yaml
dashboards:
# This the second dashboard.
- title: My Containers
contents:
# This is a fieldset, which is a way of dashboard items together actions together.
- title: Container {{ container.Names }}
entity: container
type: fieldset
contents:
# This is a display
- type: display
title: |
{{ container.Names }}
'
shell: docker ps
```
### [](#%5Fsaving%5Fand%5Fserving%5Ficons%5Ffor%5Foffline%5Fuse)Saving and serving icons for "offline" use
Sometimes you might want to store images to use as icons, with your installation of OliveTin. This can be useful when your installation is meant to be offline, or disconnected from the internet. This is easily done.
OliveTin will try to create a directory called `custom-webui` in the same directory as the `config.yaml` file. If this directory exists, OliveTin will serve files from this directory as if they were in the standard webui directory, in the same path as your OliveTin web UI.
Ideally, put your icons in a directory like `/custom-webui/icons/`. If this directory contained a file called "mrgreen.gif", then it would be served at ``. Below is a picture of Mr Green. Feel free to save his likeness and awesomeness for yourself, for future awesome offline usage.

Figure 2\. Mr Green, the original awesome smily.
In your OliveTin config, customize your command again using HTML, like this;
```asciidoc
actions:
- title: Mr Green
icon: ''
shell: echo "I don't like the word 'emoji' "
```
This will result in a locally hosted icon that will work offline, that looks like this;

Action IDs
====================
OliveTin actions do not require IDs to be specified in the `config.yaml`, as most users of OliveTin start off with the Web Interface. However, if you want to use OliveTin actions via the [API](../api/intro.html), then you will need to set your action IDs manually.
| | OliveTin will automatically generate a new ID for actions every time it starts up, for actions that don’t have an id: property set. |
| -------------------------------------------------------------------------------------------------------------------------------------- |
```yaml
actions:
- title: Start the reactor
id: start_reactor
shell: /bin/startReactor.sh
```
Action customisation
====================
Actions in OliveTin can be customized in many ways to fit your specific needs. This section covers various customization options that allow you to control how actions behave, appear, and execute.
You can customize actions by:
* Setting icons to make actions visually distinct
* Configuring timeouts to control how long actions can run
* Assigning actions to specific users or groups
* Controlling concurrency to limit how many instances of an action can run simultaneously
* Setting rate limits to prevent actions from being executed too frequently
* Using enabled expressions to dynamically enable/disable actions based on entity state
* Assigning unique IDs for API access
* Configuring log saving for audit trails
* Setting popup behaviors when actions start
See the links in this section for detailed information on each customization option.
## [](#%5Fwhats%5Fnext)What’s Next?
Explore specific customization options:
* [Customize icons](icons.html) \- Set visual icons for your actions
* [Configure timeouts](timeouts.html) \- Control how long actions can run
* [Assign to users](users.html) \- Restrict actions to specific users
* [Control concurrency](concurrency.html) \- Limit simultaneous executions
* [Set rate limits](ratelimiting.html) \- Prevent actions from running too frequently
* [Enabled expressions](enabledExpression.html) \- Dynamically enable/disable actions based on entity state
* [Configure popups](popuponstart.html) \- Control popup behavior when actions start
* [Save action logs](savelogs.html) \- Configure log retention for actions
* [Set action IDs](ids.html) \- Assign IDs for API access
Popup on Start (Execution Feedback)
====================
OliveTin now has several options to control "execution feedback" when actions are started. This can be controlled on a per-action basis, using the `popupOnStart` configuration option.
You can also set the default for OliveTin using the `defaultPopupOnStart` configuration option.
## [](#%5Fbig%5Fflashy%5Fbuttons%5Fdefault)Big Flashy Buttons (default)
`config.yaml`
```yaml
actions:
- title: Ping the Internet
popupOnStart: default
```
This will also be the option that is used if no other values match.

## [](#%5Fexecution%5Fdialog%5Foutput%5Fonly)Execution Dialog (Output Only)
This can be useful for just displaying the output of a command, without too many additional details like the start time, end time, etc.
`config.yaml`
```yaml
actions:
- title: Check disk space
popupOnStart: execution-dialog-stdout-only
```
| | OliveTin used to separate out the Standard Output (stdout) and Standard Error (stderr) into two separate output streams. This made no sense, as lines would effectively be separated. This behavior has change to now display stdout and stderr in the same output stream. However, the configuration option execution-dialog-stdout-only was not renamed - and now it includes stderr as well. |
| -------------------------------------------------------------------------------------------------------------------------------------------------------------------------------------------------------------------------------------------------------------------------------------------------------------------------------------------------------------------------------------------------- |

## [](#%5Fexecution%5Fdialog)Execution Dialog
The `execution-dialog` option for `popupOnStart` is simialr to the above `execution-dialog-stdout-only`, but it includes the start time, end time, exit code and the duration of time it took for the command to execute.
`config.yaml`
```yaml
actions:
- title: Check dmesg logs
popupOnStart: execution-dialog
```

Figure 1\. Example of `popupOnStart: execution-dialog`
## [](#%5Fexecution%5Fbuttons)Execution Buttons
This mode of `popupOnStart` will create a new button for each individual execution. This can be useful for actions that are executed again and again.
The text of the button (eg, "0s" in the screenshot below), is the time it took to execute the action in seconds.
`config.yaml`
```yaml
actions:
- title: date
popupOnStart: execution-button
```

## [](#%5Faction%5Fexecution%5Fhistory)Action execution history
The `history` option opens the action details page for that binding when the execution starts, so you can see past runs and status for the same action.
`config.yaml`
```yaml
actions:
- title: Long-running job
popupOnStart: history
```
Rate limiting
====================
By default, OliveTin allows you to execute actions as fast as you can click the button. This is fine if you are running OliveTin with trusted users in a trusted environment, but otherwise you may want to rate limit actions.
Rate limiting is implemented like this;
`config.yaml`
```yaml
actions:
- title: date
shell: date
icon: clock
maxRate:
- limit: 3
duration: 5m
```
If you try to execute `date` more than 3 times in 5 minutes, you will get a log message in the UI that looks like this;

Additionally, OliveTin will also output this to it’s process log;
```asciidoc
INFO Blocked from executing. This action has run 3 out of 3 allowed times in the last 5m. actionTitle="date"
```
Saving logs
====================
By default, OliveTin only keeps logs in memory, meaning that if you restart OliveTin your logs will be lost. For some use cases this is acceptable, but you can configure OliveTin to save logs for you.
You can configure the global setting for saving logs, or override it on a per-action basis;
`config.yaml`
```yaml
saveLogs:
resultsDirectory: /var/log/OliveTin/results/
outputDirectory: /var/log/OliveTin/output/
actions:
# This will use the default `saveLogs` setting.
- title: date
shell: date
# This will override the default `saveLogs` setting.
- title: date2
shell: date
saveLogs:
resultsDirectory: /logs/
outputDirectory: /logs/
```
From the above example, you can see there There are two types of logs - **results (.yaml)** and **output (.log)**
* **Results (.yaml)** \- this captures almost everything that OliveTin knows about the action and looks like this.
Example results - date.1714333384.5e2dc9e5-b6b3-445b-bff9-c2082b0bbbb2.yaml
```yaml
datetimestarted: 2024-04-28T20:43:04.426754136+01:00
datetimefinished: 2024-04-28T20:43:04.436596926+01:00
stdout: |
Sun 28 Apr 20:43:04 BST 2024
stderr: ""
timedout: false
blocked: false
exitcode: 0
tags: []
executionstarted: true
executionfinished: true
executiontrackingid: 5e2dc9e5-b6b3-445b-bff9-c2082b0bbbb2
process:
pid: 4168638
actiontitle: date
actionicon: '😀'
actionid: d3cf6e25-8bab-432d-b4f9-e6f531b2b67b
```
* **output (.log)** \- this just captures the output - stdout, stderr from an execution,
Example output - date.1714333384.5e2dc9e5-b6b3-445b-bff9-c2082b0bbbb2.log
```asciidoc
Sun 28 Apr 20:43:04 BST 2024
```
Timeouts
====================
By default, actions in OliveTin have a **3 second timeout** for all actions. This means that OliveTin will kill the action if it is running for longer than the timeout, which can be useful to stop commands running for a long time.
You can set your own timeouts like this;
```yaml
actions:
- title: My special action
shell: sleep 5
timeout: 10
```
| | Allowing commands to run for infinity just doesn’t seem to make sense, or at least is probably a bad case for OliveTin. Therefore, if you set a timeout**less than 3 seconds**, OliveTin will overwrite your Timeout and default to 3 seconds. If you think you have a use case where a shorter (or infinite) timeout makes sense, please open an issue and let’s discuss. |
| ----------------------------------------------------------------------------------------------------------------------------------------------------------------------------------------------------------------------------------------------------------------------------------------------------------------------------------------------------------------------------- |
## [](#%5Fcheck%5Fthe%5Flogs)Check the logs
If a action really does "time out", it will show in the logs with "(timed out)" next to the exist code;

Run as different users
====================
OliveTin does not **need** to run as root. It does not request any special permissions from the operating system that require root (as long as you run on ports above 1024, and it can read/write it’s configuration). So, you can run as any non-root user if you wish.
However, it is very convenient to run as root, as many users will need to run actions and jobs that do require root permissions.
There are no ways in OliveTin to specify which user runs an action, because the Linux OS has several great ways to do this already, and adding support for it in OliveTin just adds bloat when there are perfectly good ways that already exist.
## [](#%5Feg%5Fusing%5Fsudo)EG: Using sudo;
```asciidoc
actions:
- title: Run echo as a different user
shell: sudo -u bob echo "I am Bob."
```
If you are worried about security, you could run OliveTin as a non-privileged user, and use sudo rules to control what it can and cannot do.
Ansible Playbooks
====================
| Installation type | Difficulty to do this |
| -------------------------------- | --------------------------------------------------------------------------------------------------------- |
| Running as a **Systemd service** | Easy |
| Running in a **container** | Install the \`ansible\` package in your [OliveTin container](../reference/containerInstallPackages.html). |
## [](#%5Fexample%5Fconfig%5Fyaml)Example config.yaml
Many users use OliveTin to easily execute Ansible playbooks, somtimes as a simple alternative to AWX.
Run an Ansible Playbook
```yaml
actions:
- title: Run Ansible Playbook
icon: "🇦"
shell: ansible-playbook -i /etc/hosts /root/myRepo/myPlaybook.yaml
timeout: 120
```
You probably want to set the [timeout](../action%5Fcustomization/timeouts.html) to more than the default 3 seconds.
Containers - start/stop
====================
| | There is a complete example of how to setup a [container control panel](../solutions/container-control-panel/index.html) in the solutions section. |
| ----------------------------------------------------------------------------------------------------------------------------------------------------- |
| Installation type | Difficulty to do this |
| -------------------------------- | ------------------------ |
| Running as a **Systemd service** | Easy |
| Running in a **container** | Setup needed - see below |
## [](#%5Fexample%5Fconfig%5Fyaml)Example config.yaml
actions:
- title: Stop Plex
shell: docker stop plex
- title: Start plex
shell: docker start plex
## [](#%5Fsetup%5Fif%5Frunning%5Finside%5Fa%5Fcontainer)Setup if running inside a container
You can control other containers, when running OliveTin inside a container itself, however you need to do some extra setup when creating the OliveTin container.
### [](#%5Fensure%5Fyour%5Fcontainer%5Fhas%5Fpermissions%5Fto%5Fcontrol%5Fdocker)Ensure your container has permissions to control docker
You have two alternatives to allow OliveTin (running inside a container) to talk to the Docker daemon through the bind-mounted socket. Pick one:
#### [](#%5Foption%5F1%5Fuse%5Fprivileged%5Fsimplest)Option 1 — Use `--privileged` (simplest)
| | Simplest for most users. Podman does not have this requirement. |
| ------------------------------------------------------------------ |
* Run the container with `--privileged` and as `root` (eg `--user root`).
* This avoids user/group permission issues on `/var/run/docker.sock`.
If you are getting "permission denied" errors it is probably because OliveTin runs as user UID 1000 by default, which is not allowed by your docker host. Running with `--user root` under `--privileged` resolves this quickly. Note that [PUID and PGID variables will not work](../troubleshooting/puid-pgid.html).
#### [](#%5Foption%5F2%5Frun%5Fas%5Fnon%5Froot%5Fin%5Fthe%5Fhost%5Fdocker%5Fgroup%5Fno%5Fprivileged)Option 2 — Run as non-root in the host `docker` group (no `--privileged`)
Use the standard Docker guidance to manage Docker as a non-root user (becoming a member of the `docker` group) and match the group’s GID inside the container so the process can access the socket permissions.
* Docs: [Manage Docker as a non-root user](https://docs.docker.com/engine/install/linux-postinstall/#manage-docker-as-a-non-root-user)
* Find the `docker` group GID on the host, for example using `getent group docker`.
* Run the container with your user UID and the `docker` group GID, and bind-mount the socket. Using Compose:
docker-compose.yml
```yaml
services:
olivetin:
container_name: olivetin
image: jamesread/olivetin
user: ${UID}:${docker_group_id}
volumes:
- /var/run/docker.sock:/var/run/docker.sock
```
Where `UID` and `docker_group_id` are provided via your shell environment or a `.env` file next to your Compose file, for example:
env
```bash
UID=1000
docker_group_id=995
```
This allows you to run the container as a non-root user, while still allowing access to `/var/run/docker.sock`.
### [](#%5Fpass%5Fthe%5Fdocker%5Fsocket%5Finto%5Fthe%5Fcontainer)Pass the docker socket into the container
1. Pass `/var/run/docker.sock` as a bind mount to the container when creating it, eg:
```asciidoc
docker create --privileged --user root -v /var/run/docker.sock:/var/run/docker.sock ...additional args here...
```
Or, using the `docker run` syntax;
```asciidoc
docker run --privileged --user root -v /var/run/docker.sock:/var/run/docker.sock --name OliveTin jamesread/olivetin
```
2. The official x86\_64 docker container comes with the `docker` client pre-installed. If you are using `arm` or and `arm64` container, you will need to add Docker yourself.
[How to install additional packages in the container](../reference/containerInstallPackages.html)
| | The reason that the arm and arm64 containers do not include docker, is that when these images are cross-compiled at build time, it takes FOREVER because we have to emulate arm. |
| ----------------------------------------------------------------------------------------------------------------------------------------------------------------------------------- |
After you have passed the socket into the container (and optionally installed docker), you should be able to setup docker actions like it’s shown in the example [above](#example-control-containers).
Using the Docker socket proxy
====================
The OliveTin container comes with the official docker CLI pre-installed, as well as the compose plugin. This is because OliveTin is very often used to start and stop containers.
You can choose to directly bind-mount the docker control socket into OliveTin, or optionally use a docker socket proxy host if you feel you need more security. You can use a docker socket proxy as an additional security measure and as an alternative to mounting the docker socket directly.
Most people will want to add the docker socket proxy into the same compose file that they are running OliveTin from;
docker-compose.yaml
```yaml
services:
olivetin:
container_name: olivetin
image: jamesread/olivetin
...
socket-proxy:
image: lscr.io/linuxserver/socket-proxy:latest
container_name: socket-proxy
environment:
- ALLOW_START=1 #optional
- ALLOW_STOP=1 #optional
...
volumes:
- /var/run/docker.sock:/var/run/docker.sock:ro
```
You can find all the documentation for all the socket-proxy options here on the [LinuxServer.io socket-proxy page](https://github.com/linuxserver/docker-socket-proxy).
Assuming your docker socket proxy is running as `socket-proxy` running on port 1028;
OliveTin config.yaml
```yaml
actions:
- title: Stop container
shell: DOCKER_HOST=socket-proxy:1028 docker stop mycontainer
```
Action Examples
====================
This section provides practical examples of how to configure actions in OliveTin for common use cases. These examples demonstrate real-world scenarios and can serve as starting points for your own configurations.
The examples cover:
* Container management (starting, stopping, and managing containers)
* Systemd service control
* Network utilities like ping
* Remote execution via SSH
* PowerShell commands for Windows environments
* Integration with automation tools like Ansible
Each example includes a complete configuration snippet that you can adapt for your environment. Browse through the examples to find scenarios that match your needs, or use them as inspiration for creating your own custom actions.
## [](#%5Fwhats%5Fnext)What’s Next?
After reviewing the examples, you can:
* [Create your own action](../action%5Fexecution/create%5Fyour%5Ffirst.html) \- Build a custom action for your needs
* [Customize your actions](../action%5Fcustomization/intro.html) \- Learn how to configure action properties
* [Add arguments](../args/intro.html) \- Make your actions interactive with user input
* [Explore complete solutions](../solutions/intro.html) \- See full configurations for common use cases
* [Understand shell vs exec](../action%5Fexecution/shellvsexec.html) \- Learn about execution methods for security
Ping an address
====================
| Installation type | Difficulty to do this |
| -------------------------------- | --------------------- |
| Running as a **Systemd service** | Easy |
| Running in a **container** | Easy |
## [](#%5Fexample%5Fconfig%5Fyaml)Example config.yaml
```yaml
actions:
# This sends 1 ping to google.com.
- title: ping google.com
shell: ping google.com -c 1
icon: ping
timeout: 3
```
Powershell
====================
| Installation type | Difficulty to do this |
| -------------------------------- | --------------------- |
| Running as a **Systemd service** | Easy |
| Running in a **container** | Not possible |
## [](#%5Fexample%5Fconfig%5Fyaml)Example config.yaml
Powershell requires `pwsh` to execute commands.
`config.yaml`
```yaml
actions:
- title: Run Powershell Script:
shell: pwsh C:/Scripts/MyScript.ps1
```
SSH (easy setup)
====================
This is probably one of the most useful things OliveTin is used for - just plain old SSH, which allows it to easily connect from a container to any server running on your network to run commands. This is also the preferred method of running commands on the server that is hosting the OliveTin container image as well.
| | This is the easy method of setting up SSH with OliveTin - this generates a new SSH key for you, and a configuration file that disables SSH host key checking, to make it faster to do useful things with OliveTin. This is fine for most homelab setups, but if you are using OliveTin in a production environment, you should use the more secure method of setting up SSH and set it up manually, see [SSH (manual setup)](#). |
| ----------------------------------------------------------------------------------------------------------------------------------------------------------------------------------------------------------------------------------------------------------------------------------------------------------------------------------------------------------------------------------------------------------------------------------- |
## [](#%5Fssh%5Ffrom%5Finside%5Fa%5Fcontainer%5Fsetup%5Finstructions)SSH from inside a Container - setup instructions
* [Step 1](#ssh-easy-step-1) Use the olivetin-setup-easy-ssh script to generate a new SSH key and configuration file
* Add this key fingerprint to servers and hosts that you want to SSH to.
* [Step 2](#ssh-easy-step-2) Setup actions that use SSH with this configuration file (which points to the key)
Visually, this is what it looks like - OliveTin is running in the (orange) container, and then can either connect back to _server-with-olivetin_ or _server2_.

## [](#ssh-easy-step-1)Step 1: Run the olivetin-setup-easy-ssh script
Setup an action as follows, to use the builtin olivetin-setup-easy-ssh script that comes with OliveTin containers. This script does **not** work on Windows, MacOS, or outside of a container.
config.yaml
```yaml
actions:
- title: Setup SSH
shell: olivetin-setup-easy-ssh
popupOnStart: execution-dialog
```
## [](#ssh-easy-step-2)Step 2: Use the configuration file in your actions
To use the configuration file generated by the script, you can use the following in your other actions:
config.yaml
```yaml
actions:
- title: SSH into a server
shell: ssh -F /config/ssh/config root@myserver '/opt/script-on-my-server.sh'
```
SSH (manual setup)
====================
This is probably one of the most useful things OliveTin is used for - just plain old SSH, which allows it to easily connect from a container to any server running on your network to run commands. This is also the preferred method of running commands on the server that is hosting the OliveTin container image as well.
| | There is an easy method of setting up SSH with OliveTin, which is described in the [SSH (easy setup)](#action-ssh-easy) section. This section is for those who want to set up SSH manually. |
| ---------------------------------------------------------------------------------------------------------------------------------------------------------------------------------------------- |
| Installation type | Difficulty to do this |
| -------------------------------- | ---------------------------------------------------------------------------------- |
| Running as a **Systemd service** | Easy |
| Running in a **container** | Needs some setting up - see the [SSH Container setup instructions](#ssh-container) |
## [](#%5Fexample%5Fconfig%5Fyaml)Example config.yaml
OliveTin `config.yaml`
```yaml
actions:
# This will SSH into a server an run the command 'service httpd restart'
- title: Restart httpd on Server 1
shell: ssh root@server-with-olivetin 'service httpd restart'
icon: ping
timeout: 5
```
**Note about SSH keys**: You should make sure that the user that OliveTin is running as has access to a SSH key. This applies to container images as well. The setup instructions below briefly explain how to generate a SSH key and make it accessible to OliveTin which is running inside a container.
SSH from inside a Container - setup instructions
This is a two step process;
* [Step 1](#ssh-step-1) Give OliveTin a SSH key
* [Step 2](#ssh-step-2) Setup actions that use SSH with this key
Visually, this is what it looks like - OliveTin is running in the (orange) container, and then can either connect back to _server-with-olivetin_ or _server2_.

The steps in detail are below;
[red]#Step 1#: Give OliveTin a SSH key
Open a terminal window on _server-with-olivetin_.
1. Create the `/opt/OliveTinSshKeys` directory, to create a shared directory for your SSH key file.
```bash
root@server-with-olivetin: mkdir /opt/OliveTinSshKeys
```
This will later be used as a "volume mount" when you create a docker container.
2. Run `ssh-keygen` to generate a SSH key just for OliveTin.
```bash
root@server-with-olivetin: ssh-keygen
```
1. Enter the file in which to save the key: `/opt/OliveTinSshKeys/id_rsa`
2. Enter passphrase (empty for no passphrase): ``
This will create a passwordless SSH key that OliveTin can use. It is safe as long as nobody steals your SSH key file! OliveTin cannot enter passwords into SSH keys, so you have to leave the password blank.
3. You should get something that looks like this. If you get a "permission denied" error when creating files, try running `chmod 0777 /opt/OliveTinSshKeys` and try again.
```asciidoc
root@server-with-olivetin: ssh-keygen
Generating public/private rsa key pair.
Enter file in which to save the key (/root/.ssh/id_rsa): /opt/OliveTinSshKeys/id_rsa
Enter passphrase (empty for no passphrase):
Enter same passphrase again:
Your identification has been saved in /opt/OliveTinSshKeys/id_rsa
Your public key has been saved in /opt/OliveTinSshKeys/id_rsa.pub
The key fingerprint is:
SHA256:t+vGUn+MTeOtRDpxKanO3Cg63+gvAHslZCe3YVNnfWU root@server-with-olivetin
The key's randomart image is:
+---[RSA 3072]----+
| .. o. E|
| + * o ...|
| o = + . |
| . . o . . |
| o oS . + + |
| . o ..o *o |
| . . oo.o*.o |
| . +*o+oo= .|
| .=+BX .... |
+----[SHA256------+
```
This will create two files, `/opt/OliveTinSshKeys/id_rsa` (your private key) and `/opt/OliveTinSshKeys/id_rsa.pub` (your public key).
4. Copy your public key to every server you want to connect to.
Using the `ssh-copy-id` command is a really quick and safe way to do this.
```asciidoc
root@server-with-olivetin: ssh-copy-id -i /opt/OliveTinSshKeys/id_rsa.pub root@localhost
(enter your SSH password)
root@server2: ssh-copy-id ssh-copy-id -i /opt/OliveTinSshKeys/id_rsa.pub root@server2
(enter your SSH password)
```
You will be asked to login with a password for each server.
After you have done that, you will then be able to login with the ssh key instead. Here is a quick way that you can test your SSH key manually;
```asciidoc
root@server-with-olivetin: ssh -i /opt/OliveTinSshKeys/id_rsa root@server2
(you should login without a password)
```
5. Give the SSH key to the OliveTin container.
The way to do this is via a "volume mount". When you create the container, you use "-v" to specify a volume.
You should mount your SSH keys directory into the OliveTin user’s home directory by creating the container like this;
If you want to create the container from the command line
```asciidoc
docker run -v /opt/OliveTinSshKeys/:/home/olivetin/.ssh/ -v /etc/OliveTin/:/config --name OliveTin jamesread/olivetin
```
If you are using docker-compose
```yaml
services:
olivetin:
container_name: olivetin
image: jamesread/olivetin
volumes:
- "/etc/OliveTin/:/config"
- "/opt/OliveTinSshKeys:/home/olivetin/.ssh"
ports:
- "1337:1337"
restart: unless-stopped
```
This also works for things like SSH configuration files, if you want to use them. This is step 1 complete from the diagram above.
[red]#Step 2#: Setup actions that use SSH with this key
Thankfully, step 2 is very simple! `ssh` commands in your OliveTin `config.yaml` should work without a password!, and allow OliveTin to access services, files, and other stuff outside of the OliveTin container.
OliveTin `config.yaml`
```shell
actions:
# This will SSH into a server an run the command 'service httpd restart'
- title: Restart httpd on Server 1
shell: ssh root@server-with-olivetin 'service httpd restart'
icon: ping
timeout: 5
```
Restart a systemd service
====================
| Installation type | Difficulty to do this |
| -------------------------------- | -------------------------- |
| Running as a **Systemd service** | Easy |
| Running in a **container** | Not really possible to do. |
## [](#%5Fexample%5Fconfig%5Fyaml)Example config.yaml
```yaml
actions:
- title: Start httpd
shell: systemctl start httpd
- title: Stop httpd
shell: systemctl stop httpd
- title: Restart httpd
shell: systemctl restart httpd
# https://docs.olivetin.app/action-ssh.html
- title: Restart httpd on server 1
shell: ssh root@server1 'service httpd restart'
```
Execute after completion
====================
Sometimes you want to execute another command after the main command executes, this is often the case when you want to check the status of the main command, or if you want to send a notification.
`config.yaml`
```yaml
actions:
- title: Check date and send notification via apprise
icon: date
shell: date
shellAfterCompleted: "apprise -c /config/apprise.yml -t 'Notification: Backup script completed' -b 'The backup script completed with code {{ exitCode}}. The log is: \n {{ output }} '"
```
When running shellAfterCompleted, you **cannot** use argument values - they are not passed to the command. However the following special arguments are defined;
* `{{ exitCode }}` \- The exit code of the previous shell command
* `{{ output }}` \- The standard output of the previous shell command
* `{{ .Arguments.ot_executionTrackingId }}` \- The unique execution tracking id for this execution (version 3k; in 2k use `{{ ot_executionTrackingId }}`)
* `{{ .Arguments.ot_username }}` \- The username of the user who started the execution (version 3k; in 2k use `{{ ot_username }}`). May be `guest` or `cron` for unauthenticated or automated runs.
You can only use a single `shellAfterCompleted`, so use it for notifications, or similar. It would be an antipattern to use this do run 2 commands making up a mini script.
The official OliveTin container images from version 2024.03.24 onwards include the fantastic apprise tool, which makes chat notifications on many protocols very easy.
*
*
`/config/apprise.yaml`
```yaml
urls:
- tgram://bottoken/ChatID
```
## [](#%5Fsee%5Falso)See Also
* [Triggers](triggers.html) \- Executing full actions after this one (with separate arguments, etc).
Create your first action
====================
This is an example of your very first action. First of all, edit your config.yaml, and enter this YAML markup;
config.yaml
```yaml
actions:
- title: Say hello
shell: echo "Hello!"
icon: smile
```
If OliveTin is running, it should popup on your dashboard like this;

Simply click on the button to execute the shell command. You can expand the executions to view the logs.
## [](#%5Fimportant%5Fconsiderations)Important considerations
* The action title must be unique. If you have multiple actions with the same title, only one will be shown.
## [](#%5Fwhats%5Fnext)What’s Next?
Now that you’ve created your first action, here are some logical next steps:
* [Customize your actions](../action%5Fcustomization/intro.html) \- Learn how to set icons, timeouts, and other action properties
* [Add arguments to actions](../args/intro.html) \- Make your actions interactive with user input
* [Browse action examples](../action%5Fexamples/intro.html) \- See real-world examples for common use cases
* [Schedule actions](oncron.html) \- Set up actions to run automatically on a schedule
* [Trigger actions via webhooks](onwebhook.html) \- Integrate OliveTin with external systems
* [Organize actions with dashboards](../dashboards/intro.html) \- Create custom views to organize your actions
Execute on calendar file
====================
| | The feature is currently experimental. |
| ----------------------------------------- |
Sometimes you want to schedule an action to run at a specific date and time, like at 2024-02-07 at 15:30\. This is technically called "an instant", and OliveTin can watch a file that contains a list of instants for new additions.
`start-server-calendar.yaml`
```yaml
- 2024-03-08T20:11:45+00:00
- 2024-03-08T20:12:30+00:00
```
OliveTin will watch this file, and also load it on startup. If an instant is seen that is in the past, it is just ignored. If it is in the future then it is scheduled.
This is how you setup an action to use the calendar file:
`config.yaml`
```yaml
actions:
- title: start server
shell: echo "Starting Server!"
execOnCalendarFile: start-server-calendar.yaml
```
You will often want an easy way to schedule actions from the web interface as well, you can do this by creating a separate schedule action that adds an instant to the calendar file.
You can use an argument with `type: datetime` to create a date selector in the web interface, to easily select dates to be added to the calendar file. You will have to add hardcoded timezone to suit your needs, you can see below that "+00:00" is being added to "{{ when }}" to create an instant in the UTC timezone.
`config.yaml`
```yaml
actions:
- title: Schedule server
shell: echo '- {{ when }}+00:00' >> start-server-calendar.yaml
arguments:
- name: when
title: When?
type: datetime
- title: start server
shell: echo "Starting Server!"
execOnCalendarFile: start-server-calendar.yaml
```
Execute on schedule (cron)
====================
OliveTin can execute actions on a schedule, and uses a cron format for configuration.
`config.yaml`
```yaml
actions:
- title: Say hello
shell: echo "Hello!"
execOnCron:
- "@hourly"
- title: Say goodbye
shell: echo "Say Goodbye"
execOnCron:
- "*/5 * * * *" # Every 5 minutes
```
This is a fantastic website:
## [](#%5Fsupport%5Ffor%5Fseconds%5Fin%5Fcron)Support for seconds in cron
The default cron format for OliveTin supports the Unix/Linux format - 5 fields, with no support for seconds. This is by far the most popular format that most people are used to.
If you need per-second resolution for your actions, this can be enabled in your config - meaning that your cronlines will support 6 columns. The first "new" column is seconds. For example, to execute `date` every 5 seconds;
`config.yaml`
```yaml
cronSupportForSeconds: true
actions:
title: Execute every 5 seconds
shell: date
execOnCron:
- "*/5 * * * * *"
```
## [](#%5Fcron%5Fand%5Facls)Cron and ACLs
If you have enabled ACL, cron tasks are run as the user `cron`, which means that your ACL needs to allow the cron user to execute the action. This is one possibilty:
`config.yaml`
```yaml
accessControlLists:
- name: "cron"
matchUsernames:
- cron
permissions:
exec: true
actions:
- title: Say hello
shell: echo "Hello!"
execOnCron:
- "@hourly"
acls:
- "cron"
```
Execute on demand
====================
This is the default, meaning that the action shows up on a dashboard, and at the moment cannot be changed.
Execute on file changed
====================
You can execute an action when a file is changed in a directory. The argument `filename` is pre-populated for you.
```yaml
actions:
- title: Print names of new files
shell: "echo Filename: {{ filename }} Filedir: {{ filedir }} Filext: {{ fileext }}"
arguments:
- name: filename
type: unicode_identifier
- name: filedir
type: unicode_identifier
- name: fileext
type: unicode_identifier
execOnFileChangedInDir:
- /home/user/Downloads/
```
## [](#%5Ffile%5Fin%5Fdir%5Farguments)File in dir arguments
| Predefined Argument | Example |
| ------------------- | --------------------------------------- |
| filepath | /Downloads/txt1.txt |
| filedir | /Downloads |
| filename | test1.txt |
| fileext | .txt |
| filesizebytes | 100 |
| filemode | 0644 |
| filemtime | 2024-04-27 20:09:42.465235047 +0100 BST |
| fileisdir | false |
Like all arguments, OliveTin also passes these arguments as [environment variables](#env-vars) if this is better for your use case.
Execute on file created
====================
You can execute an action when a file is created in a directory. The argument `filename` is pre-populated for you.
`config.yaml`
```yaml
actions:
- title: Print names of new files
shell: echo {{ filename }}
arguments:
- name: filename
type: unicode_identifier
- name: filedir
type: unicode_identifier
- name: fileext
type: unicode_identifier
execOnFileCreatedInDir:
- /home/user/Downloads/
```
## [](#%5Ffile%5Fin%5Fdir%5Farguments)File in dir arguments
| Predefined Argument | Example |
| ------------------- | --------------------------------------- |
| filepath | /Downloads/txt1.txt |
| filedir | /Downloads |
| filename | test1.txt |
| fileext | .txt |
| filesizebytes | 100 |
| filemode | 0644 |
| filemtime | 2024-04-27 20:09:42.465235047 +0100 BST |
| fileisdir | false |
Like all arguments, OliveTin also passes these arguments as [environment variables](#env-vars) if this is better for your use case.
Execute on startup
====================
OliveTin can execute actions on a startup.
`config.yaml`
```yaml
actions:
- title: Say hello
shell: echo "Hello!"
execOnStartup: true
```
## [](#dnf-startup)Example: Install additional commands into OliveTin
This functionality to execute actions on startup is a very easy way to install additional commands in OliveTin, however it requires running OliveTin as a root user to be able to use `microdnf`;
`config.yaml`
```yaml
actions:
- title: Install dnsmasq
shell: microdnf install bind-utils
execOnStartup: true
```
A more secure method than running DNF as root, is a manual command the temporarily runs as root. To learn more about how to install additional packages into the container in this more secure way, see [Installing extra container packages](../reference/containerInstallPackages.html).
Execute on webhook
====================
Webhooks allow external services to trigger OliveTin actions by sending HTTP POST requests. This is useful for integrating OliveTin with CI/CD pipelines, monitoring systems, IoT devices, or any service that can send HTTP requests.
OliveTin provides a dedicated webhook endpoint at `/webhooks` that can receive webhook payloads and match them to configured actions.
## [](#%5Fbasic%5Fconfiguration)Basic Configuration
To configure an action to run on a webhook, add the `execOnWebhook` property to your action:
`config.yaml`
```yaml
actions:
- title: Deploy Application
id: deploy
shell: /opt/scripts/deploy.sh
execOnWebhook:
- matchHeaders:
X-Event-Type: deploy
```
This action will be triggered when a POST request is sent to `/webhooks` with the header `X-Event-Type: deploy`.
## [](#%5Fwebhook%5Fendpoint)Webhook Endpoint
All webhooks are received at:
```asciidoc
http://your-olivetin-server:1337/webhooks
```
or
```asciidoc
http://your-olivetin-server:1337/webhooks/
```
Both paths work identically. All webhook requests must use the HTTP POST method.
## [](#%5Fmatching%5Fwebhooks)Matching Webhooks
OliveTin can match incoming webhooks based on several criteria:
### [](#%5Fmatch%5Fby%5Fheaders)Match by Headers
Match webhooks based on HTTP header values:
```yaml
actions:
- title: Process Event
shell: echo "Processing event"
execOnWebhook:
- matchHeaders:
X-Event-Type: my-event
X-Source: my-service
```
All specified headers must match for the webhook to trigger the action.
### [](#%5Fmatch%5Fby%5Fquery%5Fparameters)Match by Query Parameters
Match webhooks based on URL query parameters:
```yaml
actions:
- title: Process Request
shell: echo "Processing request for {{ service }}"
arguments:
- name: service
type: ascii
execOnWebhook:
- matchQuery:
action: deploy
env: production
```
A request to `/webhooks?action=deploy&env=production` would match this action.
### [](#%5Fmatch%5Fby%5Fjson%5Fbody%5Fpath)Match by JSON Body Path
Match webhooks based on values in the JSON request body using JSONPath expressions:
```yaml
actions:
- title: Handle Push Event
shell: echo "Push to {{ branch }}"
arguments:
- name: branch
type: ascii
execOnWebhook:
- matchPath: "$.event_type=push"
```
The `matchPath` format is `jsonpath=value`. You can also just specify a JSONPath without a value to match if the path exists:
```yaml
execOnWebhook:
- matchPath: "$.repository.name" # Matches if this path exists in the JSON
```
### [](#%5Fusing%5Fregex%5Ffor%5Fmatching)Using Regex for Matching
Header and query parameter values can use regex patterns by prefixing with `regex:`:
```yaml
actions:
- title: Handle Multiple Events
shell: echo "Handling event"
execOnWebhook:
- matchHeaders:
X-Event-Type: "regex:^(push|pull_request|release)$"
```
### [](#%5Fcombining%5Fmatch%5Fcriteria)Combining Match Criteria
You can combine multiple match criteria. All criteria must match for the webhook to trigger:
```yaml
actions:
- title: Production Deploy
shell: /opt/scripts/deploy.sh production
execOnWebhook:
- matchHeaders:
X-Event-Type: deploy
matchQuery:
environment: production
matchPath: "$.status=approved"
```
## [](#%5Fextracting%5Farguments%5Ffrom%5Fwebhooks)Extracting Arguments from Webhooks
You can extract values from the webhook payload and pass them as arguments to your action using JSONPath expressions:
```yaml
actions:
- title: Deploy Version
shell: |
echo "Deploying version {{ version }} to {{ environment }}"
/opt/scripts/deploy.sh "{{ version }}" "{{ environment }}"
arguments:
- name: version
type: ascii
- name: environment
type: ascii
execOnWebhook:
- matchHeaders:
X-Event-Type: deploy
extract:
version: "$.release.tag_name"
environment: "$.target.environment"
```
The `extract` map defines which action arguments to populate from the webhook payload. The key is the argument name, and the value is the JSONPath expression to extract the value.
### [](#%5Fautomatic%5Fwebhook%5Fmetadata)Automatic Webhook Metadata
OliveTin automatically adds several metadata arguments from each webhook request:
* `webhook_method` \- The HTTP method (always POST for webhooks)
* `webhook_path` \- The request URL path
* `webhook_query` \- The raw query string
* `webhook_header_` \- Each HTTP header (lowercase name)
For example, to access the `X-Request-Id` header in your action:
```yaml
actions:
- title: Log Request
shell: echo "Request ID: {{ webhook_header_x-request-id }}"
arguments:
- name: webhook_header_x-request-id
type: ascii
execOnWebhook:
- matchHeaders:
X-Event-Type: log
```
## [](#%5Fwebhook%5Fauthentication)Webhook Authentication
OliveTin supports several authentication methods to verify webhook requests:
### [](#%5Fno%5Fauthentication)No Authentication
By default, webhooks have no authentication. Any request matching the criteria will trigger the action:
```yaml
execOnWebhook:
- authType: none
matchHeaders:
X-Event-Type: my-event
```
### [](#%5Fhmac%5Fsha256%5Fsignature)HMAC-SHA256 Signature
Verify webhooks using HMAC-SHA256 signatures (commonly used by GitHub, GitLab, etc.):
```yaml
execOnWebhook:
- authType: hmac-sha256
authHeader: X-Hub-Signature-256
secret: your-webhook-secret
matchHeaders:
X-Event-Type: push
```
The `authHeader` specifies which header contains the signature. The signature should be in the format `sha256=`.
### [](#%5Fhmac%5Fsha1%5Fsignature)HMAC-SHA1 Signature
For services using HMAC-SHA1 (legacy GitHub webhooks):
```yaml
execOnWebhook:
- authType: hmac-sha1
authHeader: X-Hub-Signature
secret: your-webhook-secret
matchHeaders:
X-Event-Type: push
```
### [](#%5Fbearer%5Ftoken)Bearer Token
Verify webhooks using a Bearer token in the Authorization header:
```yaml
execOnWebhook:
- authType: bearer
secret: your-bearer-token
matchHeaders:
X-Event-Type: deploy
```
The webhook sender must include `Authorization: Bearer your-bearer-token` in the request.
### [](#%5Fbasic%5Fauthentication)Basic Authentication
Verify webhooks using HTTP Basic authentication:
```yaml
execOnWebhook:
- authType: basic
secret: "username:password"
matchHeaders:
X-Event-Type: deploy
```
Or with password only:
```yaml
execOnWebhook:
- authType: basic
secret: "mypassword"
matchHeaders:
X-Event-Type: deploy
```
## [](#%5Fmultiple%5Fwebhook%5Ftriggers)Multiple Webhook Triggers
An action can have multiple webhook configurations. The action will be triggered if any of them match:
```yaml
actions:
- title: Deploy
shell: /opt/scripts/deploy.sh
execOnWebhook:
- matchHeaders:
X-Event-Type: deploy-manual
- matchHeaders:
X-Event-Type: deploy-auto
matchPath: "$.status=success"
```
## [](#%5Ftesting%5Fwebhooks)Testing Webhooks
You can test your webhook configuration using `curl`:
```bash
# Simple webhook with headers
curl -X POST \
-H "Content-Type: application/json" \
-H "X-Event-Type: deploy" \
-d '{"version": "1.2.3"}' \
http://localhost:1337/webhooks
# Webhook with HMAC-SHA256 authentication
SECRET="your-secret"
PAYLOAD='{"event": "push", "branch": "main"}'
SIGNATURE=$(echo -n "$PAYLOAD" | openssl dgst -sha256 -hmac "$SECRET" | cut -d' ' -f2)
curl -X POST \
-H "Content-Type: application/json" \
-H "X-Event-Type: push" \
-H "X-Hub-Signature-256: sha256=$SIGNATURE" \
-d "$PAYLOAD" \
http://localhost:1337/webhooks
```
## [](#%5Fsee%5Falso)See Also
* [GitHub Webhooks](onwebhook%5Fgithub.html) \- Specific configuration for GitHub webhook events
* [GitOps Solution](../solutions/on-git-push/index.html) \- Running actions on Git push using hooks
* [Start Action API](../api/start%5Faction.html) \- Alternative method for triggering actions via API
GitHub Webhooks
====================
OliveTin includes built-in templates for GitHub webhooks that simplify configuration. Instead of manually configuring header matching and argument extraction, you can use a template that handles all the common settings for you.
## [](#%5Fsupported%5Fgithub%5Ftemplates)Supported GitHub Templates
OliveTin supports the following GitHub webhook templates:
* `github-push` \- Triggered on push events
* `github-pr` or `github-pull-request` \- Triggered on pull request events
* `github-release` \- Triggered on release events
* `github-workflow` \- Triggered on workflow run events
## [](#%5Fsetting%5Fup%5Fgithub%5Fwebhooks)Setting Up GitHub Webhooks
### [](#%5F1%5Fconfigure%5Fthe%5Fwebhook%5Fin%5Fgithub)1\. Configure the Webhook in GitHub
1. Go to your GitHub repository → **Settings** → **Webhooks** → **Add webhook**
2. Set the **Payload URL** to ``
3. Set **Content type** to `application/json`
4. Enter a **Secret** (you’ll use this in your OliveTin config)
5. Choose which events to trigger the webhook:
* Select **Just the push event** for push triggers
* Or select **Let me select individual events** for more control
6. Click **Add webhook**
### [](#%5F2%5Fconfigure%5Folivetin)2\. Configure OliveTin
Use the `template` property to apply GitHub-specific settings:
`config.yaml`
```yaml
actions:
- title: Deploy on Push
shell: |
echo "Deploying commit {{ git_commit }} to {{ git_branch }}"
/opt/scripts/deploy.sh "{{ git_branch }}"
arguments:
- name: git_commit
type: ascii
- name: git_branch
type: ascii
execOnWebhook:
- template: github-push
secret: your-github-webhook-secret
```
## [](#%5Fgithub%5Fpush%5Ftemplate)GitHub Push Template
The `github-push` template is designed for push events. It automatically:
* Sets authentication to HMAC-SHA256 with the `X-Hub-Signature-256` header
* Matches the `X-GitHub-Event: push` header
* Extracts common push event data
### [](#%5Fextracted%5Farguments)Extracted Arguments
The following arguments are automatically extracted and available in your action:
| Argument Name | Description | JSONPath |
| --------------- | ------------------------------------------ | -------------------------- |
| git\_repository | Full repository name (owner/repo) | $.repository.full\_name |
| git\_ref | Full git reference (e.g., refs/heads/main) | $.ref |
| git\_commit | The HEAD commit SHA | $.head\_commit.id |
| git\_branch | The branch reference | $.ref |
| git\_message | The commit message | $.head\_commit.message |
| git\_author | The commit author’s name | $.head\_commit.author.name |
### [](#%5Fexample%5Fdeploy%5Fon%5Fpush%5Fto%5Fmain)Example: Deploy on Push to Main
```yaml
actions:
- title: Deploy to Production
shell: |
if [ "{{ git_ref }}" = "refs/heads/main" ]; then
echo "Deploying {{ git_commit }} by {{ git_author }}"
/opt/scripts/deploy.sh production
else
echo "Ignoring push to non-main branch"
fi
arguments:
- name: git_ref
type: ascii
- name: git_commit
type: ascii
- name: git_author
type: ascii
execOnWebhook:
- template: github-push
secret: your-secret
```
### [](#%5Fexample%5Ffilter%5Fby%5Fbranch)Example: Filter by Branch
To only trigger on specific branches, add a `matchPath` condition:
```yaml
actions:
- title: Deploy Staging
shell: /opt/scripts/deploy.sh staging
execOnWebhook:
- template: github-push
secret: your-secret
matchPath: '$.ref="refs/heads/develop"'
```
## [](#%5Fgithub%5Fpull%5Frequest%5Ftemplate)GitHub Pull Request Template
The `github-pr` (or `github-pull-request`) template handles pull request events.
### [](#%5Fextracted%5Farguments%5F2)Extracted Arguments
| Argument Name | Description | JSONPath |
| --------------- | ------------------------------------------------ | -------------------------- |
| pr\_number | Pull request number | $.number |
| pr\_title | Pull request title | $.pull\_request.title |
| pr\_author | PR author’s username | $.pull\_request.user.login |
| pr\_action | Event action (opened, closed, synchronize, etc.) | $.action |
| git\_repository | Full repository name | $.repository.full\_name |
| pr\_state | PR state (open, closed) | $.pull\_request.state |
| pr\_head\_sha | HEAD commit SHA of the PR branch | $.pull\_request.head.sha |
### [](#%5Fexample%5Frun%5Ftests%5Fon%5Fpr)Example: Run Tests on PR
```yaml
actions:
- title: Run PR Tests
shell: |
echo "Running tests for PR #{{ pr_number }}: {{ pr_title }}"
echo "Action: {{ pr_action }}, Author: {{ pr_author }}"
/opt/scripts/run-tests.sh "{{ pr_head_sha }}"
arguments:
- name: pr_number
type: ascii
- name: pr_title
type: ascii
- name: pr_action
type: ascii
- name: pr_author
type: ascii
- name: pr_head_sha
type: ascii
execOnWebhook:
- template: github-pr
secret: your-secret
```
### [](#%5Fexample%5Fonly%5Fon%5Fpr%5Fopen%5For%5Fsynchronize)Example: Only on PR Open or Synchronize
```yaml
actions:
- title: CI Build
shell: /opt/scripts/ci-build.sh "{{ pr_head_sha }}"
arguments:
- name: pr_head_sha
type: ascii
execOnWebhook:
- template: github-pr
secret: your-secret
matchPath: '$.action="opened"'
- template: github-pr
secret: your-secret
matchPath: '$.action="synchronize"'
```
## [](#%5Fgithub%5Frelease%5Ftemplate)GitHub Release Template
The `github-release` template handles release events.
### [](#%5Fextracted%5Farguments%5F3)Extracted Arguments
| Argument Name | Description | JSONPath |
| --------------- | ----------------------------------------- | ----------------------- |
| release\_action | Release action (published, created, etc.) | $.action |
| release\_tag | Release tag name | $.release.tag\_name |
| release\_name | Release name/title | $.release.name |
| git\_repository | Full repository name | $.repository.full\_name |
| release\_author | Release author’s username | $.release.author.login |
### [](#%5Fexample%5Fdeploy%5Fon%5Frelease)Example: Deploy on Release
```yaml
actions:
- title: Deploy Release
shell: |
echo "Deploying release {{ release_tag }}: {{ release_name }}"
/opt/scripts/deploy-release.sh "{{ release_tag }}"
arguments:
- name: release_tag
type: ascii
- name: release_name
type: ascii
execOnWebhook:
- template: github-release
secret: your-secret
matchPath: '$.action="published"'
```
## [](#%5Fgithub%5Fworkflow%5Ftemplate)GitHub Workflow Template
The `github-workflow` template handles workflow run events, useful for triggering actions when GitHub Actions workflows complete.
### [](#%5Fextracted%5Farguments%5F4)Extracted Arguments
| Argument Name | Description | JSONPath |
| -------------------- | -------------------------------------------- | ---------------------------- |
| workflow\_name | Name of the workflow | $.workflow\_run.name |
| workflow\_status | Workflow status | $.workflow\_run.status |
| workflow\_conclusion | Workflow conclusion (success, failure, etc.) | $.workflow\_run.conclusion |
| git\_repository | Full repository name | $.repository.full\_name |
| git\_commit | HEAD commit SHA | $.workflow\_run.head\_sha |
| git\_branch | Branch that triggered the workflow | $.workflow\_run.head\_branch |
### [](#%5Fexample%5Fdeploy%5Fafter%5Fci%5Fsuccess)Example: Deploy After CI Success
```yaml
actions:
- title: Deploy After CI
shell: |
echo "CI workflow '{{ workflow_name }}' completed with {{ workflow_conclusion }}"
if [ "{{ workflow_conclusion }}" = "success" ]; then
/opt/scripts/deploy.sh "{{ git_branch }}" "{{ git_commit }}"
fi
arguments:
- name: workflow_name
type: ascii
- name: workflow_conclusion
type: ascii
- name: git_branch
type: ascii
- name: git_commit
type: ascii
execOnWebhook:
- template: github-workflow
secret: your-secret
matchPath: '$.action="completed"'
```
## [](#%5Fcustomizing%5Ftemplates)Customizing Templates
Templates provide default values, but you can override or extend them:
```yaml
actions:
- title: Custom Push Handler
shell: echo "Push from {{ custom_field }}"
arguments:
- name: custom_field
type: ascii
- name: git_commit
type: ascii
execOnWebhook:
- template: github-push
secret: your-secret
# Add additional extractions
extract:
custom_field: "$.sender.login"
# Add additional match criteria
matchPath: '$.repository.private=false'
```
Custom `extract` values are merged with template defaults, so you can add extra fields without losing the standard ones.
## [](#%5Fsecurity%5Fconsiderations)Security Considerations
1. **Always use a secret** \- Without a secret, anyone can trigger your webhooks
2. **Use HTTPS** \- When exposing OliveTin to the internet, use a reverse proxy with TLS
3. **Limit webhook events** \- Only subscribe to the events you actually need in GitHub
4. **Validate in your scripts** \- Add additional validation in your shell scripts for sensitive operations
## [](#%5Ftroubleshooting)Troubleshooting
### [](#%5Fwebhook%5Fnot%5Ftriggering)Webhook Not Triggering
1. Check the OliveTin logs with `logLevel: DEBUG` for webhook processing details
2. Verify the webhook is being received (check GitHub webhook delivery history)
3. Ensure the secret matches exactly between GitHub and OliveTin config
4. Verify the `template` name is spelled correctly
### [](#%5Fsignature%5Fverification%5Ffailed)Signature Verification Failed
1. Ensure the secret in OliveTin matches the one configured in GitHub
2. Check that you’re using the correct template (GitHub uses HMAC-SHA256 by default)
3. Make sure the webhook Content-Type is set to `application/json`
### [](#%5Farguments%5Fnot%5Fextracted)Arguments Not Extracted
1. Verify the argument names match exactly (case-sensitive)
2. Check that arguments are defined in the action’s `arguments` list
3. Use `logLevel: DEBUG` to see extracted values in the logs
## [](#%5Fsee%5Falso)See Also
* [Webhooks Overview](onwebhook.html) \- General webhook configuration
* [GitOps Solution](../solutions/on-git-push/index.html) \- Alternative approach using Git hooks
* [GitHub Webhooks Documentation](https://docs.github.com/en/webhooks) \- Official GitHub webhook documentation
Shell vs Exec
====================
OliveTin supports two different methods to run commands: `shell` and `exec`. The difference between these two is that "shell" accepts strings, and will wrap that whole command in a shell with "bash -c". Exec uses a syscall directly to execute commands.
* **Shell** is more flexible, because it allows you to chain commands (eg, using &&) and redirect or pipe output (eg: ">" or "|").
* **Exec** is more secure, because it does not invoke a shell, and thus avoids shell injection attacks.
Shell can be safe and secure with simple argument types (like ascii\_identifier), but some argument types like URL can contain basically any character - /, :, ?, &, etc - which can lead to shell injection vulnerabilities while still being a valid URL.
OliveTin will try and prevent you from using dangerous characters in shell commands (eg, URL is no longer permitted with Shell).
The way that you specify these two types of execution is different - `shell` expects a single string, while `exec` expects a list of strings (the first being the command, the rest being the arguments).
Using Shell
```yaml
actions:
- title: List files
shell: ls -l /some/directory
```
Using Exec
```yaml
actions:
- title: List files
exec:
- ls
- -l
- /some/directory
```
When in doubt, prefer `exec` over `shell` for better security. Shell was added in both OliveTin 3k and OliveTin 2k in October 2025.
## [](#%5Fwhats%5Fnext)What’s Next?
Now that you understand execution methods, continue building your actions:
* [Create your first action](create%5Fyour%5Ffirst.html) \- Build a simple action to get started
* [Add arguments to actions](../args/intro.html) \- Make actions interactive with user input
* [Schedule actions](oncron.html) \- Set up automated execution
* [Trigger via webhooks](onwebhook.html) \- Integrate with external systems
* [Configure security](../security/concepts.html) \- Secure your actions with authentication and authorization
* [Browse examples](../action%5Fexamples/intro.html) \- See real-world action configurations
Triggers
====================
Sometimes you want to trigger another action after the first one completes. This is mostly useful for updating hidden actions that update entity files, without having to run those updates on a cron job every 10 seconds!
| | OliveTin used to support a single action trigger, but now supports multiple triggers. The field trigger was renamed to triggers and is now an array of triggers. |
| ------------------------------------------------------------------------------------------------------------------------------------------------------------------- |
```yaml
entities:
- file: /etc/OliveTin/entities/containers.json
name: container
actions:
- title: stop {{ container.Names }}
shell: docker stop {{ container.Names}}
entity: container
triggers:
- update containers
- title: update containers
shell: docker ps -a --format=json > /etc/OliveTin/entities/containers.json
hidden: true
```
Environment Variables in the Config File
====================
You can pull configuration values from environment variables like this:
`config.yaml`
```yaml
logLevel: ${{ LOG_LEVEL }}
pageTitle: Olivetin - ${{ DEPLOY_ENV }}
actions:
...
```
While loading the config file, Olivetin will substitute the value of the named environment variable for the token. If the variable is unset, Olivetin will use an empty string as the value and log a warning. This syntax works even for configuration values that aren’t strings, as long as the final string value can be converted to the proper type.
## [](#%5Fnotes)Notes
1. These variables are read while loading the config file. Changes in the environment won’t be reflected until the config file is reloaded. If you want to read environment variables at execution time in your action’s `shell` line, make sure to use regular shell syntax, i.e., `$FOO` rather than `${{ FOO }}`. See [environment variables](../args/env.html)for info on using environment variables in your actions.
## [](#using-env-in-template-replacements)Using .Env in template replacements
In addition to config-file substitution, OliveTin supports using the process environment inside **action templates** (e.g. `shell`, `shellAfterCompleted`, entity directory titles, and other fields that use Go template syntax). Use `{{ .Env.VAR_NAME }}` to substitute an environment variable at the time the action is executed.
This is useful when you want a command to depend on the runtime environment (e.g. container or system env) rather than config-load time, or when you need env values in template fields that are not the raw `shell` command (where you could use `$VAR`).
Example: use `.Env` in a shell command
```yaml
actions:
- title: Run with deploy env
shell: /opt/deploy.sh --env {{ .Env.DEPLOY_ENV }} --host {{ .Env.HOSTNAME }}
```
Example: use `.Env` in a completion notification
```yaml
actions:
- title: Backup
shell: /opt/backup.sh
shellAfterCompleted: "apprise -t 'Backup on {{ .Env.HOSTNAME }}' -b '{{ output }}'"
```
`.Env` uses the same Go template context as other action variables (e.g. `.Arguments`, `.CurrentEntity`, `.OliveTin`). The map is built from the process environment when OliveTin starts; values are read at template execution time. If a variable is missing, the template engine will report a missing-key error (with `missingkey=error`), so use defaulting when a variable might be unset, e.g. `{{ or .Env.OPTIONAL_VAR "default" }}`.
This feature addresses the need to use environment variables in templates without changing the config loader (see [GitHub issue #840](https://github.com/OliveTin/OliveTin/issues/840)).
Diagnostics
====================
OliveTin provides a built-in diagnostics page that can be used to help check how OliveTin is running and help to troubleshoot issues. It’s mainly designed for checking SSH configuration at the moment.
This is a screenshot of the diagnostics page, which can be accessed by clicking the "Diagnostics" link in the navigation bar:

## [](#%5Fdisabling%5Fdiagnostics)Disabling Diagnostics
The diagnostics page is enabled by default, but you can disable it by using the OliveTin [security policy configuration](../security/acl.html#%5Facls%5Fand%5Fpolicies%5Fglobal), using the defaults, or via an ACL. Examples are shown below for each of these methods.
### [](#%5Fdisable%5Fdiagnostics%5Ffor%5Fall%5Fusers)Disable Diagnostics for all users;
```yaml
logLevel: info
defaultPolicy:
showDiagnostics: false
```
### [](#%5Fdisable%5Fdiagnostics%5Fexpect%5Ffor%5Fadmin%5Fusers)Disable Diagnostics expect for admin users
```yaml
logLevel: info
defaultPolicy:
showDiagnostics: false
accessControlLists:
- name: admin
matchUsernames:
- alice
- bob
policy:
showDiagnostics: true
```
Advanced Configuration
====================
This section covers advanced configuration options that provide additional control and customization for OliveTin. These options are typically used by users who need fine-grained control over logging, diagnostics, networking, UI customization, and other advanced features.
Topics covered in this section include:
* Application and action logging configuration
* Diagnostics and troubleshooting tools
* Environment variable configuration
* Network port configuration
* Style modifications for UI customization
* Prometheus metrics integration
* Timezone configuration
* Web UI customization options
* Version display in the footer (show or hide the application version)
Most users will not need to modify these settings for basic OliveTin usage, but they become important when you need to integrate OliveTin into complex environments or customize its behavior to match specific requirements.
## [](#%5Fwhats%5Fnext)What’s Next?
Explore the advanced configuration options:
* [Configure logging](logs.html) \- Set up application and action logging
* [Use the logs calendar](logs-calendar.html) \- Browse execution history visually
* [Use diagnostics](diagnostics.html) \- Access troubleshooting and diagnostic tools
* [Customize the web UI](webui.html) \- Modify the appearance and behavior of the interface
* [Apply style mods](stylemods.html) \- Use style modifications for UI customization
* [Set up Prometheus](prometheus.html) \- Configure metrics collection
* [Configure timezones](timezones.html) \- Set timezone handling for actions
* [Use environment variables](config%5Fenvs.html) \- Configure environment variable handling
* [Understand network ports](../reference/network-ports.html) \- Learn about OliveTin’s port configuration
* [Version display](../reference/version%5Fdisplay.html) \- Show or hide the application version in the footer
Logging - Actions
====================
| | There are two different types of logs in OliveTin - [application logs](logs.html) and [action logs](#). This page is about the _action logs_, which are the logs that are generated by the actions that you run in OliveTin. |
| ------------------------------------------------------------------------------------------------------------------------------------------------------------------------------------------------------------------------------- |
## [](#%5Fcontrolling%5Faccess%5Fto%5Fsee%5Faction%5Flogs)Controlling access to see action logs
You can control access to action logs using **permissions**, which are assigned to actions.
### [](#%5Fdisabling%5Flogs%5Ffor%5Fall%5Fusers)Disabling logs for all users
```yaml
logLevel: info
defaultPermissions:
logs: false
```
### [](#%5Fenabling%5Flogs%5Ffor%5Fa%5Fspecific%5Facl)Enabling logs for a specific ACL
```yaml
logLevel: info
defaultPermissions:
logs: false
accessControlLists:
- name: admin
matchUsernames:
- alice
- bob
permissions:
logs: true
addToEveryAction: true
actions:
- title: My Action
shell: echo "Hello World"
```
## [](#%5Fdisabling%5Fthe%5Flog%5Fviewer)Disabling the log viewer
You can disable the log viewer in the interface with [security policy configuration](../security/acl.html#%5Facls%5Fand%5Fpolicies%5Fglobal), using the defaults, or via an ACL. Examples are shown below for each of these methods.
### [](#%5Fdisable%5Flog%5Fviewer%5Ffor%5Fall%5Fusers)Disable log viewer for all users;
```yaml
logLevel: info
defaultPolicy:
showLogList: false
```
### [](#%5Fdisable%5Flog%5Fviewer%5Fexpect%5Ffor%5Fadmin%5Fusers)Disable log viewer expect for admin users
```yaml
logLevel: info
defaultPolicy:
showLogList: false
accessControlLists:
- name: admin
matchUsernames:
- alice
- bob
policy:
showLogList: true
```
## [](#%5Fsee%5Falso)See Also
* [Saving Action logs](../action%5Fcustomization/savelogs.html)
* [Application Logs](logs.html)
* [Logs Calendar View](logs-calendar.html)
Logs Calendar View
====================
The logs calendar view provides a visual way to browse your action execution history. Instead of scrolling through a list of logs, you can see executions displayed on a calendar, making it easy to identify patterns, busy periods, or specific dates when actions were run.
## [](#%5Faccessing%5Fthe%5Fcalendar%5Fview)Accessing the Calendar View
To access the calendar view, navigate to the **Logs** page and click the **Calendar** button in the toolbar. This will switch from the list view to the calendar view.
You can return to the list view at any time by clicking the **Back to list** button.
## [](#%5Ffeatures)Features
### [](#%5Fview%5Fexecutions%5Fon%5Fa%5Fcalendar)View Executions on a Calendar
Each action execution is displayed as an event on the calendar. Events show:
* The action title
* The action icon (if configured)
This gives you a quick visual overview of when actions were executed throughout the month.
### [](#%5Fnavigate%5Fbetween%5Fmonths)Navigate Between Months
Use the navigation controls at the top of the calendar to move between months. The calendar will display all logged executions for the visible month.
### [](#%5Fclick%5Fon%5Fan%5Fevent)Click on an Event
Click on any event (execution) on the calendar to view the full execution details, including:
* The complete output of the action
* Execution timing information
* Exit code and status
* User who triggered the action
### [](#%5Fclick%5Fon%5Fa%5Fdate)Click on a Date
Click on any date on the calendar to filter the logs list view by that specific day. This is useful when you want to see all executions from a particular date in the traditional list format.
After clicking a date, you’ll be redirected to the logs list view with a date filter applied. You can clear this filter using the clear button next to the timestamp header.
## [](#%5Fuse%5Fcases)Use Cases
The calendar view is particularly useful for:
* **Auditing** \- Quickly identify when specific actions were run
* **Troubleshooting** \- Find executions around a specific date when issues occurred
* **Pattern recognition** \- Visualize how often scheduled actions run
* **Historical review** \- Get an overview of system activity over time
## [](#%5Fsee%5Falso)See Also
* [Logging - Actions](logs-actions.html)
* [Logging - Application](logs.html)
* [Saving Action Logs](../action%5Fcustomization/savelogs.html)
Logging - Application
====================
| | There are two different types of logs in OliveTin - [application logs](#) and [action logs](logs-actions.html). This page is about the _application logs_, which are the logs that OliveTin itself generates. The action logs are the logs that are generated by the actions that you run in OliveTin. |
| --------------------------------------------------------------------------------------------------------------------------------------------------------------------------------------------------------------------------------------------------------------------------------------------------------- |
OliveTin supports a few different log levels. The default logLevel is `INFO`.
You can set a `logLevel` in config.yaml like this;
`config.yaml`
```yaml
logLevel: "INFO"
actions:
....
```
The supported log levels are;
* `DEBUG` \- Every possible log message will be shown. This will use a lot of disk space and is not recommended unless you are a developer / like reading code.
* `ERROR` \- OliveTin rarely uses the `ERROR` log level.
* `WARN` \- Very few messages, only warnings are shown.
* `INFO` \- The defualt log level.
You can change the `logLevel` while OliveTin is running, and it should update as soon as you save your config.yaml. You will always get a log message like this;
```bash
INFO Setting log level to warning
```
## [](#%5Fjson%5Flog%5Fformat)JSON Log Format
* OliveTin 2k supports JSON log format from version **2025.10.30**.
* OliveTin 3k supports JSON log format from version **3000.2.2**.
You can enable JSON log format by setting the `OLIVETIN_LOG_FORMAT` environment variable to `json`.
Example of setting `OLIVETIN_LOG_FORMAT` to `json`.
```bash
root@server: ./OliveTin
{"commit":"nocommit","date":"nodate","level":"info","msg":"OliveTin initializing","time":"2025-10-30T10:09:55Z","version":"dev"}
{"level":"debug","msg":"Value of -configdir flag","time":"2025-10-30T10:09:55Z","value":"."}
{"level":"debug","msg":"servicehost nonwin","time":"2025-10-30T10:09:55Z"}
{"level":"info","msg":"Setting log level to info","time":"2025-10-30T10:09:55Z"}
{"level":"info","msg":"OliveTin initialization complete","time":"2025-10-30T10:09:55Z"}
{"configDir":"/home/xconspirisist/sandbox/Development/OliveTin/OliveTin","level":"info","msg":"OliveTin started","time":"2025-10-30T10:09:55Z"}
```
Ports
====================
See [the network ports](../reference/network-ports.html) documentation in the reference section.
Prometheus
====================
OliveTin supports basic Prometheus metrics, and the project is interested to hear about what more metrics people would find useful, as well!
To enable Prometheus support;
`config.yaml`
```yaml
logLevel: INFO
prometheus:
enabled: true
defaultGoMetrics: false
```
It is required to restart OliveTin after changing the `prometheus` configuration.
The `defaultGoMetrics` option will enable the default Go metrics, which expose metrics like go\_memstats\_alloc\_bytes, or go\_memstats\_heap\_alloc\_bytes, and generally most people don’t need these.
This will give you metrics available at . The page should look something like this;
```asciidoc
# HELP olivetin_actions_requested_count The actions requested count
# TYPE olivetin_actions_requested_count gauge
olivetin_actions_requested_count 0
# HELP olivetin_config_action_count Then number of actions in the config file
# TYPE olivetin_config_action_count gauge
olivetin_config_action_count 18
# HELP olivetin_config_reloaded_count The number of times the config has been reloaded
# TYPE olivetin_config_reloaded_count counter
olivetin_config_reloaded_count 1
# HELP olivetin_sv_count The number entries in the sv map
# TYPE olivetin_sv_count gauge
olivetin_sv_count 49
```
Stylemods
====================
There are several style modifications that some people like to use, which can easily be added to OliveTin. The configuration syntax in your `config.yaml` is very simple, and looks like this with a single style mod;
```yaml
stylemods:
- sm-side-icons
```
You can add as many style mods as you like, but note that some of them may conflict with each other. The style mods are applied in the order they are listed, so if you have a conflict, the last one in the list will take precedence.
## [](#%5Favailable%5Fstyle%5Fmods)Available Style Mods
* `sm-side-icons`: Display action buttons with the icons on the left hand side rather than above the text.
* `sm-imageicons-fullwidth`: Display image icons in full width, rather than the default size.
* `sm-transparent-header`: Make the header background transparent.
* `sm-transparent-footer`: Make the footer background transparent.
| | The sm-transparent-header and sm-transparent-footer style mods often fix themes that were designed for OliveTin 2k. |
| ---------------------------------------------------------------------------------------------------------------------- |
The list of style mods on this page is maintained as new style modifications are added to OliveTin.
## [](#%5Ffeature%5Fhistory)Feature history
* OliveTin `2025.7.29` introduced the ability to use style modifications, or "style mods".
Timezones
====================
OliveTin will obviously use the system time just like all other programs, but when running in a container, time works in a slightly unusual way.
You may be used to using a TZ or TIMEZONE environment variable in your Linux container inages, but this is not a standard that works for all Linux distributions - it’s mostly supported by Debain based containers. OliveTin’s base container image is fedora-minimal, which deliberately does not include timezone data, to reduce storage space.
To change the time in the OliveTin container, simply bind-mount the correct zone file;
Same as the container host
```asciidoc
docker create -v /etc/localtime:/etc/localtime -v /etc/OliveTin:/config --name OliveTin docker.io/jamesread/olivetin
```
Different timezone to the container host
```asciidoc
docker create -v /usr/share/zoneinfo/Japan:/etc/localtime -v /etc/OliveTin:/config --name OliveTin docker.io/jamesread/olivetin
```
Customize the web UI
====================
The OliveTin web UI is reasonably customizable - parts of the page that you don’t need can be hidden when they’re not needed.
## [](#%5Fpage%5Ftitle)Page Title
You can customize the page title;

`config.yaml`
```yaml
pageTitle: My OliveTin Instance
```
## [](#show-nav)Navigation - show / hide
You can choose to hide the navigation elements in OliveTin, to present a simplified user interface.

Figure 1\. The default user interface with the sidebar shown
To have OliveTin hide these buttons, add `showNavigation: false` to your config.yaml;
`config.yaml`
```yaml
logLevel: "INFO"
showNavigation: false
actions:
....
```

Figure 2\. The same user interface, but with the sidebar hidden (`showNavigation: false`)
## [](#show-navigate-on-start-icons)Navigate-on-start icons on action buttons
When enabled (the default), each action button can show a small icon indicating what happens when the action is started:
* **Popup dialog** — the action opens a popup (e.g. `popupOnStart: execution-dialog`)
* **Action history** — the action opens the action details page (e.g. `popupOnStart: history`)
* **Argument form** — the action opens an argument form on start
* **Run in background** — the action runs without opening a dialog
Set `showNavigateOnStartIcons: false` in your `config.yaml` to hide these indicator icons for a cleaner look.
`config.yaml`
```yaml
showNavigateOnStartIcons: false
```
## [](#section-navgiation-style)Section Navigation Style
`sectionNavigationStyle` \- You can choose to have the section navigation buttons displayed as a Sidebar (`sidebar` \- default), or along the top (`topbar`).
### [](#%5Fsidebar%5Fnavigation%5Fstyle%5Fdefault)Sidebar navigation style (default)
`sectionNavigationStyle: sidebar` looks like this;

### [](#%5Ftopbar%5Fnavigation%5Fstyle)Topbar navigation style
`sectionNavigationStyle: topbar` looks like this;

## [](#show-version-number)Version number in the footer
You can control whether the installed OliveTin version is shown in the web interface. When enabled (the default), the footer displays text like **OliveTin 2024.06.02**. When disabled, the footer shows only **OliveTin** with no version number.
This is controlled by the **showVersionNumber** policy (in `defaultPolicy` or per user/group in ACLs). Hiding the version also hides any "new version available" link in the footer and redacts the version in [server diagnostics](../troubleshooting/server-diagnostics.html) output, which can be useful for privacy when sharing reports.
* [Version display](../reference/version%5Fdisplay.html) — full configuration and policy examples
## [](#show-new-versions)New version available - show/hide
You can disable the "new version" information in the footer - the default for `showNewVersions` is `true`;
`config.yaml`
```yaml
logLevel: "INFO"
showNewVersions: false
```
OliveTin does not check for updates by default. To enable it, see [enable update checking](../reference/updateChecks.html).
## [](#show-footer)Footer visibility - show / hide
You can disable the entire footer, if you would like a really minimal interface. The default for `showFooter` is `true`.
`config.yaml`
```yaml
logLevel: "INFO"
showFooter: false
```
This means the [showNewVersions](#show-new-versions) configuration option will automatically be `false` as well.
## [](#%5Fadditional%5Fsection%5Fnavigation%5Flinks)Additional section navigation links
You can add custom links to the OliveTin navigation bar. This is useful if you want to link to other OliveTin instances, or other web applications.
```yaml
additionalNavigationLinks:
- title: Duck Duck Go
url: https://duckduckgo.com
target: _blank
```
This will render like this;

## [](#custom-js)Custom JavaScript
This is considered an advanced feature, and is not recommended unless you like writing your own code.
You can add custom JavaScript to OliveTin, which will be executed on every page load. This can be useful for adding custom functionality to the web UI.
1. The custom javascript should be in a file called `custom.js` and saved in `custom-webui/`, which should be in the same directory as your `config.yaml`.
2. You can put whatever code you like really in your `custom.js` file.
3. Set `enableCustomJs: true` in your `config.yaml` to enable this feature.
4. Restart OliveTin. Note that the custom JavaScript will only be loaded once on startup, so if you are changing the custom JavaScript while OliveTin is running, you will need to restart OliveTin to see the changes.
If the browser blocks your script or network calls with Content Security Policy errors, see [Content Security Policy headers](../security/content%5Fsecurity%5Fpolicy.html) for how to adjust or disable the CSP sent by OliveTin.
## [](#%5Fcustom%5Fcss%5Fwith%5Fa%5Fcustom%5Ftheme)Custom CSS (with a custom theme)
You can customize OliveTin with themes, but it’s also possible to write your on very simple theme that contains just a few CSS rules to change the look and feel of OliveTin. This is very useful if you just want to change the colours of OliveTin, or hide a few elements.
### [](#%5Fwriting%5Fa%5Fsimple%5Ftheme%5Fwith%5Fa%5Fcss%5Fchange)Writing a simple theme with a CSS change
You’ll need to create a new theme, and let’s assume our theme name is going to be called `uihack`. OliveTin themes are simply a directory of CSS and other assets. OliveTin looks for a directory called `custom-webui/themes/` in the same directory as your `config.yaml` file.
Start by creating a directory called `custom-webui/themes/uihack` relative to the same directory as your `config.yaml` file. In this directory, create a file called `theme.css`.
```yaml
├── config.yaml
└── custom-webui
└── themes
└── uihack
└── theme.css
```
Here’s an example of what your `theme.css` should contain;
```css
body {
background-color: red;
}
```
### [](#%5Fsetup%5Folivetin%5Fconfig%5Fto%5Fuse%5Fyour%5Ftheme)Setup OliveTin config to use your theme
Now you need to tell OliveTin to use your new theme. To do this, set `themeName: uihack` in your OliveTin config.yaml and restart OliveTin.
```yaml
logLevel: "INFO"
themeName: uihack
```
| | OliveTin will by default only read theme.css once on startup. If you are intending to change theme.css while OliveTin is running, set themeCacheDisabled: true in your config.yaml. This will make OliveTin read theme.css on every request, and is useful for development. |
| ------------------------------------------------------------------------------------------------------------------------------------------------------------------------------------------------------------------------------------------------------------------------------ |
Restart OliveTin for the theme change to take effect. Beware of the theme cache mentioned above, if you are making changes to the CCS and refreshing the page a few times.
* [More information on theme development](../reference/reference%5Fthemes%5Ffor%5Fdevelopers.html)
API Overview
====================
**Short version**:
* on your OliveTin server to get the REST API.
* [Swagger](http://docs.olivetin.app/api/swagger/) documents the API.
**Longer version**: The OliveTin API is formally defined using the Protobuf IDL, which generates gRPC stubs, as well as a REST Gateway.
The REST API gateway is used by the WebUI, and you can use it too by default - it is exposed at "/api" by default.
The gRPC API only listens on localhost default, but it can be set to listen publicly. See [the network ports documentation](../reference/network-ports.html) for a better description of how the APIs are exposed. Most people do not need to use the gRPC API.
## [](#%5Flinks)Links
* [OliveTin 2k API: Swagger UI](http://docs.olivetin.app/api/swagger/)
* [OliveTin 2k API: OpenAPI JSON Definition](http://docs.olivetin.app/api/swagger/OliveTin.openapi.json)
* [OliveTin 3k API: Swagger UI](http://docs.olivetin.app/api/swagger/3k/)
* [OliveTin 3k API: OpenAPI JSON Definition](http://docs.olivetin.app/api/swagger/3k/OliveTin.openapi.json)
* [The OliveTin Protobuf file](https://github.com/OliveTin/OliveTin/blob/main/proto/olivetin/api/v1/olivetin.proto).
Please do talk to the developers on Discord if you’d like help using the API, or you’re thinking about building something interesting using the API!
Local User Login via API
====================
OliveTin supports serveral different ways to login, and most installations will probably login via reverse proxy, or via local user login.
To login via local user login, you can use the following API call: `/LocalUserLogin`. This is documented in the API documentation which can be found here;
The API call is a POST request, and you need to provide a `username` and `password` as a JSON object in the body of the request. Here is an example of how you can login via a cURL request;
```bash
user@host: curl -X POST "http://olivetin-server:1337/api/LocalUserLogin" -H "accept: application/json" -H "Content-Type: application/json" -d '{"username":"admin","password":"toomanysecrets"}' -v
...
< Set-Cookie: olivetin-sid-local=c6c5b2b3-a58b-4dbc-b070-ed7bdd3f1956; Path=/; Max-Age=31556952; HttpOnly
...
{"success":true}
```
You can see from the above example that the header response sets a cookie called "olivetin-sid-local" to a UUID which is your session ID. You must include this cookie with future requests to authenticate yourself.
You can also that the body of the response is a JSON object with a simple `success` key, which will be `true` if the login was successful, and `false` if it was not.
## [](#%5Fcheck%5Flogin%5Fwith%5Fwhoami)Check login with `WhoAmI`
You can check your current login status by using the `/WhoAmI` API call. This is a GET request, and you need to provide the `olivetin-sid-local` cookie in the request. Here is an example of how you can check your login status via a cURL request;
```bash
user@host: curl -X GET http://localhost:1337/api/WhoAmI -H "accept: application/json" -H 'Content-Type: application/json' -b "olivetin-sid-local=cd33aa9c-c613-473e-8581-2b742716ab8e"
{"authenticatedUser":"admin", "usergroup":"", "provider":"local", "acls":[], "sid":""}
```
API Method: StartAction
====================
This is the method the OliveTin web UI uses to start actions, and is probably the best method to use if you are writing scripts.
* **HTTP Method**: `POST`
* **Request Type**: OliveTin request object
* **Response Type**: Execution Tracking ID
There are several variants of this API call available which might be easier for scripts (or humans) to work with:
There are 4 main methods to start an action in OliveTin, which can be used in scripts or other applications. These methods allow you to trigger actions either immediately or wait for them to complete, and they can be accessed via HTTP requests.
__Webhook/API reference table__
| Function | HTTP Method | Request Type (How to select an action) | Response Type |
| ---------------------------------------------------------------- | ----------- | -------------------------------------------------------------- | --------------------------------------------------------------------------------------- |
| [StartAction](#) | POST | [OliveTin request object](start%5Faction.html#api-request-obj) | [Execution Tracking ID](start%5Faction.html#api-response-trackingid) |
| [StartActionByGet](method%5FStartActionByGet.html) | GET | [Action ID in the URL](start%5Faction.html#api-request-idurl) | [Execution Tracking ID](start%5Faction.html#api-response-trackingid) |
| [StartActionAndWait](method%5FStartActionAndWait.html) | POST | [OliveTin request object](start%5Faction.html#api-request-obj) | [Log Entry (waits for the action to finish)](start%5Faction.html#api-response-logentry) |
| [StartActionByGetAndWait](method%5FStartActionByGetAndWait.html) | GET | [Action ID in the URL](start%5Faction.html#api-request-idurl) | [Log Entry (waits for the action to finish)](start%5Faction.html#api-response-logentry) |
You can also browse these methods in the [OpenAPI/Swagger](htts://docs.olivetin.app/api/swagger/) docs if you prefer.
## [](#%5Fexample%5Fapi%5Fcall%5Fstart%5Fan%5Faction%5Fusing%5Fstartaction)Example API call: Start an action using `StartAction`
curl
```bash
user@host: curl "http://olivetin.webapps.teratan.lan/api/StartAction" --json '{"bindingId": "nuclear_reactor_shutdown"}'
```
Powershell
```powershell
PS C:\Users\xcons> $json = '{"bindingId": "deploy_attack_gnomes"}'
PS C:\Users\xcons> Invoke-RestMethod -Method "Post" -Uri "http://olivetinServer:1337/api/StartAction" -Body $json
```
## [](#%5Fexample%5Fapi%5Fcall%5Fstart%5Fan%5Faction%5Fusing%5Fstartaction%5Fwith%5Farguments)Example API call: Start an action using `StartAction` with arguments
curl
```bash
user:host: curl 'http://olivetin.example.com/api/StartAction' --json '{"bindingId": "Ping_host", "arguments": [{"name": "host", "value": "example.com"},{"name": "count", "value": "1"}]}'
```
API Method: StartActionAndWait
====================
This method is useful is you are writing a script, and want to wait for the action to finish so that you can check the result, or get the output.
* **HTTP Method**: `POST`
* **Request Type**: OliveTin request object
* **Response Type**: Log Entry (waits for the action to finish)
There are several variants of this API call available which might be easier for scripts (or humans) to work with:
There are 4 main methods to start an action in OliveTin, which can be used in scripts or other applications. These methods allow you to trigger actions either immediately or wait for them to complete, and they can be accessed via HTTP requests.
__Webhook/API reference table__
| Function | HTTP Method | Request Type (How to select an action) | Response Type |
| ---------------------------------------------------------------- | ----------- | -------------------------------------------------------------- | --------------------------------------------------------------------------------------- |
| [StartAction](method%5FStartAction.html) | POST | [OliveTin request object](start%5Faction.html#api-request-obj) | [Execution Tracking ID](start%5Faction.html#api-response-trackingid) |
| [StartActionByGet](method%5FStartActionByGet.html) | GET | [Action ID in the URL](start%5Faction.html#api-request-idurl) | [Execution Tracking ID](start%5Faction.html#api-response-trackingid) |
| [StartActionAndWait](#) | POST | [OliveTin request object](start%5Faction.html#api-request-obj) | [Log Entry (waits for the action to finish)](start%5Faction.html#api-response-logentry) |
| [StartActionByGetAndWait](method%5FStartActionByGetAndWait.html) | GET | [Action ID in the URL](start%5Faction.html#api-request-idurl) | [Log Entry (waits for the action to finish)](start%5Faction.html#api-response-logentry) |
You can also browse these methods in the [OpenAPI/Swagger](htts://docs.olivetin.app/api/swagger/) docs if you prefer.
API Method: StartActionByGet
====================
This is the method that allows you to specify the action ID in the URL, and is probably the best to do quick integrations - QR Codes, streamdeck, etc. You cannot pass arguments using this method.
* **HTTP Method**: `GET`
* **Request Type**: Action ID in the URL
* **Response Type**: Execution Tracking ID
There are 4 main methods to start an action in OliveTin, which can be used in scripts or other applications. These methods allow you to trigger actions either immediately or wait for them to complete, and they can be accessed via HTTP requests.
__Webhook/API reference table__
| Function | HTTP Method | Request Type (How to select an action) | Response Type |
| ---------------------------------------------------------------- | ----------- | -------------------------------------------------------------- | --------------------------------------------------------------------------------------- |
| [StartAction](method%5FStartAction.html) | POST | [OliveTin request object](start%5Faction.html#api-request-obj) | [Execution Tracking ID](start%5Faction.html#api-response-trackingid) |
| [StartActionByGet](#) | GET | [Action ID in the URL](start%5Faction.html#api-request-idurl) | [Execution Tracking ID](start%5Faction.html#api-response-trackingid) |
| [StartActionAndWait](method%5FStartActionAndWait.html) | POST | [OliveTin request object](start%5Faction.html#api-request-obj) | [Log Entry (waits for the action to finish)](start%5Faction.html#api-response-logentry) |
| [StartActionByGetAndWait](method%5FStartActionByGetAndWait.html) | GET | [Action ID in the URL](start%5Faction.html#api-request-idurl) | [Log Entry (waits for the action to finish)](start%5Faction.html#api-response-logentry) |
You can also browse these methods in the [OpenAPI/Swagger](htts://docs.olivetin.app/api/swagger/) docs if you prefer.
## [](#%5Fexample%5Fapi%5Fcall%5Fstart%5Fan%5Faction%5Fby%5Fid%5Fin%5Fthe%5Furl)Example API call; Start an action by ID in the URL
curl
```asciidoc
user@host: curl http://olivetin.example.com/api/StartActionByGet/pingGithub
```
The corresponding config.yaml would look like this;
```yaml
actions:
- title: Ping GitHub.com
id: pingGithub
shell: ping github.com -c 1
```
IDs are used by these API calls, as you probably want the interface to display a human-readable title, whereas the API call doesn’t want to have spaces or punctuation.
API Method: StartActionByGetAndWait
====================
This method is also a very easy way to quickly start an action, but it waits for the action to finish before returning the result. This is useful if you want to get the output of the action or check its result without having to poll for it.
* **HTTP Method**: `GET`
* **Request Type**: Action ID in the URL
* **Response Type**: Log Entry (waits for the action to finish)
There are several variants of this API call available which might be easier for scripts (or humans) to work with:
There are 4 main methods to start an action in OliveTin, which can be used in scripts or other applications. These methods allow you to trigger actions either immediately or wait for them to complete, and they can be accessed via HTTP requests.
__Webhook/API reference table__
| Function | HTTP Method | Request Type (How to select an action) | Response Type |
| ------------------------------------------------------ | ----------- | -------------------------------------------------------------- | --------------------------------------------------------------------------------------- |
| [StartAction](method%5FStartAction.html) | POST | [OliveTin request object](start%5Faction.html#api-request-obj) | [Execution Tracking ID](start%5Faction.html#api-response-trackingid) |
| [StartActionByGet](method%5FStartActionByGet.html) | GET | [Action ID in the URL](start%5Faction.html#api-request-idurl) | [Execution Tracking ID](start%5Faction.html#api-response-trackingid) |
| [StartActionAndWait](method%5FStartActionAndWait.html) | POST | [OliveTin request object](start%5Faction.html#api-request-obj) | [Log Entry (waits for the action to finish)](start%5Faction.html#api-response-logentry) |
| [StartActionByGetAndWait](#) | GET | [Action ID in the URL](start%5Faction.html#api-request-idurl) | [Log Entry (waits for the action to finish)](start%5Faction.html#api-response-logentry) |
You can also browse these methods in the [OpenAPI/Swagger](htts://docs.olivetin.app/api/swagger/) docs if you prefer.
Misc API calls
====================
## [](#%5Fexample%5Fapi%5Fcall%5Fget%5Fthe%5Fdashboard%5Fbuttons%5Fcomponents)Example API call: Get the dashboard buttons ("components")
curl
```asciidoc
user@host: curl http://olivetinServer:1337/api/GetDashboardComponents
```
## [](#%5Fexample%5Fapi%5Fcall%5Freadyz%5Fhealthcheck)Example API call: readyz Healthcheck
This is useful for configuring healthchecks in docker containers, or on Kubernetes.
curl
```asciidoc
user@host: curl http://olivetinServer:1337/api/readyz
{"status": "ok"}
```
The response will always be "status: ok" to indicate that the API is up, or it will timeout.
Starting Actions from the API
====================
There are several variants of this API call available which might be easier for scripts (or humans) to work with!
There are 4 main methods to start an action in OliveTin, which can be used in scripts or other applications. These methods allow you to trigger actions either immediately or wait for them to complete, and they can be accessed via HTTP requests.
__Webhook/API reference table__
| Function | HTTP Method | Request Type (How to select an action) | Response Type |
| ---------------------------------------------------------------- | ----------- | ------------------------------------------- | -------------------------------------------------------------------- |
| [StartAction](method%5FStartAction.html) | POST | [OliveTin request object](#api-request-obj) | [Execution Tracking ID](#api-response-trackingid) |
| [StartActionByGet](method%5FStartActionByGet.html) | GET | [Action ID in the URL](#api-request-idurl) | [Execution Tracking ID](#api-response-trackingid) |
| [StartActionAndWait](method%5FStartActionAndWait.html) | POST | [OliveTin request object](#api-request-obj) | [Log Entry (waits for the action to finish)](#api-response-logentry) |
| [StartActionByGetAndWait](method%5FStartActionByGetAndWait.html) | GET | [Action ID in the URL](#api-request-idurl) | [Log Entry (waits for the action to finish)](#api-response-logentry) |
You can also browse these methods in the [OpenAPI/Swagger](htts://docs.olivetin.app/api/swagger/) docs if you prefer.
## [](#api-request-idurl)Request type: Action ID in the URL
Used by:
* [StartActionByGet](method%5FStartActionByGet.html)
* [StartActionByGetAndWait](method%5FStartActionByGetAndWait.html)
If you are trying to integrate OliveTin with your own scripts or processes, it’s probably easiest to start actions by using an ID directly in the URL, [see the example](#api-eg-startIdUrl).
## [](#api-request-obj)Request type: OliveTin request object
Used by:
* [StartAction](method%5FStartAction.html)
* [StartActionAndWait](method%5FStartActionAndWait.html)
OliveTin request object structure
```json
{
"actionId": "string",
"arguments": [
{
"name": "string",
"value": "string"
}
],
"uniqueTrackingId": "string"
}
```
To find your Action ID, and understand how Action IDs work, see the [Action ID](../action%5Fcustomization/ids.html) documentation
If you need more control over the execution, then the only other option is to submit a `OliveTin reqjest object`, which is just a very simple JSON structure like this;
```json
{
"actionId": "Generate cryptocurrency",
"arguments": [],
"uniqueTrackingId": "my-tracking-id",
}
```
More detailed examples can be seen below.
## [](#api-response-trackingid)Response type: Execution Tracking ID
Used by:
* [StartAction](method%5FStartAction.html)
* [StartActionByGet](method%5FStartActionByGet.html)
Example Execution Tracking ID response
```json
{"executionTrackingId":"5bb4860c-bbd0-4bc9-a7d6-42240551500c"}
```
## [](#api-response-logentry)Response type: LogEntry
Used by:
* [StartActionAndWait](method%5FStartActionAndWait.html)
* [StartActionByGetAndWait](method%5FStartActionByGetAndWait.html)
Example log entry
```json
{
"logEntry": {
"datetimeStarted": "2024-02-27 14:14:49",
"actionTitle": "Restart httpd on server1",
"stdout": "",
"stderr": "",
"timedOut": true,
"exitCode": -1,
"user": "",
"userClass": "",
"actionIcon": "🔄",
"tags": [
],
"executionTrackingId": "b04b1e90-d457-4158-b7dc-da9e81f21568",
"datetimeFinished": "2024-02-27 14:14:52",
"actionId": "restart_httpd",
"executionStarted": true,
"executionFinished": true,
"blocked": false
}
}
```
Environment variables
====================
All argument names and values are also passed as environment variables as well, which can be very useful when passing several arguments to a script, for example.
`config.yaml`
```yaml
actions:
- title: Print names of new files
shell: /opt/newfile.py
arguments:
- name: filename
type: unicode_identifier
- name: filesizebytes
type: unicode_identifier
- name: fileisdir
type: unicode_identifier
execOnFileCreatedInDir:
- /home/user/Downloads/
```
This is an example of a python script using the environment variables;
`/opt/newfile.py`
```python
#!/usr/bin/env python
import os
print(os.environ['OLIVETIN'])
print(os.environ['FILENAME'])
print(os.environ['FILESIZEBYTES'])
print(os.environ['FILEISDIR'])
```
## [](#execution-request-variables)Execution Request Variables
OliveTin injects two execution request variables into every action execution. They are available as template variables (e.g. in `shell`, `shellAfterCompleted`, or other template fields) and as environment variables passed to the process.
* `ot_username` — The username of the user who started the execution. In templates (version 3k) use `{{ .Arguments.ot_username }}`; in the process environment it is `OT_USERNAME`. For unauthenticated or automated runs this may be `guest`, `cron`, or similar, depending on how the action was triggered.
* `ot_executionTrackingId` — A unique identifier for this execution. In templates (version 3k) use `{{ .Arguments.ot_executionTrackingId }}`; in the process environment it is `OT_EXECUTIONTRACKINGID`. Useful for logging, correlating with the API or execution log, or idempotency in scripts.
In version 2k, the template syntax was `{{ ot_username }}` and `{{ ot_executionTrackingId }}` (without the `.Arguments.` prefix). Version 3k uses the `.Arguments.` form.
Example in a shell command (version 3k):
```yaml
shell: echo "Run by {{ .Arguments.ot_username }} (execution {{ .Arguments.ot_executionTrackingId }})"
```
Example in a script using environment variables:
```shell
#!/bin/sh
echo "Started by $OT_USERNAME with tracking id $OT_EXECUTIONTRACKINGID"
```
In [Execute after completion](../action%5Fexecution/aftercompletion.html) (`shellAfterCompleted`), the same variables are available as template variables (e.g. `{{ .Arguments.ot_username }}`, `{{ .Arguments.ot_executionTrackingId }}` in version 3k); user-defined argument values are not passed there.
## [](#olivetin-env-var)The OLIVETIN environment variable
OliveTin sets the environment variable `OLIVETIN` to `1` for every action it runs. Scripts can check this variable to detect whether they are running inside OliveTin (for example, to adjust logging, skip interactive prompts, or enable OliveTin-specific behavior).
Example: detect OliveTin in a shell script
```shell
#!/bin/sh
if [ "$OLIVETIN" = "1" ]; then
echo "Running under OliveTin"
else
echo "Running outside OliveTin"
fi
```
## [](#%5Fusing%5Fprocess%5Fenvironment%5Fin%5Ftemplates)Using process environment in templates
To use the **process** environment (the environment OliveTin was started with) inside action template fields such as `shell` or `shellAfterCompleted`, use the `.Env` template variable: `{{ .Env.VAR_NAME }}`. This substitutes the value at execution time. See [Using .Env in template replacements](../advanced%5Fconfiguration/config%5Fenvs.html#using-env-in-template-replacements) for details and examples.
## [](#%5Fnotes)Notes
1. Argument names are converted to uppercase for environment variables, `name: filename` becomes `FILENAME`.
2. OliveTin sets `OLIVETIN=1` in the process environment for every action; see [The OLIVETIN environment variable](#olivetin-env-var) above.
3. The execution request variables are exposed as `OT_USERNAME` and `OT_EXECUTIONTRACKINGID` in the process environment; see [Execution Request Variables](#execution-request-variables) above.
4. The environment variables are passed into the execution context which uses a shell (/bin/sh on Linux), so it is also possible to use them with the $ notation in the `shell` line, like this; `shell: echo $FILENAME` for example.
Input: Textbox
====================
Many times you need to customize how an action/shell command is run, with arguments. For example;
```asciidoc
echo "Hello world"
```
In the example above, `Hello world` is an argument passed to the `echo` command. OliveTin allows you to add pre-defined, and free-text arguments to commands in this way. Below is the OliveTin version of the `echo` command shown above;
`config.yaml`
```yaml
actions:
- title: echo a message
icon: smile
shell: echo {{ message }}
arguments:
- name: message
default: Hello World
type: ascii_sentence
actions:
- title: Print a message
shell: echo {{ message }}
arguments:
- name: message
description: The message you want to print out on the shell.
title: Your Message
default: Hello World
type: ascii_sentence
```
This will give you a normal button, like this;

However, when you click on it, you’ll get a prompt to enter arguments, like this;

You’ll see that the type is set to `ascii_sentence`. This applies fairly safe input validation to arguments, so that only a-z, 0-9, spaces and .'s are allowed.
When you start the action, and it’s finished, go to the "logs" view to view the output of the command we’ve just run.

Input: Checkbox/Boolean
====================
The `checkbox` type argument is a simple checkbox that can be used to toggle a boolean value. It can be especially useful to pass flags to your actions.
```yaml
actions:
- title: remove files
shell: rm {{ useTheForce }} /tmp/Downloads/
arguments:
- title: Use rm -rf?
name: useTheForce
type: checkbox
choices:
- title: 1
value: "-rf"
- title: 0
value: ""
```
Input: Confirmation
====================
The `confirmation` type argument is a special argument type, which simply disables the "Start" button until a checkbox is ticked. This can be useful if you have an action with no other arguments, but you want to prevent accidental button-clicks starting the action.
```yaml
actions:
- title: Delete old backups
icon: ashtonished
shell: rm -rf /opt/oldBackups/
arguments:
- type: confirmation
title: Are you sure?!
```

Notice in the webui the "start" button is disabled.
Input: DateTime
====================
OliveTin supports datetime pickers - note that these do NOT add your timezone, so it up to your scripts / commands to interpret which timezone is being used.
`config.yaml`
```yaml
actions:
- title: Print your favourite datetime!
shell: echo {{ my_favourite_time }}
arguments:
- type: datetime
title: My Favourite DateTime
```

## [](#%5Fformat%5Fvalidation)Format & Validation
| | The OliveTin server does try to parse and validate the date on the server side to prevent dangerous input, but there is no validation in the browser, beyond what your browser might do to prevent you from picking an invalid date. **This is safe**, as what really matters is what the server allows to be passed to be executed - and that is checked. |
| ------------------------------------------------------------------------------------------------------------------------------------------------------------------------------------------------------------------------------------------------------------------------------------------------------------------------------------------------------------- |
At the time of writing, it is not yet possible to specify only a date, or only a time, or change the date / time format.
## [](#%5Frejecting%5Fempty%5Fvalues%5Fnull)Rejecting empty values (null)
```yaml
actions:
- shell: echo "Hello {{ name }}!"
arguments:
- name: name
rejectNull: true`
```
Input: Dropdowns
====================
Predefined choices are normally the safest type of arguments, because users are limited to only enter values that you specify.
```yaml
actions:
- title: Print a message
icon: smile
shell: echo "{{ message }}"
arguments:
- name: message
description: The message you want to print out.
choices:
- title: Hello
value: Hello there!
- title: Goodbye
value: Aww, goodbye. :-(
```
Note that when predefined choices are used, the argument type is ignored.
This is what it looks like in the web interface;

Then finally, when you execute this command, it would look something like this (remember that this is just a basic "echo" command).

In the logs, you can then click on the log entry link to open the results;

## [](#args-dropdown-entities)Using Entities in Dropdowns
Dropdowns can also be populated with a list of entities, like this;
`config.yaml`
```yaml
actions:
- title: restart container
shell: 'docker restart {{ containerToRestart }}'
arguments:
- name: containerToRestart
entity: container
title: 'Select Container'
choices:
- value: '{{ container.Names }}'
title: '{{ container.Names }}'
entities:
- file: entities/containers.json
name: container
```
This is what it looks like in the web interface;

## [](#%5Frejecting%5Fempty%5Fvalues%5Fnull)Rejecting empty values (null)
```yaml
actions:
- shell: echo "Hello {{ name }}!"
arguments:
- name: name
rejectNull: true`
```
## [](#%5Fdefault%5Fvalues)Default values
Dropdown arguments can also have default values. This is done by adding a `default` key to the argument definition.
`config.yaml`
```yaml
actions:
- title: "Print your favorite movie"
shell: echo '{{ movie }} is amazing'
arguments:
- name: movie
choices:
- value: "Star Wars"
- value: "Star Trek"
- value: "The Matrix"
default: "Star Trek"
```
Input: Textarea
====================
OliveTin supports multi-line text inputs, which can be useful for longer messages or scripts. You should set your argument `type` to `raw_string_multiline` to use these.
As the name implies, textareas are raw, and are NOT validated by any regex.
`config.yaml`
```yaml
actions:
- title: Save text to file
shell: echo "$CONTENT" > file
arguments:
- type: raw_string_multiline
name: content
```
This renders like this;

Introduction to Arguments
====================
Actions and commands that OliveTin runs, without arguments, are generally quite safe - only that command can be run, without modifications. However, many users need the flexibility to set options on that command - normally called command line arguments. In OliveTin, arguments are defined in a shell commands like `echo {{ message }}`, with a bit of extra configuration.
Examples of valid argument names are `{{ personName }}`, `{{ customer_number }}` and `{{ ISBN11_code }}`.
* a-z (case insensitive)
* \_ is allowed
* numbers are allowed (argument names can also start with numbers)
* all other characters are invalid for argument names.
## [](#%5Fwhats%5Fnext)What’s Next?
Now that you understand how arguments work, explore the different argument types and features:
* [Argument types](types.html) \- Learn about different input types (text, dropdown, checkbox, etc.)
* [Argument safety](safety.html) \- Understand how OliveTin keeps arguments safe
* [Argument suggestions](suggestions.html) \- Add dynamic suggestions to help users
* [Input validation with regex](regex.html) \- Validate user input with regular expressions
* [Environment variables](env.html) \- Use arguments to set environment variables
* [See examples](../action%5Fexamples/intro.html) \- View real-world examples using arguments
Password
====================
Sometimes you want to mask the input you pass, and a password field is useful for this.
| | Passwords are passed to the OliveTin server in cleartext (unless you’re using HTTPS), and are just treated as a string on the server side. |
| --------------------------------------------------------------------------------------------------------------------------------------------- |
`config.yaml`
```yaml
actions:
- title: echo a message
icon: smile
shell: echo {{ my_password }}
arguments:
- name: my_password
type: password
```
Custom regex
====================
OliveTin version 2024.02.081 and above support custom regex patterns for argument types. Here is an example to validate against any 3 letter word;
| | The regex pattern should be enclosed in single quotes, otherwise you will probably get a YAML error when starting OliveTin. |
| ------------------------------------------------------------------------------------------------------------------------------ |
`config.yaml`
```yaml
actions:
- title: echo a message
icon: smile
shell: echo "{{ message }}"
arguments:
- name: message
type: 'regex:^\w\w\w$'
```
The site is a good place to test your regex patterns. OliveTin checks your regex 2 times;
1. **Regex in the browser** (which probably uses PCRE or Perl Compatible Regular Expressions) - this is so that the browser can give you a nice validation message. This is ignored when it reaches the server though, or if you are using the API directly. Select "PCRE" on the regex101 site when testing.
2. **Regex on the server** (which uses Golang’s regex engine) - this is the one that actually validates the input. Select "Golang" on the regex101 site when testing.
You cannot specify different regex patterns for the browser and server. The regex pattern you create will need to be compatible with both types of regex engine.
Important Safety Warning
====================
Before you continue, it’s important to read through this safety warning.
OliveTin supports customization of command line arguments, but there is a element of risk. For example, if your command is `echo {{ message }}`, and you allow your users to set `{{ message }}` to the value `"" && rm -rf /` , then you’ve got real problems. For this reason, OliveTin tries to give you useful ways to restrict what users are allowed to enter - with **argument types**.
However, here are some important rules to try and follow with argument types;
* Use the most restrictive argument types when possible - `ascii` and `int`. This will stop users entering argument values that might be used dangerously, but it’s not foolproof. For example, if you have a command like `createSnapshot.sh --count {{ snapshotCount }}`, and set `snapshotCount` to `int`, then at least users will only be able to enter integer numbers. However, nothing stops them entering crazy values like 9999.
* Don’t give access to actions with arguments to people you don’t trust. Please don’t ever put your OliveTin install on the public internet!
Suggestions
====================
Argument inputs can also have "suggested" values, which can make it quicker to type commonly used options. The way that these are displayed will vary depending on your browser, as they are implemented as a modern HTML5 browser feature called "datalist".
Suggestions are configured like this;
Configuration example of input suggestions
```yaml
actions:
- title: Restart Docker Container
icon: restart
shell: docker restart {{ container }}
arguments:
- name: container
title: Container name
suggestions:
- plex:
- graefik:
- grafana:
- wifi-controller: WiFi Controller
- firewall-controller: Firewall Controller
```
In the examples above, there are 5 suggestions. The first 3 suggestions contain a suggestion with a blank title. The last 2 suggestions contain a human readable title (eg: `wifi-controller` is the suggestion, and `WiFi Controller` is the title).
| | suggestions: is a yaml **map**, not a **list**. If you leave the title empty you must still end the suggestion with a ":". |
| ----------------------------------------------------------------------------------------------------------------------------- |
## [](#%5Fexamples)Examples

Figure 1\. Screenshot of input suggestions with Firefox on Linux.

Figure 2\. Screenshot of input suggestions with Chrome on Linux.
## [](#suggestions-browser-key)Browser-Stored Suggestions
In addition to static suggestions defined in your configuration, OliveTin can remember values that users have previously entered and offer them as suggestions for future use. This is enabled using the `suggestionsBrowserKey` property.
When a user submits an action with a `suggestionsBrowserKey` configured, the entered value is saved in the browser’s local storage. The next time the user opens the same form (or any form with the same key), those previously-used values appear as suggestions alongside any static suggestions.
### [](#%5Fbasic%5Fusage)Basic Usage
```yaml
actions:
- title: SSH to Server
shell: ssh {{ hostname }}
arguments:
- name: hostname
title: Hostname
description: Server to connect to
suggestionsBrowserKey: ssh-hosts
```
With this configuration:
1. The first time a user runs this action and enters `server1.example.com`, that value is saved
2. The next time they open the action, `server1.example.com` appears as a suggestion
3. Each new unique value they enter is added to the suggestions list
### [](#%5Fsharing%5Fsuggestions%5Facross%5Farguments)Sharing Suggestions Across Arguments
Multiple arguments can share the same `suggestionsBrowserKey`, allowing suggestions to be reused across different actions or arguments. This is useful when the same type of value is used in multiple places.
```yaml
actions:
- title: Ping Host
shell: ping -c 4 {{ host }}
arguments:
- name: host
title: Hostname
suggestionsBrowserKey: network-hosts
- title: SSH to Host
shell: ssh {{ server }}
arguments:
- name: server
title: Server
suggestionsBrowserKey: network-hosts
- title: Traceroute
shell: traceroute {{ destination }}
arguments:
- name: destination
title: Destination
suggestionsBrowserKey: network-hosts
```
In this example, all three actions share the `network-hosts` key. If a user enters `192.168.1.100` in the Ping action, that value will also appear as a suggestion in the SSH and Traceroute actions.
### [](#%5Fcombining%5Fstatic%5Fand%5Fbrowser%5Fsuggestions)Combining Static and Browser Suggestions
You can use both static `suggestions` and `suggestionsBrowserKey` together. Both sets of suggestions will be displayed to the user:
```yaml
actions:
- title: Deploy to Environment
shell: /opt/scripts/deploy.sh {{ environment }}
arguments:
- name: environment
title: Environment
suggestions:
production: Production Server
staging: Staging Server
development: Development Server
suggestionsBrowserKey: deploy-environments
```
This gives users quick access to the predefined environments while also remembering any custom environments they’ve deployed to.
### [](#%5Fbehavior%5Fnotes)Behavior Notes
* **Password and sensitive fields**: Values from `password`, `checkbox`, and `confirmation` type arguments are never saved to browser storage
* **Empty values**: Empty or blank values are not saved as suggestions
* **Local storage**: Suggestions are stored in the browser’s `localStorage` under keys prefixed with `olivetin-suggestions-`
* **Per-browser**: Since suggestions use browser local storage, they are specific to each browser and device - they don’t sync across devices or browsers
* **Clearing suggestions**: Users can clear their saved suggestions by clearing their browser’s local storage for the OliveTin site
## [](#%5Fbrowser%5Fsupport)Browser Support
`datalist` is widely supported now-a-days, but Firefox on Android notably lacks support; . See the upstream bug here; .
Argument types
====================
A full list of argument types are below;
__Argument types reference table__
| Type | Rendered as | Allowed values |
| ---------------------------- | ----------------------------------------- | -------------------------------------------------------------------------------------------------------------------------------------------------------------------------------------------------------------------------------------------------------------------------- |
| (default) | [Textbox](input.html) | If a type: is not set, and choices: is empty, then ascii will be used, and a warning will be logged. It is recommended that you set the type explicitly, rather than relying on defaults. |
| ascii | [Textbox](input.html) | a-z (case insensitive), 0-9, but no spaces or punctuation |
| ascii\_identifier | [Textbox](input.html) | Like a DNS name, a-Z (case insensitive), 0-9, \-, ., and \_. |
| shell\_safe\_identifier | [Textbox](input.html) | Like an ascii identifier, but also allows @ and +. Useful for shell-safe usernames and email-style identifiers. |
| ascii\_sentence | [Textbox](input.html) | a-z (case insensitive), 0-9, with spaces, . and ,. |
| unicode\_identifier | [Textbox](input.html) | Like an ascii identifier, but allows unicode characters. This is useful for languages that use non-ascii characters, such as Chinese, Japanese, etc. |
| email | [Textbox](input.html) | An email address. |
| password | [Password](password.html) | A password, which is hidden when typed. |
| very\_dangerous\_raw\_string | [Textbox](input.html) | Anything. This is **incredibly dangerous**, as effectively people can type anything they like, including executing additional commands beyond what you specify. Absolutely should not be used unless your OliveTin instance can only be used by people you trust entirely. |
| regex:… | [Textbox](input.html) | Version 2024.03.081 and above support custom regex patterns. See [Custom regex arguments](regex.html). |
| int | [Textbox](input.html) | Any number, made up of the characters 0 to 9\. Negative numbers are not supported. |
| url | [Textbox](input.html) | A URL (e.g. ). Accepts any scheme, including file:// and ftp://. See warning below. |
| confirmation | [Confirmation](input%5Fconfirmation.html) | A "hidden" argument that makes the action require a confirmation before launching. |
| n/a, but choices used | [Dropdown](input%5Fdropdown.html) | A "hidden" argument that makes the action require a confirmation before launching. |
| raw\_string\_multiline | [Textarea](input%5Ftextarea.html) | Anything. This is **dangerous**, as effectively people can type anything they like |
| | Security risk: URL argument type The url argument type does not restrict the URL scheme. Users can enter file:// (local filesystem) URLs, ftp://, or other schemes. If the argument value is passed directly to curl, wget, or similar tools, a malicious or mistaken input could read local files, access internal services, or trigger unwanted network requests. If your action might be used by untrusted users, validate or filter the URL in your script (e.g. allow only https://) before using the value. |
| -------------------------------------------------------------------------------------------------------------------------------------------------------------------------------------------------------------------------------------------------------------------------------------------------------------------------------------------------------------------------------------------------------------------------------------------------------------------------------------------------------------------- |
Fieldsets
====================
It is possible to group actions together in a "group", which is not a directory, but is called a "fieldset". This is an example of a fieldset that contains two [Folders](3-folders.html).

Fieldsets are defined under a [Dashboards](intro.html) in your config.yaml.
`config.yaml`
```yaml
dashboards:
- title: My First Dashboard
contents:
- title: Fieldset 1
type: fieldset
contents: []
- title: Fieldset 2
type: fieldset
contents: []
```
Fieldsets are also generated for you when you use [Entities](../entities/intro.html).
`config.yaml`
```yaml
dashboards:
- title: My First Dashboard
contents:
- title: Fieldset 1
type: fieldset
entity: server
contents:
- title: Start {{ server.Name }}
- title: Shutdown {{ server.Name }}
```
Folders (Directories)
====================
Folders (Directories) are a good way to group up actions in the same way that you would organize files on your computer into directories.

You must first create a dashboard to use a directory, and then you "reference" actions that you want in that folder based on the action name. Anything without a "contents" property is treated as an action.
Let’s look at the example below with 4 actions, 2 top level folders and 1 subfolder.
`config.yaml`
```yaml
actions:
- title: Action 1
shell: echo "action1"
- title: Action 2
shell: echo "action2"
- title: Action 3
shell: echo "action3"
- title: Action 4
shell: echo "action4"
dashboards:
- title: My First Dashboard
contents:
- title: Fieldset 1
type: fieldset
contents:
- title: Folder 1
contents:
- title: Action 1
- title: Action 2
- title: Subfolder 2
contents:
- title: Action 3
- title: Folder 2
contents:
- title: Action 4
```
Displays
====================
Displays are a way of displaying text, values, variables and similar on a dashboard.
They are rendered as just a simple box, that shown alongside actions. You can add arbitary HTML to a display, which makes it useful for showing links, etc.

`config.yaml`
```yaml
dashboards:
# This the second dashboard.
- title: My Containers
contents:
# This is a fieldset, which is a way of dashboard items together actions together.
- title: Container {{ container.Names }}
entity: container
type: fieldset
contents:
# This is a display
- type: display
title: |
{{ container.Names }}
{{ container.State }}
# These are the actions that we want on the dashboard.
- title: 'Start {{ container.Names }}'
- title: 'Stop {{ container.Names }}'
```
## [](#%5Fcss%5Fclasses)CSS Classes
You can also add CSS classes to the display, which can be useful for styling.
```yaml
dashboards:
- title: My Containers
contents:
- title: 'Container {{ container.Names.0 }} ({{ container.Image }})'
entity: container
type: fieldset
contents:
- type: display
cssClass: '{{ container.State }}'
title: |
{{ container.Status }}
{{ container.State }}
- title: 'Start {{ container.Names.0 }}'
- title: 'Stop {{ container.Names.0 }}'
- title: 'Remove {{ container.Names.0 }}'
```
You can then use the following CSS to style the display;
```css
div.display.running {
color: green;
}
```
Most recent action output
====================
This is considered an advanced and experimental feature at the moment.
The `stdout-most-recent-execution` view is a way to display the most recent output of an action on a dashboard. This is useful for actions that are run on a schedule, or actions that are run on startup. This is a picture of what it looks like:
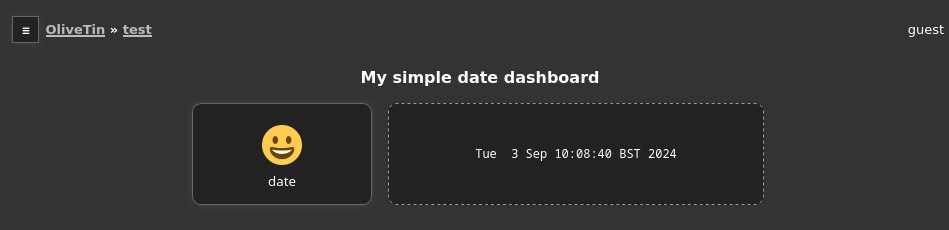
To set this up, here is the configuration you need to add to your `config.yaml` file;
```yaml
actions:
- title: Get status
id: status_command
shell: date
execOnStartup: true
execOnCron:
- "*/1 * * * *"
dashboards:
- title: Control Panel
contents:
- title: Status
type: fieldset
contents:
- type: stdout-most-recent-execution
title: status_command
```
Note that the output only refreshes with the browser, not when the button is clicked.
As this is an experimental feature, please look at options for [support](../troubleshooting/wheretofindhelp.html) if you need help getting it to work.
The "actions" section
====================
To make Olivetin easy to use, it generates a default "Actions" section for you, as many people don’t want the hassle of having to configure dashboards. This is fine, you absolutely do not need a `dashboards:` section in your `config.yaml` at all if you don’t want it.
However, some people prefer to put every action onto a Dashboard. If you so this, OliveTin will hide the `Actions` view for you on the sidebar.
Change component style
====================
You can change the style of any dashboard component by adding a `cssClass` property to the component. This is useful for styling actions, displays, fieldsets and folders. Here is an example of how to add a class to an action;
```yaml
themeName: my-theme
actions:
- title: My Action
shell: echo "Hello"
dashboards:
- title: My Dashboard
contents:
- title: My Fieldset
type: fieldset
contents:
- title: My Action
cssClass: big-button
```
You can then create a theme, and add the following CSS to style the action;
`custom-webui/themes/my-theme/theme.css`
```css
.big-button {
background-color: red;
color: white;
font-size: 20px;
grid-column: span 2;
grid-row: span 2;
}
```
Entity Directories
====================
| | Entity directories were added in 3000.6.0. |
| --------------------------------------------- |
Entity directories are a way of grouping actions together based on a single entity instance.
For example, if you have a `server` entity, you can create a directory called `servers` and then add all the actions that you want to apply to all servers to that directory.
In the default config, **More Options** is an **entity directory** because it’s parent is a fieldset that is defined with an `entity` property.
```yaml
- type: fieldset
entity: server
title: 'Server: {{ .CurrentEntity.hostname }}'
contents:
# By default OliveTin will look for an action with a matching title
# and put it on the dashboard.
#
# Fieldsets also support `type: display`, which can display arbitary
# text. This is useful for displaying things like a container's state.
- type: display
title: |
Hostname: {{ server.name }}
IP Address: {{ server.ip }}
# These are the actions (defined above) that we want on the dashboard.
- title: '{{ server.name }} Wake on Lan'
- title: '{{ server.name }} Power Off'
- title: More Options
type: directory
contents:
- title: '{{ server.name }} Print server name'
```
Example Dashboard usage
====================
Check out the following examples of dashboards in several complete OliveTin solutions;
* [Container Control Panel](../solutions/container-control-panel/index.html)
* [Systemd Control Panel](../solutions/systemd-control-panel/index.html)
Hyperlinks in dashboards
====================
This page explains how to add clickable links on dashboards using [display components](4-displays.html) (`type: display`).
## [](#%5Fhow%5Fdo%5Fi%5Fadd%5Fa%5Fclickable%5Flink%5Fon%5Fa%5Fdashboard)How do I add a clickable link on a dashboard?
Use a `type: display` component and put normal HTML in its `title` field. OliveTin renders `title` as HTML, so use an anchor element, for example:
```html
Documentation
```
## [](#%5Fshould%5Fi%5Fopen%5Fexternal%5Flinks%5Fin%5Fa%5Fnew%5Ftab)Should I open external links in a new tab?
For links that leave OliveTin, `target="_blank"` is convenient. Combine it with `rel="noopener noreferrer"` so the new page cannot access your OliveTin tab and referrer details are limited. Example:
```yaml
contents:
- type: display
title: |
Open docs
```
## [](#%5Fcan%5Fi%5Fmix%5Flinks%5Fwith%5Fentity%5Fvariables%5For%5Fplain%5Ftext)Can I mix links with entity variables or plain text?
Yes. `title` can combine literal text, [entity template variables](../entities/intro.html), and HTML (such as `
`, ``, or ``). Use YAML’s `|` block scalar when you need several lines.
## [](#%5Fdoes%5Fmarkdown%5Flink%5Fsyntax%5Flike%5Ftexturl%5Fwork)Does Markdown link syntax like `[text](url)` work?
No. Display `title` is not run through a Markdown parser; it is treated as HTML. Use `…` (or other tags you need) explicitly.
## [](#%5Fwhat%5Fshould%5Fi%5Favoid%5Fwhen%5Fembedding%5Fhtml)What should I avoid when embedding HTML?
Treat anything you put in `title` as trusted markup only you control; do not paste untrusted strings into `href` or other attributes without strict validation.
Some deployments use [Content Security Policy](../security/content%5Fsecurity%5Fpolicy.html) headers, which may block certain schemes or injected scripts—ordinary `https:` links are usually the safest choice.
## [](#%5Fwhere%5Felse%5Fis%5Fthis%5Fdocumented)Where else is this documented?
See [Displays](4-displays.html) for full display configuration (including [CSS classes](css.html)).
Actions Inline in Dashboards
====================
| | This feature is available in OliveTin version 3000.7.0 and later. If you are using OliveTin 2k, you can only used [Linked Actions in Dashboards](actions.html). |
| ------------------------------------------------------------------------------------------------------------------------------------------------------------------ |
```yaml
dashboards:
- name: Main Dashboard
contents:
- inlineAction:
title: Date
shell: date
icon: date
```
## [](#%5Fsee%5Falso)See Also
* [Actions (Linked)](actions.html)\]
Dashboards
====================
OliveTin generates a default view of actions which is useful for simple OliveTin use cases - this is always called "Actions" and cannot be renamed. The Actions view also does not support entities, fieldsets or folders.
If you want to start organizing OliveTin actions more effectively, then **Dashboards** are for you!
One of the biggest reasons to use Dashboards as opposed to just the "Actions" section, is that dashboards allow you to use [Folders](3-folders.html), and dashboards really start to get exciting when you start using [entities](../entities/intro.html) and displays.
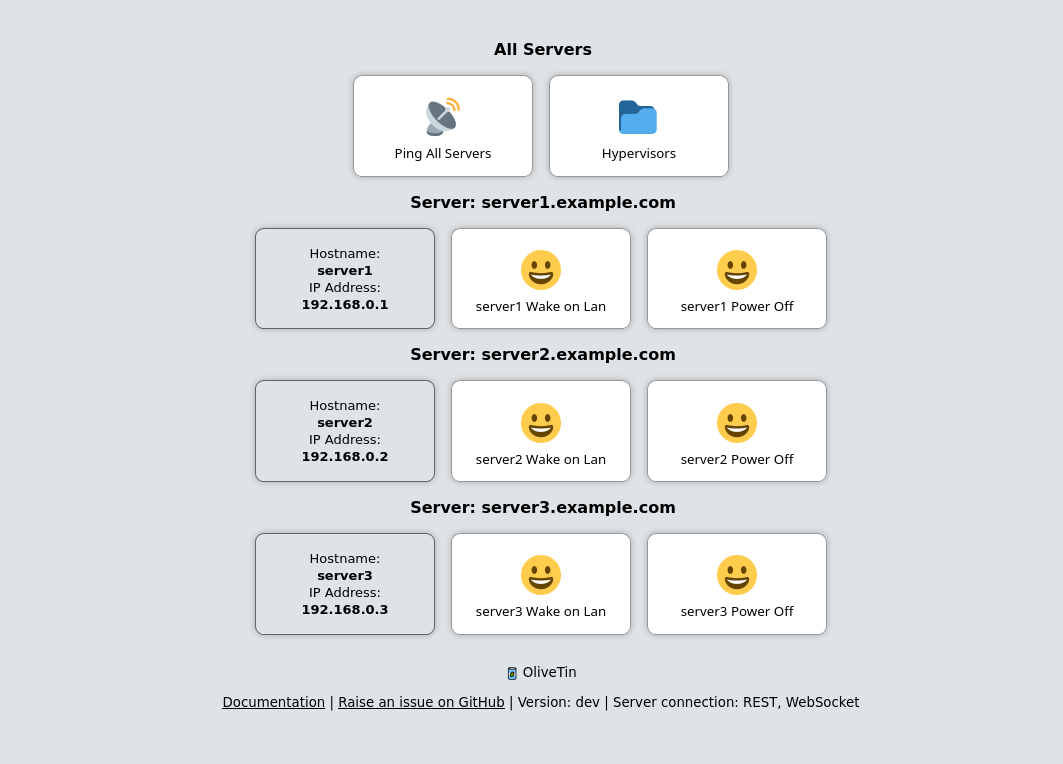
## [](#%5Fdashboards%5Fpull%5Factions%5Ffrom%5Fthe%5Fdefault%5Fview)Dashboards pull actions from the default view
Dashboards are a way of pulling actions from the default "actions" view, and organizing them into groups - either into folders, or fieldsets. Because dashboards literally do "pull" actions from the default view, you cannot use an action in multiple dashboards - and every action must have a unique title.
## [](#%5Fexample%5Fconfiguration)Example configuration
`config.yaml`
```yaml
# Actions MUST be defined in the actions section, not in the dashboards
# section. The dashboards only "link" to actions by their title.
actions:
- title: Ping All Servers
shell: echo "ping all..."
- title: '{{ server.name }} Wake on Lan'
shell: 'wol {{ server.name }}'
timeout: 10
entity: server
- title: '{{ server.name }} Power Off'
shell: 'ssh root@{{ server.name }} "poweroff"'
timeout: 10
entity: server
# Dashboards are a way of taking actions from the default "actions" view, and
# organizing them into groups - either into folders, or fieldsets.
#
# The only way to properly use entities, are to use them with a `fieldset` on
# a dashboard.
dashboards:
# Top level items are dashboards.
- title: My Servers
contents:
# On dashboards, all items need to be in a "fieldset". If you don't
# specify a fieldset, actions will be assigned to a fieldset with a title
# called "default".
- title: All Servers
type: fieldset
contents:
# The contents of a dashboard will try to look for an action with a
# matching title IF the `contents: ` property is empty.
- title: Ping All Servers
# If you create an item with some "contents:", OliveTin will show that as
# directory.
- title: Hypervisors
contents:
- title: Ping hypervisor1
- title: Ping hypervisor2
# If you specify `type: fieldset` and some `contents`, it will show your
# actions grouped together without a folder.
- type: fieldset
entity: server
title: 'Server: {{ server.hostname }}'
contents:
# By default OliveTin will look for an action with a matching title
# and put it on the dashboard.
#
# Fieldsets also support `type: display`, which can display arbitary
# text. This is useful for displaying things like a container's state.
- type: display
title: |
Hostname: {{ server.name }}
IP Address: {{ server.ip }}
# These are the actions (defined above) that we want on the dashboard.
- title: '{{ server.name }} Wake on Lan'
- title: '{{ server.name }} Power Off'
```
## [](#%5Fwhats%5Fnext)What’s Next?
Now that you understand dashboards, explore these related features:
* [Learn about fieldsets](2-fieldsets.html) \- Group actions visually on dashboards
* [Organize with folders](3-folders.html) \- Create folder structures for better organization
* [Add displays](4-displays.html) \- Show information alongside actions
* [FAQ: Hyperlinks in displays](faq-display-hyperlinks.html) \- Clickable links in display components
* [Configure output views](5-output-views.html) \- Customize how action output is displayed
* [Use entities with dashboards](../entities/intro.html) \- Dynamically generate actions from entity files
* [View dashboard examples](examples.html) \- See complete dashboard configurations
* [Customize dashboard styling](css.html) \- Change the appearance of dashboard components
Example Entity Usage
====================
Check out the following [Solutions](../solutions/intro.html) which make good use of entities.
* [Container Control Panel](../solutions/container-control-panel/index.html)
* [Systemd Control Panel](../solutions/systemd-control-panel/index.html)
Entities
====================
An entity is something that exists - a "thing", like a VM, or a Container is an entity. OliveTin allows you to then dynamically generate actions based around these entities.
This is really useful if you want to generate wake on lan or poweroff actions for `server` entities, for example.
A very popular use case that entities were designed for was for `container` entities - in a similar way you could generate `start`, `stop`, and `restart` container actions.
Entities are just loaded from files on disk, OliveTin will also watch these files for updates while OliveTin is running, and update entities.
Entities can have properties defined in those files, and those can be used in your configuration as variables. For example; `container.status`, or `vm.hostname`.
```yaml
entities:
- file: /etc/OliveTin/containers.json
name: container
- file: /etc/OliveTin/servers.yaml
name: server
```
Entity Actions can only be used on [Dashboards](../dashboards/intro.html).
## [](#%5Fwhats%5Fnext)What’s Next?
Now that you understand entities, here’s how to use them effectively:
* [Create YAML entity files](yaml.html) \- Learn the YAML format for entity files
* [Create JSON entity files](json.html) \- Learn the JSON format for entity files
* [View entity examples](examples.html) \- See complete examples of entity configurations
* [Use entities in dashboards](../dashboards/intro.html) \- Combine entities with dashboards for dynamic action generation
* [Container control panel solution](../solutions/container-control-panel/index.html) \- See a complete example using container entities
* [Systemd control panel solution](../solutions/systemd-control-panel/index.html) \- See a complete example using systemd entities
JSON entity files
====================
JSON files are parsed as if each line is a single JSON object. This can be super helpful for getting a list of containers, for example; `docker ps -a --format=json > /etc/OliveTin/containers.json`.
`/etc/OliveTin/containers.json`
```json
{"Command":"\"/opt/entrypoint.sh\"","CreatedAt":"2024-02-08 15:27:42 +0000 GMT","ID":"4bafe6f9f956","Image":"fedora","Labels":"?","LocalVolumes":"0","Mounts":"","Names":"media-indexing-container","Networks":"bridge","Ports":"","RunningFor":"13 days ago","Size":"0B","State":"exited","Status":"Exited (128) 13 days ago"}
{"Command":"\"/opt/entrypoint.sh\"","CreatedAt":"2023-12-17 20:58:03 +0000 GMT","ID":"d25f37c49c35","Image":"fedora","Labels":"?","LocalVolumes":"0","Mounts":"","Names":"media-playback-container","Networks":"bridge","Ports":"","RunningFor":"27 days ago","Size":"0B","State":"exited","Status":"Exited (137) 27 days ago"}
```
YAML entity files
====================
YAML files are the default expected format, so you can use .yml, .yaml, or even .txt - as long as the file contains a valid yaml LIST, then it will be loaded.
`/etc/OliveTin/servers.yaml`
```yaml
- name: server1
state: started
hostname: server1.example.com
ip: 192.168.0.1
- name: server2
state: started
hostname: server2.example.com
ip: 192.168.0.2
- name: server3
state: stopped
hostname: server3.example.com
ip: 192.168.0.3
```
BSD
====================
Using BSD? Good for you! :-)
binary tar.gz:
## [](#%5Fpost%5Finstallation)Post installation
You will need to write a basic configuration file before OliveTin will startup.
Edit the basic config file at `config.yaml` with the following contents;
The most simple `config.yaml` file.
```yaml
actions:
- title: "Hello world!"
shell: echo 'Hello World!'
```
Start OliveTin, preferably via a terminal. On Unix based systems (eg MacOS, BSD, Linux, etc) you can just run `./OliveTin`. On Windows you would run `OliveTin.exe` in windows terminal.
You should be able to browse to (or similar) to get to the web interface.
If you see the OliveTin page popup in your browser, you are good to go! Here are some helpful next steps;
* [Create your first action](../action%5Fexecution/create%5Fyour%5Ffirst.html)
* [configuration section](../config.html) for a list of all configuration options.
## [](#%5Ftroubleshooting%5Finstallations)Troubleshooting installations
If you are having problems, OliveTin will log it’s status on startup. Check the log messages in the terminal.
For tips on capturing and sharing that output, see [Service logs (troubleshooting)](../troubleshooting/service-logs.html).
If you cannot understand the logs, or otherwise need help, see the [support page](../troubleshooting/wheretofindhelp.html).
Which download do I need?
====================
OliveTin can be run as a [service](#package) or a [container](container.html). If you are not sure which is best for you, read [containers vs services](container%5Fvs%5Fservice.html).
## [](#package)Packages (run OliveTin as a service)
This is a table that explains which package/download is best for each environment;
| Processor Type | Operating System | Distribution | File on [latest release page](https://github.com/OliveTin/OliveTin/releases/latest) |
| ------------------------------------------------------------------------------------------------------------------------------------------------------------- | ---------------------------------------------------------------------------------------------------------------------------------------------------------------------- | --------------- | ---------------------------------------------------------------------------------------------------------------------------------------------------------------- |
| AMD / Intel → amd64 | Linux | Other → .tar.gz | [OliveTin-linux-amd64.tar.gz](https://github.com/OliveTin/OliveTin/releases/latest/download/OliveTin-linux-amd64.tar.gz) [installation instructions](targz.html) |
| Red Hat, Fedora, etc → .rpm | [OliveTin\_linux\_amd64.rpm](https://github.com/OliveTin/OliveTin/releases/latest/download/OliveTin%5Flinux%5Famd64.rpm) [installation instructions](linux%5Frpm.html) | | |
| Debian, Ubuntu → .deb | [OliveTin\_linux\_amd64.deb](https://github.com/OliveTin/OliveTin/releases/latest/download/OliveTin%5Flinux%5Famd64.deb) [installation instructions](linux%5Fdeb.html) | | |
| Windows | [OliveTin-windows-amd64.zip](https://github.com/OliveTin/OliveTin/releases/latest/download/OliveTin-windows-amd64.zip) | | |
| macOS,macOS | [OliveTin-macOS-amd64.tar.gz](https://github.com/OliveTin/OliveTin/releases/latest/download/OliveTin-macOS-amd64.tar.gz) | | |
| 32bit ARM (Raspberry Pi 1, 2, or similar) → arm | Linux | Other → .tar.gz | [One of the OliveTin-linux-arm….tar.gz files](https://github.com/OliveTin/OliveTin/releases/latest) [installation instructions](targz.html) |
| Red Hat, Fedora, etc → .rpm | [One of the OliveTin\_linux\_arm…..rpm files](https://github.com/OliveTin/OliveTin/releases/latest) [installation instructions](linux%5Frpm.html) | | |
| Debian, Ubuntu → .deb | [One of the OliveTin\_linux\_arm….deb files](https://github.com/OliveTin/OliveTin/releases/latest) [installation instructions](linux%5Fdeb.html) | | |
| 64bit ARM (Apple M1, Raspberry Pi 3, 4, or similar) → arm64 **Note**: If you are running 32bit Raspberry Pi OS, choose the 32bit ARM download option instead. | Linux | Other → .tar.gz | [OliveTin-linux-arm64.tar.gz](https://github.com/OliveTin/OliveTin/releases/latest/download/OliveTin-linux-arm64.tar.gz) [installation instructions](targz.html) |
| Red Hat, Fedora, etc → .rpm | [OliveTin\_linux\_arm64.rpm](https://github.com/OliveTin/OliveTin/releases/latest/download/OliveTin%5Flinux%5Farm64.rpm) [installation instructions](linux%5Frpm.html) | | |
| Debian, Ubuntu → .deb \` | [OliveTin\_linux\_arm64.deb](https://github.com/OliveTin/OliveTin/releases/latest/download/OliveTin%5Flinux%5Farm64.deb) [installation instructions](linux%5Fdeb.html) | | |
| macOS | [OliveTin-macOS-arm64.tar.gz](https://github.com/OliveTin/OliveTin/releases/latest/download/OliveTin-macOS-amd64.tar.gz) [installation instructions](targz.html) | | |
A full list of **packages** can be downloaded from the [GitHub project releases](https://github.com/jamesread/OliveTin/releases) page.
## [](#container-images)Container images
| | OliveTin is supported when run as a Linux Container in many different ways, and lot of OliveTin users will assume that a Linux Container is the best way to install OliveTin because Linux Containers are really popular… However, it is very common that some OliveTin use cases become overcomplicated when a container is used, compared to running as a native service. Read the [\[install-container-vs-service\]](#install-container-vs-service) document to understand if a container or a service is right for your use case. |
| ----------------------------------------------------------------------------------------------------------------------------------------------------------------------------------------------------------------------------------------------------------------------------------------------------------------------------------------------------------------------------------------------------------------------------------------------------------------------------------------------------------------------------------------- |
The image is pushed to the following registries, pick the one that you prefer - the container images are identical so you only need one;
* Dockerhub container image: [docker.io/jamesread/olivetin](https://hub.docker.com/r/jamesread/olivetin/)
* GitHub container image: [ghcr.io/jamesread/olivetin](https://ghcr.io/olivetin/olivetin)
The following methods can be used to install the container;
* [Installation as a standalone container (podman/docker)](container.html)
* [Installation with Docker Compose](docker%5Fcompose.html)
* [Installation on Kubernetes with Helm](helm.html)
* [Installation on Kubernetes (manually)](k8s.html)
Linux Container
====================
## [](#%5Frepositories)Repositories
The OliveTin container images are hosted on both Docker Hub and the GitHub Container Registry.
The main OliveTin image is available at;
* **Docker Hub**: `docker.io/jamesread/olivetin` [View on Docker Hub](https://hub.docker.com/r/jamesread/olivetin/tags?page=1&ordering=last%5Fupdated)
* **GitHub**: `ghcr.io/olivetin/olivetin` [View on GitHub](https://github.com/OliveTin/OliveTin/pkgs/container/olivetin)
## [](#%5Ftags)Tags
* `latest-2k` \- This tag will always point to the latest OliveTin 2k version (eg 2025.11.11)
* `latest-3k` \- This tag will always point to the latest OliveTin 3k version (eg 3000.2.0)
* `latest` \- This tag will always point to the latest OliveTin version (currently 3k)
Read more about 2k vs 3k here: [OliveTin 2k vs OliveTin 3k](../upgrade/2k3k.html)
## [](#%5Fcontainer%5Finstallation%5Foptions)Container installation options
* [Docker or Podman](podmandocker.html)
* [Docker Compose](docker%5Fcompose.html)
* [Kubernetes with Helm](helm.html)
* [Kubernetes with Manifests](k8s.html)
Containers vs Services
====================
Linux Containers have become an incredibly popular method for running software. OliveTin supports every way of running Linux containers - spanning from homelabs up to enterprise environments. As a container, it can be used [standalone using Podman/Docker](container.html), through to [using docker-compose](docker%5Fcompose.html) or even on [Kubernetes](k8s.html).
**However**, a lot of OliveTin use cases, such as providing an interface to run scripts, rely on files on their local Linux filesystem - containers, by definition, have their own separate filesystem. It is of course possible to "bind mount" parts of your local filesystem into OliveTin, but sometimes this requires more effort, or introduces subtle problems that are more complicated to solve. If you have a good amount of experience with Linux containers, then this approach is absolutely fine - but if you are new to these types of problems - not seeing files you expect, file permissions errors, etc, then it might just be easier to [install using a Linux package](choose%5Fpackage.html) instead.
## [](#%5Fdont%5Fovercomplicate%5Fyour%5Fcontainers%5Fuse%5Fssh)Don’t overcomplicate your containers - use SSH!
Sometimes you just want to (or have to) use containers, but also want to use these local resources as well. Instead of bind-mounting lots of stuff into the Linux container and creating a really complicated container definition (which is hard to scale), consider a simple alternative: [SSH with OliveTin](../action%5Fexamples/ssh-easy.html). This allows you to easily SSH back into the container host and keep your container definition really simple. This approach works great and is popular for a lot of users.
## [](#%5Fwhich%5Fshould%5Fi%5Fchoose)Which should I choose?
| Use Case | Recommended Option |
| ---------------------------------------------------------------------------- | ---------------------------------------------------------------------------------------------------------------------------------- |
| You’re experienced with Linux containers, and know how to bind mount volumes | [Linux Container](container.html) |
| You’re new to Linux containers, or not very comfortable with them | [Linux service](choose%5Fpackage.html), or [Linux container](container.html) with [SSH action](../action%5Fexamples/ssh-easy.html) |
| Needs to use lots of different file paths on the host filesystem | Run as a systemd service, or bind-mount the filesystem into the container. |
| Needs to control processes, like systemd services | Run as a systemd service. |
Docker Compose install
====================
Docker compose is a popular way to define multi-container applications using a infrastructure as code approach.
If you personally prefer to use `docker compose`, then here is a sample to get you started;
`docker-compose.yml`
```yaml
services:
olivetin:
container_name: olivetin
image: jamesread/olivetin
volumes:
- OliveTin-config:/config # replace host path or volume as needed
ports:
- "1337:1337"
restart: unless-stopped
volumes:
OliveTin-config:
external: false
```
## [](#%5Fpost%5Finstallation%5Fcontainer)Post installation (container)
You will need to write a basic configuration file before OliveTin will startup.
Create a basic config file at `/etc/OliveTin/config.yaml` \- the exact path depends on what directory you specified in the bind mount container creation in the last step. Note that the file must be called `config.yaml`, and `config.yml` or `mystuff.yaml` would not work. You can download a sample configuration file like this if you like;
Download the sample config.yaml file to get you started.
```shell
user@host: cd /etc/OliveTin/
user@host: curl -O https://raw.githubusercontent.com/OliveTin/OliveTin/main/config.yaml
```
The file contents should look something like this;
The most simple `config.yaml` file.
```yaml
actions:
- title: "Hello world!"
shell: echo 'Hello World!'
```
If you are running a firewall on your server, like firewalld, you will need to open port 1337;
## [](#%5Fconfigure%5Fyour%5Ffirewall)Configure your firewall
* No Firewall
* FirewallD
If you don’t have a firewall, continue to the next section.
This is how you configure your firewalld firewall for OliveTin:
```shell
user@host: firewall-cmd --add-port 1337/tcp --permanent
user@host: firewall-cmd --reload
```
## [](#%5Fstart%5Fthe%5Folivetin%5Fservice)Start the OliveTin service
Now that you have a configuration file, and the OliveTin container created, you are now ready to start OliveTin!
```asciidoc
user@host: docker start olivetin
```
You should be able to browse to (or similar) to get to the web interface.
If you see the OliveTin page popup in your browser, you are good to go! Here are some helpful next steps;
* [Create your first action](../action%5Fexecution/create%5Fyour%5Ffirst.html)
* [configuration section](../config.html) for a list of all configuration options.
## [](#%5Ftroubleshooting%5Fpodmandocker%5Finstallations)Troubleshooting podman/docker installations
If you are having problems in starting OliveTin, or OliveTin is crashing on startup, then check the logs like this;
```asciidoc
user@host: docker logs OliveTin
```
For more detail on what to capture and how to share logs when asking for help, see [Service logs (troubleshooting)](../troubleshooting/service-logs.html).
If you cannot understand the logs, or otherwise need help, see the [support page](../troubleshooting/wheretofindhelp.html).
## [](#compose-docker-socket)Controlling other docker containers from a Docker Compose install of OliveTin
If you want OliveTin running in a container to control other Docker containers, pass the Docker socket into the service and give the container process membership in the same numeric `docker` group that owns the socket on the host.
On many Linux installs, Docker Engine creates a `docker` group automatically; see [Manage Docker as a non-root user](https://docs.docker.com/engine/install/linux-postinstall/#manage-docker-as-a-non-root-user) in the Docker documentation.
### [](#%5Ffind%5Fthe%5Fdocker%5Fgroup%5Fgid%5Fon%5Fthe%5Fhost)Find the `docker` group GID on the host
On the Docker host, read the `docker` group numeric ID (third field of the output):
```bash
getent group docker
```
If that command prints nothing, create the group or finish Docker post-install steps first, then retry.
### [](#%5Fadd%5Fthe%5Fsocket%5Fmount%5Fand%5Fgroup%5Fadd%5Fin%5Fcompose)Add the socket mount and `group_add` in Compose
In `docker-compose.yml`, bind-mount the socket and add `group_add` with that GID (as a string is fine). Replace the example GID with the value from your host:
`docker-compose.yml` including Docker socket access without running as root
```yaml
services:
olivetin:
container_name: olivetin
image: jamesread/olivetin
volumes:
- /docker/OliveTin:/config # replace host path or volume as needed
- /var/run/docker.sock:/var/run/docker.sock
group_add:
- "992" (1)
```
| **1** | Replace 992 with the GID from getent group docker on the machine where Compose runs. The number is not portable between hosts. |
| ----- | ------------------------------------------------------------------------------------------------------------------------------ |
This keeps the default container user while allowing access to `/var/run/docker.sock`, which is usually tighter than running the whole service as `root`.
See [containers](../action%5Fexamples/containers.html) for `docker run`, `--privileged`, and other options if you cannot use a `docker` group on the host.
## [](#%5Frunning%5Fthe%5Folivetin%5Fcontainer%5Fas%5Fa%5Fdifferent%5Fuser%5Fin%5Fcompose)Running the OliveTin container as a different user in Compose
If you need the service to run as a specific Unix user in Compose for reasons other than Docker socket access, set `user` explicitly, for example:
```yaml
services:
olivetin:
container_name: olivetin
image: jamesread/olivetin
user: "1000:1000"
...
```
For Docker socket access from Compose, prefer [group\_add with the host docker group GID](#compose-docker-socket) instead of `user: root`.
| | [PUID and PGID are not used](../troubleshooting/puid-pgid.html) by the official OliveTin container image. |
| ------------------------------------------------------------------------------------------------------------ |
## [](#docker-compose-traefik)Using Traefik with Docker Compose
Traefik is a popular reverse proxy that seems to be used a lot in people’s Docker compose setups. See the [Traefik + Docker Compose](../reverse-proxies/traefik.html) page for more details.
Installation on Kubernetes with Helm
====================
Helm makes installing OliveTin on Kubernetes very easy, the official chart is hosted on Artifact Hub.
[](https://artifacthub.io/packages/search?repo=olivetin)
## [](#%5Frequirements)Requirements
### [](#%5Fprerequisites)Prerequisites
* A Kubernetes cluster setup and running
* Kubernetes client installed and authenticated
* An ingress controller configure for web traffic
* Helm installed and authenticated to the cluster
## [](#%5Finstallation)Installation
```shell
user@host: helm repo add olivetin https://olivetin.github.io/OliveTin-HelmChart/
user@host: helm install olivetin olivetin/olivetin
NAME: olivetin
LAST DEPLOYED: Tue Apr 1 23:19:09 2025
NAMESPACE: default
STATUS: deployed
REVISION: 1
TEST SUITE: None
```
## [](#%5Fconfigure)Configure
After a minute or two, check the pod status;
```shell
user@host: kubectl get pods
NAME READY STATUS RESTARTS AGE
olivetin-578b79766-4b8lg 1/1 Running 0 87s
```
Hopefully the pod is not crashlooping or anything like that. If it is, check the logs.
The helm chart should have created a basic ConfigMap for you;
```shell
user@host: kubectl describe cm/olivetin-config
Name: olivetin-config
Namespace: default
Labels: app.kubernetes.io/managed-by=Helm
Annotations: meta.helm.sh/release-name: olivetin
meta.helm.sh/release-namespace: default
Data
====
config.yaml:
--
actions:
- title: "Hello world!"
shell: echo 'Hello World!'
```
You should edit this ConfigMap to match your needs for OliveTin. Remember to restart the OliveTin deployment if you want the config changes to be picked up more quickly;
```shell
user@host: kubectl rollout restart deploy/olivetin
deployment.apps/olivetin restarted
```
You should be able to browse to (or similar) to get to the web interface.
If you see the OliveTin page popup in your browser, you are good to go! Here are some helpful next steps;
* [Create your first action](../action%5Fexecution/create%5Fyour%5Ffirst.html)
* [configuration section](../config.html) for a list of all configuration options.
## [](#%5Fincluded%5Ftemplates)Included templates
You can view the raw templates here:
* Deployment
* ConfigMap
* Service
* Ingress (optional)
## [](#%5Fsee%5Falso)See Also
* [Solution: Kubernetes Control Panel (Hosted)](../solutions/k8s-control-panel-hosted/index.html)
Installation guide
====================
## [](#%5Fpreparation)Preparation
You will need approximately **10 minutes** to install OliveTin on almost every platform, with root/system administrator access in most cases.
You probably will need about **10-20 minutes** to understand how OliveTin configuration works, and to be able to write your first action to make it do something useful.
## [](#%5Fwhere%5Fto%5Ffind%5Fhelp)Where to find help
When something is wrong with the **WebUI** in the browser, capturing [browser console logs](../troubleshooting/browser-console-logs.html) (even as a screenshot) helps diagnose the issue.
When something is wrong with the **OliveTin process** (startup failures, actions, API, or auth), capturing [service logs](../troubleshooting/service-logs.html) from Docker, Podman, or `journalctl` helps diagnose the issue.
To get relatively quick access to help, **Discord** is where the chat community for OliveTin is. Note that this project is a free community open source project, and it relies on volenteers to spare their free time to help you. Please be patient and polite.
 [Chat on Discord](https://discord.gg/jhYWWpNJ3v)
If nobody is online, or you’re not getting the right level of support, you can raise a ticket with the project’s developers on GitHub. Again, please be patient and polite.
 [Open a support request on GitHub](https://github.com/OliveTin/OliveTin/issues/new?assignees=&labels=support&template=support%5Frequest.md&title=)
## [](#%5Ffirst%5Fstep%5Fwhere%5Fare%5Fyou%5Finstalling)First step: where are you installing?
* Linux
* [Containers or Service?](container%5Fvs%5Fservice.html)
* Linux Service
* [Fedora Linux](linux%5Ffedora.html)
* [Alpine Linux](linux%5Falpine.html)
* [Manjaro Linux](linux%5Fmanjaro.html)
* [Arch Linux](linux%5Farch.html)
* [Generic .rpm based Linux](linux%5Frpm.html)
* [Generic .deb based Linux](linux%5Fdeb.html)
* [.tar.gz Install (manual)](targz.html)
* [Linux Container](container.html)
* [Docker or Podman](podmandocker.html)
* [Docker Compose](docker%5Fcompose.html)
* [Kubernetes with Helm](helm.html)
* [Kubernetes with Manifests](k8s.html)
* [FreeBSD](bsd.html)
* [Windows](windows.html)
* [MacOS](macos.html)
## [](#%5Fwhats%5Fnext)What’s Next?
After installing OliveTin, follow these steps to get started:
* [Learn about configuration](../config.html) \- Understand how OliveTin’s configuration works
* [Create your first action](../action%5Fexecution/create%5Fyour%5Ffirst.html) \- Build a simple action to test your installation
* [Explore action examples](../action%5Fexamples/intro.html) \- See what OliveTin can do with real-world examples
* [Check out solutions](../solutions/intro.html) \- Find complete configurations for common use cases
* [Set up a reverse proxy](../reverse-proxies/intro.html) \- Configure secure access through a reverse proxy
Kubernetes with Manifest files
====================
OliveTin works just fine on Kubernetes. The easiest way to deploy it is with a Kubernetes `ConfigMap`, `Deployment`, `Service` and finally `Ingress`. Like so;
## [](#%5Fconfigmap)ConfigMap
```yaml
apiVersion: v1
kind: ConfigMap
metadata:
name: olivetin-config
data:
config.yaml: |
actions:
- title: "Hello world!"
shell: echo 'Hello World!'
```
The main application config.yml for OliveTin is specified in the `ConfigMap`above. You will want to edit this later - see the "Configuration" section.
Next, we need a deployment;
## [](#%5Fdeployment)Deployment
```yaml
apiVersion: apps/v1
kind: Deployment
metadata:
name: olivetin
spec:
replicas: 1
selector:
matchLabels:
app: olivetin
template:
metadata:
labels:
app: olivetin
spec:
containers:
- name: olivetin
image: docker.io/jamesread/olivetin:latest
ports:
- containerPort: 1337
volumeMounts:
- name: olivetin-config
mountPath: "/config"
readOnly: true
livenessProbe:
exec:
command:
- curl
- localhost:1337
initialDelaySeconds: 5
periodSeconds: 30
volumes:
- name: olivetin-config
configMap:
name: olivetin-config
```
That should deploy OliveTin.
## [](#%5Fservice)Service
Now that OliveTin is deployed, expose it’s port as a service;
```asciidoc
user@host: kubectl expose deployment/olivetin
```
Lastly, create a Ingress rule for for that service;
## [](#%5Fingress)Ingress
```yaml
apiVersion: networking.k8s.io/v1
kind: Ingress
metadata:
name: olivetin-ingress
spec:
defaultBackend:
service:
name: olivetin
port:
number: 1337
rules:
- host: olivetin.apps.ocp.teratan.net
http:
paths:
- path: /
pathType: Prefix
backend:
service:
name: olivetin
port:
number: 1337
```
You should be able to browse to (or similar) to get to the web interface.
If you see the OliveTin page popup in your browser, you are good to go! Here are some helpful next steps;
* [Create your first action](../action%5Fexecution/create%5Fyour%5Ffirst.html)
* [configuration section](../config.html) for a list of all configuration options.
Alpine Linux
====================
Alpine Linux is supported by an upstream .apk package, or a manual .tar.gz install, or by [a container](container.html).
These instructions on this page are quite basic, because not many people have tried to use OliveTin on Alpine, or other OpenRC distributions. If you can help suggest improvements to these docs, or Alpine Linux support, it would be great to [hear from you](../troubleshooting/wheretofindhelp.html)!
## [](#%5Finstalling%5Fthe%5Fupstream%5Fapk)Installing the upstream `.apk`
```asciidoc
user@host: wget https://github.com/OliveTin/OliveTin/releases/latest/download/OliveTin_linux_amd64.apk
user@host: apk add --allow-untrusted OliveTin_linux_amd64.apk
```
## [](#%5Finstalling%5Fthe%5Ftar%5Fgz)Installing the `.tar.gz`
The standard [.tar.gz instructions](targz.html) should work just fine, replacing systemd for the OpenRC file.
Arch Linux (AUR)
====================
There are 3 packages available for Arch Linux;
1. [olivetin in AUR](https://aur.archlinux.org/packages/olivetin) \- This builds from source, using a release Git tag.This is officially maintained by the authors of the OliveTin project.
2. [olivetin-bin in AUR](https://aur.archlinux.org/packages/olivetin-bin) \- This re-packages the binaries built by the official binaries. This is not officially maintained by the authors of the OliveTin project, and might be a bit older - but it should work just fine.
3. [olivetin .apk built by the project](https://github.com/OliveTin/OliveTin/releases/latest/download/OliveTin%5Flinux%5Famd64.apk) \- This may be useful to have a package outside of AUR.
## [](#%5Finstallation%5Faur)Installation (AUR)
Install using `yay`;
```asciidoc
user@host: yay -Syu olivetin
```
| | One does not simply just do something with Arch without telling someone about it. Therefore, after you successfully install OliveTin on Arch, that you tell at least two people "I’m using OliveTin on Arch, btw". :-) |
| ------------------------------------------------------------------------------------------------------------------------------------------------------------------------------------------------------------------------- |
## [](#%5Fpost%5Finstallation)Post installation
You will need to write a basic configuration file before OliveTin will startup.
Create the following basic config file at `/etc/OliveTin/config.yaml` with the following contents;
The most simple `config.yaml` file.
```yaml
actions:
- title: "Hello world!"
shell: echo 'Hello World!'
```
Now that you have a configuration file, and OliveTin is installed, start it;
Start the service (only needed once)
```shell
user@host: systemctl enable --now OliveTin
```
If you are running a firewall on your server, like firewalld, you will need to open port 1337;
```shell
user@host: firewall-cmd --add-port 1337/tcp --permanent
user@host: firewall-cmd --reload
```
You should be able to browse to (or similar) to get to the web interface.
If you see the OliveTin page popup in your browser, you are good to go! Here are some helpful next steps;
* [Create your first action](../action%5Fexecution/create%5Fyour%5Ffirst.html)
* [configuration section](../config.html) for a list of all configuration options.
## [](#%5Ftroubleshooting%5Fsystemd%5Finstallations)Troubleshooting systemd installations
If you are having problems, you can check if OliveTin is running like this;
```shell
user@host: systemctl status OliveTin
```
If the service has failed, scroll through the logs;
```shell
user@host: journalctl -eu OliveTin
```
If you cannot understand the logs, or otherwise need help, see the [support page](../troubleshooting/wheretofindhelp.html).
For more detail on what to capture and how to share logs when asking for help, see [Service logs (troubleshooting)](../troubleshooting/service-logs.html).
Generic .deb based Linux
====================
Running OliveTin as a systemd service on a Linux machine means it can use any program installed on your machine (you don’t have to add programs to a container). This is generally easier to use than a container, but containers can work just fine too with a bit more effort.
There are .deb packages published for OliveTin on each release page. If you distribution is not linked in this installation guide, and you use a .deb based Linux distribution, this package should work.
* [downloads page](https://github.com/jamesread/OliveTin/releases).
You can install these packages for .deb like this;
```bash
user@host: wget https://github.com/OliveTin/OliveTin/releases/latest/download/OliveTin_linux_amd64.deb
user@host: dpkg -i OliveTin_linux_amd64.deb
```
## [](#%5Fpost%5Finstallation)Post installation
You will need to write a basic configuration file before OliveTin will startup.
Create the following basic config file at `/etc/OliveTin/config.yaml` with the following contents;
The most simple `config.yaml` file.
```yaml
actions:
- title: "Hello world!"
shell: echo 'Hello World!'
```
Now that you have a configuration file, and OliveTin is installed, start it;
Start the service (only needed once)
```shell
user@host: systemctl enable --now OliveTin
```
If you are running a firewall on your server, like firewalld, you will need to open port 1337;
```shell
user@host: firewall-cmd --add-port 1337/tcp --permanent
user@host: firewall-cmd --reload
```
You should be able to browse to (or similar) to get to the web interface.
If you see the OliveTin page popup in your browser, you are good to go! Here are some helpful next steps;
* [Create your first action](../action%5Fexecution/create%5Fyour%5Ffirst.html)
* [configuration section](../config.html) for a list of all configuration options.
## [](#%5Ftroubleshooting%5Fsystemd%5Finstallations)Troubleshooting systemd installations
If you are having problems, you can check if OliveTin is running like this;
```shell
user@host: systemctl status OliveTin
```
If the service has failed, scroll through the logs;
```shell
user@host: journalctl -eu OliveTin
```
If you cannot understand the logs, or otherwise need help, see the [support page](../troubleshooting/wheretofindhelp.html).
For more detail on what to capture and how to share logs when asking for help, see [Service logs (troubleshooting)](../troubleshooting/service-logs.html).
Fedora Linux (dnf)
====================
Fedora is included in the Fedora Project official repositories. For an overview of versions, see the Package Sources page;
## [](#%5Finstallation%5Fproject%5Fpackage)Installation (project package)
root@host: rpm -U https://github.com/OliveTin/OliveTin/releases/latest/download/OliveTin_linux_amd64.rpm
## [](#%5Finstallation%5Fdistribution%5Fpackage)Installation (distribution package)
WARN: The package included in the Fedora repositories is currently very old, and is not recommended. Please use the project package instead.
Install using `dnf` (or yum, on older versions of Fedora);
```asciidoc
user@host: dnf install -y OliveTin
```
## [](#%5Fpost%5Finstallation)Post installation
You will need to write a basic configuration file before OliveTin will startup.
Create the following basic config file at `/etc/OliveTin/config.yaml` with the following contents;
The most simple `config.yaml` file.
```yaml
actions:
- title: "Hello world!"
shell: echo 'Hello World!'
```
Now that you have a configuration file, and OliveTin is installed, start it;
Start the service (only needed once)
```shell
user@host: systemctl enable --now OliveTin
```
If you are running a firewall on your server, like firewalld, you will need to open port 1337;
```shell
user@host: firewall-cmd --add-port 1337/tcp --permanent
user@host: firewall-cmd --reload
```
You should be able to browse to (or similar) to get to the web interface.
If you see the OliveTin page popup in your browser, you are good to go! Here are some helpful next steps;
* [Create your first action](../action%5Fexecution/create%5Fyour%5Ffirst.html)
* [configuration section](../config.html) for a list of all configuration options.
## [](#%5Ftroubleshooting%5Fsystemd%5Finstallations)Troubleshooting systemd installations
If you are having problems, you can check if OliveTin is running like this;
```shell
user@host: systemctl status OliveTin
```
If the service has failed, scroll through the logs;
```shell
user@host: journalctl -eu OliveTin
```
If you cannot understand the logs, or otherwise need help, see the [support page](../troubleshooting/wheretofindhelp.html).
For more detail on what to capture and how to share logs when asking for help, see [Service logs (troubleshooting)](../troubleshooting/service-logs.html).
Manjaro (pamac/AUR)
====================
Please see teh [Arch Linux](#install-archbtw) page for a description of the difference between `olivetin-bin` and `olivetin` in AUR. This page assumes you want to compile from source (`olivetin` package).
```bash
PATH=$PATH:~/go/bin/
pamac install buf
pamac install olivetin
sudo mkdir -p /etc/OliveTin/custom-webui/themes/
sudo mkdir -p /etc/OliveTin/entities/
```
## [](#%5Fpost%5Finstallation)Post installation
You will need to write a basic configuration file before OliveTin will startup.
Create the following basic config file at `/etc/OliveTin/config.yaml` with the following contents;
The most simple `config.yaml` file.
```yaml
actions:
- title: "Hello world!"
shell: echo 'Hello World!'
```
Now that you have a configuration file, and OliveTin is installed, start it;
Start the service (only needed once)
```shell
user@host: systemctl enable --now OliveTin
```
If you are running a firewall on your server, like firewalld, you will need to open port 1337;
```shell
user@host: firewall-cmd --add-port 1337/tcp --permanent
user@host: firewall-cmd --reload
```
You should be able to browse to (or similar) to get to the web interface.
If you see the OliveTin page popup in your browser, you are good to go! Here are some helpful next steps;
* [Create your first action](../action%5Fexecution/create%5Fyour%5Ffirst.html)
* [configuration section](../config.html) for a list of all configuration options.
## [](#%5Ftroubleshooting%5Fsystemd%5Finstallations)Troubleshooting systemd installations
If you are having problems, you can check if OliveTin is running like this;
```shell
user@host: systemctl status OliveTin
```
If the service has failed, scroll through the logs;
```shell
user@host: journalctl -eu OliveTin
```
If you cannot understand the logs, or otherwise need help, see the [support page](../troubleshooting/wheretofindhelp.html).
For more detail on what to capture and how to share logs when asking for help, see [Service logs (troubleshooting)](../troubleshooting/service-logs.html).
Generic .rpm based Linux
====================
Running OliveTin as a systemd service on a Linux machine means it can use any program installed on your machine (you don’t have to add programs to a container). This is generally easier to use than a container, but containers can work just fine too with a bit more effort.
There are .rpm packages published for OliveTin on each release page. If you distribution is not linked in this installation guide, and you use a .rpm based Linux distribution, this package should work.
* [downloads page](https://github.com/jamesread/OliveTin/releases).
You can install these packages for .rpm like this;
```bash
user@host: rpm -U https://github.com/OliveTin/OliveTin/releases/latest/download/OliveTin_linux_amd64.rpm
```
## [](#%5Fpost%5Finstallation)Post installation
You will need to write a basic configuration file before OliveTin will startup.
Create the following basic config file at `/etc/OliveTin/config.yaml` with the following contents;
The most simple `config.yaml` file.
```yaml
actions:
- title: "Hello world!"
shell: echo 'Hello World!'
```
Now that you have a configuration file, and OliveTin is installed, start it;
Start the service (only needed once)
```shell
user@host: systemctl enable --now OliveTin
```
If you are running a firewall on your server, like firewalld, you will need to open port 1337;
```shell
user@host: firewall-cmd --add-port 1337/tcp --permanent
user@host: firewall-cmd --reload
```
You should be able to browse to (or similar) to get to the web interface.
If you see the OliveTin page popup in your browser, you are good to go! Here are some helpful next steps;
* [Create your first action](../action%5Fexecution/create%5Fyour%5Ffirst.html)
* [configuration section](../config.html) for a list of all configuration options.
## [](#%5Ftroubleshooting%5Fsystemd%5Finstallations)Troubleshooting systemd installations
If you are having problems, you can check if OliveTin is running like this;
```shell
user@host: systemctl status OliveTin
```
If the service has failed, scroll through the logs;
```shell
user@host: journalctl -eu OliveTin
```
If you cannot understand the logs, or otherwise need help, see the [support page](../troubleshooting/wheretofindhelp.html).
For more detail on what to capture and how to share logs when asking for help, see [Service logs (troubleshooting)](../troubleshooting/service-logs.html).
macOS Desktop
====================
OliveTin runs natively on macOS, on both Apple Silicon (M-series) and Intel Macs. It is a single, self-contained binary - there is no installer and no dependencies to set up.
If you want OliveTin to run in the background and start automatically, follow the [install OliveTin as a launchd service](macos%5Fservice.html) instructions instead.
## [](#%5Fdownload)Download
macOS builds are published on the [releases page](https://github.com/OliveTin/OliveTin/releases/latest). Choose the archive that matches your Mac’s processor:
| Your Mac | Archive |
| --------------------------- | -------------------------------------------------------------------------------------------------------------------------- |
| Apple Silicon (M1/M2/M3/M4) | [OliveTin-darwin-arm64.tar.gz](https://github.com/OliveTin/OliveTin/releases/latest/download/OliveTin-darwin-arm64.tar.gz) |
| Intel | [OliveTin-darwin-amd64.tar.gz](https://github.com/OliveTin/OliveTin/releases/latest/download/OliveTin-darwin-amd64.tar.gz) |
Not sure which you have? Run `uname -m` in Terminal - `arm64` means Apple Silicon, `x86_64` means Intel.
| | If you run the wrong architecture, macOS reports Bad CPU type in executable. Download the other archive if you see this. |
| --------------------------------------------------------------------------------------------------------------------------- |
## [](#%5Fextract)Extract
Start a terminal, then extract the archive and change into the directory (replace `arm64` with `amd64` on Intel):
```shell
tar -xzf OliveTin-darwin-arm64.tar.gz
cd OliveTin-darwin-arm64
```
## [](#%5Fremove%5Fthe%5Fgatekeeper%5Fquarantine)Remove the Gatekeeper quarantine
The binary is downloaded from the internet and is not notarized by Apple, so on first run Gatekeeper blocks it with a message like _"OliveTin can’t be opened because Apple cannot check it for malicious software."_
Clear the quarantine attribute so it will run:
```shell
xattr -dr com.apple.quarantine ./OliveTin
```
| | Alternatively, the first time only, right-click the binary in Finder and choose **Open**, or approve it under **System Settings → Privacy & Security**. |
| ---------------------------------------------------------------------------------------------------------------------------------------------------------- |
## [](#%5Fpost%5Finstallation)Post installation
You will need to write a basic configuration file before OliveTin will startup.
Edit the basic config file at `config.yaml` with the following contents;
The most simple `config.yaml` file.
```yaml
actions:
- title: "Hello world!"
shell: echo 'Hello World!'
```
Start OliveTin, preferably via a terminal. On Unix based systems (eg MacOS, BSD, Linux, etc) you can just run `./OliveTin`. On Windows you would run `OliveTin.exe` in windows terminal.
You should be able to browse to (or similar) to get to the web interface.
If you see the OliveTin page popup in your browser, you are good to go! Here are some helpful next steps;
* [Create your first action](../action%5Fexecution/create%5Fyour%5Ffirst.html)
* [configuration section](../config.html) for a list of all configuration options.
## [](#%5Ftroubleshooting%5Finstallations)Troubleshooting installations
If you are having problems, OliveTin will log it’s status on startup. Check the log messages in the terminal.
For tips on capturing and sharing that output, see [Service logs (troubleshooting)](../troubleshooting/service-logs.html).
If you cannot understand the logs, or otherwise need help, see the [support page](../troubleshooting/wheretofindhelp.html).
macOS Service (launchd)
====================
This option installs OliveTin as a launchd service, so it runs in the background and starts automatically. This is the macOS equivalent of running OliveTin as a Linux systemd service or a [Windows service](windows%5Fservice.html). If you just want to run OliveTin as a regular application, follow the [macOS install](macos.html) instructions instead.
Before continuing, complete the [macOS install](macos.html) steps (download, extract, and clear the Gatekeeper quarantine) and confirm OliveTin starts correctly by running `./OliveTin`.
## [](#%5Fchoose%5Flaunchagent%5For%5Flaunchdaemon)Choose LaunchAgent or LaunchDaemon
launchd offers two ways to run a background service:
* **LaunchAgent** \- runs as your user and starts when you log in. No root required. Best for a desktop Mac.
* **LaunchDaemon** \- runs as root and starts at boot, before any user logs in. Best for a headless, always-on Mac.
Follow one complete flow below. Both use the same plist structure; only the install locations and `launchctl` domain differ.
## [](#%5Fservice%5Fdefinition)Service definition
Create a file named `app.olivetin.olivetin.plist` with the contents below.
| | launchd does **not** expand \~, so every path in the plist must be absolute. Replace YOUR\_USERNAME with the output of whoami when using the LaunchAgent paths. |
| ------------------------------------------------------------------------------------------------------------------------------------------------------------------ |
```xml
Label
app.olivetin.olivetin
ProgramArguments
/Users/YOUR_USERNAME/Library/Application Support/OliveTin/OliveTin
-configdir
/Users/YOUR_USERNAME/Library/Application Support/OliveTin
WorkingDirectory
/Users/YOUR_USERNAME/Library/Application Support/OliveTin
KeepAlive
RunAtLoad
StandardOutPath
/Users/YOUR_USERNAME/Library/Logs/OliveTin/olivetin.log
StandardErrorPath
/Users/YOUR_USERNAME/Library/Logs/OliveTin/olivetin.log
```
For a LaunchDaemon, use the same keys but substitute the paths shown in the table:
| Plist entry | LaunchAgent | LaunchDaemon |
| ----------------------------------- | ------------------------------------------------------------------- | ------------------------------- |
| Binary (ProgramArguments\[0\]) | /Users/YOUR\_USERNAME/Library/Application Support/OliveTin/OliveTin | /usr/local/bin/OliveTin |
| \-configdir and WorkingDirectory | /Users/YOUR\_USERNAME/Library/Application Support/OliveTin | /usr/local/etc/OliveTin |
| StandardOutPath / StandardErrorPath | /Users/YOUR\_USERNAME/Library/Logs/OliveTin/olivetin.log | /usr/local/var/log/olivetin.log |
`WorkingDirectory` makes the relative `webui` and `var` folders resolve inside the config directory, `KeepAlive` restarts OliveTin if it exits (like systemd’s `Restart=always`), and `RunAtLoad` starts it as soon as the service is loaded.
| | OliveTin looks for config.yaml in the directory given by the \-configdir flag. The plist passes \-configdir explicitly so the service does not depend on the process working directory alone. |
| ------------------------------------------------------------------------------------------------------------------------------------------------------------------------------------------------ |
| | launchctl bootstrap/bootout replace the deprecated launchctl load/unload. |
| ---------------------------------------------------------------------------- |
## [](#%5Flaunchagent%5Fper%5Fuser)LaunchAgent (per-user)
### [](#%5Finstall%5Fthe%5Ffiles)Install the files
Run these from the extracted archive directory:
```shell
# Create the application folder and a place for logs
mkdir -p ~/Library/Application\ Support/OliveTin/var
mkdir -p ~/Library/Logs/OliveTin
# Copy in the binary, your config, and the bundled web UI
cp OliveTin ~/Library/Application\ Support/OliveTin/
cp config.yaml ~/Library/Application\ Support/OliveTin/
cp -R webui ~/Library/Application\ Support/OliveTin/
```
This gives you the following layout, all owned by your user:
```asciidoc
~/Library/Application Support/OliveTin/
├── OliveTin # the binary
├── config.yaml # your configuration
├── webui/ # the web interface assets (shipped in the archive)
└── var/ # runtime data OliveTin writes (logs, etc.)
~/Library/Logs/OliveTin/olivetin.log # service stdout/stderr
```
### [](#%5Fregister%5Fand%5Fstart)Register and start
```shell
cp app.olivetin.olivetin.plist ~/Library/LaunchAgents/
launchctl bootstrap gui/$(id -u) ~/Library/LaunchAgents/app.olivetin.olivetin.plist
```
### [](#%5Fverify)Verify
Open in a browser. If the page does not load, check the service log:
```shell
tail -f ~/Library/Logs/OliveTin/olivetin.log
```
### [](#%5Fstop%5Fand%5Fdisable)Stop and disable
```shell
launchctl bootout gui/$(id -u) ~/Library/LaunchAgents/app.olivetin.olivetin.plist
```
### [](#%5Frestart%5Fafter%5Fa%5Fchange)Restart after a change
After editing `config.yaml` or replacing the binary, restart the service so the change takes effect:
```shell
launchctl kickstart -k gui/$(id -u)/app.olivetin.olivetin
```
If you changed the **plist** itself, `kickstart` is not enough - boot the service out and back in so launchd re-reads it (`bootstrap` errors if the service is still loaded):
```shell
launchctl bootout gui/$(id -u) ~/Library/LaunchAgents/app.olivetin.olivetin.plist
launchctl bootstrap gui/$(id -u) ~/Library/LaunchAgents/app.olivetin.olivetin.plist
```
## [](#%5Flaunchdaemon%5Fsystem%5Fwide)LaunchDaemon (system-wide)
### [](#%5Finstall%5Fthe%5Ffiles%5F2)Install the files
Run these from the extracted archive directory:
```shell
sudo mkdir -p /usr/local/bin /usr/local/etc/OliveTin/var /usr/local/var/log
sudo cp OliveTin /usr/local/bin/OliveTin
sudo cp config.yaml /usr/local/etc/OliveTin/
sudo cp -R webui /usr/local/etc/OliveTin/
```
This gives you the following layout:
```asciidoc
/usr/local/bin/OliveTin
/usr/local/etc/OliveTin/
├── config.yaml
├── webui/
└── var/
/usr/local/var/log/olivetin.log # service stdout/stderr
```
### [](#%5Fregister%5Fand%5Fstart%5F2)Register and start
```shell
sudo cp app.olivetin.olivetin.plist /Library/LaunchDaemons/
sudo chown root:wheel /Library/LaunchDaemons/app.olivetin.olivetin.plist
sudo launchctl bootstrap system /Library/LaunchDaemons/app.olivetin.olivetin.plist
```
### [](#%5Fverify%5F2)Verify
Open in a browser. If the page does not load, check the service log:
```shell
tail -f /usr/local/var/log/olivetin.log
```
### [](#%5Fstop%5Fand%5Fdisable%5F2)Stop and disable
```shell
sudo launchctl bootout system /Library/LaunchDaemons/app.olivetin.olivetin.plist
```
### [](#%5Frestart%5Fafter%5Fa%5Fchange%5F2)Restart after a change
After editing `config.yaml` or replacing the binary, restart the service so the change takes effect:
```shell
sudo launchctl kickstart -k system/app.olivetin.olivetin
```
If you changed the **plist** itself, `kickstart` is not enough - boot the service out and back in so launchd re-reads it (`bootstrap` errors if the service is still loaded):
```shell
sudo launchctl bootout system /Library/LaunchDaemons/app.olivetin.olivetin.plist
sudo launchctl bootstrap system /Library/LaunchDaemons/app.olivetin.olivetin.plist
```
## [](#%5Fpost%5Finstallation)Post installation
You will need to write a basic configuration file before OliveTin will startup.
Edit the basic config file at `config.yaml` with the following contents;
The most simple `config.yaml` file.
```yaml
actions:
- title: "Hello world!"
shell: echo 'Hello World!'
```
Start OliveTin, preferably via a terminal. On Unix based systems (eg MacOS, BSD, Linux, etc) you can just run `./OliveTin`. On Windows you would run `OliveTin.exe` in windows terminal.
You should be able to browse to (or similar) to get to the web interface.
If you see the OliveTin page popup in your browser, you are good to go! Here are some helpful next steps;
* [Create your first action](../action%5Fexecution/create%5Fyour%5Ffirst.html)
* [configuration section](../config.html) for a list of all configuration options.
## [](#%5Ftroubleshooting%5Finstallations)Troubleshooting installations
If you are having problems, OliveTin will log it’s status on startup. Check the log messages in the terminal.
For tips on capturing and sharing that output, see [Service logs (troubleshooting)](../troubleshooting/service-logs.html).
If you cannot understand the logs, or otherwise need help, see the [support page](../troubleshooting/wheretofindhelp.html).
Docker or Podman
====================
| | OliveTin is supported when run as a Linux Container in many different ways, and lot of OliveTin users will assume that a Linux Container is the best way to install OliveTin because Linux Containers are really popular… However, it is very common that some OliveTin use cases become overcomplicated when a container is used, compared to running as a native service. Read the [\[install-container-vs-service\]](#install-container-vs-service) document to understand if a container or a service is right for your use case. |
| ----------------------------------------------------------------------------------------------------------------------------------------------------------------------------------------------------------------------------------------------------------------------------------------------------------------------------------------------------------------------------------------------------------------------------------------------------------------------------------------------------------------------------------------- |
The image is pushed to the following registries, pick the one that you prefer - the container images are identical so you only need one;
* Dockerhub container image: [docker.io/jamesread/olivetin](https://hub.docker.com/r/jamesread/olivetin/)
* GitHub container image: [ghcr.io/jamesread/olivetin](https://ghcr.io/olivetin/olivetin)
If you prefer to use docker-compose, then follow the [docker-compose](docker%5Fcompose.html) installation instructions>>.
The standard container setup just needs **port 1337** forwarded for web traffic, and a volume **to store the configuration file**. Note that OliveTin containers expect the config to be in `/config/` inside the container, but it doesn’t really matter where this directory is mounted from on the host. This documention uses the convention of `/etc/OliveTin` on the host, but `/dockerStuff/OliveTin/` or similar would be fine.
Create the container (but don’t start it yet)
```shell
user@host: mkdir /etc/OliveTin/
user@host: # ie: Your config file is /etc/OliveTin/config.yaml on the host machine. We'll create this in the post-installation step.
user@host: docker pull jamesread/olivetin
user@host: docker create --name olivetin -p 1337:1337 -v /etc/OliveTin/:/config:ro docker.io/jamesread/olivetin
```
| | The OliveTin container is built using fedora-minimal, which doesn’t use customizations that some people may be familiar with from popular projects like LSIO, or debian-based containers. The two top misunderstandings are [PUID and PGID are ignored](../troubleshooting/puid-pgid.html). Please see the instructions below if you’re not familiar with changing users or timezones. |
| ----------------------------------------------------------------------------------------------------------------------------------------------------------------------------------------------------------------------------------------------------------------------------------------------------------------------------------------------------------------------------------------- |
## [](#container-user)Container user
OliveTin does not need to be run as a root, and does not need any special capabilities. If you want to change the user that OliveTin runs as, use `--user` when creating the container. OliveTin ignores [PUID and PGID](../troubleshooting/puid-pgid.html).
## [](#container-timezone)Container timezone
To change the [changing the timezone requires a bound-mount](../advanced%5Fconfiguration/timezones.html) from the host. Olivetin ignores the TZ variable as it is non-standard.
## [](#%5Fpost%5Finstallation%5Fcontainer)Post installation (container)
You will need to write a basic configuration file before OliveTin will startup.
Create a basic config file at `/etc/OliveTin/config.yaml` \- the exact path depends on what directory you specified in the bind mount container creation in the last step. Note that the file must be called `config.yaml`, and `config.yml` or `mystuff.yaml` would not work. You can download a sample configuration file like this if you like;
Download the sample config.yaml file to get you started.
```shell
user@host: cd /etc/OliveTin/
user@host: curl -O https://raw.githubusercontent.com/OliveTin/OliveTin/main/config.yaml
```
The file contents should look something like this;
The most simple `config.yaml` file.
```yaml
actions:
- title: "Hello world!"
shell: echo 'Hello World!'
```
If you are running a firewall on your server, like firewalld, you will need to open port 1337;
## [](#%5Fconfigure%5Fyour%5Ffirewall)Configure your firewall
* No Firewall
* FirewallD
If you don’t have a firewall, continue to the next section.
This is how you configure your firewalld firewall for OliveTin:
```shell
user@host: firewall-cmd --add-port 1337/tcp --permanent
user@host: firewall-cmd --reload
```
## [](#%5Fstart%5Fthe%5Folivetin%5Fservice)Start the OliveTin service
Now that you have a configuration file, and the OliveTin container created, you are now ready to start OliveTin!
```asciidoc
user@host: docker start olivetin
```
You should be able to browse to (or similar) to get to the web interface.
If you see the OliveTin page popup in your browser, you are good to go! Here are some helpful next steps;
* [Create your first action](../action%5Fexecution/create%5Fyour%5Ffirst.html)
* [configuration section](../config.html) for a list of all configuration options.
## [](#%5Ftroubleshooting%5Fpodmandocker%5Finstallations)Troubleshooting podman/docker installations
If you are having problems in starting OliveTin, or OliveTin is crashing on startup, then check the logs like this;
```asciidoc
user@host: docker logs OliveTin
```
For more detail on what to capture and how to share logs when asking for help, see [Service logs (troubleshooting)](../troubleshooting/service-logs.html).
If you cannot understand the logs, or otherwise need help, see the [support page](../troubleshooting/wheretofindhelp.html).
.tar.gz Install (manual)
====================
Installing OliveTin from a .tar.gz file is considered advanced setup, and is provided for users who cannot use the .deb or .rpm packages, or who don’t want to use the Linux container.
## [](#%5Fmanual%5Fsetup%5Ftar%5Fgz)Manual setup (.tar.gz)
1. Copy the `OliveTin` binary to `/usr/local/bin/OliveTin`
1. Make sure it is executable: `chmod +x /usr/local/bin/OliveTin`
2. Make a directory for the configuration files: `mkdir -p /etc/OliveTin`
1. Copy the `config.yaml` file to `/etc/OliveTin/`
3. Copy the `webui` directory contents to `/var/www/olivetin/` (eg, `/var/www/olivetin/index.html`)
4. Copy the `OliveTin.service` file to `/etc/systemd/system/`
5. Files in the `var` directory are all considered optional.
1. `var/entities/` contains some example entity files used by the default config.yaml. You can copy these to `/etc/OliveTin/entities/` if you want to use them.
2. `var/helper-actions/` contains some helpers that are mostly useful for containers. These should be copied to somewhere on your path if you want to use them, such as `/usr/local/bin/`.
3. `var/initscript/OliveTin` is provided for init-based systems. You can copy this to `/etc/init.d/OliveTin` and make it executable if you want to use it.
4. `var/manpage/OliveTin.1.gz` contains the manpage for OliveTin. You can copy this to `/usr/share/man/man1/` if you want to use it.
5. `var/marketing` contains some marketing materials used by the repository. You can probably ignore these unless you’re writing a blog article or something.
6. `var/openrc/OliveTin` is provided for OpenRC-based systems. You can copy this to `/etc/init.d/OliveTin` and make it executable if you want to use it.
7. `var/tekton` is a directory that contains an experimental Tekton base image builder. You don’t need this.
## [](#%5Fpost%5Finstallation)Post installation
You will need to write a basic configuration file before OliveTin will startup.
Create the following basic config file at `/etc/OliveTin/config.yaml` with the following contents;
The most simple `config.yaml` file.
```yaml
actions:
- title: "Hello world!"
shell: echo 'Hello World!'
```
Now that you have a configuration file, and OliveTin is installed, start it;
Start the service (only needed once)
```shell
user@host: systemctl enable --now OliveTin
```
If you are running a firewall on your server, like firewalld, you will need to open port 1337;
```shell
user@host: firewall-cmd --add-port 1337/tcp --permanent
user@host: firewall-cmd --reload
```
You should be able to browse to (or similar) to get to the web interface.
If you see the OliveTin page popup in your browser, you are good to go! Here are some helpful next steps;
* [Create your first action](../action%5Fexecution/create%5Fyour%5Ffirst.html)
* [configuration section](../config.html) for a list of all configuration options.
## [](#%5Ftroubleshooting%5Fsystemd%5Finstallations)Troubleshooting systemd installations
If you are having problems, you can check if OliveTin is running like this;
```shell
user@host: systemctl status OliveTin
```
If the service has failed, scroll through the logs;
```shell
user@host: journalctl -eu OliveTin
```
If you cannot understand the logs, or otherwise need help, see the [support page](../troubleshooting/wheretofindhelp.html).
For more detail on what to capture and how to share logs when asking for help, see [Service logs (troubleshooting)](../troubleshooting/service-logs.html).
Windows install
====================
Yes, OliveTin is supported on Windows, too!
You can instal install OliveTin as a Windows service, follow the instructions to [install OliveTin as a Windows service](windows%5Fservice.html).
## [](#%5Fdownload%5Fand%5Frun)Download and run
1. You can download the latest version of OliveTin here: [OliveTin-windows-amd64.zip](https://github.com/OliveTin/OliveTin/releases/latest/download/OliveTin-windows-amd64.zip)
2. Unzip and run "OliveTin.exe"
## [](#windows-service-logs)Process log directory
On Windows, OliveTin writes its **process logs** (startup messages, configuration load, errors, and internal diagnostics) to a log file on disk. By default these files are stored under `%ProgramData%\OliveTin\logs\` as `OliveTin-service-.log`.
This is separate from [action execution logs](../action%5Fcustomization/savelogs.html) (`saveLogs`), which persist command output from individual actions.
Portable or self-contained installs often keep OliveTin, its configuration, and its logs together in one folder. Without a custom path, process logs always go to `%ProgramData%`, even when you run OliveTin from another location.
Add a `serviceLogs` block to your `config.yaml`:
```yaml
serviceLogs:
directory: ./logs/service/
```
OliveTin creates the directory if it does not exist and writes a new timestamped log file there on each startup.
If `serviceLogs.directory` is omitted, OliveTin uses the default location: `%ProgramData%\OliveTin\logs\`.
Relative paths (for example `./logs/service/`) are resolved from the directory containing `OliveTin.exe`. This keeps portable installs self-contained when you colocate logs with the application.
| | serviceLogs.directory is **Windows only**. If you set it on Linux, macOS, or in a container, OliveTin logs an error at startup and ignores the setting. On those platforms, use [service logs troubleshooting](../troubleshooting/service-logs.html) for how to read process output (for example journalctl or container logs). |
| ---------------------------------------------------------------------------------------------------------------------------------------------------------------------------------------------------------------------------------------------------------------------------------------------------------------------------------- |
## [](#%5Fpost%5Finstallation)Post installation
You will need to write a basic configuration file before OliveTin will startup.
Edit the basic config file at `config.yaml` with the following contents;
The most simple `config.yaml` file.
```yaml
actions:
- title: "Hello world!"
shell: echo 'Hello World!'
```
Start OliveTin, preferably via a terminal. On Unix based systems (eg MacOS, BSD, Linux, etc) you can just run `./OliveTin`. On Windows you would run `OliveTin.exe` in windows terminal.
You should be able to browse to (or similar) to get to the web interface.
If you see the OliveTin page popup in your browser, you are good to go! Here are some helpful next steps;
* [Create your first action](../action%5Fexecution/create%5Fyour%5Ffirst.html)
* [configuration section](../config.html) for a list of all configuration options.
## [](#%5Ftroubleshooting%5Finstallations)Troubleshooting installations
If you are having problems, OliveTin will log it’s status on startup. Check the log messages in the terminal.
For tips on capturing and sharing that output, see [Service logs (troubleshooting)](../troubleshooting/service-logs.html).
If you cannot understand the logs, or otherwise need help, see the [support page](../troubleshooting/wheretofindhelp.html).
Windows Service install
====================
This option is to install OliveTin as a Windows service, which allows it to run in the background and start automatically when the system boots up. This is useful for servers or systems that need to run OliveTin without user intervention. If you want to run OliveTin as a regular application, you can follow the [Windows install](windows.html) instructions instead.
## [](#%5Fdownload%5Fand%5Fextract)Download and extract;
| | There is no .msi installer for OliveTin yet, so you will need to download the .zip file and extract it in the desired location. |
| ---------------------------------------------------------------------------------------------------------------------------------- |
You can download the latest version of OliveTin here: [OliveTin-windows-amd64.zip](https://github.com/OliveTin/OliveTin/releases/latest/download/OliveTin-windows-amd64.zip)
* Create c:/Program Files/OliveTin/
* Copy **OliveTin.exe** into this directory.
* Copy the **webui** directory into this directory.
* Create c:/ProgramData/OliveTin/
* Copy the **config.yaml** file into this directory.
## [](#windows-service-logs)Process log directory
On Windows, OliveTin writes its **process logs** (startup messages, configuration load, errors, and internal diagnostics) to a log file on disk. By default these files are stored under `%ProgramData%\OliveTin\logs\` as `OliveTin-service-.log`.
This is separate from [action execution logs](../action%5Fcustomization/savelogs.html) (`saveLogs`), which persist command output from individual actions.
Portable or self-contained installs often keep OliveTin, its configuration, and its logs together in one folder. Without a custom path, process logs always go to `%ProgramData%`, even when you run OliveTin from another location.
Add a `serviceLogs` block to your `config.yaml`:
```yaml
serviceLogs:
directory: ./logs/service/
```
OliveTin creates the directory if it does not exist and writes a new timestamped log file there on each startup.
If `serviceLogs.directory` is omitted, OliveTin uses the default location: `%ProgramData%\OliveTin\logs\`.
Relative paths (for example `./logs/service/`) are resolved from the directory containing `OliveTin.exe`. This keeps portable installs self-contained when you colocate logs with the application.
| | serviceLogs.directory is **Windows only**. If you set it on Linux, macOS, or in a container, OliveTin logs an error at startup and ignores the setting. On those platforms, use [service logs troubleshooting](../troubleshooting/service-logs.html) for how to read process output (for example journalctl or container logs). |
| ---------------------------------------------------------------------------------------------------------------------------------------------------------------------------------------------------------------------------------------------------------------------------------------------------------------------------------- |
## [](#%5Ftest%5Folivetin%5Fstartup)Test OliveTin startup
Open a command prompt and make suer you are in the c:/Program Files/OliveTin/ directory, then run:
./OliveTin.exe
If everything is set up correctly, you should see the OliveTin service starting up and listening on port 1337.
## [](#%5Fswitch%5Fstartup%5Fmode%5Fto%5Fa%5Fwindows%5Fservice)Switch startup mode to a Windows service
Windows services require executables to run a "service host" thread, which is not started by default for OliveTin on windows. To run OliveTin as a service, you will need to set this in your configuration file;
`config.yaml`
```yaml
serviceHostMode: "winsvc-standard"
logLevel: info
actions:
...
```
## [](#%5Fregister%5Fthe%5Fservice)Register the service
Open a command prompt as Administrator and run the following command;
Make sure to run `sc.exe` and not just `sc`, as the latter is a PowerShell alias for `Set-Content` and does not display any output, which can be very confusing.
sc.exe create OliveTin binPath= "C:\Program Files\OliveTin\OliveTin.exe" start= auto
## [](#%5Fstart%5Fthe%5Fservice)Start the service
Start the service from the Microsoft Management Console (MMC) or by running the following command;
sc.exe start OliveTin
## [](#%5Fpost%5Finstallation)Post installation
You will need to write a basic configuration file before OliveTin will startup.
Edit the basic config file at `config.yaml` with the following contents;
The most simple `config.yaml` file.
```yaml
actions:
- title: "Hello world!"
shell: echo 'Hello World!'
```
Start OliveTin, preferably via a terminal. On Unix based systems (eg MacOS, BSD, Linux, etc) you can just run `./OliveTin`. On Windows you would run `OliveTin.exe` in windows terminal.
You should be able to browse to (or similar) to get to the web interface.
If you see the OliveTin page popup in your browser, you are good to go! Here are some helpful next steps;
* [Create your first action](../action%5Fexecution/create%5Fyour%5Ffirst.html)
* [configuration section](../config.html) for a list of all configuration options.
## [](#%5Ftroubleshooting%5Finstallations)Troubleshooting installations
If you are having problems, OliveTin will log it’s status on startup. Check the log messages in the terminal.
For tips on capturing and sharing that output, see [Service logs (troubleshooting)](../troubleshooting/service-logs.html).
If you cannot understand the logs, or otherwise need help, see the [support page](../troubleshooting/wheretofindhelp.html).
Home Assistant (HACS Integration)
====================
Integrating OliveTin with Home Assistant allows you to control OliveTin from your Home Assistant dashboard. Using the HACS integration is the recommended way to integrate OliveTin with Home Assistant. It is easy to set up and provides a seamless experience.
If you are not familiar with HACs, it is a custom component for Home Assistant that allows you to install and manage custom integrations easily. It is similar to the Home Assistant Add-ons store but for integrations.
## [](#%5Fsetup%5Fguide)Setup guide
1. [Install HACS](https://hacs.xyz/docs/use/)
2. Go to HACS in your home assistant control panel. Click the "…" dropdown in the top right corner, and select "**Custom Repositories**".

3. In the dialog that pops up, add the custom repo as follows;

1. **Repository link**:
2. **Type**: Integration
4. Search for "OliveTin" in the HACS store, and download it. You will probably need to restart Home Assistant for it be registered correctly.


5. Go to "Settings" and open "Devices & Services"

6. Click "Add integration" and search for "OliveTin". Note that if it does not show up, you may need to restart Home Assistant.

1. Select "OliveTin"
2. Host:
3. Username:
4. Password:
7. Under "Configured", you should see OliveTin. Open it by clicking on the arrow.
8. After configuring it, you should see buttons appear in Home Assistant;

Home Assistant (REST)
====================
| | The recommended way to integrate HomeAssistant and OliveTin is via the [HACS integration](homeassistant-integration.html). |
| ----------------------------------------------------------------------------------------------------------------------------- |
Home Assistant is able to call REST API endpoints, making integration with OliveTin possible without any custom plugins or integrations in Home Assistant. This does require modifying your Home Assistant configuration.yml file though.
## [](#%5Fgive%5Fyou%5Factions%5Fan%5Fid)Give you actions an ID
First, you need to give your actions an ID. This is done by adding an `id` field to your action. This ID will be used by Home Assistant to call the correct action. Here is an example of an action with an ID:
```yaml
actions:
- id: "server_sleep"
title: "Server Sleep"
icon: ping
shell: ssh user@server "sudo systemctl suspend"
```
You then need to know the URL to call to trigger this action. This URL is the OliveTin API URL, with the action ID appended to it. For example, if your OliveTin is running at ``, the URL to call to trigger the action above would be ``.
You can learn more about starting actions via the OliveTin API by reading the link [Starting Actions via the API](../api/start%5Faction.html) page, but the method "StartActionAndWait" is the one you will want to use for Home Assistant.
## [](#%5Fadd%5Fthe%5Frest%5Fapi%5Fcall%5Fto%5Fhome%5Fassistant)Add the REST API call to Home Assistant
Now that you have the URL to call to trigger your action, you can add this to your Home Assistant configuration. This is done by adding a `rest_command` to your configuration.yml file.
* [Home Assistant Configuration](https://www.home-assistant.io/docs/configuration/)
That page assumes you will use the Home Assistant File Editor addon to edit your configuration.yaml. Install it from the Home Assistant addon store if you have not done so already;
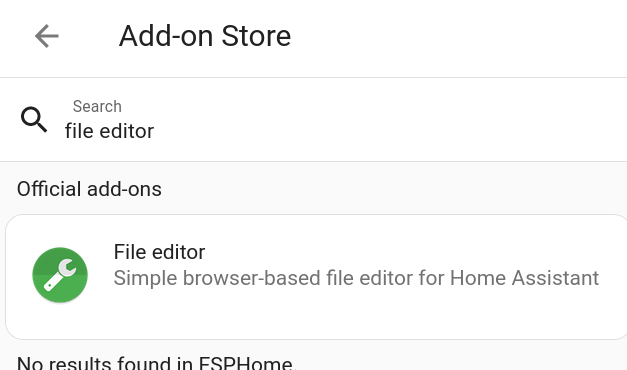
The addon is started and added to the sidebar;
Here is an example of a `rest_command` that calls the action above:
From the file editor now in your sidebar, browse the filesystem to the configuration.yaml file and add the following to the file:
```yaml
rest_command:
olivetin_sleep_mindstorm:
url: http://olivetin.webapps.teratan.lan/api/StartActionByGetAndWait/server_sleep
method: get
```
You save the file, and restart Home Assistant to pick up the changes.
## [](#%5Fadd%5Fa%5Fbutton%5Fto%5Fyour%5Fhass%5Fdashboard)Add a button to your HASS Dashboard
Now that you have a `rest_command` set up to call your action, you can add a button to your Home Assistant dashboard to trigger the action. This is done by adding a `button` to your dashboard configuration.
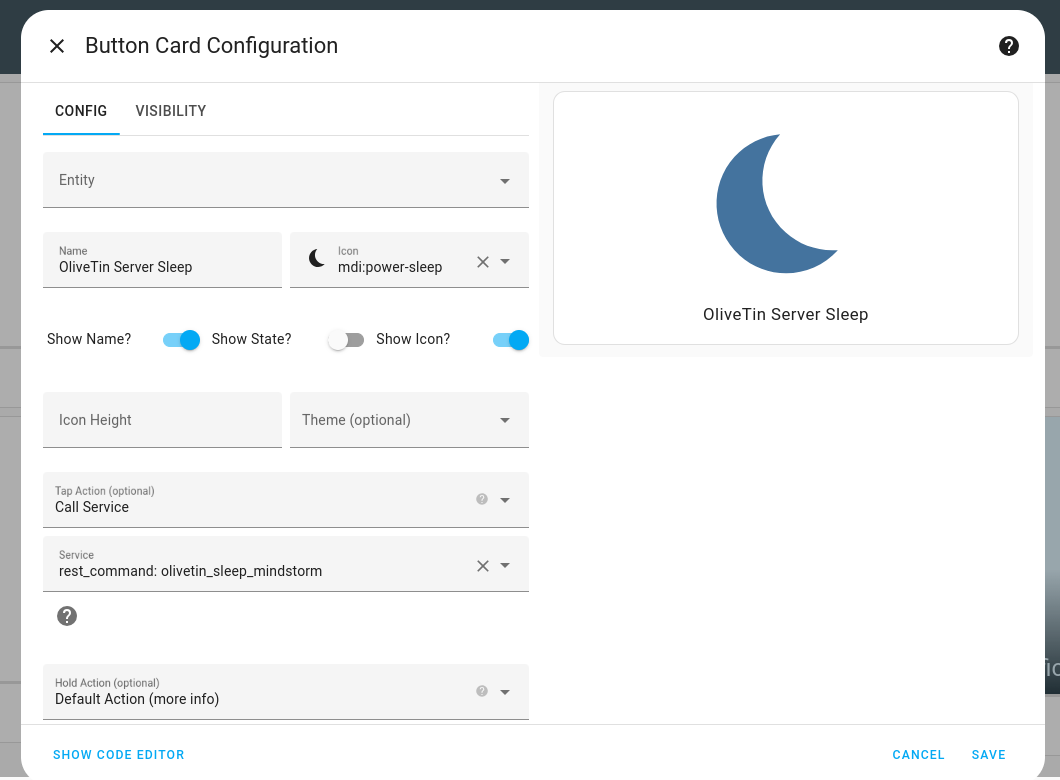
Set the "Tap Action" to "Call Service" and select the `rest_command` you created earlier. You can also set the icon and name of the button to whatever you like.
Good luck!
OliveTin and MCP Servers
====================
OliveTin does not yet include a built-in [Model Context Protocol (MCP)](https://modelcontextprotocol.io) server integration, and there is no current roadmap to add one to OliveTin itself.
## [](#%5Fcommunity%5Fproject)Community project
A community-maintained MCP server for OliveTin is available at [olivetin-mcp](https://github.com/vaddisrinivas/olivetin-mcp).
| | This project is not maintained by the OliveTin project maintainers. For issues specific to the MCP server, please use that repository. If you run into problems on the OliveTin side, the OliveTin community will try to help where it can. |
| ---------------------------------------------------------------------------------------------------------------------------------------------------------------------------------------------------------------------------------------------- |
OliveTin n8n Integration
====================
The OliveTin n8n node is a community node for [n8n](https://n8n.io) that lets you trigger OliveTin actions from your n8n workflows.
* **npm package**: `n8n-nodes-olivetin`
* **Repository**: [OliveTin-n8n-node](https://github.com/OliveTin/OliveTin-n8n-node)
## [](#%5Finstallation)Installation
Install the node in n8n via the Community nodes panel, or install the package in your n8n environment.
| | Detailed installation steps and usage documentation will be added here in a future update. |
| --------------------------------------------------------------------------------------------- |
OliveTin Stream Deck Plugin
====================
| | Plugin has been developed, and is waiting for approval on the Marketplace. |
| ----------------------------------------------------------------------------- |
## [](#%5Fget%5Fthe%5Fplugin%5Fon%5Fthe%5Fmarketplace)Get the plugin on the Marketplace
Head over to the [Elegato Marketplace](https://marketplace.elgato.com/stream-deck/plugins), and search for "OliveTin".
Click "Get" on the plugin to install it onto your Stream-Deck.
## [](#%5Fconfigure%5Fa%5Fbutton)Configure a button
Here are some screenshots, and later documentation will follow when the plugin gets approved.
Add the OliveTin button;
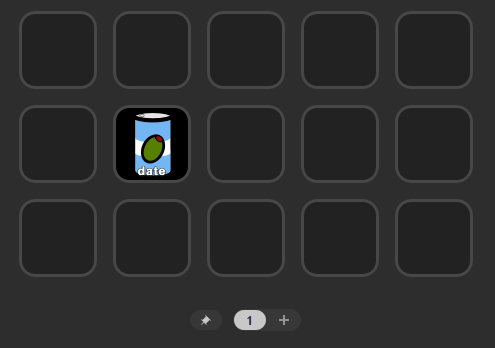
Set the OliveTin API URL to;
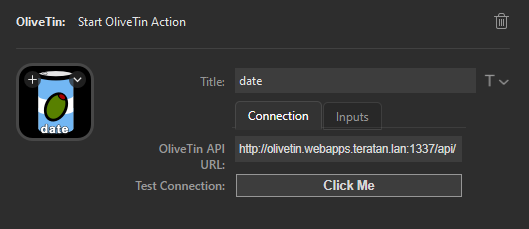
Switch to the **Input** tab, and the enter an action ID:
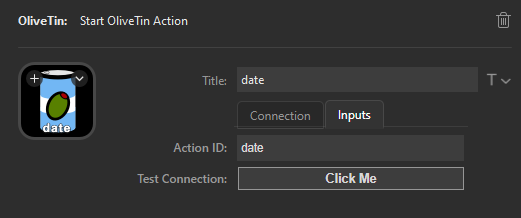
If you don’t have IDs set on your action, then read [how to set action IDs](../action%5Fcustomization/ids.html).
Installing extra container packages
====================
The official OliveTin container image is based on Fedora Linux. Fedora has shown to offer a great mix of stability and support over two decades. The base container image for OliveTin is relatively lightweight, with not many tools installed by default. This keeps the download size small, but you may want to add additional packages.
## [](#%5Fquickstart%5Fusing%5Fdnf%5Fto%5Finstall%5Fadditional%5Fpackages)Quickstart - using DNF to install additional packages
You can of course create your own container image, but this is probably a lot of work for new users, or people who just want a few extra packages/commands. Instead of creating a whole new container image, you can simply run `microdnf` (the Fodora package manager) to install more commands.
1. Start the OliveTin container using one of the methods shown in the [container installation instructions](../install/container.html).
2. Then, on the same host that is running the container, spawn a root shell inside the OliveTin container, like this;
```asciidoc
user@host: docker exec -it olivetin -u root /bin/bash
[root@019d08ef95bd /]#
```
The important thing here is passing `-u root`. By default, OliveTin does not run as root.
3. Once you have a root shell in OliveTin, you can use the Fedora package manager - `microdnf` to install things that you might need. If you are used to Debian’s `apt-get` tool, it works in a very similar way;
```asciidoc
[root@019d08ef95bd /]# microdnf install -y nc
```
Note that if you upgrade the OliveTin container image, you will need to reinstall these packages.
Once you have finished installing these packages, just exit the root shell using `exit`. You don’t need to restart the container - and OliveTin does not need to run as root to use most commands.
## [](#%5Fsee%5Falso)See also
* [OliveTin container on Docker Hub](https://hub.docker.com/r/jamesread/olivetin)
* [Installing using a container](../install/container.html)
* [Installing using docker compose](../install/docker%5Fcompose.html)
* [Installing on Kubernetes with Helm](../install/helm.html)
* [Installing on Kubernetes (manually)](../install/k8s.html)
Contribute
====================
First of all, a huge, huge thanks for reading this page, and considering some form of contribution. Here are some suggestions below.
| | OliveTin does not accept [Donations and Sponsorship](donations%5Fand%5Fsponsorship.html). |
| -------------------------------------------------------------------------------------------- |
1. If you have 2 Minutes to contribute: **Share how you are using OliveTin**, on Reddit, Twitter/X, LinkedIn, Mastodon, or whatever - use the hashtag #OliveTin. Show a screenshot or blog about it. Tell people how OliveTin helped you. There is also #screenshot-showcase in the OliveTin Discord community. If you want to ping me directly, I really like getting email or PMs; jump on Discord and just say it, or contact me via one of the methods found at .
2. If you have 10 minutes to contribute: **Answer a call for support**: look for support issues in #support on discord, or tagged om GitHub issues, and help someone out! You don’t have to solve the problem, just point someone in the right direction.
3. If you have 15 minutes to contribute:
1. **Write up a feature request** on GitHub issues
2. **Improve the docs** \- I make a LOT of typos!
4. **If you have lots of time:** contribute code!
5. **If you have spare compute** \- spare server capacity where I can have a virtual machine with root access, then having more VMs to test OliveTin on is always very welcome indeed. I have a lot of sever capacity already though personally, so I’m probably just being greedy for CPU and RAM :-)
Donations & Sponsorship
====================
Sometimes I (James Read) get asked if people can donate money, or sponsor me for OliveTin. If you are reading this page, maybe you are thinking the same.
**I do not accept donations or sponsorship** for OliveTin, but I want to **thank you very much indeed** for thinking about the potential.
I have a job that pays me, where I don’t write code as part of my day job (very often) - I enjoy coding as a hobby in my spare time. If I get money for that, it somehow takes the pleasure or fun out of it, or makes it feel like a job. There are concerns that I might "prefer" to work on one user’s feature request if I am sponsored, or even feel compelled that I have to work on something because someone gave me money. I don’t want OliveTin development to go that way. There are also other little considerations, like being paid on the side out of my job then affects my job, and tax, and so on and so on. This is why I don’t take any form of money, donations or sponsorship.
Another way that you can show your appreciation for OliveTin, that actually means a lot more than money, is to [contribute to OliveTin](contribute.html). There are little ways and big ways to contribute - depends on if you have 2 minutes or 2 weeks to give!
Understanding exit codes
====================
OliveTin just runs commands. If the command exits with an unusual exit code (something other than 0), OliveTin will tell you. Many Linux commands will exit with code 1, 2, 3, etc to indicate different types of errors.
It’s important to understand that OliveTin is just reporting back what the command exited with, it’s very unusual for OliveTin to cause new types of errors!
For example, if `ping` exits with code 1 or 2, the documentation for ping says that this indicates either a name not found, timeout, or other similar error. The best thing you can do is `man ping` to read the ping manual page to find out more.
## [](#%5Fcommon%5Ferror%5Fcodes)Common error codes
* **Exit code 127** is used by the Linux shell to indicate "Command not found". Most often this means you need to install the command (often in the linux container image).
Includes
====================
OliveTin 3k supports including configuration files from other files. This is useful for organizing large configurations or reusing common settings across multiple actions.
## [](#%5Finclude%5Fsyntax)Include Syntax
To include another configuration file, use the following syntax in your main configuration file:
```yaml
include: config.d
```
This will include all config files in the /config.d/ directory.
## [](#%5Finclude%5Flogic)Include Logic
Files are included in alphabetical order based on their filenames. This allows you to control the order of inclusion by naming your files accordingly. For example;
* `01-setup.yaml` contains `logLevel: debug`
* `02-actions.yaml` contains `logLevel: info`
* Final `logLevel` will be `info` since `02-actions.yaml` is included after `01-setup.yaml`.
Everything under `actions` is merged into a single `actions` list after all files are included. This means you can define actions in multiple files and they will be combined into one list.
| | All other "lists" are overwritten by later files. For example, if you define dashboards, entities, accessControlLists or similar in multiple files, only the last definition will be used. |
| --------------------------------------------------------------------------------------------------------------------------------------------------------------------------------------------- |
Multiple instances on a server
====================
Several users will find themselves wanting to run multiple instances of OliveTin. Depending on how you’ve setup OliveTin depends on how easy it is to configure that. This page includes instructions for OliveTin installed as a container, and as a package (.tar.gz).
## [](#%5Fwith%5Fcontainers)With Containers
This is the easiest way to run multiple OliveTin instances. Follow the [Container Installation instructions](../install/container.html), or similar for [Docker Compose](../install/docker%5Fcompose.html), [Helm](../install/helm.html) or similar to get started.
1. Create a `config.yaml` file for each instance of OliveTin (instances cannot share the same config).
2. Choose a new external port for OliveTin and set it in the config file (by default that is `1337` is used). For example, set `listenAddressSingleHTTPFrontend: 0.0.0.0:2337` for your 2nd container’s config.
3. When creating the container, pass in the 2nd instance’s config, eg; `-v /opt/OliveTin_two/:/config/`
4. When creating the container, set the external port, eg: `2337:1337` \- 2337 is the external port)
You do not need to change the listenAddresses / ports for the other 3 ports that OliveTin uses, when you are running inside a container.
## [](#%5Fwithout%5Fcontainers%5Fusing%5Fa%5Fpackage%5Ftar%5Fgz)Without containers - using a package (.tar.gz)
If you are not using containers, then it is probably best not to use a `.deb/.rpm` installation, as those packages can only be installed for one instance.
Instead, follow the instructions for [installing from a .tar.gz](../install/targz.html) archive.
When you come to create the config.yaml file, OliveTin will look for this in it’s own startup directory. Therefore it is probably best to extract the .tar.gz file like this and change the paths;
* `/opt/OliveTin_one/`
* `/opt/OliveTin_two/`
* `/opt/OliveTin_three/`
Because you are running outside of a container, you will also need to change the "internal" ports used by OliveTin so they are separate for all instances. OliveTin listens on 4 addresses (1 external, 3 internal) and needs 4 ports. You can read about these in the [network ports documentation](network-ports.html).
| | OliveTin also supports reading the PORT environment variable, and will use this as a base port for the simgle frontend, will add 1 to start extra servers. For example of PORT is 2000, then the simgle frontend will start on port 2000, the REST API on 2001, and so on. |
| ----------------------------------------------------------------------------------------------------------------------------------------------------------------------------------------------------------------------------------------------------------------------------- |
You could end up with a setup that looks like this;
| Instance Name | Install path | Config file path | Single frontend point (listenAddressSingleHTTPFrontend) | REST Actions port (listenAddressRestActions) | gRPC Actions port (listenAddressGrpcActions) | WebUI Port (listenAddressWebUI) |
| --------------- | -------------------- | -------------------------------- | ------------------------------------------------------- | -------------------------------------------- | -------------------------------------------- | ------------------------------- |
| OliveTin\_one | /opt/OliveTin\_one | /opt/OliveTin\_one/config.yaml | 0.0.0.0:1337 | localhost:1338 | localhost:1339 | localhost:1340 |
| OliveTin\_two | /opt/OliveTin\_two | /opt/OliveTin\_two/config.yaml | 0.0.0.0:2337 | localhost:2338 | localhost:2339 | localhost:2340 |
| OliveTin\_three | /opt/OliveTin\_three | /opt/OliveTin\_three/config.yaml | 0.0.0.0:3337 | localhost:3338 | localhost:3339 | localhost:3340 |
Note that you will also need to adjust the default systemd service file to point to your install directory, if using that. Here is an example for `OliveTin_two`;
A modified systemd service file for a 2nd instance
```asciidoc
[Unit]
Description=OliveTin2
[Service]
WorkingDirectory=/opt/OliveTin_two/
ExecStart=/opt/OliveTin_two/OliveTin
Restart=always
[Install]
WantedBy=multi-user.target
```
Network ports
====================
OliveTin might surprise some people when they see it is listening on several ports when it starts up. Most of these ports are internal and localhost-only by default. It keeps the architecture of OliveTin clean and simple, and allows for a lot of flexibility if needed.
## [](#%5Fnetwork%5Fflow%5Fdiagram)Network flow diagram
Here is the default flow of traffic in OliveTin without any config changes.
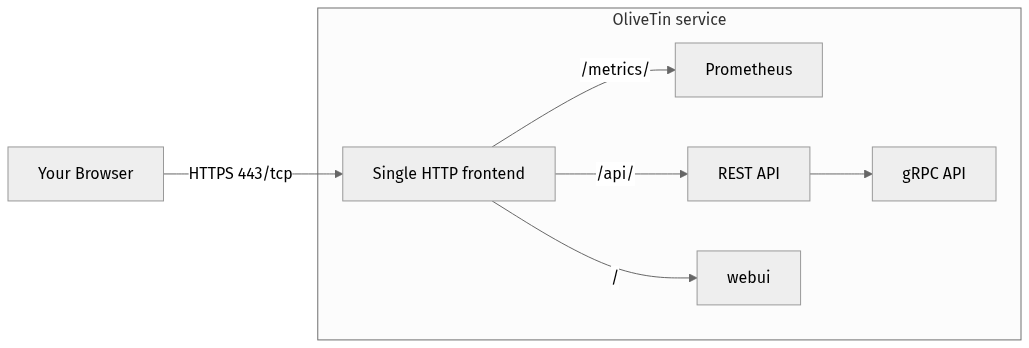
Figure 1\. Flow of an inbound network request
1. Traffic comes into OliveTin over your network and hits the only port listening - 1337, which listens on all interfaces. This is a micro HTTP reverse proxy.
2. Traffic for `/` gets proxied to `localhost:1340` for the static web server.
3. Traffic for `/api/` gets proxied to `localhost:1338` for REST actions.
4. The REST API actually makes gRPC API calls internally, to port`localhost:1339`.
Below is a detailed reference table.
## [](#%5Fport%5Freference%5Ftable)Port Reference Table
__Port reference table__
| Config file reference (and Default Address:Port) | Purpose |
| --------------------------------------------------------------------------------- | ---------------------------------------------------------------------------------------------------------------------------------------------------------------------------------------------------------------------------------------------------------------------------------------------------------------------------------------------------------------------------------------------------------------------------------------------------------- |
| listenAddressSingleHTTPFrontend: 0.0.0.0:1337 (listen on all available addresses) | This is a "micro reverse proxy" built into OliveTin. It’s only purpose is to serve /ui and / (the web interface) from a single endpoint. This means that problems like CORSs and setting "external addresses" is not necessary. It does not do any caching or anything else. It can be disabled, but it makes life a lot easier for you. It’s common to put your own reverse proxy like haproxy, traefik, etc in front of this single micro reverse proxy. |
| listenAddressRestActions: localhost:1338 | REST - the protocol used by web pages to talk to web APIs. In the case of OliveTin, the API is used to get actions, and start actions. |
| listenAddressGrpcActions:localhost:1339 | gRPC - a very popular method of service-to-service API communication. This provides the "real" API for OliveTin. |
| listenAddressWebUI: localhost:1340 | Hosts a simple static web server with some HTML, stylesheets, Javascript etc for the web interface. |
| listenAddressPrometheus: localhost:1341 | Hosts a prometheus endpoint, which is disabled by default. See [Prometheus](../advanced%5Fconfiguration/prometheus.html) to learn more. |
## [](#%5Fsee%5Falso)See also
* [Running Multiple instances of OliveTin on the same server](#reference/multiple%5Finstances)
Snapshot builds
====================
It’s sometimes useful to test code changes in OliveTin that are still in development - and have not yet made it into an official version, yet. Thankfully, all code changes are automatically compiled into a "snapshot" builds and are saved in GitHub actions.
If you browse to GitHub actions page for OliveTin, you’ll find the "Build Snapshot" job, with a list of recent builds.
* [OliveTin’s Build Snapshot page](https://github.com/OliveTin/OliveTin/actions/workflows/build-snapshot.yml)
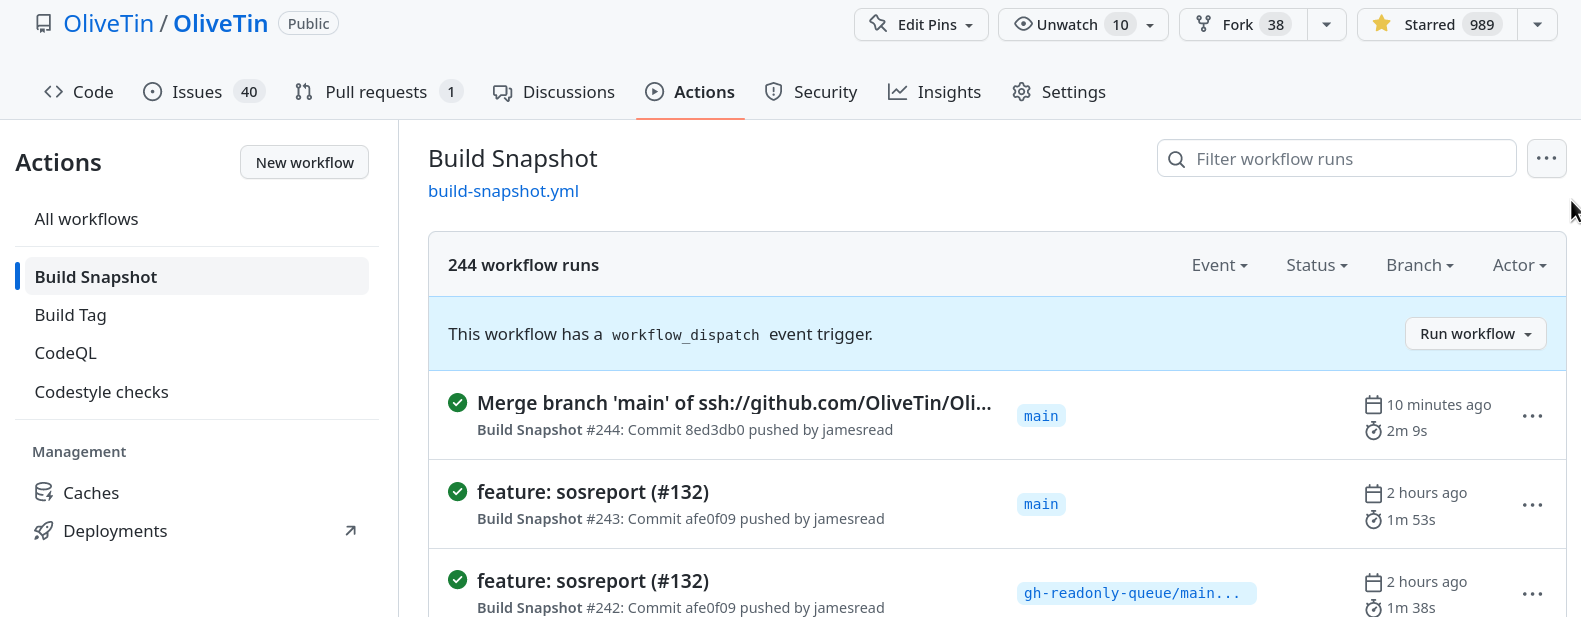
Most of the time you will want to select the top build, unless you’ve specifically been given a build link to use.
## [](#%5Fdownload%5Fthe%5Fsnapshot%5Farchive)Download the snapshot archive
On the job page, you will have a single "snapshot" file listed. In this screenshot, it is 109 MB.
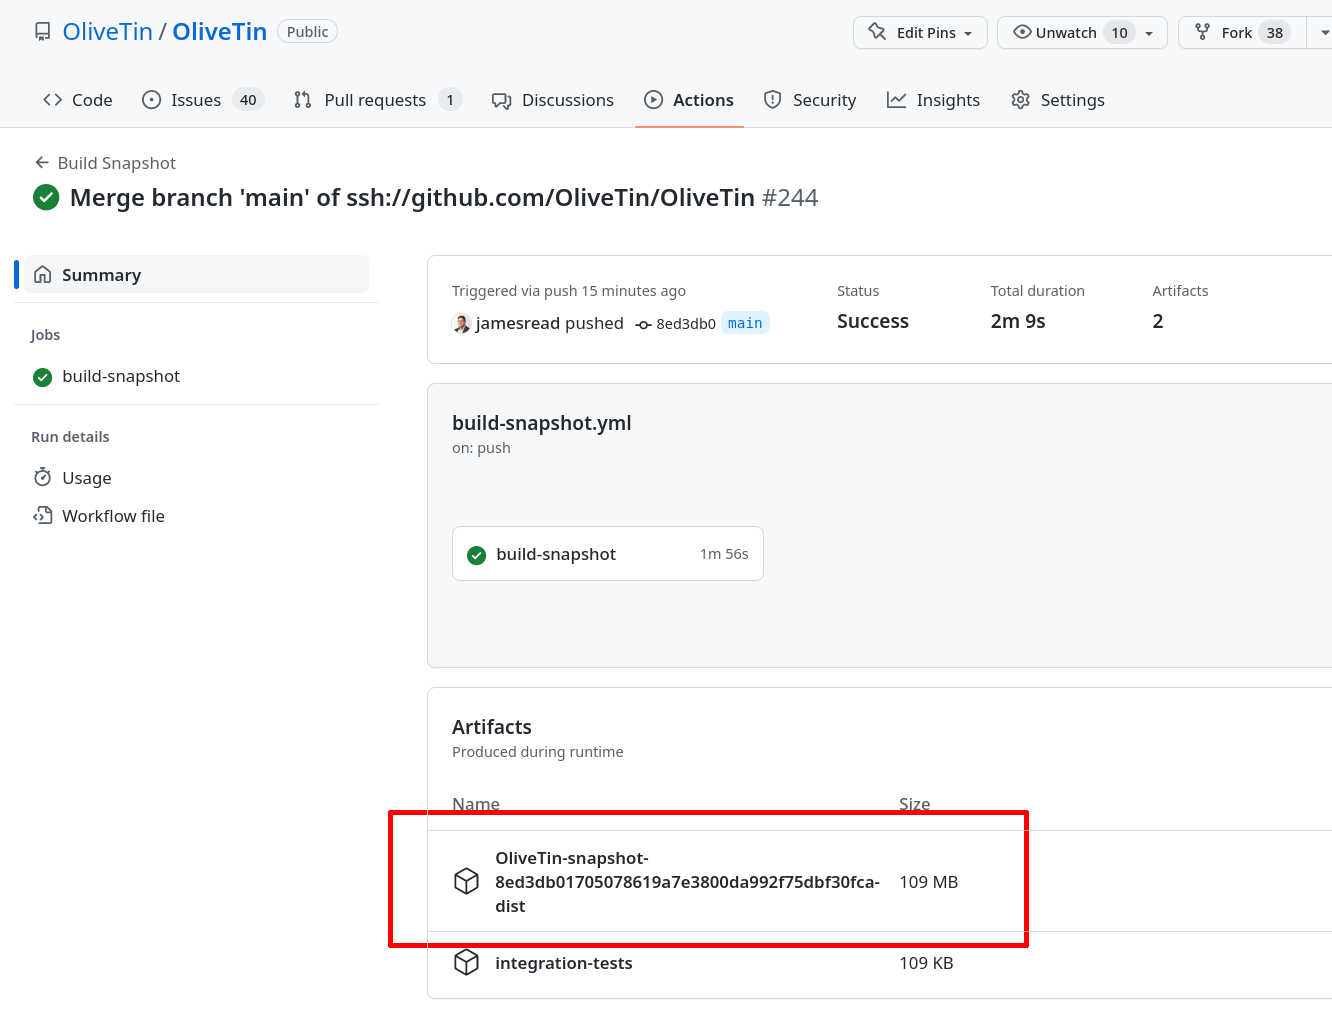
Once downloaded, you can open the archive using any tool that you use to open .zip files. The contents should read something like this;
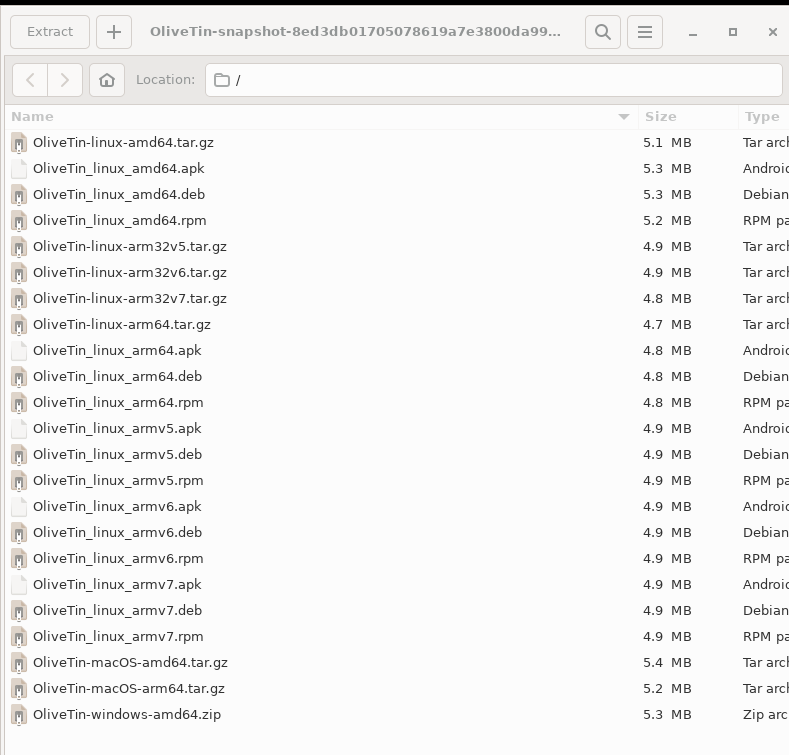
Extract the file you need, and off you go!
Themes (for theme developers)
====================
## [](#%5Fstep%5Fby%5Fstep%5Ftheme%5Fguide)Step by step theme guide
OliveTin themes are simply a directory of CSS and other assets. OliveTin looks for a directory called `custom-webui/themes/` in the same directory as your `config.yaml` file.
Start by creating a directory called `custom-webui/themes/` in the same directory as your `config.yaml` file. This is where you will put your theme files. A theme must also have a theme.css file, which is the main CSS file for your theme. This file must be called `theme.css` and must be in the same directory as your theme folder.
* OliveTin will by default only read theme.css once on startup. If you are intending to change theme.css while OliveTin is running, set `themeCacheDisabled: true` in your config.yaml. This will make OliveTin read theme.css on every request, and is useful for development.
* Go to and use this template repository to create your new theme repository on GitHub.
* Install OliveTin somewhere, and clone your new repository using `git clone` into your themes directory.
* Set `themeName: ` in your OliveTin config.yaml and restart OliveTin.
Write beautiful CSS to create your theme as you like it, commit your changes to git.
Note that OliveTin will load `/theme.css` depending on `themeName:` in your config file. Images and any other assets will be served at `/custom-webui/themes/mytheme/`.
## [](#%5Funderstanding%5Ftheme%5Furls)Understanding theme URLs
When you create a theme, OliveTin will serve your theme’s CSS at `/theme.css` and any other assets at `/custom-webui/themes/mytheme/`. This might be a little strange at first, as your theme.css file will be in the `/custom-webui/themes/mytheme/` directory, but OliveTin will still serve it at `/theme.css`. Let’s explain why this happens;
OliveTin wants to make it easy for your reverse proxy, cache server, or browser, to cache as much content as possible. This means that if OliveTin had to inject a new CSS file into the HTML every time you changed your theme, then your reverse proxy, cache server, or browser would have to re-download the HTML every time you changed your theme. This is not ideal.
It is possible that OliveTin’s initial webUiSettings.json (that is loaded to setup the page), could include the theme name, and then the JavaScript could then add an extra stylesheet to load, but this is slow, and creates a horrible "page flash" effect as the theme is requested.
To make things fast, OliveTin will copy the content of your `/custom-webui/themes/mytheme/theme.css` file into memory when it starts, and then requests for `/theme.css` will load this file.
What this means for you, is that to get to files like `background.png` from your CSS, you must write your CSS to point to the file in the `/custom-webui/themes/mytheme/` directory;
Correct example
```asciidoc
body {
background-image: url('/custom-webui/themes/mytheme/background.png');
}
```
Incorrect example
```asciidoc
body {
background-image: url('/background.png');
}
```
## [](#%5Fhow%5Fto%5Flist%5Fyour%5Ftheme%5Fon%5Fthe%5Folivetin%5Fthemes%5Fpage)How to list your theme on the OliveTin themes page
The OliveTin themes page is here;
When you are done with your theme, fork on GitHub and create a new page under the "content" directory for your new theme. Commit that to GitHub and then raise a pull request.
If you need more help, please jump on our Discord server!
Release Policy
====================
This page is a collection of notes around the policy for releases.
## [](#%5Fpackage%5Fand%5Ftag%5Fdeletions)Package and tag deletions
The OliveTin project **WILL** delete packages and tags in the following situations;
* A release went out accidently, or the package is broken in a way that prevents installation or use (something critical).
* A release went out with the wrong tag, or wrong tag format (eg 2025-11-06 instead of 2025.11.06) for OliveTin 2k.
* This is because registries that contain bag tag formats that do not match smever will cause issues for users trying to install or upgrade in the future.
It is understood that this can break some users workflows, but deleting packages occours rarely, and is only done to prevent further issues.
If this is really a concern that you want to guard against, it is recommended to run your own private registry/mirror of OliveTin packages.
Deleted packages will not be supported in any way;
## [](#%5Fhistory%5Fof%5Fdeleted%5Fpackages)History of deleted packages;
* **OliveTin 2025-11-06** \- deleted due to wrong tag format (2025-11-06 instead of 2025.11.06)
* GitHub releases page
* GHCR
* Docker Hub
* **OliveTin 2025-10-30** \- deleted due to wrong tag format (2025-10-30 instead of 2025.10.30)
* GitHub releases page
* GHCR
* Docker Hub
Themes (for users)
====================
You can look for themes on the [OliveTin Theme Site](http://www.olivetin.app/themes/).
## [](#%5Finstalling%5Fa%5Ftheme)Installing a theme
There are 3 ways to install a theme;
If running inside a Docker container:
1. Use the `olivetin-get-theme` command to easily Git clone the theme into your `custom-webui/themes/` directory.
If running without using containers:
1. Download the theme .zip and copy it across to your `custom-webui/themes/` directory.
2. Git Clone the theme into your `custom-webui/themes/` directory.
## [](#get-theme)How to use the `olivetin-get-theme` command
The default OliveTin configuration comes with an action to get new OliveTin themes. If you deleted it from your configuration, you can add it back in by adding the following to your `config.yaml` file;
```bash
actions:
- title: Get OliveTin Theme
shell: olivetin-get-theme {{ themeGitRepo }} {{ themeFolderName }}
icon: theme
arguments:
- name: themeGitRepo
title: Theme's Git Repository
description: Find new themes at https://olivetin.app/themes
type: url
- name: themeFolderName
title: Theme's Folder Name
type: ascii_identifier
```
When you are browsing the OliveTin Theme Site, you can click on a theme and see it’s Git Repository URL. You can then copy this URL and paste it into the `olivetin-get-theme` command.
## [](#%5Fwhere%5Fdo%5Fi%5Ffind%5Fmy%5Fthemes%5Fdirectory)Where do I find my themes directory?
When OliveTin starts up, it will try to create a directory called `custom-webui/themes/` in your config directory. This directory is where you can put your own custom themes.
OliveTin will then serve this theme directory at ``, this means that all theme content should go into `/custom-webui/themes/mytheme/`.
Install Themes into your `custom-webui/themes/` directory, which should be in your config directory. If this directory does not exist, you can create it.
```yaml
├── config.yaml
├── custom-webui
│ └── themes
│ └── custom-icons
│ ├── icon.png
│ └── theme.css
├── entities
│ ├── containers.json
│ ├── heating.yaml
│ ├── servers2.yml
│ ├── servers.yaml
│ └── systemd_units.json
└── installation-id.txt
```
## [](#%5Fcreate%5Fyour%5Fown%5Ftheme%5Fwithout%5Fany%5Fintention%5Fof%5Fpublishing%5Fit)Create your own theme (without any intention of publishing it)
Create a sub-directory under your theme directory (eg `custom-webui/themes/mytheme`);
Set your theme in your config
`config.yaml`
```yaml
themeName: mytheme
```
Add your css into `custom-webui/themes/mytheme/theme.css`.
Your theme css will be loaded "on top" of the existing stylesheet.
To test it is working, set your theme CSS to something ridiculous like;
```asciidoc
body {
background-color: red !important;
}
```
Profit.
Check out [Themes for Developers](reference%5Fthemes%5Ffor%5Fdevelopers.html) for more information on how to develop themes.
Update Checks
====================
| | This page is for OliveTin versions **2024.06.02** and afterwards. Previous versions of OliveTin used to have a form of tracking. To learn about how that worked, see [update tracking](updateTracking.html). |
| --------------------------------------------------------------------------------------------------------------------------------------------------------------------------------------------------------------- |
OliveTin has the ability to check for updates, which is now turned OFF if nothing is specified in your configuration file. To enable this feature, set the following in your `config.yaml` file;
`config.yaml`
```yaml
checkForUpdates: true
```
By enabling this feature, OliveTin will;
* Do a HTTP GET in plaintext (not HTTPS) to and download the contents of that file. While the server will see your IP address in it’s webserver logs, this information isn’t actively used, and the OliveTin project has no intention of actively parsing the logs to use that.
* Once OliveTin has that json file, it will compare the "latestVersion" attribute against the version it is running.
* If there is a later version, it is displayed in the page OliveTin footer.
Update Checks & Tracking (legacy)
====================
| | This page is for OliveTin versions **2022-01-06** to **2024.06.02**. To see the current behavior of update checking, go to [update checks](updateChecks.html) |
| ---------------------------------------------------------------------------------------------------------------------------------------------------------------- |
The OliveTin server will now check for updates on startup, and every 7 days after that. It will report those updates as a log message in the console. It does not apply any updates, because this is the choice and responsibility of whoever is running OliveTin to decide if, when, and how to apply any updates.
The information OliveTin sends to the update server is stored/saved., and this could be considered a form of tracking - that is tracking installations, not tracking people. This page hopefully helps explain what, how and why that information is used so you can be informed (and make changes if you wish).
## [](#%5Fdesign%5Fconsiderations)Design considerations
* The source code for the update check (client), and the update service are open and on GitHub, freely auditable.
* A generated installation ID (which is just a UUID), that is used to differentiate between installations [more info](#installation-id).
* The update request is sent and stored in plain text - easy to check/audit.
* The update request goes to an obvious domain name - update-check.olivetin.app
* The checkins can be freely viewed by anyone in the public log.
* The update check can be disabled.
## [](#update-sent)What is sent (and tracked)
When OliveTin checks for updates, it will send the following;
* CurrentVersion - eg: 1.0.0
* CurrentCommit - the Git commit used to build this version
* OS - The update check wants to know your OS, because it’s possible in the future that some versions and updates might not be available for all OSes at the same time.
* Architecture (x86\_64, ARM, etc)
* InstallationID - See below
Here is an example of a log entry that is sent/stored;
```asciidoc
{"CurrentVersion":"dev","CurrentCommit":"nocommit","OS":"linux","Arch":"amd64","InstallationID":"f232d115-255c-4728-ba7f-a8f8b2b10a1f"}
```
If you would like to audit the update code, look at the following directory;
## [](#installation-id)What is the OliveTin installation ID?
This is a randomly generated [UUID](https://en.wikipedia.org/wiki/Universally%5Funique%5Fidentifier) \- that is not based on your operating system, not on any of your data. OliveTin tries to create a random installation-id.txt in your config directory when it starts up.
The reason for creating a installation ID is to tell the differences between installations - without this identifier, we would not know if 10 instances, or 1 instances of OliveTin are running a specific version.
In older versions of OliveTin, the MachineID was used instead of InstallationID (see below).
## [](#machine-id)Why do you need my machine ID?
This was changed in OliveTin - the MachineID is no longer collected, and the project moved to InstallationID instead. The answer is kept here for old versions.
First of all, OliveTin only sends a hashed version of a unique identifier for your machine. OliveTin does not use your actual machine ID, because this is private, and potentially sensitive information in it’s original form. This hashed version of this ID is used, which should be considered safe - because it’s a hash, it’s not possible to get back to the original sensitive machine ID.
From a technical perspective, OliveTin uses the golang package `machineiid` to get as hashed version of your MachineId. OliveTin follows the security recommendations of that project by using the hashed MachineId;
The reason for getting the machine ID is to tell the differences between installations - without this identifier, we would not know if 10 instances, or 1 instances of OliveTin are running a specific version.
## [](#%5Fwhy%5Fdo%5Fyou%5Fneed%5Fto%5Fstore%5Fany%5Finformation%5Fat%5Fall)Why do you need to store any information at all?
This is incredibly useful information for project developers to know, because;
1. It helps the project developers know how long it takes for updates to be applied by users of OliveTin (ie, should updates be released more often / less often) - the installation ID helps track this.
2. This helps the project better understand what are the most popular operating systems and architectures (ie, so more testing can be done).
3. How many old versions of the project to support?
## [](#%5Fwhat%5Fis%5Fstored)What is stored?
The update service only stores the information that is sent - [explained with an example above](#update-sent).
You can audit the update service code here;
## [](#%5Fwhat%5Fis%5Fnot%5Fsentstored)What is not sent/stored
* No information about you, users of your system, no files, nothing else apart from what is mentioned above.
* Not your public IP address, or any information about your network
* Not any information about how you have configured OliveTin, or any actions.
## [](#%5Fwhere%5Fis%5Fthe%5Finformation%5Fsent)Where is the information sent
To . This is a virtual machine which stores the logs on the machine filesystem. The data is accessible to all who which to view it, in the interest of transparency.
## [](#%5Fwhy%5Fisnt%5Fthis%5Fopt%5Fin)Why isn’t this opt-in?
It seems the majority of software does perform update checks by default like this - Chrome, Firefox, most modern Operating Systems, etc. Because no information about people, or your data is being used, apart from your installation ID, this seems like a safe default.
Also, if this were to default off, many people probably would not think about turning it on.
## [](#disable-update-checks)How do I disable update checking?
If you are worried about privacy, or similar, please do make your concerns known. This is best if this is an open discussion.
But, simply, to disable this feature, add to your config file;
checkForUpdates: false
## [](#hide-news-versions)How can I hide version upgrades in the OliveTin web interface?
Set the following in your configuration file;
showNewVersions: false
OliveTin will need to be restarted for this change to have affect.
## [](#hsts)Why can’t I visit update-check.olivetin.app in my browser?
The root domain for OliveTin (OliveTin.app) has HSTS turned on - this forces your browser to use SSL (HTTPS - the little encryption padlock) for all subdomains - including www.olivetin.app and docs.olivetin.app. Although both of those websites don’t transmit anything that really needs encrypion, the web is certainly moving to having SSL turned on everywhere. It even has a positive impact on search engine rankings!
The update-check service - which is accessible from update-check.olivetin.app - is designed to be only accessed via the OliveTin app. Non-web browsers, like this OliveTin app, generally ignore HSTS (and therefore don’t try and access the update-check site via SSL/HTTPS.
If you use a non-web browser to try to access the site over HTTP, (eg, curl), you should find it works like normal.
As mentioned previously, the update-check site deliberately uses does not use SSL/HTTPS, to make it easy for people to audit what is actually being sent to the update site. Tools like tcpdump, wireshark, or others can verify that OliveTin is not sending more information than is described on this page.
Version display
====================
| | This feature was added in OliveTin version 3000.11.0. |
| -------------------------------------------------------- |
OliveTin can show or hide the application version in the web interface. This is controlled by the **showVersionNumber** policy, which can be set globally or per user/group via [ACL policies](../security/acl.html#%5Facls%5Fand%5Fpolicies%5Fglobal).
## [](#%5Fwhat%5Fyou%5Fsee)What you see
When **showVersionNumber** is enabled (the default):
* The page footer shows the application name and version, for example: **OliveTin 2024.06.02**.
* If [update checks](updateChecks.html) are enabled and a newer version exists, a link to the new version may appear in the footer.
* [Server diagnostics](../troubleshooting/server-diagnostics.html) includes the installed version.
When **showVersionNumber** is disabled:
* The footer shows only **OliveTin** (no version number).
* No update-version link is shown, even if update checks are on.
* In server diagnostics output, the version information is redacted, which can be useful for privacy when sharing the report.
## [](#%5Fconfiguration)Configuration
The policy defaults to `true` for all users. You can change it in the **defaultPolicy** or override it per user or group in an ACL.
### [](#%5Fhide%5Fversion%5Ffor%5Feveryone)Hide version for everyone
`config.yaml`
```yaml
defaultPolicy:
showVersionNumber: false
```
### [](#%5Fshow%5Fversion%5Fonly%5Ffor%5Fsome%5Fusers)Show version only for some users
To hide the version by default but show it for certain users (for example, admins):
`config.yaml`
```yaml
defaultPolicy:
showVersionNumber: false
accessControlLists:
- name: admins
matchUsergroups:
- admins
policy:
showVersionNumber: true
```
### [](#%5Fshow%5Fversion%5Ffor%5Feveryone%5Fdefault)Show version for everyone (default)
If you do not set **showVersionNumber**, it is treated as `true`. To set it explicitly:
`config.yaml`
```yaml
defaultPolicy:
showVersionNumber: true
showDiagnostics: true
showLogList: true
```
## [](#%5Fsee%5Falso)See also
* [Access Control Lists](../security/acl.html) — how policies and ACLs work
* [Update Checks](updateChecks.html) — how OliveTin checks for new versions
* [Server diagnostics](../troubleshooting/server-diagnostics.html) — version is included or redacted based on this policy
Apache HTTPD
====================

Figure 1\. Flow of an inbound network request
This is an example of how to setup a DNS name based Apache HTTPD proxy for OliveTin. It assumes OliveTin is running on localhost, port 1337.
/etc/httpd/conf.d/OliveTin.conf
```apache
ServerName olivetin.example.com
ProxyPreserveHost On
ProxyPass / http://localhost:1337/
ProxyPassReverse / http://localhost:1337/
# Optional: increase timeout for long-lived websocket connections.
# The websocket endpoint is api/olivetin.api.v1.OliveTinApiService/EventStream (default may drop it).
ProxyTimeout 600
```
| | Apache’s default proxy timeouts are short for long-lived connections. Without increasing them, the websocket to api/olivetin.api.v1.OliveTinApiService/EventStream is likely to disconnect regularly. OliveTin will attempt to reconnect automatically, but setting ProxyTimeout (or a per-route timeout= on the websocket ProxyPass) avoids unnecessary disconnects. |
| ------------------------------------------------------------------------------------------------------------------------------------------------------------------------------------------------------------------------------------------------------------------------------------------------------------------------------------------------------------------------ |
Note, you virtual host should **not** include a DocumentRoot directive - httpd is just proxying OliveTin, not serving it’s actual pages.
If you proxy the websocket path explicitly, set a per-route timeout (place these **before** the general `ProxyPass /`):
```apache
ProxyPreserveHost On
ProxyPass /api/olivetin.api.v1.OliveTinApiService/EventStream ws://127.0.0.1:1337/api/olivetin.api.v1.OliveTinApiService/EventStream timeout=600
ProxyPassReverse /api/olivetin.api.v1.OliveTinApiService/EventStream ws://127.0.0.1:1337/api/olivetin.api.v1.OliveTinApiService/EventStream
# Optional global default for proxied backends
ProxyTimeout 600
```
Caddy
====================

Figure 1\. Flow of an inbound network request
Caddy seems to work without any special configuration for websockets. If you see websocket disconnects, you may need to increase timeouts; see [Reverse proxies will close websockets](../troubleshooting/err-websocket-connection.html#reverse-proxies-will-close-websockets). A simple `Caddyfile` works like this;
Caddyfile
```nginx
http://olivetin.example.com {
reverse_proxy * http://localhost:1337
}
```
## [](#caddy-path)Custom paths
Caddyfile
```asciidoc
....
handle {$GLOBAL_PORTAL_PATH}/olivetin* {
redir {$GLOBAL_PORTAL_PATH}/olivetin {$GLOBAL_PORTAL_PATH}/olivetin/
uri strip_prefix {$GLOBAL_PORTAL_PATH}/olivetin
basicauth {
{$GLOBAL_USER} HASH
}
reverse_proxy * localhost:1337
}
....
```
Note, because you are changing the default path (from `/` to `/OliveTin/`), you will need to tell the OliveTin webUI where to find the API.
You need to also set `externalRestAddress` in your config.yaml like this;
OliveTin config.yaml
```yaml
externalRestAddress: http://myserver/OliveTin
```
HAProxy
====================
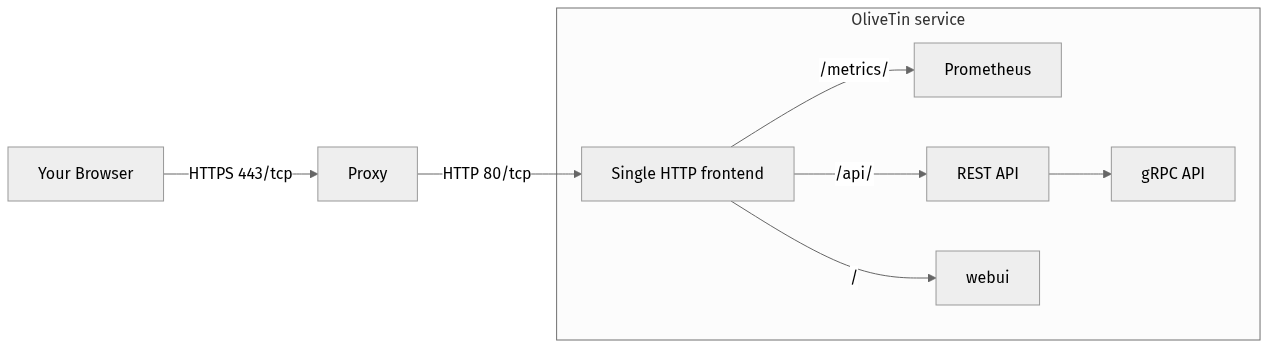
Figure 1\. Flow of an inbound network request
This is a straightforward example of how to setup a DNS name based HAProxy setup for OliveTin.
/etc/haproxy/haproxy.conf
```python
frontend cleartext_frontend
bind 0.0.0.0:80
option httplog
use_backend be_olivetin_webs if { hdr(Host) -i olivetin.example.com && path_beg /websocket }
use_backend be_olivetin_http if { hdr(Host) -i olivetin.example.com }
backend be_olivetin_http
server olivetinServer 127.0.0.1:1337 check
backend be_olivetin_webs
timeout tunnel 1h
option http-server-close
server olivetinServer 127.0.0.1:1337
```
The `timeout tunnel 1h` is important: without it, HAProxy’s default timeouts will close long-lived websocket connections. See [Reverse proxies will close websockets](../troubleshooting/err-websocket-connection.html#reverse-proxies-will-close-websockets) if you see disconnects.
Reverse Proxies
====================
This section of the documentation has a few examples of reverse proxy configurations for popular reverse proxy servers.
Configuring a reverse proxy server for OliveTin is entirely optional. If you don’t want to use a reverse proxy, you can skip this section.
## [](#proxy-guide)Reverse Proxy general guide
It’s common to put OliveTin behind a reverse proxy, for authentication, customizing the OliveTin address/path, or for a variety of other reasons.
### [](#%5Fdns%5Fname%5Fvs%5Fpath%5Fbased%5Fproxies)DNS name vs Path based proxies
DNS Name based virtual hosts (eg: olivetin.example.com ) are easier to setup and configure than path based virtual hosts (eg: www.example.com/utils/OliveTin), because path based virtual hosts need to take care mangle OliveTin paths without breaking things.
* If using a path based reverse proxies, you may need to set `externalRestAddress` manually to something like; `` in the OliveTin config.yaml.
* If using DNS Name based reverse proxies, then you should not need to change anything in config.yaml
#### [](#%5Fwhich%5Fport)Which port?
If you look at OliveTin startup logs, you will see OliveTin starting services on several ports. For most users, even under reverse proxy configurations, just proxying port 1337 should be all that is needed. To better understand why OliveTin uses several internal ports by default, see [network-ports](../reference/network-ports.html).
### [](#%5Fhandling%5Fwebsockets)Handling websockets
OliveTin versions after 2023-08 use websockets instead of polling for updates. Ensure your proxy re-passes the `Connection: Upgrade` and `Upgrade: websocket` headers for the websocket path. In OliveTin 3k the websocket endpoint is `api/olivetin.api.v1.OliveTinApiService/EventStream`; when proxying the whole site (e.g. `ProxyPass /` or `location /`), that path is covered automatically.
Many reverse proxies use short default timeouts and will close long-lived websocket connections, causing disconnects (OliveTin will reconnect automatically). To avoid this, increase the websocket or proxy timeout in your reverse proxy—see the individual proxy pages (e.g. [Apache](apache.html)) and [Error Connecting to WebSocket](../troubleshooting/err-websocket-connection.html) for details.
#### [](#%5Fgeneral%5Fchecklist)General checklist
* `olivetin.example.com/*` is all just HTTP traffic (port 1337)
* `olivetin.example.com/` should show the standard webui (port 1337)
* `olivetin.example.com/webUiSettings.json` should return a JSON file generated by OliveTin that sets up the web interface. (port 1337)
* `olivetin.example.com/api` should show the REST based API. (port 1337)
* The websocket (e.g. `api/olivetin.api.v1.OliveTinApiService/EventStream` in OliveTin 3k) should be a websocket connection upgrade.
## [](#%5Fwhats%5Fnext)What’s Next?
Choose your reverse proxy and follow the configuration guide:
* [Nginx](nginx.html) \- Configure Nginx as a reverse proxy
* [Apache](apache.html) \- Configure Apache as a reverse proxy
* [Caddy](caddy.html) \- Configure Caddy as a reverse proxy
* [Traefik](traefik.html) \- Configure Traefik as a reverse proxy
* [HAProxy](haproxy.html) \- Configure HAProxy as a reverse proxy
* [Nginx Proxy Manager](nginx%5Fproxy%5Fmanager.html) \- Configure NPM as a reverse proxy
* [Use trusted headers](../security/trusted%5Fheader.html) \- Authenticate users via reverse proxy headers
* [Understand network ports](../reference/network-ports.html) \- Learn about OliveTin’s port configuration
Nginx
====================

Figure 1\. Flow of an inbound network request
This is an example of DNS based proxying with Nginx.
/etc/nginx/cond.d/OliveTin.conf
```nginx
server {
listen 443 ssl;
ssl_certificate "/etc/nginx/conf.d/server.crt";
ssl_certificate_key "/etc/nginx/conf.d/server.key";
access_log /var/log/nginx/ot.access.log main;
error_log /var/log/nginx/ot.error.log notice;
server_name olivetin.example.com;
location / {
proxy_pass http://localhost:1337/;
proxy_redirect http://localhost:1337/ http://localhost/OliveTin/;
}
location /websocket {
proxy_set_header Upgrade "websocket";
proxy_set_header Connection "upgrade";
proxy_pass http://localhost:1337/websocket;
proxy_read_timeout 600s;
proxy_send_timeout 600s;
}
}
```
Increase the proxy timeout for the websocket location so the reverse proxy does not close long-lived connections; see [Reverse proxies will close websockets](../troubleshooting/err-websocket-connection.html#reverse-proxies-will-close-websockets) if you see disconnects.
## [](#nginx-path)Custom paths
These "custom path" instructions are for when you want to use OliveTin with a custom path like "apps.example.com/olivetin" instead of the root path + DNS name - eg: "olivetin.example.com". Generally it is **not recommended** to use a custom path for OliveTin. Instructions are provided below though, and it mostly-works.
nginx.conf
```nginx
....
location /OliveTin/ {
proxy_pass http://localhost:1337/;
proxy_redirect http://localhost:1337/ http://localhost/OliveTin/;
}
location /OliveTin/websocket {
proxy_set_header Upgrade "websocket";
proxy_set_header Connection "upgrade";
proxy_pass http://localhost:1337/websocket;
proxy_read_timeout 600s;
proxy_send_timeout 600s;
}
....
```
Note, because you are changing the default path (from `/` to `/OliveTin/`), you will need to tell the OliveTin webUI where to find the API.
You need to also set `externalRestAddress` in your config.yaml like this;
OliveTin config.yaml
```yaml
externalRestAddress: http://myserver/OliveTin
```
Nginx Proxy Manager
====================

Figure 1\. Flow of an inbound network request
This is an example of DNS based proxying with Nginx Proxy Manager.
This example assumes that you are trying to access OliveTin at **olivetin.npm.teratan.lan** and already have a DNS record pointing to the IP address of the Nginx Proxy Manager. This also assumes you are running Nginx Proxy Manager and OliveTin using Docker Compose.
docker-compose.yml
```yaml
services:
app:
image: 'jc21/nginx-proxy-manager:latest'
restart: unless-stopped
ports:
- '80:80'
- '81:81'
- '443:443'
volumes:
- ./data:/data
- ./letsencrypt:/etc/letsencrypt
olivetin:
container_name: olivetin
image: jamesread/olivetin
volumes:
- ./OliveTin:/config # replace host path or volume as needed
ports:
- "1337:1337"
restart: unless-stopped
```
Note that OliveTin needs a configuration file to run, see the [docker compose install instructions](../install/docker%5Fcompose.html) for a bit more detail.
Assuming you have Nginx Proxy Manager running, start by adding a new proxy host.
* **Domain Names**: olivetin.npm.teratan.lan (again, assume this is the domain you have set up in your DNS)
* **Scheme**: http (OliveTin does support HTTPS if you create your own certificates, but it is more normal to speak HTTP between Nginx and OliveTin, and just use HTTPS to the proxy).
* **Forward Hostname/IP**: 192.168.66.168 (change this to be the IP address of your docker host)
* **Forward Port**: 1337 (this is the default port for OliveTin)
* **Websockets Support**: Yes (OliveTin uses websockets for the Web UI). If you see websocket disconnects, try increasing the proxy timeout in Nginx Proxy Manager’s advanced config; see [Reverse proxies will close websockets](../troubleshooting/err-websocket-connection.html#reverse-proxies-will-close-websockets).
That really should be all that you need to get OliveTin working with Nginx Proxy Manager. If you have any issues, please check the logs of both OliveTin and Nginx Proxy Manager for any errors, and look for ways of getting [support](../troubleshooting/wheretofindhelp.html).
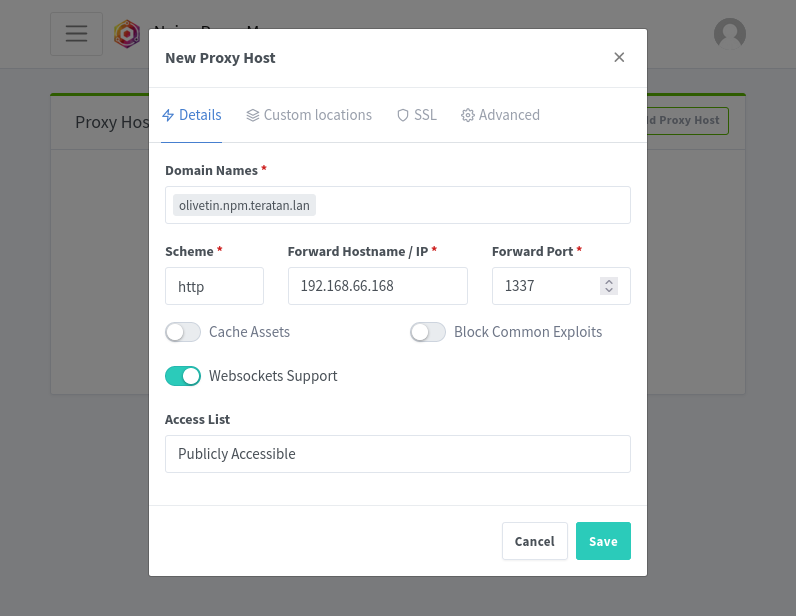
Traefik + Docker Compose
====================

Figure 1\. Flow of an inbound network request
The following example is known to work well with Traefik and docker-compose. If you see websocket disconnects, increase the proxy timeout in Traefik; see [Reverse proxies will close websockets](../troubleshooting/err-websocket-connection.html#reverse-proxies-will-close-websockets).
```yaml
services:
olivetin:
container_name: olivetin
image: jamesread/olivetin
volumes:
- /docker/olivetin:/config # replace host path or volume as needed
ports:
- "1337:1337"
restart: unless-stopped
labels:
- "traefik.enable=true"
- "traefik.http.routers.olivetin.entrypoints=web"
- "traefik.http.routers.olivetin.rule=Host(`olivetin.example.com`)"
traefik:
image: "traefik:v2.9"
container_name: "traefik"
command:
#- "--log.level=DEBUG"
- "--api.insecure=true"
- "--api.dashboard=true"
- "--providers.docker=true"
- "--providers.docker.exposedbydefault=false"
- "--entrypoints.web.address=:80"
ports:
- "80:80"
- "8080:8080"
volumes:
- "/var/run/docker.sock:/var/run/docker.sock:ro"
```
Access Control Lists
====================
OliveTin uses Access Control Lists (ACLs) to implement it’s security model, which allows you to have fine-grained control over indivividual actions or groups of actions. This can be used to implement role based access control (RBAC), or other security models that you may need.
ACLs are built up of the following set of rules;
* `name` \- The name of the ACL. This is used to identify the ACL in the configuration file.
* `matchUsergroups` \- A list of usergroups that this ACL applies to. This is used to match users that are in the specified usergroup.
* `matchUserNames` \- A list of usernames that this ACL applies to. This is used to match users that are in the specified usergroup.
* `permissions` \- A set of permissions which are used with **actions**. eg: `view`, `exec`, `logs`, etc.
* `addToEveryAction` \- A boolean value that indicates if this ACL should be added to every action. This is useful if you want to apply the same ACL to all actions, without having to manually add it to each action.
* `policy` \- A policy is a set of rules that affect the **whole of OliveTin**.
## [](#%5Facls%5Fand%5Fpolicies%5Fglobal)ACLs and Policies (global)
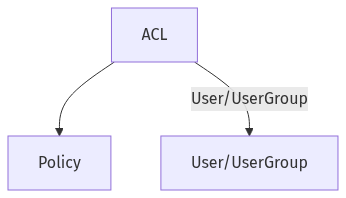
**Policies** are a set of rules that apply to the whole of OliveTin ("global"), and not just to individual actions (like permissions are).
The **defaultPolicy** is special, in that all values are set to true by default. This means that if you do not set a `defaultPolicy`, then all policies will be set to `true` by default. This is effectively what the `defaultPolicy` is set to;
```yaml
defaultPolicy:
showDiagnostics: true
showLogList: true
```
You can override defaults using an ACL, like this;
```yaml
accessControlLists:
- name: admins
matchUsergroups:
- admins
policy:
showDiagnostics: true
showLogList: true
defaultPolicy:
showDiagnostics: false
showLogList: false
```
## [](#%5Facls%5Fand%5Fpermissions%5Ffor%5Factions)ACLs and Permissions (for Actions)

An action always starts with `defaultPermissions` (see below), and then then have one or more ACLs applied to it. This means that you can for example have an action that is only available to a certain group of users, or only to a single user.
Let’s say you have a user `james` and a usergroup `admins`. You can then create an ACL that only allows `james` and users in the `admins` group to view and execute an action.
You can specify default permissions for all actions by changing the `defaultPermissions` like this;
`config.yaml`
```yaml
defaultPermissions:
view: false
exec: false
logs: true
```
In the example above, all users will start off with the permissions to only see action logs - but will not be able to view or execute actions.
It is then possible to add an "admins" ACL on top of every action. In the example below, we define one extra ACL called "admins", which matches any users with the usergroup also called "admins". This ACL will then be applied to all actions, and will allow users in the "admins" usergroup to view and execute the action.
`config.yaml`
```yaml
defaultPermissions:
view: false
exec: false
accessControlLists:
- name: admins
matchUsergroups:
- admins
permissions:
view: true
exec: true
actions:
- title: Shutdown Reactor
acls:
- admins
```
### [](#%5Fadd%5Fan%5Facl%5Fto%5Fevery%5Faction)Add an ACL to every action
Sometimes you want to define an ACL that applies to all actions. It can be tedious and error prone to manually add the ACL under the "acls" list for every action, if you have several actions. Instead, there is a shortcut to add an ACL to all actions - `addToEveryAction: true`.
`config.yaml`
```yaml
accessControlLists:
- name: admins
matchUsergroups:
- admins
permissions:
view: true
exec: true
addToEveryAction: true
```
## [](#%5Facl%5Fmatching%5Fusernames%5Fand%5Fusergroups)ACL Matching - usernames and usergroups.
You can match users based on their usergroup which is the most common, but it is also possible to match based on the user’s username.
`config.yaml`
```yaml
accessControlLists:
- name: admins
matchUsergroups:
- admins
permissions:
view: true
exec: true
- name: james
matchUserNames:
- james
permissions:
view: true
exec: true
```
## [](#%5Fwhats%5Fnext)What’s Next?
Now that you understand ACLs, here’s how to implement them:
* [View security examples](examples.html) \- See complete ACL configurations
* [Example: Login required](example%5Flogin%5Frequired.html) \- Configure login requirements
* [Example: Admin-only actions](example%5Fsome%5Fadmin%5Factions.html) \- Restrict actions to admins
* [Set up local users](local.html) \- Create users for ACL matching
* [Configure OAuth2](oauth2.html) \- Set up OAuth2 for user groups
* [Security design recommendations](design%5Fchoices.html) \- Learn best practices for ACL design
API Keys
====================
This page is for **developers** who want to call OliveTin’s HTTP API (Connect RPC under `/api/`) using a **Bearer token**, without using the interactive web login.
API keys are configured on [local users](local.html) as an optional `apiKey` field. When present, clients can authenticate by sending:
```asciidoc
Authorization: Bearer
```
The prefix `` Bearer ` (including the trailing space after `Bearer ``) must match exactly.
## [](#%5Fconfiguration)Configuration
`config.yaml`
```yaml
authLocalUsers:
enabled: true
users:
- username: automation
usergroup: bots
apiKey: "{{ .Env.OLIVETIN_AUTOMATION_KEY }}"
- username: alice
usergroup: admins
password: $argon2id$v=19$m=65536,t=4,p=6$...
apiKey: "{{ .Env.OLIVETIN_ALICE_API_KEY }}"
```
* Use a **long, random** API key (similar to any other bearer secret).
* Prefer loading the key from the environment with `{{ .Env.VAR }}` instead of committing the raw value to disk.
* **TLS**: send bearer tokens only over HTTPS in real deployments.
* **Interactive login**: if a user has **no** `password` configured, they **cannot** use the `/login` page; they can only authenticate with an API key (or another auth mechanism you configure separately).
Two local users **must not** share the same `apiKey` value. OliveTin will refuse to start if duplicate keys are detected.
## [](#%5Fauthorization%5Fpermissions)Authorization (permissions)
API key authentication uses the same **username** and **usergroup** as the matching local user. [Access Control Lists](acl.html) and `defaultPermissions` apply in the same way as for users who sign in via the web UI.
## [](#%5Fexample%5Fcurl%5Fand%5Finit)Example: curl and Init
The OliveTin API is **Connect RPC**. Unary calls accept JSON bodies. The following example calls `Init` with an empty request object:
```bash
curl -sS -X POST \
-H "Authorization: Bearer YOUR_API_KEY_HERE" \
-H "Content-Type: application/json" \
"https://olivetin.example.com:1337/api/olivetin.api.v1.OliveTinApiService/Init" \
--data '{}'
```
Replace the host, port, and path prefix if your installation differs. Other RPCs use the same URL pattern with a different final segment (method name).
## [](#%5Foperational%5Fsecurity%5Fnotes)Operational security notes
* **Reverse proxies**: if you use [Trusted Header Authorization](trusted%5Fheader.html), remember it is evaluated **before** bearer API keys. Do not expose OliveTin in a way that allows clients to spoof trusted identity headers.
* **Debug logging**: avoid enabling `logDebugOptions.singleFrontendRequestHeaders` in production. OliveTin redacts common sensitive headers (including `Authorization`) in debug output, but minimizing debug surface area is still recommended.
* **Brute force**: OliveTin does not ship per-IP rate limiting for failed bearer attempts. Consider rate limiting or WAF rules on `/api/` at your reverse proxy.
## [](#%5Fsee%5Falso)See also
* [Local Users Authorization](local.html) (password hashing and local user basics)
* [Access Control Lists](acl.html)
Security Concepts
====================
OliveTin implements a security model that covers **Authentication**, **Authorization** (via [ACLs](acl.html)) and **Accounting**.
## [](#%5Fauthentication)Authentication
To allow users to be Authenticated to OliveTin, there are several options to choose from;
* [Local Users](local.html) (ie: Login with Username and Password)
* [OAuth2](oauth2.html) (eg: Google, GitHub, etc)
* [Trusted Header](trusted%5Fheader.html) (eg: Nginx, Apache, etc)
* [JWT](jwt.html) (eg: Traefik, Organizr, etc)
## [](#%5Fauthorization)Authorization
OliveTin’s authorization system, or permissions, is built on [Access Control Lists](acl.html). This is a powerful mechanism that allows you to implement very fine grained access control, or your own role based access control (RBAC).
## [](#%5Faccounting)Accounting
OliveTin’s accounting is via it’s logs. This aspect of OliveTin’s security model is poorly documented at the moment.
## [](#%5Fwhats%5Fnext)What’s Next?
Now that you understand OliveTin’s security model, implement it for your use case:
* [Set up local users](local.html) \- Configure username/password authentication
* [Configure OAuth2](oauth2.html) \- Integrate with OAuth2 providers (Google, GitHub, etc.)
* [Use trusted headers](trusted%5Fheader.html) \- Authenticate via reverse proxy headers
* [Configure JWT](jwt.html) \- Use JWT tokens for authentication
* [Set up Access Control Lists](acl.html) \- Implement fine-grained permissions
* [View security examples](examples.html) \- See complete security configurations
* [Security design recommendations](design%5Fchoices.html) \- Learn best practices for securing OliveTin
Content Security Policy (CSP)
====================
When [the single HTTP frontend](../reference/network-ports.html) is enabled (the default), OliveTin adds several browser security headers to every response, including `Content-Security-Policy`. This page explains how to turn that header off or replace it with a less strict policy when you need to (for example, custom scripts, different API hosts, or embedding in an iframe).
| | Relaxing or removing CSP weakens protection against cross-site scripting and related attacks. Prefer the smallest change that fixes your issue, and keep the rest of the policy as tight as you can. |
| ------------------------------------------------------------------------------------------------------------------------------------------------------------------------------------------------------- |
## [](#%5Fdefault%5Fbehavior)Default behavior
With default settings, OliveTin sends a `Content-Security-Policy` header similar to the following (single line in the actual response):
```text
default-src 'self'; script-src 'self' 'unsafe-inline' https:; style-src 'self' 'unsafe-inline'; img-src 'self' data: https:; connect-src 'self' https:; frame-ancestors 'none'; base-uri 'self'
```
If `security.headerContentSecurityPolicy` is `true` but `security.contentSecurityPolicy` is left empty, OliveTin fills in this default on startup.
## [](#%5Fdisable%5Fthe%5Fcsp%5Fheader%5Fentirely)Disable the CSP header entirely
Set `security.headerContentSecurityPolicy` to `false`. OliveTin will not send `Content-Security-Policy` on responses from the single HTTP frontend.
`config.yaml`
```yaml
security:
headerContentSecurityPolicy: false
```
## [](#%5Fuse%5Fa%5Fcustom%5Frelaxed%5Fpolicy)Use a custom (relaxed) policy
Keep `security.headerContentSecurityPolicy` `true` and set `security.contentSecurityPolicy` to the full header value you want. For example, to allow WebSocket connections to the same host when you serve the UI over plain HTTP in a lab (not recommended for production), you might widen `connect-src`:
`config.yaml`
```yaml
security:
headerContentSecurityPolicy: true
contentSecurityPolicy: "default-src 'self'; script-src 'self' 'unsafe-inline' https:; style-src 'self' 'unsafe-inline'; img-src 'self' data: https:; connect-src 'self' http: https: ws: wss:; frame-ancestors 'none'; base-uri 'self'"
```
Build your policy from the [MDN documentation on CSP](https://developer.mozilla.org/en-US/docs/Web/HTTP/CSP) and test in the browser developer tools (Console will report CSP violations).
Typical reasons people adjust this setting:
* **Custom JavaScript or third-party scripts** — You may need to extend `script-src` (and sometimes `connect-src` for XHR/fetch). See [Custom JavaScript](../advanced%5Fconfiguration/webui.html#custom-js).
* **Embedding OliveTin in another site** — The default includes `frame-ancestors 'none'`, which blocks iframes. You must change that directive (and may need to relax `X-Frame-Options` using `security.headerXFrameOptions` and `security.xFrameOptions`) if embedding is required.
* **API or auth on another origin** — Extend `connect-src` (and possibly `form-action` or others) to include those URLs.
* **Reverse proxy also sets CSP** — Your proxy might add a second policy; browsers combine them. Align OliveTin and the proxy so you do not get conflicting or unexpectedly strict effective policies.
## [](#%5Frelated%5Fsettings)Related settings
Other keys under `security` in `config.yaml` control additional headers (for example `headerXContentTypeOptions`, `headerXFrameOptions`, and `xFrameOptions`). This page focuses on CSP; see the OliveTin `SecurityConfig` in the application source if you need the full list of fields.
Configuration reload: if you use OliveTin’s live config reload, changes to `security` are picked up without restarting the process in typical setups.
Security Design & Hardening Recommendations
====================
| | OliveTin has not **yet** had a remote code execution vulnerability found in it. However, given what OliveTin does, it is possible, and likely that a security vulnerability will be found in the future. This document explains how OliveTin is designed so that you can make an informed decision about how to use OliveTin in your environment. It also provides hardening recommendations to help you secure OliveTin. |
| ---------------------------------------------------------------------------------------------------------------------------------------------------------------------------------------------------------------------------------------------------------------------------------------------------------------------------------------------------------------------------------------------------------------------------- |
## [](#%5Fsecurity%5Fdesign)Security Design
OliveTin has a few design choices that should help it’s general security posture.
* OliveTin does deliberate not have any web based control panel where commands can be typed in. This is try to avoid arbitary command execution vulnerabilities caused by authentication bypass attacks.
* Control over what commands are run is determined via the `config.yaml` alone. OliveTin does NOT write to the config.yaml in any way. This is to avoid any of arbitary command execution vulnerabilities caused by writing to the config.yaml.
* OliveTin listens on just 1 open public port by default (1337). The rest of the ports only listen on `localhost` so you don’t have to worry about them in your firewall.
* Standard Linux controls can be used to run OliveTin as non-root, with `sudo` permissions if needed. See the action customization section of these docs for more details.
* Robust code-scanning, code review, and dependency analysis at build-time. OliveTin uses many linters and code checkers, especially on new pull requests. Out dated dependencies are addressed quickly.
## [](#%5Fhardening%5Frecommendations)Hardening Recommendations
* Implement authentication on the OliveTin API using one of the many methods provided.
* Run OliveTin as a non-root user, or even better, run OliveTin in a container (as non-root).
* Use normal `sudo` permissions to elevate OliveTin to run privileged commands, and restrict the commands that OliveTin can run with `sudo` to only the ones you need.
* Place a reverse proxy in front of OliveTin, or better, a web application firewall.
Example: Force Login
====================
A common use case for OliveTin with security is to expose some dashboards that require login to be able to use. This page brings together the configuration options that are needed to achieve this. The most important configuration option is setting `authRequireGuestsToLogin` to `true`.
## [](#%5Ffull%5Fexample%5Fconfiguration)Full example configuration
```yaml
logLevel: "INFO"
authRequireGuestsToLogin: true
accessControlLists:
- name: "admins"
permissions:
view: true
exec: true
logs: true
matchUsergroups:
- "admins"
addToEveryAction: true
authLocalUsers:
enabled: true
users:
- username: "admin"
usergroup: admins
password: -- your password hash here --
actions:
- title: "Restart"
shell: echo "Restart"
dashboards:
- title: "Admin Dashboard"
contents:
- title: "Restart"
```
Note, to use this configuration, you will need to replace `-- your password hash here --` with a password hash. You can generate a password hash by looking at the options in the [local-users](local.html) configuration section.
## [](#%5Fimportant%5Fconfiguration%5Foption%5Fauthrequiregueststologin)Important configuration option: `AuthRequireGuestsToLogin`
The `AuthRequireGuestsToLogin` option is a helpful shortcut that sets all `defaultPermissions` to false, and makes it so that all guests are prompted to login before they can do anything with OliveTin.
Technically, you could achieve the same effect by setting `defaultPermissions` to `false` and setting up an ACL that allows access to the login page, but `AuthRequireGuestsToLogin` is a more convenient way to achieve the same effect.
## [](#%5Fper%5Faction%5Facls%5Fvs%5Faddtoeveryaction)Per-action ACLs, vs `addToEveryAction`
It is possible to specify one or more ACL per action, like so;
```yaml
actions:
- title: "Restart"
shell: echo "Restart"
acl:
- name: "admins"
```
However, this configuration is also a bit more verbose, and if you just have one main ACL, can save yourself some typing by using the `addToEveryAction` option in the ACL configuration.
Example: Some actions require admin
====================
A common use case for OliveTin with security is to expose some actions to guests, and have some actions that require login to be able to use. This page brings together the configuration options that are needed to achieve this. The most important configuration option is setting `authRequireGuestsToLogin` to `true`.
## [](#%5Ffull%5Fexample%5Fconfiguration)Full example configuration
```yaml
logLevel: "INFO"
accessControlLists:
- name: "noguests"
permissions:
view: false
exec: false
logs: false
matchUsernames: [ "guest" ]
- name: "admins"
permissions:
view: true
exec: true
logs: true
matchUsergroups: [ "admins" ]
authLocalUsers:
enabled: true
users:
- username: "admin"
usergroup: admins
password: -- your password hash here --
actions:
- title: "Date"
shell: date
- title: "Reboot"
shell: reboot" # Note that this won't work inside a container
acls:
- "noguests"
- "admins"
dashboards:
- title: "Guest Dashboard"
contents:
- title: "Date"
- title: "Admin Dashboard"
contents:
- title: "Reboot"
```
Note, to use this configuration, you will need to replace `-- your password hash here --` with a password hash. You can generate a password hash by looking at the options in the [local-users](local.html) configuration section.
Security Examples
====================
The following examples show you how to combine several security configuration options to setup common scenarios that people often ask for.
* [Example: Login Required](example%5Flogin%5Frequired.html)
* [Example: Some actions required admin](example%5Fsome%5Fadmin%5Factions.html)
## [](#%5Fsecurity%5Fsolutions)Security Solutions
* [Cloudflare Access & Tunnels](../solutions/cloudflare%5Faccess%5Ftunnel/index.html)
JWT Authorization
====================
One of the best ways to do authorization with OliveTin is to pass it a **JSON Web token (JWT)**, after first authenticating with a popular single sign on system, like Keycloak, CloudFlare Tunnels, Authentik or Organizr.
Two types of JWT mechanisms are supported;
* [JWT with Keys](jwt%5Fkeys.html) (eg: CloudFlare Tunnels, Authentik)
* X509 Certs/Keys on disk are supported
* **JWKS** is also supported
* [JWT with HMAC](jwt%5Fhmac.html) (eg: Organizr)
## [](#%5Fjwt%5Fflow)JWT Flow
The flow generally goes like this;
1. User browses to a website like Organizr and logs in, which sets a JWT Cookie for apps.example.com.
2. User browses to OliveTin.apps.example.com, and the cookie is sent to OliveTin.
3. OliveTin verifies the JWT token given the signing secret, and picks up on the `name` and `group` fields from the JWT claim.
4. OliveTin matches any relevant ACLs based on the claims.
5. If any ACLs are not matched, then the defaultPermissions are used.
JWT with HMAC
====================
You need to know your JWT **Cookie Name** and **Hash Secret**. Whatever tool you are using to authenticate users will probably have instructions on how to find this.
* [Organizr - Under "Validating the token"](https://docs.organizr.app/features/server-authentication#validating-the-token)
Adding JWT details to OliveTin config.yaml
Setup your config file so it has something like this;
`config.yaml`
```yaml
# It's often useful to turn logging to DEBUG when trying to work out authentication problems
logLevel: "INFO"
authJwtCookieName: "Organizr_token_1234..."
authJwtHmacSecret: "3l4jh23v_123!"
authJwtClaimUsername: "username"
authJwtClaimUsergroup: "usergroup"
```
Note that your `authJwtCookieName` and `authJwtSecret` will need to be set exactly as they appear in your Authentication software.
## [](#%5Fusable%5Fclaims)Usable claims
OliveTin currently can match Access Control Lists based on a **username** or **user group(s)**. You can see if these are being used properly turning on `DEBUG` logging and looking at the jwt claims.
If `authJwtClaimUsergroup` is any array, ACL groups will match any of the user groups in the array.
## [](#%5Fsetup%5Fdefault%5Fpermissions)Setup default permissions
OliveTin will assume that guests are able to View and Execute every action by default. When you are setting up authorization you probably want to limit this. You can do that by setting `defaultPermissions` like this;
`config.yaml`
```yaml
logLevel: "INFO"
defaultPermissions:
view: false
exec: false
```
## [](#%5Fsetup%5Folivetin%5Faccess%5Fcontrol%5Flists)Setup OliveTin Access Control Lists
Access Control Lists are a way to override the default permissions.
`config.yaml`
```yaml
logLevel: "INFO"
defaultPermissions:
view: false
exec: false
logs: true
accessControlLists:
- name: Admins
addToEveryAction: true
matchUsergroups:
- Admins
permissions:
view: true
exec: true
logs: true
- name: "Developers"
matchUsergroups:
- "developer"
permissions:
view: true
exec: false
logs: false
actions:
- name: Only visible to admins
shell: echo "I am a secret command only visible to admins"
- name: Restart database
shell: systemctl restart mariadb
acls:
- "developer"
```
In the example above, the `admins` ACL is automatically added to every action, because `addToEveryAction` is true.
Customizing field names
You may need to customize the field names for your JWT authentication.
`config.yaml`
```yaml
authJwtClaimUsername: "username"
authJwtClaimUsergroup: "usergroup"
```
JWT with Keys
====================
| | This page is marked as "earlydoc", which means that it more of a collection of notes and an early draft before this page turns into good documentation later on. It is hoped that this early form of documentation is useful to you, but please understand that most documentation pages are higher quality than this. If you have suggestions or comments, please do get in contact or consider contributing your suggestions to the OliveTin documentation. |
| ---------------------------------------------------------------------------------------------------------------------------------------------------------------------------------------------------------------------------------------------------------------------------------------------------------------------------------------------------------------------------------------------------------------------------------------------------------------- |
## [](#%5Fusing%5Fpublic%5Fkeys%5Fvia%5Fjwks)Using Public Keys via JWKS
OliveTin Supports **JSON Web Key Sets (JWKS)**. This approach is often used with services like CloudFlare.
`config.yaml`
```yaml
authJwtAud: "asdf1234"
authJwtCertsURL: "https://mydomain.cloudflareaccess.com/cdn-cgi/access/certs"
authJwtClaimUsername: email
authJwtCookieName: "CF_Authorization"
```
You may well want to set `logLevel: DEBUG` and `insecureAllowDumpJwtClaims: true` in your config when testing JWT for the first time.
## [](#%5Fusing%5Fwith%5Fteleportheaders)Using with Teleport/Headers
If you are using Teleport, you can use the `authJwtCertsURL` to point to the Teleport JWKS.
Teleport can only [inject the JWT into a header](https://goteleport.com/docs/enroll-resources/application-access/jwt/introduction/#inject-jwt), so you will need to set `authJwtHeader` to the header name that you have configured Teleport to use, e.g., `Authorization`.
`config.yaml`
```yaml
authJwtCertsURL: "https://teleport.mydomain/.well-known/jwks.json"
authJwtHeader: Authorization
```
Replace teleport.mydomain with the domain of your Teleport instance.
## [](#%5Fusing%5Fpublic%5Fkeys%5Fon%5Fdisk)Using Public Keys on Disk
This approach can be useful if your Authentication service does not support JWKS, or if you don’t want to use it. Public Keys should be available on disk in a file - which can have any filename or extension you like. The files need to be RSA keys in PEM format to be used by OliveTin, though. P12 is not supported.
`config.yaml`
```yaml
authJwtAud: "asdf1234"
authJwtPubKeyPath: "/opt/mykey.crt"
authJwtClaimUsername: email
authJwtCookieName: "CF_Authorization"
```
## [](#%5Fsee%5Falso)See Also
* [Cloudflare Access & Tunnels Solution](../solutions/cloudflare%5Faccess%5Ftunnel/index.html)
Local Users Login
====================
OliveTin supports just basic users defined with a username and password in the config.yaml file. This can be used when you do not want to use a full authentication system like LDAP, OAuth2 or a Reverse Proxy.
For programmatic access (scripts, integrations) using per-user bearer API keys, see [API Keys](api%5Fkeys.html).
## [](#%5Fdefine%5Fa%5Fuser)Define a user
`config.yaml`
```yaml
authLocalUsers:
enabled: true
users:
- username: james
password: $argon2id$v=19$m=65536,t=4,p=6$LnNW4sw+jZfa5Ex3YjfuHQ$vl8pjUJhxNmBxScV4lI3cgAZPkNB1rSrnX6ibgoAP8k
```
## [](#%5Fdefine%5Fusers%5Fwith%5Fa%5Fuser%5Fgroup)Define users with a user group
OliveTin local users do not need to be part of a user group, and unless any user groups are added, they will not be in any user group. However, if you want to add a user to a user group, you can do so like this:
`config.yaml`
```yaml
authLocalUsers:
enabled: true
users:
- username: alice
usergroup: admins
password: $argon2id$v=19$m=65536,t=4,p=6$LnNW4sw+jZfa5Ex3YjfuHQ$vl8pjUJhxNmBxScV4lI3cgAZPkNB1rSrnX6ibgoAP8k
- username: bob
password: ...
usergroup: admins
- username: charlie
password: ...
usergroup: webmasters
```
## [](#%5Fget%5Fa%5Fargon2id%5Fhashed%5Fpassword)Get a Argon2id hashed password
You will notice from the configuration examples above that the password is hashed using Argon2id. You can use any of the following methods to generate a Argon2id hashed password;
### [](#%5Foption%5Fa%5Fusing%5Folivetin%5Fapi)Option A - Using OliveTin API
You can see from the example above that the config contains a single user called **james**, and the password is hashed using Argon2id. OliveTin provides a utility API to hash passwords using Argon2id which can be useful when you want to create new users. Simply run the following curl command to hash a password:
```bash
curl -sS --json '{"password": "myPassword"}' http://olivetin.example.com:1337/api/PasswordHash
```
| | Curl 7.82 added support for the \--json option, if you are using an older version of curl, see [this issue](https://github.com/OliveTin/OliveTin/issues/462). |
| ---------------------------------------------------------------------------------------------------------------------------------------------------------------- |
This will return a output like this, you can then copy and paste this hash into your config.yaml file;
```asciidoc
Your password hash is: $argon2id$v=19$m=65536,t=4,p=6$dlWTV1RL04/Nuvxzl94NAg$KsYXvCFE2Eu/jkXi/dbbZM3I/2b2VByTAwRIenUwdJk
```
### [](#%5Foption%5Fb%5Fusing%5Fthe%5Fargon2%5Fcommand%5Fline%5Ftool)Option B - Using the `argon2` command line tool
You can also easily hash the password using the `argon2` package:
```bash
echo -n "myPassword" | argon2 "$(openssl rand -base64 16)" -id -t 4 -m 16 -p 6 -l 32 -e
```
### [](#%5Fopption%5Fc%5Fusing%5Fthe%5Fhash%5Fdocker%5Fimage)Opption C - Using the `hash` docker image
Or using the [hash](https://hub.docker.com/r/leplusorg/hash) docker image:
```bash
docker run --rm -i --net=none leplusorg/hash sh -c 'echo -n "myPassword" | argon2 "$(openssl rand -base64 16)" -id -t 4 -m 16 -p 6 -l 32 -e'
```
Then simply visit the OliveTin web interface and browse to the login page, eg:
### [](#%5Fwhy%5Fdoes%5Folivetin%5Fuse%5Fargon2id)Why does OliveTin use Argon2id?
Argon2id is the password hashing algorithm that is [recommended by OWASP](https://cheatsheetseries.owasp.org/cheatsheets/Password%5FStorage%5FCheat%5FSheet.html) as of October 2024\. There doesn’t seem to be a good reason yet to provide configuration options for changing the password hashing algorithm, but if you have a good reason, please open an issue on the GitHub repository.
## [](#%5Fforce%5Flogin%5Fpage)Force login page
If you don’t want to allow guests to do anything in OliveTin, you can use the `authRequireGuestsToLogin` option to force all users to login before they do anything. This will redirect all users to the login page if they are not logged in, and it will also set `defaultPermissions` to `false`, meaning that permissions must be explicitly set for each user or user group.
`config.yaml`
```yaml
authRequireGuestsToLogin: true
authLocalUsers:
enabled: true
users:
- username: james
password: $argon2id$v=19$m=65536,t=4,p=6$LnNW4sw+jZfa5Ex3YjfuHQ$vl8pjUJhxNmBxScV4lI3cgAZPkNB1rSrnX6ibgoAP8k
```
OAuth2
====================
| | This page is marked as "earlydoc", which means that it more of a collection of notes and an early draft before this page turns into good documentation later on. It is hoped that this early form of documentation is useful to you, but please understand that most documentation pages are higher quality than this. If you have suggestions or comments, please do get in contact or consider contributing your suggestions to the OliveTin documentation. |
| ---------------------------------------------------------------------------------------------------------------------------------------------------------------------------------------------------------------------------------------------------------------------------------------------------------------------------------------------------------------------------------------------------------------------------------------------------------------- |
OliveTin supports OAuth2 for login with any OAuth2 compliant provider.
At the moment, username fetching is only supported on GitHub. More will be added soon, probably with the addition of OpenID Connect support.
```yaml
authOAuth2RedirectUrl: http://localhost:1337/oauth/callback
authOAuth2Providers:
github:
clientId: 1234567890
clientSecret: 1234567890
```
## [](#%5Fprovider%5Fconfiguration)Provider configuration
* `name` \- a "simple name" for the provider, used in the login redirect and internally in OliveTin, e.g. `github`
* `title` \- the human-readable name of the provider, e.g. `GitHub`
* `clientId` \- the client ID provided by the OAuth2 provider
* `clientSecret` \- the client secret provided by the OAuth2 provider
* `icon` \- the icon to use for the provider. Accepts any HTML, e.g. ``
* `scopes` \- a list of scopes to request.
* `authUrl` \- the URL to redirect to for authentication
* `tokenUrl` \- the URL to exchange the code for a token
* `whoamiUrl` \- the URL to fetch user information from
* `usernameField` \- the field in the user information response to use as the username
* `userGroupField` \- the field in the user information response to use as the group. This is a string containing one group name, e.g. `olivetin_group`
* `addToUsergroup` \- a group name to add to every user who logs in via this provider. If the user already has a usergroup (e.g. from `userGroupField`), this value is appended to it; otherwise it becomes the user’s usergroup. Useful for giving all users from this provider a common group for ACLs, e.g. `addToUsergroup: github`
* `certBundlePath` \- the path to a certificate to add to the truststore for authentication requests, e.g. `/certs/internal.crt`
* `insecureSkipVerify` \- a boolean to disable certificate verfication
* `connectTimeout` \- an integer for seconds until the request will timeout, e.g. `10`
## [](#%5Fbuilt%5Fin%5Fproviders%5Fname)Built-in providers (`name`)
OliveTin comes with a few built-in providers for convenience. If you are using one of these with a `name`, then you don’t need to specify the various URLs, scopes, icon, usernameField, etc. It will be automatically configured for you. You will still need to provide the client ID and client secret.
* `github` \- GitHub
* `google` \- Google
## [](#%5Faddtousergroup%5Fexamples)AddToUsergroup examples
The `addToUsergroup` option assigns a group to every user who signs in through that OAuth2 provider. You can use it alone, or together with `userGroupField`, so that all users from the provider share a common group for ACLs (e.g. "everyone from GitHub") while still keeping provider-specific groups when available.
### [](#%5Fwhen%5Fthe%5Fprovider%5Fdoes%5Fnot%5Freturn%5Fa%5Fgroup)When the provider does not return a group
Some providers (e.g. Google with standard Gmail accounts) do not return a group claim. Users logging in through them get no group, so they do not match any ACLs and end up with no permissions or visible actions. Use `addToUsergroup` to give every user from that provider a default group such as `guest`:
```yaml
authOAuth2Providers:
google:
clientId: your-client-id
clientSecret: your-client-secret
addToUsergroup: guest
```
Then ensure an ACL matches that group, for example `matchUsergroups: ["guest"]`, so those users get the intended access.
### [](#%5Fall%5Fusers%5Ffrom%5Fa%5Fprovider%5Fin%5Fone%5Fgroup)All users from a provider in one group
Give every user who logs in via GitHub the group `github` so you can target them in ACLs:
```yaml
authOAuth2Providers:
github:
clientId: your-client-id
clientSecret: your-client-secret
addToUsergroup: github
```
Then in your actions you can restrict access with `allowedUserGroups: ["github"]`.
### [](#%5Fcombining%5Fwith%5Fusergroupfield)Combining with userGroupField
If your provider returns a group (e.g. from GitHub org/team or an IdP), use both `userGroupField` and `addToUsergroup`. The provider group is used as the user’s group, and `addToUsergroup` is appended so the user belongs to both:
```yaml
authOAuth2Providers:
github:
clientId: your-client-id
clientSecret: your-client-secret
userGroupField: olivetin_group
addToUsergroup: github
```
A user with `olivetin_group: admins` will end up in groups `admins` and `github`; a user with no group will get only `github`.
### [](#%5Fmultiple%5Fproviders%5Fshared%5Fand%5Fper%5Fprovider%5Fgroups)Multiple providers, shared and per-provider groups
Use different `addToUsergroup` values per provider so you can allow "all OAuth users" or "only GitHub" / "only Google":
```yaml
authOAuth2Providers:
github:
clientId: github-client-id
clientSecret: github-client-secret
addToUsergroup: github
google:
clientId: google-client-id
clientSecret: google-client-secret
addToUsergroup: google
```
Then use ACLs such as `allowedUserGroups: ["github"]` for GitHub-only actions or `allowedUserGroups: ["github", "google"]` for any OAuth user.
OAuth2 - Authelia
====================
Notes contributed by a member of the OliveTin community - many thanks Phampyk!
Authelia code
```yaml
identity_providers:
oidc:
hmac_secret: "xxxxxx"
jwks:
- key_id: "primary"
algorithm: "RS256"
use: "sig"
key: |
-----BEGIN PRIVATE KEY-----
xxxxxxxxxxxxxxxxxxxxxxxxxx
-----END PRIVATE KEY-----
clients:
- client_id: "olivetin"
client_name: "OliveTin"
client_secret: "xxxxxxxxxxxxxxxxx"
redirect_uris:
- "https://olivetin.hostname.com/oauth/callback"
scopes:
- openid
- profile
consent_mode: implicit
```
* hmac\_secret generated with `openssl rand -hex 64 or can be authelia crypto rand --length 64 --charset alphanumeric` [Source](https://www.authelia.com/reference/guides/generating-secure-values/#generating-a-random-alphanumeric-string)
* Private key generated with `openssl genrsa -out oidc.key 2048 and openssl rsa -in oidc.key -pubout -out oidc.pub` but only used the oidc.key here
* client\_id olivetin is for the example, as per authelia docs the recomendation is a random string generated with `authelia authelia crypto rand --length 72 --charset rfc3986` [Source](https://www.authelia.com/integration/openid-connect/frequently-asked-questions/#client-id—identifier)
* consent\_mode I had to set this one up as implicit or every time I loged in it was an extra step where you had to authorize OliveTin to access profile and openid. [Source](https://www.authelia.com/configuration/identity-providers/openid-connect/clients/#consent%5Fmode)
* client\_secret is recommended in the docs to be generated with `authelia crypto hash generate pbkdf2 --variant sha512 --random --random.length 72 --random.charset rfc3986` and it gives you the password (Random password on the example) and the hash (Digest on the example). Olivetin needs the password and Authelia the hash [Source](https://www.authelia.com/integration/openid-connect/frequently-asked-questions/#client-secret)
```asciidoc
Random Password: JxMbHrQgmykaVm2n0p_5q6P_YoZG_YdRWvHxHbVJ5Alv.Ni3OJPVPHEJ6Tfw_AklrwayFl39
Digest: $pbkdf2-sha512$310000$yQogpMZvkHoAmOBGiIHVJQ$hxKuvar6Q6pOlkdzQBMWq1i5WjXcBA3rvuXxeylvLeTuKI/hLVeZsM43R5TWejZ6gBp/OH8yy1hWytiohLQh5w
```
## [](#%5Folivetin%5Fconfig)OliveTin config
```yaml
authRequireGuestsToLogin: true
authOAuth2RedirectURL: https://olivetin.hostname.com/oauth/callback
authOAuth2Providers:
authelia:
name: authelia
title: Authelia
clientID: olivetin #same as authelia
clientSecret: xxxxxxx #same as authelia but not hashed
authURL: https://authelia.hostname.com/api/oidc/authorization
tokenURL: https://authelia.hostname.com/api/oidc/token
whoamiUrl: https://authelia.hostname.com/api/oidc/userinfo
scopes:
- openid
- profile
usernameField: preferred_username
icon:
accessControlLists:
- name: john #same as authelia
matchUserNames:
- john
permissions:
view: true
exec: true
logs: true
addToEveryAction: true
```
## [](#%5Fnext%5Fsteps)Next steps
Once you have OAuth2 working, you will probably want to configure access control lists in OliveTin. This is described in the [Access Control Lists](acl.html) documentation page.
OAuth2 - Authentik
====================
OliveTin has been tested with Authentik. This documentation page describes how to configure Authentik for use with OliveTin and assumes you already have Authentik installed and running.
Login as an Authentik administrator and start by creating a new app as follows;
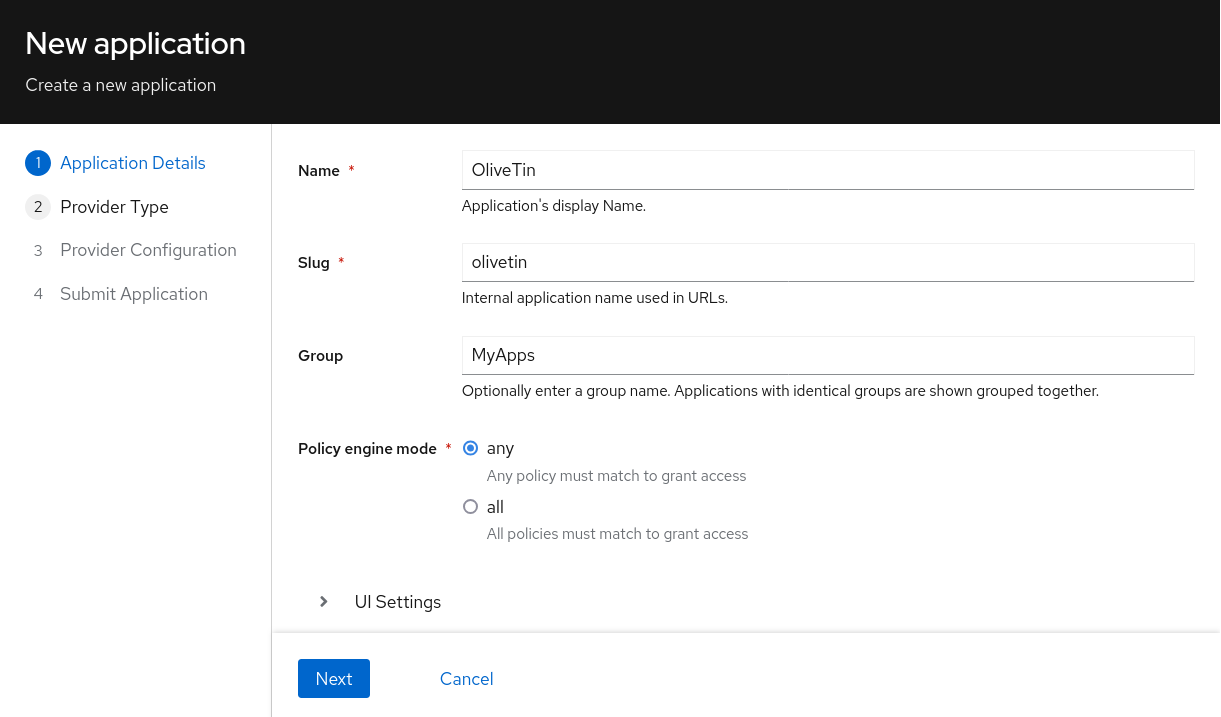
Click Next, and on the **Provider Type** page select **OAuth2**.
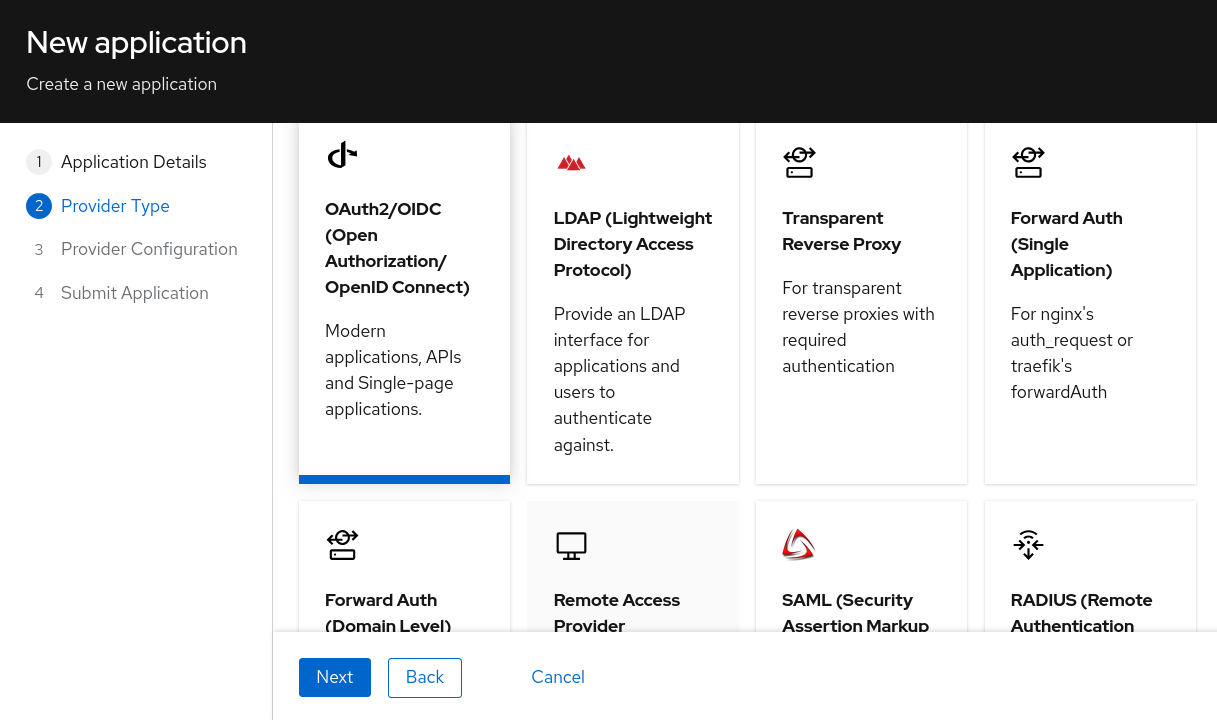
Click Next, and on the **Provider Configuration** page, fill in the following fields;
* **Authorization flow:** `default-authorization-eplicit-consent (Authorize Application)` (or similar)
* **Client Type**: `confidential` \- OliveTin requires a confidential client (it keeps it’s secrets on the server side).
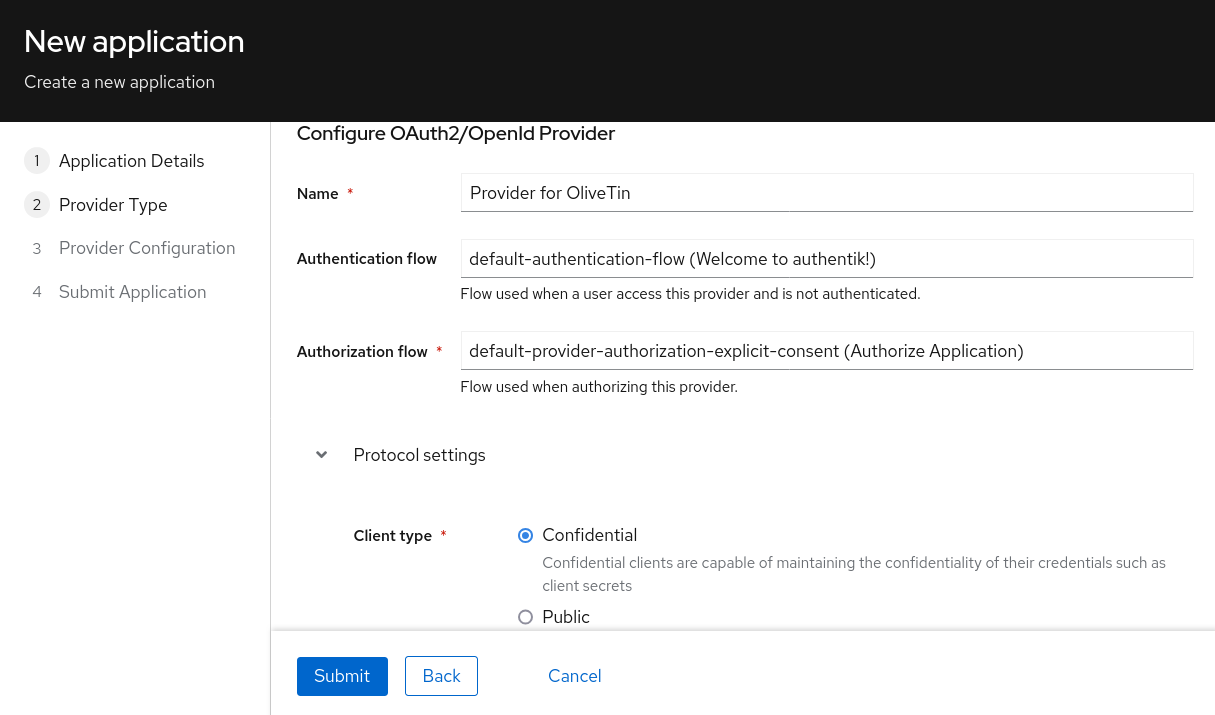
Scroll down, and on the same page, copy the **Client ID** and **Client Secret** fields into a text file, a secret manager, or somewhere else safe. You will need these values later. These are used in the OliveTin configuration file later.
For the **Redirect URIs**, OliveTin requires that the URI ends with `/oauth/callback`. Therefore if your OliveTin instance is running on ``, you should add the following redirect URI: ``. Note that the URL must match the URL that you use to access OliveTin - so it is whatever you type in your browser address bar, with `/oauth/callback` appended to it.
| | That URL says oauth, not oauth2. OliveTin only supports OAuth2, not "OAuth\[1\]", but the path is oauth nevertheless. |
| ------------------------------------------------------------------------------------------------------------------------ |
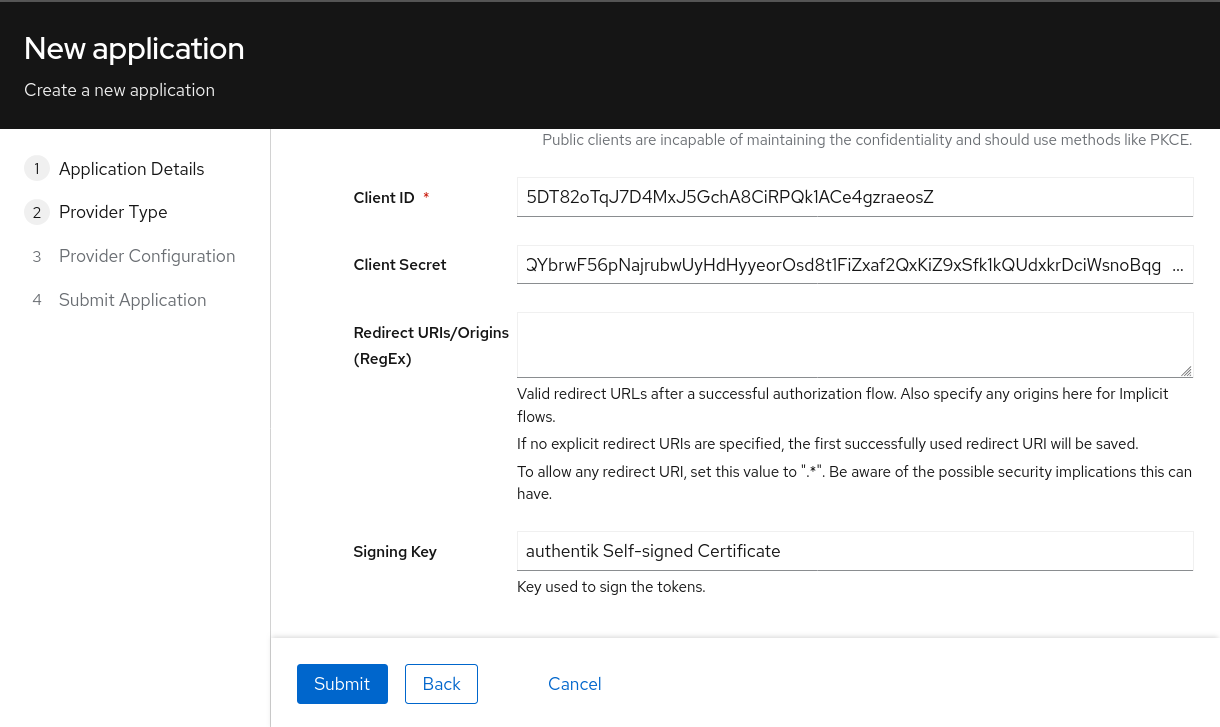
If your Authentik instance has a "Configure Bindings" page, you can bind users to be able to access OliveTin like you would with any other application that you add to Authentik.
Submit this wizard to save the configuration.
## [](#%5Fgroup%5Fmapping)Group Mapping
OliveTin `2024.11.24` added support for OAuth2 group mapping for a single group. OliveTin `2025.7.29` added support for OAuth2 group mapping for multiple groups when passed as a commaa-separated list.
The examples below show various ways to map groups from Authentik to OliveTin.
### [](#%5Fmultiple%5Fgroup%5Fmapping%5Fcomma%5Fseparated%5Flist)Multiple group mapping: Comma-separated list
The below will match all groups the user is a member of and return them as a comma-separated list. If no groups are found then an empty string is returned (no groups)".
In Authentik: `Admin Interface > Customization > Property Mappings > Create > Scope Mapping`
* **Name**: `olivetin-group-mapping-multiple` (or similar)
* **Scope Name**: `olivetin-group-mapping-multiple` (or similar)
* **Description**: `map all groups to a comma-separated list for olivetin`
* **Expression**:
Multiple group mapping: Comma-separated list
```python
groups = [group.name for group in user.ak_groups.all()]
return {
"olivetin_group_list": ",".join(groups)
}
```
### [](#%5Fsingle%5Fgroup%5Fmapping%5Ffirst%5Fprefix%5Fmatch)Single group mapping: First Prefix Match
The below will match the first group the user is a member of that matches the prefix defined in `group_prefix`, which is set to `olivetin`. If no match is found, the group `guest` is returned by default. Both `group_prefix` and `returned_group` can be changed to your needs.
In Authentik: `Admin Interface > Customization > Property Mappings > Create > Scope Mapping`
* **Name**: `olivetin-group-mapping`
* **Scope Name**: `olivetin-group-mapping`
* **Description**: `map first group that starts with "olivetin"`
* **Expression**:
Single group mapping: First Prefix Match
```python
group_prefix = "olivetin"
returned_group = "guest"
groups = [group.name for group in user.ak_groups.all()]
for group in groups:
if group.startswith(group_prefix):
returned_group = group
break
return {
"olivetin_group_first": returned_group
}
```
| | If you use this multiple group mapping, you will need to set the AuthHttpHeaderUserGroupSep field to ,. This may sound like a strangely named field, but it is the correct one to use for this mapping. It was originally created for the HTTP Trusted Header authentication method, but it is also used for OAuth2 group mapping. |
| ------------------------------------------------------------------------------------------------------------------------------------------------------------------------------------------------------------------------------------------------------------------------------------------------------------------------------------- |
### [](#%5Fsingle%5Fgroup%5Fmapping%5Fspecific%5Fgroup%5Fmatch)Single group mapping: Specific Group Match
The below will match the specified group name to one of the groups the user is a member of. If no match is found, the group `guest` is returned by default. Both `olivetin_group` and `returned_group` can be changed to your needs.
In Authentik: `Admin Interface > Customization > Property Mappings > Create > Scope Mapping`
* **Name**: `olivetin-group-mapping-specific`
* **Scope Name**: `olivetin-group-mapping-specific`
* **Description**: `search and map specified group for olivetin`
* **Expression**:
Single group mapping: Specific Group Match
```python
olivetin_group = "olivetin-users"
returned_group = "guest"
groups = [group.name for group in user.ak_groups.all()]
if olivetin_group in groups:
returned_group = olivetin_group
return {
"olivetin_group_specific": returned_group
}
```
### [](#%5Fenable%5Fgroup%5Fmapping)Enable Group Mapping
After creating the scope mapping in Authentik, you will need to add it to your provider. For the your OliveTin config, use the `userGroupField` mentioned in the following section.
In Authentik: `Admin Interface > Applications > Providers > {Your Provider} > Edit`
* Open `Advanced protocol settings`
* Under `Scopes`, add `your_scope_map` to `Selected Scopes`
* Click `Update`
## [](#%5Folivetin%5Fconfiguration)OliveTin configuration
This section assumes that your authentik server is accessible in the browser at `` and that OliveTin is running on ``. Adjust the URLs as necessary to match your setup. The "path" part of the URL is important and should be common in all Authentik installations.
The necessary OliveTin configuration is as follows:
```yaml
authRequireGuestsToLogin: true # Optional - depends if you want to "disable" guests.
authOAuth2RedirectURL: "http://localhost:1337/oauth/callback"
authOAuth2Providers:
authentik:
name: authentik
title: Authentik
clientID: "1234567890"
clientSecret: "123456789012345"
authURL: "http://localhost:9000/application/o/authorize/"
tokenURL: "http://localhost:9000/application/o/token/"
whoamiURL: "http://localhost:9000/application/o/userinfo/"
usernameField: "preferred_username"
icon:
```
Optional configuration values to consider are:
```yaml
authHttpHeaderUserGroupSep: "," # Optional - only needed if you use the multiple group mapping
authOAuth2Providers:
authentik:
userGroupField: "olivetin_group_list" # or "olivetin_group_first" or "olivetin_group_specific" depending on which mapping you used
certBundlePath: "/path/to/mounted/certificate.pem"
insecureSkipVerify: true
connectTimeout: 15
```
You will need to restart OliveTin for the changes to take effect.
## [](#%5Ftesting)Testing
You should now be able to login to OliveTin using Authentik, on the OliveTin page, a "Login" link should be available in the top right corner. This will take you to the login form, where you can select the Authentik provider.
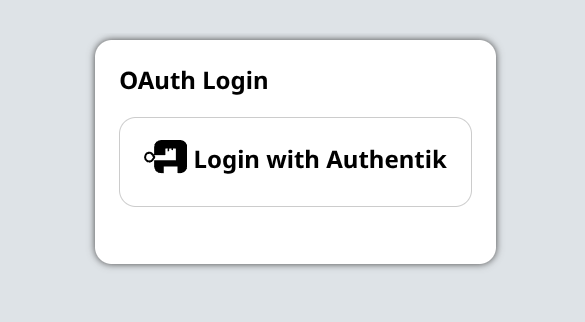
When clicking on the Authentik login button, you will be redirected to the Authentik login page which should look something like this;
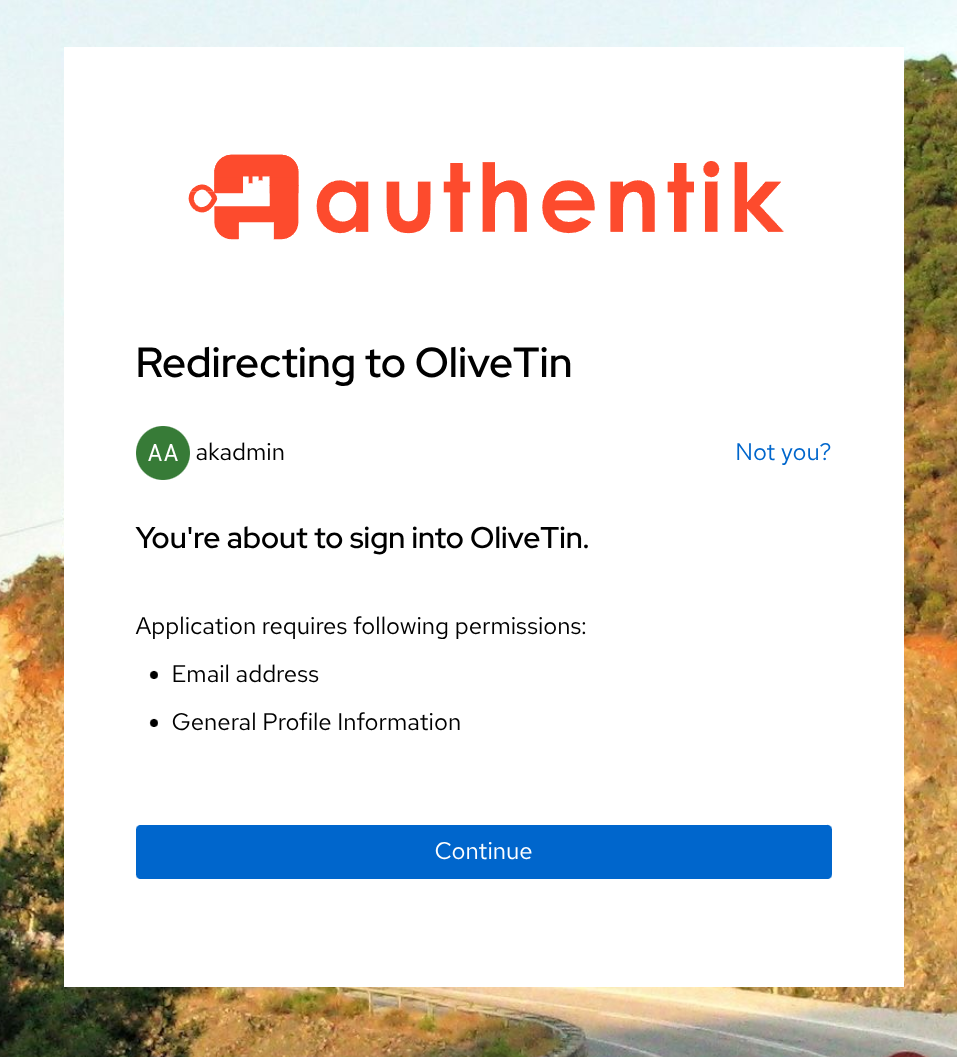
Assuming that you have given permission to OliveTin to access your account, you should be redirected back to OliveTin and logged in. You can verify that you are logged in by checking the top right corner of the OliveTin page, where your username should be displayed.

## [](#%5Fdebugging)Debugging
OliveTin logs OAuth2 flows quite extensively. If you are having trouble with OAuth2, you should check your OliveTin logs.
You may see errors such as "OAuth2: Error getting user data" or "Failed to get field from user data".
Sometimes it can be infuriating to debug the user data mapping (username and usergroup), as you cannot easily capture the data that is being sent back from Authentik. To help with this, you can temporarily enable a debug log flag that is INSECURE (do not leave this enabled) to log the user data that is being sent back from Authentik. To do this, add the following to your OliveTin configuration file:
```yaml
logLevel: debug
insecureAllowDumpOAuth2UserData: true
```
Once you have this working, you can disable the `insecureAllowDumpOAuth2UserData` flag again. This is only meant for debugging purposes and should not be left enabled in production environments.
## [](#%5Fnext%5Fsteps)Next steps
Once you have OAuth2 working, you will probably want to configure access control lists in OliveTin. This is described in the [Access Control Lists](acl.html) documentation page.
OAuth2 - Pocket ID
====================
OliveTin has been tested with Pocket ID. This documentation page describes how to configure Pocket ID for use with OliveTin and assumes you already have Pocket ID installed and running.
## [](#%5Fconfiguration)Configuration
config.yaml
```yaml
authRequireGuestsToLogin: true
accessControlLists:
- name: admin
permissions:
view: true
exec: true
logs: true
matchUsergroups:
# Since you can't map properties in userinfo response from Pocket ID I am kind of cheating here:
# only I will be able to log in and so I return the "preferred_username" as the group, and I configure my
# own username as the "Usergroup" to mean "admin"
- myusername
addToEveryAction: true
authLocalUsers:
enabled: false
authOAuth2RedirectUrl: https://olivetin.example.com/oauth/callback
authOAuth2Providers:
pocket-id:
name: pocket-id
title: Pocket ID
icon: ' '
authUrl: https://id.example.com/authorize
tokenUrl: https://id.example.com/api/oidc/token
whoamiUrl: https://id.example.com/api/oidc/userinfo
clientId: "[REDACTED]"
clientSecret: "[REDACTED]"
scopes:
- profile
- email
usernameField: preferred_username
userGroupField: preferred_username
insecureSkipVerify: true
actions:
- title: "Hello world!"
shell: echo 'Hello World!'
```
## [](#%5Fpocket%5Fid%5Fconfig)Pocket ID config
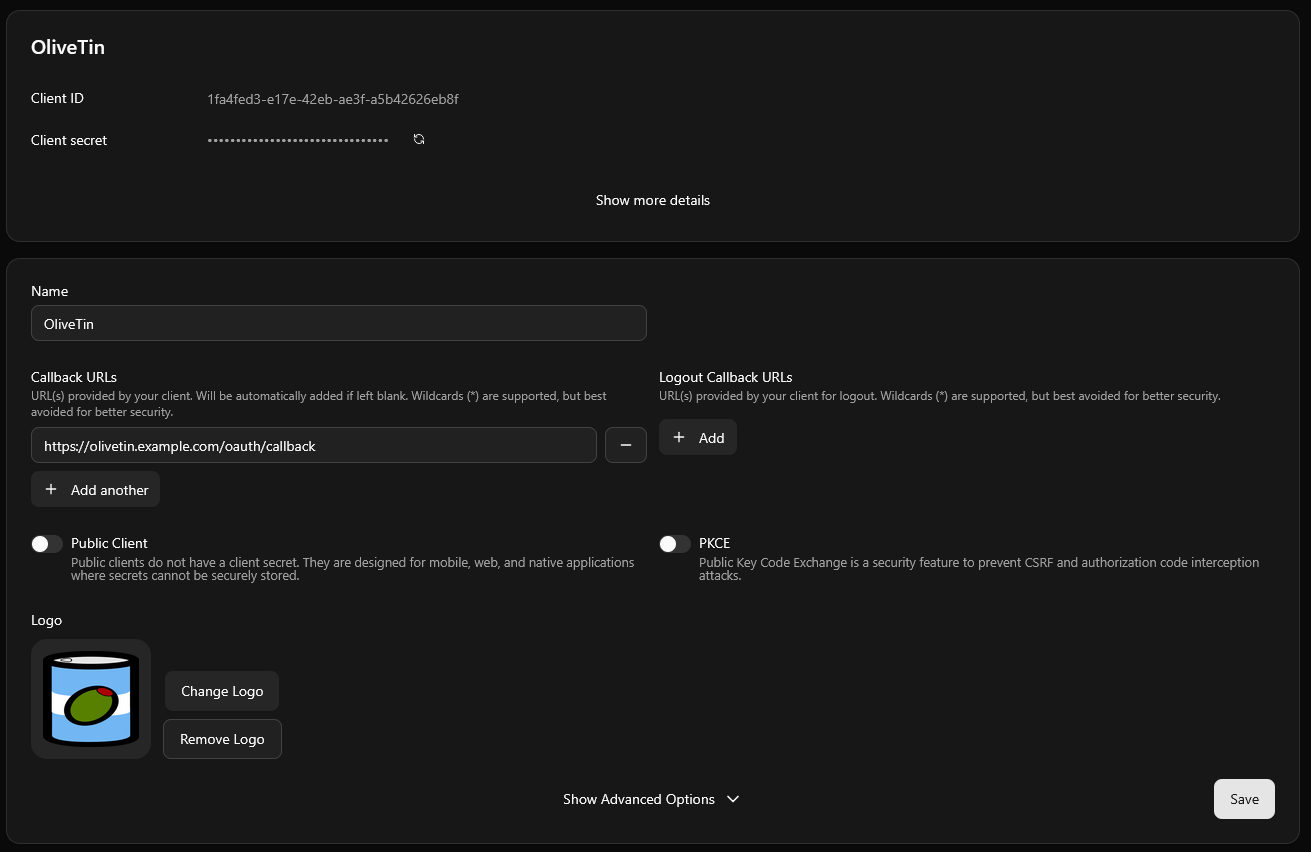
Trusted Header Authorization
====================
Trusted Header Authorization is useful if you have a proxy that handles authentication, and you just want OliveTin to trust HTTP Servers sent via that proxy.
This comes with the obvious security caveat that anyone who can set HTTP headers on requests to OliveTin can impersonate any user or usergroup. Therefore, you should only use this method if you are sure that requests to OliveTin are **only coming from trusted proxies**.
## [](#%5Fconfiguring%5Fyour%5Freverse%5Fproxy)Configuring your reverse proxy
You will need to configure your reverse proxy to set a header for the Username (eg `X-Username`) and optionally a header for Usergroup (eg `X-Usergroup`). How you do this will depend on your reverse proxy software. It is better that you check out the documentation for your reverse proxy software for how to set HTTP headers.
## [](#%5Fconfiguring%5Folivetin)Configuring OliveTin
To configure Trusted Header Authorization, set the following configuration options in your `config.yaml` file:
`config.yaml`
```yaml
authHttpHeaderUsername: "X-Username"
authHttpHeaderUsergroup: "X-Usergroup"
```
The value of `X-Username` and `X-Usergroup` can be whatever you like, as long as they match the headers set by your reverse proxy.
| | You **must** set AuthHttpHeaderUsername to some value, even if you only intend to use AuthHttpHeaderUsergroup, otherwise usergroups will be ignored. |
| ------------------------------------------------------------------------------------------------------------------------------------------------------- |
## [](#%5Fmultiple%5Fusergroups)Multiple usergroups
OliveTin will automatically detect multiple usergroups in the `authHttpHeaderUsergroup` header if they are separated by a space. You can also set a configuration option to use a different separator string with `authHttpHeaderUsergroupSep`. For example, if you set `authHttpHeaderUsergroupSep` to `,`, then the header `X-Usergroup: group1,group2` will be interpreted as two usergroups: `group1` and `group2`.
```yaml
authHttpHeaderUsergroupSep: ","
```
Solutions
====================
OliveTin was designed to be very simple, but sometimes OliveTin can get complex - especially if you are trying to do something where you need to jump between lots of different parts of the documentation!
This section of the docs is designed to bring everything into one place and present a scenario, with a single-page solution.
Advanced Troubleshooting
====================
Sometimes you need to really see what OliveTin is doing, especially when debugging entities. OliveTin has several built-in options for advanced troubleshooting, but enabling these output options can expose sensitive information, so they can be insecure.
| | OliveTin itself is not "insecure" by using these options, they would not let attackers execute different commands or anything like that. It’s just that using these options can expose data (like entity files) that maybe you don’t want an attacker to see. |
| ---------------------------------------------------------------------------------------------------------------------------------------------------------------------------------------------------------------------------------------------------------------- |
All these configuration options are `false` by default, and should be deleted from the config or reset back to `false` when you are not using them.
## [](#dump-server-diagnostics)Dump server diagnostics
`InsecureAllowDumpSos: true` \- will allow dumping [server diagnostics](server-diagnostics.html) as plain text when visiting ``
## [](#dump-action-map)Dump Action Map
`InsecureAllowDumpActionMap: true` \- will allow dumping all the actions (and those generated with entities) and their public IDs, eg: ``
## [](#dump-vars)Dump Vars
`InsecureAllowDumpVars: true` \- will allow dumping all the "string variables" from a map that is mainly used for entities, eg: ``
## [](#dump-jwt)Dump JWT Claims
`InsecureAllowDumpJwtClaims: true` \- will dump all the claims from a successfully parsed JWT token. This can be useful when trying to see how OliveTin is parsing the token, and what key fields are available.
Browser console logs (WebUI troubleshooting)
====================
The **developer console** (or **browser console**) is a panel built into your web browser. It records technical messages from the OliveTin WebUI—errors, warnings, and network failures—that do not always appear on the page itself.
When something looks wrong in the WebUI (for example a blank area, buttons that never load, or errors after clicking), sharing **console output** helps others see what the browser reported and narrow down the cause. You do **not** need to be a web developer to open it or share it.
**A screenshot of the console is often enough.** If you can copy text instead, that is helpful too. Either way, include what you were doing right before the problem (for example “opened the dashboard”, “clicked Start on action X”).
| | Before posting publicly, glance at the console for anything that looks like a password, token, or private URL. Crop or redact those lines if needed. |
| ------------------------------------------------------------------------------------------------------------------------------------------------------- |
## [](#open-the-console)Open the console
Use OliveTin in the browser where you see the problem, then open the console **before** or **right after** reproducing the issue so the messages are still visible.
### [](#desktop-chromium)Google Chrome, Microsoft Edge, Brave, and other Chromium-based browsers
1. Open the OliveTin page.
2. Open the developer tools:
* **Windows / Linux:** press F12, or Ctrl+Shift+J to go straight to the **Console**.
* **macOS:** press Cmd+Option+J for the **Console**, or Cmd+Option+I for developer tools (then click the **Console** tab).
3. If you do not see a **Console** tab, click **»** or **+** in the developer tools toolbar and choose **Console**.
### [](#desktop-firefox)Mozilla Firefox
1. Open the OliveTin page.
2. Open developer tools: F12, or Ctrl+Shift+I on Windows/Linux, or Cmd+Option+I on macOS.
3. Select the **Console** tab. (On Windows/Linux you can also use Ctrl+Shift+K to open the console directly.)
### [](#desktop-safari)Safari (macOS)
Safari hides the console until you turn on the Develop menu:
1. **Safari** → **Settings** (or **Preferences**) → **Advanced** → enable **Show features for web developers** (wording may vary slightly by Safari version).
2. In the menu bar, open **Develop** → **Show JavaScript Console**, or press Cmd+Option+C.
## [](#what-to-capture)What to capture
1. Stay on the **Console** tab.
2. If there are many old messages, use the console’s **Clear** control so only new messages appear, then reload the page or repeat the steps that trigger the problem.
3. Note any lines in **red** (errors) or **yellow** (warnings)—those are usually the most useful.
4. Use your system’s screenshot tool to capture the console window, **or** right-click in the console → **Save as…** / **Copy all messages** if your browser offers it.
## [](#share-the-logs)Share the logs
Attach the screenshot or pasted text to a [Discord or GitHub support](wheretofindhelp.html) message, along with your OliveTin version and how you access it (direct URL, reverse proxy, etc.). That combination helps diagnose WebUI issues much faster than a description of the screen alone.
If the problem might be on the server (OliveTin not starting, actions failing, API errors), also collect [service logs](service-logs.html) from Docker, Podman, or systemd.
Error Getting Buttons
====================
This is most often caused by not being able to get to /api/ properly - normally due to a bad proxy config, or your network was disconnected.
Error Fetching WebUI Settings
====================
This is a less common issue, but it means that the main web HTML has loaded, but it could not get \- most likely because of a 404 (Not Found) or JSON parse issue. You can see the exact reason if your browser as Web Developer Tools - look in the console. Firefox and Chrome both have great web developer tools, that can normally be opened with the F12 key, or from the developer tools menu.
The most common cause of this issue is a broken reverse proxy configuration. To debug this, browse to and adjust your reverse proxy configuration until the file loads properly. See [Reverse Proxies](../reverse-proxies/intro.html) for common configuration instructions.
An uncommon cause of this issue is if you are self-hosting the HTML outside of OliveTin. This is supported, but it means you will need to write the webUiSettings.json file manually. This is currently not documented as very very few people really need or want to do this. It’s very uncommon at the moment to self host the HTML outside of the OliveTin main server. Jump on the discord to discuss this if you want to do this, see [support](wheretofindhelp.html).
Error: JS Modules not supported
====================
This is most likely because you are using a very old browser, or have some Javascript disabled.
This page describes the compatible browsers for Javascript modules; .
There is no workaround for this apart from updating your browser / using a better browser, as OliveTin wants to be a progressive web app and doesn’t intend to support browsers without module support.
Error Connecting to WebSocket
====================
If OliveTin was working, but this error popped up, it’s most likely because your reverse proxy closed the connection due to a timeout.
If OliveTin is always displaying this error, it’s probably your reverse proxy not handling the websocket properly. Please check the Reverse Proxy documentation for more information.
## [](#%5Freverse%5Fproxies%5Fwill%5Fclose%5Fwebsockets)Reverse proxies will close websockets
Many reverse proxies use short default timeouts for connections. Long-lived websocket connections often hit these limits and get closed by the proxy, which triggers this error. OliveTin will attempt to reconnect automatically, but you can avoid the disconnects by increasing the websocket (or proxy) timeout in your reverse proxy configuration.
Check your proxy’s documentation for how to raise timeouts—for example, Apache HTTPD uses `ProxyTimeout`, and other proxies have similar settings. See the individual reverse proxy pages (e.g. [Apache](../reverse-proxies/apache.html)) for examples.
Error: WebUI Version Mismatch
====================
This is most often caused by the WebUI Version not matching the server version.
Every release of OliveTin will change the version number for the server, and for the webui client - these versions should match. For example, version 2024.4.1 of the server should be paired with version 2024.4.1 of the webui client. It is unlikely that the release of the server and webui client will be out of sync, but it is possible if you are using a custom build of the webui client, but the most likely cause is **aggressive caching** of the webui client files in your browser, or proxy server.
There are cache-busting mechanisms built into OliveTin to try and avoid this error, but they don’t always work in every environment.
* Try forcing a refresh with "Ctrl+F5" in your browser.
* If that doesn’t work, try clearing your browser cache.
* If that doesn’t work, try using a different browser.
Exit code 127
====================
Exit code 127 on Linux typically means "command not found". This can be the case when you need to install command in a container image for example.
Debug Log Options
====================
```yaml
logDebugOptions:
singleFrontendRequests: true
singleFrontendRequestHeaders: true
aclMatched: true
aclNotMatched: true
```
PUID and PGID support
====================
The OliveTin container image does not use the PUID and PGID convention to specify which user the container should run as - this is a convention that was popularized by linuxserver.io, because their container images use supervisord. Instead, simply use the `--user` argument when defining the container, to change the user OliveTin runs as.
* [LSIO documentation for PUID and PGID, that says that \--user is the same thing](https://docs.linuxserver.io/general/understanding-puid-and-pgid)
An example is shown below;
Using --user
```shell
user@host: docker create --name olivetin -p 1337:1337 -v /etc/OliveTin/:/config:ro docker.io/jamesread/olivetin --user container:container
user@host: docker start olivetin
```
Server diagnostics
====================
OliveTin has a useful feature to gather information about your installation when you have a support request. If you are able to provide **server diagnostics**, this generally helps others help you a lot. **Server diagnostics** does NOT send any information to the developers or anybody else—it’s simply text—**copy and paste it** to where someone is trying to help you!
Example server diagnostics output
```yaml
### SOSREPORT START (copy all text to SOSREPORT END)
# Build:
commit: nocommit
version: dev
date: nodate
# Runtime:
os: linux
osreleaseprettyname: PRETTY_NAME="Fedora Linux 37 (Workstation Edition)"
arch: amd64
incontainer: false
lastbrowseruseragent: ""
# Config:
countofactions: 7
loglevel: INFO
### SOSREPORT END (copy all text from SOSREPORT START)
```
The markers and field names above reflect what OliveTin prints; copy everything from the start marker through the end marker.
You can then copy and paste this text into a GitHub issue, discussion, Discord chat, or wherever else someone might be helping you.
## [](#%5Fhow%5Fdo%5Fi%5Fgenerate%5Fserver%5Fdiagnostics)How do I generate server diagnostics?
OliveTin needs to be able to start and its API needs to be functional. Once OliveTin is started, open this URL in a browser (replace the host and port with yours):
``
The `/api/sosreport` path is the HTTP endpoint OliveTin uses for server diagnostics.
## [](#%5Foptional%5Fallow%5Finsecure%5Fbut%5Feasy%5Fdumping%5Fto%5Fthe%5Fbrowser)Optional: Allow insecure (but easy) dumping to the browser
There is a configuration option you can set in your `config.yaml` that allows you to easily dump server diagnostics to your browser when visiting the API. This is turned off by default, as you should not allow anybody to request diagnostics at any time they like, but you can enable this option temporarily to easily get access to the text in your browser.
`config.yaml`
```yaml
InsecureAllowDumpSos: true
```
## [](#%5Fdefault%5Fdiagnostics%5Fdump%5Fto%5Flogs)Default: Diagnostics dump to logs
You should get a simple JSON message saying something like;
```asciidoc
alert: "Your SOS Report has been logged to OliveTin logs."
```
The exact wording may match your OliveTin version.
If you see this, great! The actual contents of the server diagnostics are not returned to your browser for security reasons (guests could get info about your installation, etc).
To find the diagnostics text depends on how you are running OliveTin. If you are running in a container, then try `docker logs olivetin` (where `olivetin` is your container name). If you are running using systemd, then try `journalctl -eu OliveTin`.
## [](#%5Fwhat%5Fif%5Fi%5Fcannot%5Feven%5Fget%5Fto%5Fthe%5Folivetin%5Fapi)What if I cannot even get to the OliveTin API?
OliveTin’s web interface doesn’t need to be working to get server diagnostics (the web interface and the API are separate). However, if OliveTin won’t even start, or you cannot reach the API, then server diagnostics cannot be generated. Please specify that when you ask for help.
Service logs (OliveTin process troubleshooting)
====================
**Service logs** are the lines OliveTin prints while it runs—startup messages, configuration load, errors, and action output. They are separate from [browser console logs](browser-console-logs.html), which come from the WebUI in your browser.
When something fails on the server (OliveTin will not start, actions error, API or auth problems), sharing **recent service log output** helps others see what the process reported. You do **not** need to be a Linux expert to copy logs from Docker, Podman, or `journalctl`.
| | Before posting publicly, scan the log text for passwords, API tokens, cookies, or internal hostnames. Remove or replace those strings if needed. If you enable [extra debug logging](log-debug-options.html), output can be more sensitive than usual. |
| --------------------------------------------------------------------------------------------------------------------------------------------------------------------------------------------------------------------------------------------------------- |
## [](#where-logs-go)Where logs come from
How you read logs depends on how OliveTin is installed:
* **Container (Docker / Podman):** logs are what the container runtime captured from OliveTin’s standard output.
* **systemd service:** logs are stored by the system journal for the `OliveTin` unit.
* **Manual / binary** (for example `./OliveTin` in a terminal): messages print to that terminal—copy them from there, or redirect output to a file when testing.
* **Windows (binary or service):** OliveTin writes process logs to a file under `%ProgramData%\OliveTin\logs\` by default. You can override this with [serviceLogs.directory](../install/windows%5Fservice.html#windows-service-logs) in `config.yaml`.
## [](#windows)Windows (binary or service)
By default, OliveTin on Windows writes process logs to:
```asciidoc
%ProgramData%\OliveTin\logs\OliveTin-service-.log
```
To use a custom directory (for portable installs), set in `config.yaml`:
```yaml
serviceLogs:
directory: C:\Path\To\Logs\
```
See [Windows service logs directory](../install/windows%5Fservice.html#windows-service-logs) for details. This setting is ignored on non-Windows platforms.
## [](#manual-binary)Manual or binary run
If you start OliveTin directly in a terminal window, **scroll back** and copy the text from startup through the error, or run it again and capture output:
```shell
./OliveTin 2>&1 | tee olivetin-run.log
```
That writes everything to `olivetin-run.log` while still showing it on screen. Stop OliveTin before sharing, then attach or paste the relevant part of the file.
## [](#docker-and-podman)Docker and Podman
Use the **same container name** you chose when you created the container (examples below use `olivetin`; yours may differ).
Show recent log lines (last \~200 lines)
```shell
docker logs --tail 200 olivetin
```
With Podman, use the same pattern:
```shell
podman logs --tail 200 olivetin
```
If OliveTin **crashes on startup** or you need the **full story from a restart**, show logs **after** reproducing the problem—either capture enough lines, or use a time window.
Limit output to the last few minutes (adjust the time as needed)
```shell
docker logs --since 10m olivetin
```
To **watch** logs live while you trigger an issue in another window:
```shell
docker logs -f olivetin
```
Press Ctrl+C to stop following; that does not stop OliveTin.
## [](#docker-compose)Docker Compose
From the directory that contains your `compose.yaml` (or `docker-compose.yml`):
```shell
docker compose logs --tail 200 olivetin
```
Use the **service name** from the compose file, not necessarily the container name. Add `-f` to follow logs live, same idea as above.
## [](#systemd)systemd (native Linux package)
Show whether the service is running and recent status:
```shell
systemctl status OliveTin
```
Read the journal for the OliveTin unit (scroll with arrow keys, quit with q):
```shell
journalctl -eu OliveTin
```
For a **time-bounded** slice (for example after a restart or failed action):
```shell
journalctl -eu OliveTin --since "30 minutes ago"
```
## [](#what-to-capture)What to capture
1. Reproduce the problem if you can (restart OliveTin, click the action, etc.), then collect logs **immediately after**.
2. Include lines from **startup** through the **error**—not only the last one line.
3. If the log is huge, prefer `--since` / `--tail` so the excerpt stays readable.
4. Note your **install type** (Docker, Podman, Compose, systemd) and OliveTin **version** if you know it (from the WebUI footer, [server diagnostics](server-diagnostics.html), or startup text).
For deeper server-side detail, you can temporarily enable [LogDebugOptions](log-debug-options.html)—then capture logs again with those settings in mind.
## [](#share-the-logs)Share the logs
Paste the text into a [Discord or GitHub support](wheretofindhelp.html) message (or attach a `.txt` file if it is long). Together with **how you run OliveTin** (direct port, reverse proxy, container flags) and **what you did** before the error, service logs make backend issues much easier to diagnose than a screenshot of the WebUI alone.
For WebUI-only behaviour (blank page, buttons not loading), also capture [browser console logs](browser-console-logs.html) when relevant.
Where to find help
====================
When something is wrong with the **WebUI** in the browser, capturing [browser console logs](browser-console-logs.html) (even as a screenshot) helps diagnose the issue.
When something is wrong with the **OliveTin process** (startup failures, actions, API, or auth), capturing [service logs](service-logs.html) from Docker, Podman, or `journalctl` helps diagnose the issue.
To get relatively quick access to help, **Discord** is where the chat community for OliveTin is. Note that this project is a free community open source project, and it relies on volenteers to spare their free time to help you. Please be patient and polite.
 [Chat on Discord](https://discord.gg/jhYWWpNJ3v)
If nobody is online, or you’re not getting the right level of support, you can raise a ticket with the project’s developers on GitHub. Again, please be patient and polite.
 [Open a support request on GitHub](https://github.com/OliveTin/OliveTin/issues/new?assignees=&labels=support&template=support%5Frequest.md&title=)
Understanding OliveTin 2k vs 3k
====================
| | OliveTin 3k is basically "rebuilding OliveTin for the future" - and aims to have high compatibility with OliveTin 2k while people migrate. However, as we all know, stuff will break when 3k is new - so please be patient, and report issues as you find them! OliveTin 2k isn’t going anywhere anytime soon! |
| ----------------------------------------------------------------------------------------------------------------------------------------------------------------------------------------------------------------------------------------------------------------------------------------------------------------- |
## [](#%5Fquick%5Fsummary%5Fof%5Fkey%5Fpoints)Quick summary of key points
| Release Series | Versioning Scheme | Supported Until |
| --------------------------------------------- | ---------------------------- | ----------------------------------------------------------------- |
| **OliveTin 2k** eg: 2022.11.11 eg: 2023.04.15 | Calendar Versioning (calver) | At least 31st December 2028 (bug fixes and security updates only) |
| **OliveTin 3k** eg: 3000.0.0 eg: 3000.1.0 | Semantic Versioning (semver) | Ongoing - new features and updates |
Users who are upgrading are encouraged to try OliveTin 3k, but understand that it represents several major technology changes, so subtle things might change or break in the first few releases. The objective is to maintain as much compatibility as is pragmatically possible, and highlight any breaking changes clearly.
The main reason for OliveTin 3k is to allow for major technology changes inside the project that enable new features at a later date.
## [](#%5Funderstanding%5Fwhy%5Fa%5Fchange%5Fwas%5Fnecessary%5Ffrom%5Fcalver%5Fto%5Fsemver)Understanding why a change was necessary - from calver to semver
The original version of OliveTin was released in May 2021, and it used a versioning system called [calver](https://calver.org) (Calendar Versioning). For those of you unfamiliar with the calver standard, it means that instead of using 1.0.0 as the first version, the first version was actually called **2021-05-19**. One of the benefits of this approach is that you can determine how old the version is just by looking at the version number alone. Unfortunately this is the only real benefit.
However, this worked just fine for a while, but as OliveTin grew, it became clearer that most packaging systems and users were more accustomed to the more traditional [semver](https://semver.org) (Semantic Versioning) system. As a stopgap measure, OliveTin switched the format of it’s versioning to use dots (".") instead of dashes ("-") in an attempt to make it look more like a traditional semver version. This resulted in a change with version **2022.11.11** (November 11th, 2022 - what a cool date!).
As OliveTin continued to mature, and more features were added, it became clear that there were some major architecture and library choices that were no longer ideal. Switching these out (like the configuration library, Viper), is a really major change, and isn’t something that is good to do without a lot of users being very aware of it. In May 2025, a proposal was launched to switch OliveTin to a more traditional semver versioning system. You can view the detail of that proposal here:
In short, the benefits of switching to semver are;
* Easier to understand versioning for most users
* Allows for major technology changes without confusing users (like the Viper change)
* Better compatibility with packaging systems
* Better reflects the maturity of versions, and allows people to opt out of minor patches for example
This proposal seemed to be positively received by the community, and so the James (founder) decided to move forward with the change.
## [](#%5Fwhat%5Fwere%5Fthe%5Fmajor%5Freasons%5Ffor%5Fthe%5Ftechnology%5Fchanges%5Fin%5Folivetin%5F3k)What were the major reasons for the technology changes in OliveTin 3k?
OliveTin 2k has the following technology choices which limited it’s potential for stability, maintainability and growth;
* The communication between the client and the server uses gRPC, which is then fronted by a REST API and messages are very hackily wrapped in JSON. This has worked remarkably well, but the web has moved on to offer websockets and streaming in a far better way, and connectrpc solves many of these challenges neatly and elegantly.
* The configuration library, Viper, is a defacto standard in Go several years ago - big projects like kubectl and others use it. However the library is extremely heavyweight (lots of dependencies), it has lots of open issues, and doesn’t support some commonly requested features like configuration file splitting and inclusion - which would really help user’s manage large configurations.
* The entity management inside OliveTin was written in a weekend, and is just a large map of strings inside OliveTin2k, again this has worked surprisingly well, but there are lots of interesting use cases with entities that would be much easier to implement with a proper typed backend - and far better mapping between actions and entities (which is extremely horrible in OliveTin 2k).
* The javascript in OliveTin 2k is raw web components, based on the "new" (at the time) specs from 2011\. It’s fast and standards compliant, but it’s also resulted in a LOT of spaghetti code that is very hard to test and maintain.
## [](#%5Fwhy%5Fversion%5F3000%5F0%5F0%5Fand%5Fnot%5F3%5F0%5F0)Why version 3000.0.0 (and not 3.0.0)?
If you look through the original proposal, it was to create a new package called "OliveTin-semver", and start the versioning at 1.0.0\. However, after some more thought, it was decided that this would actually create a lot of confusion, as users would have to figure out if they were using "OliveTin" or "OliveTin-semver" - and it duplicates the package in in places like Linux distributions, which is not a good idea.
However, starting with version "2.0.0" after versions like "2022.11.11" would break the logic of lots of update tools and scripts that people use. This is because major version "2" is below "2022", and so the version ordering, and logic would always think that version 2022.x.x is newer than 2.x.x. This would be very confusing for users, and would likely lead to people not updating, or even downgrading by mistake.
To avoid this confusion, it was decided to jump straight to version "3000.0.0" - which is clearly above "2022.11.11" and any other 2k version. This way, users can easily see that 3000.x.x is newer than any 2k version, and it avoids any confusion with version ordering.
* OliveTin versions like 2022.11.11 and 2023.04.15 are part of "**OliveTin 2k**" (2000 series) and use a **calendar versioning** (calver) scheme. These versions are stable and will continue to receive updates and support but will not receive new features.
* There is no plan to stop supporting OliveTin 2k versions until **at least 31st December 2028** (and I’ll probably keep extending that date, but it’s good to have a cutoff somewhere).
* OliveTin versions starting from 3000.0.0 and onwards are part of "**OliveTin 3k**" (3000 series) and also use a **semantic versioning scheme**. These versions will receive new features, improvements, and updates.
## [](#%5Fshould%5Fi%5Fautomatically%5Fupdate%5Fto%5Folivetin%5F3k)Should I automatically update to OliveTin 3k?
Users are encouraged to try OliveTin 3k, but understand that it represents several major technology changes, so subtle things might change or break in the first few releases. Please remember that OliveTin 2k will continue to be supported and receive updates until at least 31st December 2028, so there is no rush to upgrade.
The developers of this project have quite a lot of test infrastructure around OliveTin 3k (more than was possible with 2k), and would like to **strongly urge problems with updates to be reported, so that they can be fixed when possible**.
### [](#%5Fhow%5Fdo%5Fi%5Fstop%5Fmy%5Folivetin%5F2k%5Fcontainers%5Ffrom%5Fupgrading%5Fto%5Folivetin%5F3k%5Fautomatically)How do I stop my OliveTin 2k containers from upgrading to OliveTin 3k automatically?
Change your `latest` tag to `latest-2k` in your container definitions.
3 tags now exist for container images and container registries;
* `olivetin/olivetin:latest-2k` \- This tag will always point to the latest OliveTin 2k version (eg 2025.11.11)
* `olivetin/olivetin:latest-3k` \- This tag will always point to the latest OliveTin 3k version (eg 3000.2.0)
* `olivetin/olivetin:latest` \- This tag will always point to the latest OliveTin version (currently 3k)
[More information about installing OliveTin in containers](../install/container.html)
### [](#%5Fwhat%5Fdoes%5Fgithub%5Flatest%5Fpoint%5Fto)What does GitHub "latest" point to?
GitHub’s "latest" release tag isn’t super helpful. It currently points to the "release that was pushed last". So sometimes this will be 2k, and sometimes this will be 3k. We’re trying to find a way to fix this.
## [](#%5Fwhat%5Fare%5Fthe%5Fchanges%5Fi%5Fneed%5Fto%5Fmake%5Fto%5Fupgrade%5Ffrom%5Folivetin%5F2k%5Fto%5F3k)What are the changes I need to make to upgrade from OliveTin 2k to 3k?
### [](#%5Folivetin%5Fconfiguration%5Ffiles)OliveTin Configuration files
To date, no changes are required to the configuration file (and configs are being automatically migrated internally to OliveTin 3k - without rewriting the original config file).
However, it is possible that some configuration changes will be necessary as we learn more about people’s setups with OliveTin 2k.
### [](#%5Freverse%5Fproxy%5Fconfigurations)Reverse Proxy configurations
If you are using a reverse proxy (like Nginx, Apache, Caddy, Traefik etc), then you will need to make some changes to your configuration. This is because OliveTin 3k uses websockets for communication between the client and the server, instead of gRPC over HTTP/2\. Many proxies use short default timeouts and will close websocket connections; increase the websocket or proxy timeout in your proxy config to avoid disconnects (OliveTin will reconnect automatically). See [Reverse proxies will close websockets](../troubleshooting/err-websocket-connection.html#reverse-proxies-will-close-websockets) for more.
Please refer to the \[Reverse Proxies\](reverse-proxies/intro.adoc) section of the documentation for updated configuration examples for various reverse proxies.
* [Nginx: Updating your configuration from OliveTin 2k to OliveTin 3k](../reverse-proxies/nginx.html#upgrade3k)
Warning - GitHub Latest
====================
GitHub has a handy feature where releases can be marked as "latest". However, it does not understand that some projects, like OliveTin, have **two** active release streams, [2k and 3k](2k3k.html). Both of those individual streams can have a "latest" - the latest 2k version and the latest 3k version. Unfortunately, GitHub does not provide a way to mark a release at "latest-2k" or "latest-3k" - it only has "latest".
It often happens that a 2k release will come out AFTER a 3k release, and if we left GitHub to do what it does by default, the "latest" URL would be the 2k version - and then when a 3k release goes out, the "latest" URL would be point to a 3k version. This is probably not what you want - "latest" flipping between the "last release that went out". You want it to point to the latest 3k version.
Therefore, the OliveTin project has disabled "latest" releases for all the 2k versions, so that the GitHub "latest" URL will always be the latest 3k version.
This means that **GitHub "latest" URLs will now always point to a 3k version** (eg: `` \= 3k version).
| | If you have been using a script to download the latest version of OliveTin, **you will need to accept 3k, OR update your script to use the new workaround described below.** |
| ------------------------------------------------------------------------------------------------------------------------------------------------------------------------------- |
## [](#%5Fcontainer%5Ftags%5Fare%5Funaffected)Container Tags are unaffected
Container registries allow any number of arbitary tags, so containers DO have a "latest-2k" and "latest-3k" tags. The breaking change described above is only for GitHub release URLs. So, you can still pull the latest 2k or 3k version of the container if you want to. Learn more about available tags in the [Container Installation Guide](../install/container.html).
## [](#%5Fwhat%5Fif%5Fi%5Fwant%5Fto%5Fuse%5Fthe%5Flatest%5F2k%5Fdownload%5Furl%5Fin%5Fmy%5Fscripts)What if I want to use the "latest 2k" download URL in my scripts?
It is understood that some users will want to hard-code a "wget URL" for the latest 2k version into their scripts. Unfortunately the GitHub "latest" URL is now no longer a reliable way to do this. However, the OliveTin project has provided you with a workaround.
In the repository OliveTin/update-check.olivetin.app, there is a Python script that will return the latest 2k version number. You can use this to construct a URL for the latest 2k version. The file `versions.json` also contains the latest 3k versions, and provides download URLs and checksums for each package.
* [versions.json in the update-check.olivetin.app repository](https://raw.githubusercontent.com/OliveTin/update-check.olivetin.app/refs/heads/main/versions.json)
This repository is updated automatically whenever a new 2k or 3k version is released, so you can be sure that the URL you use will always point to the latest version. Please check this repository README for details on how to use this file in your scripts to get the relevant download URLs;
* [update-check.olivetin.app README](https://github.com/OliveTin/update-check.olivetin.app/tree/main)
Upgrade Notes
====================
OliveTin releases are published to GitHub, and the release notes are contained there. This page includes a summary of "Upgrade Notes" for breaking changes between releases.
## [](#%5F2024%5F08%5F14)2024.08.14
### [](#%5Fnavigation%5Fchange%5Fsubpaths%5Fno%5Flonger%5Fsupported)Navigation change - Subpaths no longer supported
In the past, OliveTin supported subpaths in the URL, for example, `` would load the OliveTin web interface. This was convenient for people who wanted to run OliveTin on a subpath of their domain for some reason, but it actually creates a lot of complexity in the code, and makes it harder to maintain. One particular change that was wanted was to be able to link to specific pages in OliveTin, for example, `` or `` \- this became incredibly difficult to implement with the subpath support.
Therefore, OliveTin no longer supports subpaths in the URL. If you have been using OliveTin with a subpath, you will need to change your configuration to use a subdomain or a different port.
## [](#%5F2024%5F04%5F09)2024.04.09
### [](#%5Fthemes%5Fdirectory%5Ffor%5Ftheme%5Fusers)Themes Directory (for theme users)
#### [](#%5Fbackground)Background
Until now, OliveTin has served the themes directory from the "webui" directory, normally `/var/www/olivetin/themes` on most installations. If you wanted to install a theme, you would put the theme in to that directory.
This was a bit cumbersome, because OliveTin treats the content of the "webui" directory as disposable / part of the system, whereas themes are much more like "user data" and "configuration". It also meant that people using Linux Containers had to bind-mount a separate directory for themes.
#### [](#%5Fupgrade)Upgrade
Now themes are stored in the "configdir" (wherever OliveTin finds it’s config file, eg `/config` in containers), under the subdirectory `custom-webui/themes`. OliveTin will try to create the `custom-webui` folder in your configdir if it doesn’t find it.
The advantage of this change is that themes are stored with your config, as part of your data.
To upgrade, simply move any themes you might have into your configdir, under `custom-webui/themes/`. eg:
```yaml
.
├── config.yaml
├── custom-webui
│ └── themes
│ └── custom-icons
│ ├── icon.png
│ └── theme.css
├── entities
│ ├── containers.json
│ ├── heating.yaml
│ ├── servers2.yml
│ ├── servers.yaml
│ └── systemd_units.json
└── installation-id.txt
```
### [](#%5Ftheme%5Fasset%5Fpaths%5Ffor%5Ftheme%5Fdevelopers)Theme Asset Paths (for theme developers)
#### [](#%5Fbackground%5F2)Background
OliveTin had to send the theme name to the browser, so that some javascript could then request ``, and load it as a stylesheet. This had the following problems;
1. This was slow (could take up to a second)
2. This creates a "flash" in the browser, as the new theme.css is loaded over the top of the existing stylesheet.
3. Browsers could not cache this theme.css with the page load.
#### [](#%5Fupgrade%5F2)Upgrade
The new behavior is that OliveTin will always try to load `` as part of the static HTML that is sent to the browser. This means that regular caching can cache the theme.css, and this effectively elliminates the slowness and "flashing" when the browser renders the page.
Internally, OliveTin maps `` to the `theme.css` of whatever the theme is set to with `themeName`, for example, it could map to `themes/myTheme/theme.css`.
As a theme developer, normally you would reference a background image, or similar using `./background.png`, but OliveTin is loading the theme.css as the directory root, and the themes' assets from the custom-webui theme directory. Therefore you need to update paths to be like; `background-image: "/custom-webui/themes/myTheme/background.png`.
Cloudflare Access & Tunnels
====================
| | This page is marked as "earlydoc", which means that it more of a collection of notes and an early draft before this page turns into good documentation later on. It is hoped that this early form of documentation is useful to you, but please understand that most documentation pages are higher quality than this. If you have suggestions or comments, please do get in contact or consider contributing your suggestions to the OliveTin documentation. |
| ---------------------------------------------------------------------------------------------------------------------------------------------------------------------------------------------------------------------------------------------------------------------------------------------------------------------------------------------------------------------------------------------------------------------------------------------------------------- |
Several uses use Cloudflare Access & Tunnels to grant access to OliveTin. There is no special configuration needed for OliveTin to work in this way, simply setup your Cloudflare tunnel to connect to OliveTin on port 1337.
## [](#%5Ftrusting%5Fthe%5Fcloudflare%5Fjwt%5Ftoken)Trusting the Cloudflare JWT Token
1. Get your **AUD** Tag (`authJwtAud`)
1. Login to your CloudFlare dashboard and go to [**Zero Trust**](https://one.dash.cloudflare.com/)
2. Go to **Access > Applications.**
3. Select **Configure** for your application.
4. On the Overview tab, copy the **Application Audience (AUD) Tag**.
2. Get your **Team Domain** (`authJwtDomain`)
1. Login to your CloudFlare dashboard and go to [**Zero Trust**](https://one.dash.cloudflare.com/)
2. Go to **Settings**
3. Go to **Custom Pages**
4. Your **Team Domain** is shown here
3. Get your Certs URL (`authJwtCertsURL`)
1. Simply add `cdn-cgi/access/certs` to your **Team Domain** for CloudFlare
4. CloudFlare gives you an `email` in the claim (`authJwtClaimUsername`) and the Cookie is always called `CF_Authorization` (`authJwtCookieName`)
5. Setup your OliveTin config.yaml like follows;
`config.yaml`
```yaml
authJwtAud: "asdf1234"
authJwtDomain: "https://mydomain.cloudflareaccess.com"
authJwtCertsURL: "https://mydomain.cloudflareaccess.com/cdn-cgi/access/certs"
authJwtClaimUsername: email
authJwtCookieName: "CF_Authorization"
```
You may well want to set `logLevel: DEBUG` and `insecureAllowDumpJwtClaims: true` in your config when testing JWT for the first time.
## [](#%5Ftrusting%5Fthe%5Fauthentication%5Fheader%5Fnot%5Frecommended)Trusting the authentication header (not recommended)
If you are using Cloudflare Access, and want to use the username given by Cloudflare in OliveTin ACLs, then you can use the Cloudflare cookie like this;
`config.yaml`
```yaml
authHttpHeaderUsername: "Cf-Access-Authenticated-User-Email"
defaultPermissions:
view: false
exec: false
accessControlLists:
- name: Admins
addToEveryAction: true
matchUsernames:
- contact@jread.com
permissions:
view: true
exec: true
actions:
- title: test apprise
shell: date
shellAfterCompleted: "apprise -c /config/apprise.yml -t 'notification: test' -b 'date is {{ stdout }}'"
```
| | OliveTin does support JWT cookies that Cloudflare uses, which is arguably more secure. It’s just that nobody in the Discord has worked out how to get the keys needed from Cloudflare to decrypt this cookie yet! See the [JWT](../../security/jwt.html) documentation for some starter points. If you figure this out, it would be most welcome to share your solution with the community. |
| ---------------------------------------------------------------------------------------------------------------------------------------------------------------------------------------------------------------------------------------------------------------------------------------------------------------------------------------------------------------------------------------------- |
Container Control Panel
====================
OliveTin is frequently used to create simple container control panels, this is one of the default examples that ships with the standard OliveTin config.yaml.
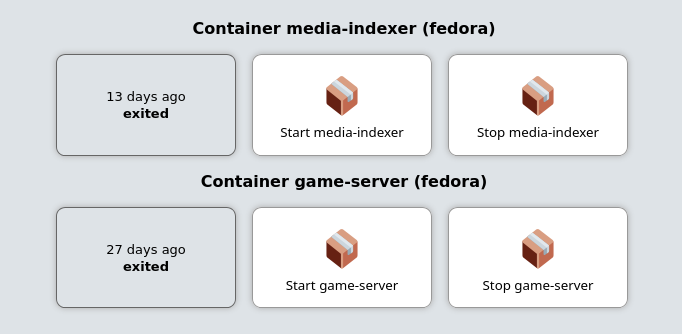
## [](#%5Fsetup%5Fif%5Frunning%5Finside%5Fa%5Fcontainer)Setup if running inside a container
You can control other containers, when running OliveTin inside a container itself, however you need to do some extra setup when creating the OliveTin container.
### [](#%5Fensure%5Fyour%5Fcontainer%5Fhas%5Fpermissions%5Fto%5Fcontrol%5Fdocker)Ensure your container has permissions to control docker
You have two alternatives to allow OliveTin (running inside a container) to talk to the Docker daemon through the bind-mounted socket. Pick one:
#### [](#%5Foption%5F1%5Fuse%5Fprivileged%5Fsimplest)Option 1 — Use `--privileged` (simplest)
| | Simplest for most users. Podman does not have this requirement. |
| ------------------------------------------------------------------ |
* Run the container with `--privileged` and as `root` (eg `--user root`).
* This avoids user/group permission issues on `/var/run/docker.sock`.
If you are getting "permission denied" errors it is probably because OliveTin runs as user UID 1000 by default, which is not allowed by your docker host. Running with `--user root` under `--privileged` resolves this quickly. Note that [PUID and PGID variables will not work](../../troubleshooting/puid-pgid.html).
#### [](#%5Foption%5F2%5Frun%5Fas%5Fnon%5Froot%5Fin%5Fthe%5Fhost%5Fdocker%5Fgroup%5Fno%5Fprivileged)Option 2 — Run as non-root in the host `docker` group (no `--privileged`)
Use the standard Docker guidance to manage Docker as a non-root user (becoming a member of the `docker` group) and match the group’s GID inside the container so the process can access the socket permissions.
* Docs: [Manage Docker as a non-root user](https://docs.docker.com/engine/install/linux-postinstall/#manage-docker-as-a-non-root-user)
* Find the `docker` group GID on the host, for example using `getent group docker`.
* Run the container with your user UID and the `docker` group GID, and bind-mount the socket. Using Compose:
docker-compose.yml
```yaml
services:
olivetin:
container_name: olivetin
image: jamesread/olivetin
user: ${UID}:${docker_group_id}
volumes:
- /var/run/docker.sock:/var/run/docker.sock
```
Where `UID` and `docker_group_id` are provided via your shell environment or a `.env` file next to your Compose file, for example:
env
```bash
UID=1000
docker_group_id=995
```
This allows you to run the container as a non-root user, while still allowing access to `/var/run/docker.sock`.
### [](#%5Fpass%5Fthe%5Fdocker%5Fsocket%5Finto%5Fthe%5Fcontainer)Pass the docker socket into the container
1. Pass `/var/run/docker.sock` as a bind mount to the container when creating it, eg:
```asciidoc
docker create --privileged --user root -v /var/run/docker.sock:/var/run/docker.sock ...additional args here...
```
Or, using the `docker run` syntax;
```asciidoc
docker run --privileged --user root -v /var/run/docker.sock:/var/run/docker.sock --name OliveTin jamesread/olivetin
```
2. The official x86\_64 docker container comes with the `docker` client pre-installed. If you are using `arm` or and `arm64` container, you will need to add Docker yourself.
[How to install additional packages in the container](../../reference/containerInstallPackages.html)
| | The reason that the arm and arm64 containers do not include docker, is that when these images are cross-compiled at build time, it takes FOREVER because we have to emulate arm. |
| ----------------------------------------------------------------------------------------------------------------------------------------------------------------------------------- |
After you have passed the socket into the container (and optionally installed docker), you should be able to setup docker actions like it’s shown in the example [above](#example-control-containers).
## [](#%5Fentity%5Ffile)Entity file
To build this Container Control dashboard, we use an [entity file](../../entities/intro.html) that stores and updates produced by `docker ps --format json > /etc/OliveTin/entities/containers.json`
`/etc/OliveTin/entities/containers.json`
```yaml
{"Command":"\"/bin/bash\"","CreatedAt":"2024-02-28 22:33:35 +0000 GMT","ID":"fcf468e18a0e","Image":"fedora","Labels":"maintainer=Clement Verna \u003ccverna@fedoraproject.org\u003e","LocalVolumes":"0","Mounts":"","Names":"minecraft","Networks":"bridge","Ports":"","RunningFor":"3 minutes ago","Size":"0B","State":"created","Status":"Created"}
{"Command":"\"/bin/bash\"","CreatedAt":"2024-02-23 23:18:57 +0000 GMT","ID":"442dd6fe316a","Image":"fedora","Labels":"maintainer=Clement Verna \u003ccverna@fedoraproject.org\u003e","LocalVolumes":"0","Mounts":"","Names":"brave_shirley","Networks":"bridge","Ports":"","RunningFor":"4 days ago","Size":"0B","State":"created","Status":"Created"}
```
You can generate this file yourself the first time, but the `config.yaml` below shows how OliveTin can run the `docker ps` command on startup, and on a schedule to update the file.
## [](#%5Fconfiguration)Configuration
Then use the following configuration file;
`config.yaml`
```yaml
# This config has two actions which are applied to all "container" entities
# found in the entity file.
#
# Docs: http://localhost/docs.olivetin.app/docs/entities.html
actions:
- title: Start {{ container.Names }}
icon: box
shell: docker start {{ container.Names }}
entity: container
triggers:
- Update container entity file
- title: Stop {{ container.Names }}
icon: box
shell: docker stop {{ container.Names }}
entity: container
triggers:
- Update container entity file
# This is a hidden action, that is run on startup, and every 5 minutes, and
# when the above start/stop commands are run (see the `triggers` property).
- title: Update container entity file
shell: 'docker ps -a --format json > /etc/OliveTin/entities/containers.json'
hidden: true
execOnStartup: true
execOnCron: '*/5 * * * *'
# Docs: http://docs.olivetin.app/entities.html
entities:
- file: /etc/OliveTin/entities/containers.json
name: container
# The only way to properly use entities, are to use them with a `fieldset` on
# a dashboard.
dashboards:
# This is the second dashboard.
- title: My Containers
contents:
- title: 'Container {{ container.Names }} ({{ container.Image }})'
entity: container
type: fieldset
contents:
- type: display
title: |
{{ container.RunningFor }}
'
authUrl: https://id.example.com/authorize
tokenUrl: https://id.example.com/api/oidc/token
whoamiUrl: https://id.example.com/api/oidc/userinfo
clientId: "[REDACTED]"
clientSecret: "[REDACTED]"
scopes:
- profile
- email
usernameField: preferred_username
userGroupField: preferred_username
insecureSkipVerify: true
actions:
- title: "Hello world!"
shell: echo 'Hello World!'
```
## [](#%5Fpocket%5Fid%5Fconfig)Pocket ID config

Trusted Header Authorization
====================
Trusted Header Authorization is useful if you have a proxy that handles authentication, and you just want OliveTin to trust HTTP Servers sent via that proxy.
This comes with the obvious security caveat that anyone who can set HTTP headers on requests to OliveTin can impersonate any user or usergroup. Therefore, you should only use this method if you are sure that requests to OliveTin are **only coming from trusted proxies**.
## [](#%5Fconfiguring%5Fyour%5Freverse%5Fproxy)Configuring your reverse proxy
You will need to configure your reverse proxy to set a header for the Username (eg `X-Username`) and optionally a header for Usergroup (eg `X-Usergroup`). How you do this will depend on your reverse proxy software. It is better that you check out the documentation for your reverse proxy software for how to set HTTP headers.
## [](#%5Fconfiguring%5Folivetin)Configuring OliveTin
To configure Trusted Header Authorization, set the following configuration options in your `config.yaml` file:
`config.yaml`
```yaml
authHttpHeaderUsername: "X-Username"
authHttpHeaderUsergroup: "X-Usergroup"
```
The value of `X-Username` and `X-Usergroup` can be whatever you like, as long as they match the headers set by your reverse proxy.
| | You **must** set AuthHttpHeaderUsername to some value, even if you only intend to use AuthHttpHeaderUsergroup, otherwise usergroups will be ignored. |
| ------------------------------------------------------------------------------------------------------------------------------------------------------- |
## [](#%5Fmultiple%5Fusergroups)Multiple usergroups
OliveTin will automatically detect multiple usergroups in the `authHttpHeaderUsergroup` header if they are separated by a space. You can also set a configuration option to use a different separator string with `authHttpHeaderUsergroupSep`. For example, if you set `authHttpHeaderUsergroupSep` to `,`, then the header `X-Usergroup: group1,group2` will be interpreted as two usergroups: `group1` and `group2`.
```yaml
authHttpHeaderUsergroupSep: ","
```
Solutions
====================
OliveTin was designed to be very simple, but sometimes OliveTin can get complex - especially if you are trying to do something where you need to jump between lots of different parts of the documentation!
This section of the docs is designed to bring everything into one place and present a scenario, with a single-page solution.
Advanced Troubleshooting
====================
Sometimes you need to really see what OliveTin is doing, especially when debugging entities. OliveTin has several built-in options for advanced troubleshooting, but enabling these output options can expose sensitive information, so they can be insecure.
| | OliveTin itself is not "insecure" by using these options, they would not let attackers execute different commands or anything like that. It’s just that using these options can expose data (like entity files) that maybe you don’t want an attacker to see. |
| ---------------------------------------------------------------------------------------------------------------------------------------------------------------------------------------------------------------------------------------------------------------- |
All these configuration options are `false` by default, and should be deleted from the config or reset back to `false` when you are not using them.
## [](#dump-server-diagnostics)Dump server diagnostics
`InsecureAllowDumpSos: true` \- will allow dumping [server diagnostics](server-diagnostics.html) as plain text when visiting ``
## [](#dump-action-map)Dump Action Map
`InsecureAllowDumpActionMap: true` \- will allow dumping all the actions (and those generated with entities) and their public IDs, eg: ``
## [](#dump-vars)Dump Vars
`InsecureAllowDumpVars: true` \- will allow dumping all the "string variables" from a map that is mainly used for entities, eg: ``
## [](#dump-jwt)Dump JWT Claims
`InsecureAllowDumpJwtClaims: true` \- will dump all the claims from a successfully parsed JWT token. This can be useful when trying to see how OliveTin is parsing the token, and what key fields are available.
Browser console logs (WebUI troubleshooting)
====================
The **developer console** (or **browser console**) is a panel built into your web browser. It records technical messages from the OliveTin WebUI—errors, warnings, and network failures—that do not always appear on the page itself.
When something looks wrong in the WebUI (for example a blank area, buttons that never load, or errors after clicking), sharing **console output** helps others see what the browser reported and narrow down the cause. You do **not** need to be a web developer to open it or share it.
**A screenshot of the console is often enough.** If you can copy text instead, that is helpful too. Either way, include what you were doing right before the problem (for example “opened the dashboard”, “clicked Start on action X”).
| | Before posting publicly, glance at the console for anything that looks like a password, token, or private URL. Crop or redact those lines if needed. |
| ------------------------------------------------------------------------------------------------------------------------------------------------------- |
## [](#open-the-console)Open the console
Use OliveTin in the browser where you see the problem, then open the console **before** or **right after** reproducing the issue so the messages are still visible.
### [](#desktop-chromium)Google Chrome, Microsoft Edge, Brave, and other Chromium-based browsers
1. Open the OliveTin page.
2. Open the developer tools:
* **Windows / Linux:** press F12, or Ctrl+Shift+J to go straight to the **Console**.
* **macOS:** press Cmd+Option+J for the **Console**, or Cmd+Option+I for developer tools (then click the **Console** tab).
3. If you do not see a **Console** tab, click **»** or **+** in the developer tools toolbar and choose **Console**.
### [](#desktop-firefox)Mozilla Firefox
1. Open the OliveTin page.
2. Open developer tools: F12, or Ctrl+Shift+I on Windows/Linux, or Cmd+Option+I on macOS.
3. Select the **Console** tab. (On Windows/Linux you can also use Ctrl+Shift+K to open the console directly.)
### [](#desktop-safari)Safari (macOS)
Safari hides the console until you turn on the Develop menu:
1. **Safari** → **Settings** (or **Preferences**) → **Advanced** → enable **Show features for web developers** (wording may vary slightly by Safari version).
2. In the menu bar, open **Develop** → **Show JavaScript Console**, or press Cmd+Option+C.
## [](#what-to-capture)What to capture
1. Stay on the **Console** tab.
2. If there are many old messages, use the console’s **Clear** control so only new messages appear, then reload the page or repeat the steps that trigger the problem.
3. Note any lines in **red** (errors) or **yellow** (warnings)—those are usually the most useful.
4. Use your system’s screenshot tool to capture the console window, **or** right-click in the console → **Save as…** / **Copy all messages** if your browser offers it.
## [](#share-the-logs)Share the logs
Attach the screenshot or pasted text to a [Discord or GitHub support](wheretofindhelp.html) message, along with your OliveTin version and how you access it (direct URL, reverse proxy, etc.). That combination helps diagnose WebUI issues much faster than a description of the screen alone.
If the problem might be on the server (OliveTin not starting, actions failing, API errors), also collect [service logs](service-logs.html) from Docker, Podman, or systemd.
Error Getting Buttons
====================
This is most often caused by not being able to get to /api/ properly - normally due to a bad proxy config, or your network was disconnected.
Error Fetching WebUI Settings
====================
This is a less common issue, but it means that the main web HTML has loaded, but it could not get \- most likely because of a 404 (Not Found) or JSON parse issue. You can see the exact reason if your browser as Web Developer Tools - look in the console. Firefox and Chrome both have great web developer tools, that can normally be opened with the F12 key, or from the developer tools menu.
The most common cause of this issue is a broken reverse proxy configuration. To debug this, browse to and adjust your reverse proxy configuration until the file loads properly. See [Reverse Proxies](../reverse-proxies/intro.html) for common configuration instructions.
An uncommon cause of this issue is if you are self-hosting the HTML outside of OliveTin. This is supported, but it means you will need to write the webUiSettings.json file manually. This is currently not documented as very very few people really need or want to do this. It’s very uncommon at the moment to self host the HTML outside of the OliveTin main server. Jump on the discord to discuss this if you want to do this, see [support](wheretofindhelp.html).
Error: JS Modules not supported
====================
This is most likely because you are using a very old browser, or have some Javascript disabled.
This page describes the compatible browsers for Javascript modules; .
There is no workaround for this apart from updating your browser / using a better browser, as OliveTin wants to be a progressive web app and doesn’t intend to support browsers without module support.
Error Connecting to WebSocket
====================
If OliveTin was working, but this error popped up, it’s most likely because your reverse proxy closed the connection due to a timeout.
If OliveTin is always displaying this error, it’s probably your reverse proxy not handling the websocket properly. Please check the Reverse Proxy documentation for more information.
## [](#%5Freverse%5Fproxies%5Fwill%5Fclose%5Fwebsockets)Reverse proxies will close websockets
Many reverse proxies use short default timeouts for connections. Long-lived websocket connections often hit these limits and get closed by the proxy, which triggers this error. OliveTin will attempt to reconnect automatically, but you can avoid the disconnects by increasing the websocket (or proxy) timeout in your reverse proxy configuration.
Check your proxy’s documentation for how to raise timeouts—for example, Apache HTTPD uses `ProxyTimeout`, and other proxies have similar settings. See the individual reverse proxy pages (e.g. [Apache](../reverse-proxies/apache.html)) for examples.
Error: WebUI Version Mismatch
====================
This is most often caused by the WebUI Version not matching the server version.
Every release of OliveTin will change the version number for the server, and for the webui client - these versions should match. For example, version 2024.4.1 of the server should be paired with version 2024.4.1 of the webui client. It is unlikely that the release of the server and webui client will be out of sync, but it is possible if you are using a custom build of the webui client, but the most likely cause is **aggressive caching** of the webui client files in your browser, or proxy server.
There are cache-busting mechanisms built into OliveTin to try and avoid this error, but they don’t always work in every environment.
* Try forcing a refresh with "Ctrl+F5" in your browser.
* If that doesn’t work, try clearing your browser cache.
* If that doesn’t work, try using a different browser.
Exit code 127
====================
Exit code 127 on Linux typically means "command not found". This can be the case when you need to install command in a container image for example.
Debug Log Options
====================
```yaml
logDebugOptions:
singleFrontendRequests: true
singleFrontendRequestHeaders: true
aclMatched: true
aclNotMatched: true
```
PUID and PGID support
====================
The OliveTin container image does not use the PUID and PGID convention to specify which user the container should run as - this is a convention that was popularized by linuxserver.io, because their container images use supervisord. Instead, simply use the `--user` argument when defining the container, to change the user OliveTin runs as.
* [LSIO documentation for PUID and PGID, that says that \--user is the same thing](https://docs.linuxserver.io/general/understanding-puid-and-pgid)
An example is shown below;
Using --user
```shell
user@host: docker create --name olivetin -p 1337:1337 -v /etc/OliveTin/:/config:ro docker.io/jamesread/olivetin --user container:container
user@host: docker start olivetin
```
Server diagnostics
====================
OliveTin has a useful feature to gather information about your installation when you have a support request. If you are able to provide **server diagnostics**, this generally helps others help you a lot. **Server diagnostics** does NOT send any information to the developers or anybody else—it’s simply text—**copy and paste it** to where someone is trying to help you!
Example server diagnostics output
```yaml
### SOSREPORT START (copy all text to SOSREPORT END)
# Build:
commit: nocommit
version: dev
date: nodate
# Runtime:
os: linux
osreleaseprettyname: PRETTY_NAME="Fedora Linux 37 (Workstation Edition)"
arch: amd64
incontainer: false
lastbrowseruseragent: ""
# Config:
countofactions: 7
loglevel: INFO
### SOSREPORT END (copy all text from SOSREPORT START)
```
The markers and field names above reflect what OliveTin prints; copy everything from the start marker through the end marker.
You can then copy and paste this text into a GitHub issue, discussion, Discord chat, or wherever else someone might be helping you.
## [](#%5Fhow%5Fdo%5Fi%5Fgenerate%5Fserver%5Fdiagnostics)How do I generate server diagnostics?
OliveTin needs to be able to start and its API needs to be functional. Once OliveTin is started, open this URL in a browser (replace the host and port with yours):
``
The `/api/sosreport` path is the HTTP endpoint OliveTin uses for server diagnostics.
## [](#%5Foptional%5Fallow%5Finsecure%5Fbut%5Feasy%5Fdumping%5Fto%5Fthe%5Fbrowser)Optional: Allow insecure (but easy) dumping to the browser
There is a configuration option you can set in your `config.yaml` that allows you to easily dump server diagnostics to your browser when visiting the API. This is turned off by default, as you should not allow anybody to request diagnostics at any time they like, but you can enable this option temporarily to easily get access to the text in your browser.
`config.yaml`
```yaml
InsecureAllowDumpSos: true
```
## [](#%5Fdefault%5Fdiagnostics%5Fdump%5Fto%5Flogs)Default: Diagnostics dump to logs
You should get a simple JSON message saying something like;
```asciidoc
alert: "Your SOS Report has been logged to OliveTin logs."
```
The exact wording may match your OliveTin version.
If you see this, great! The actual contents of the server diagnostics are not returned to your browser for security reasons (guests could get info about your installation, etc).
To find the diagnostics text depends on how you are running OliveTin. If you are running in a container, then try `docker logs olivetin` (where `olivetin` is your container name). If you are running using systemd, then try `journalctl -eu OliveTin`.
## [](#%5Fwhat%5Fif%5Fi%5Fcannot%5Feven%5Fget%5Fto%5Fthe%5Folivetin%5Fapi)What if I cannot even get to the OliveTin API?
OliveTin’s web interface doesn’t need to be working to get server diagnostics (the web interface and the API are separate). However, if OliveTin won’t even start, or you cannot reach the API, then server diagnostics cannot be generated. Please specify that when you ask for help.
Service logs (OliveTin process troubleshooting)
====================
**Service logs** are the lines OliveTin prints while it runs—startup messages, configuration load, errors, and action output. They are separate from [browser console logs](browser-console-logs.html), which come from the WebUI in your browser.
When something fails on the server (OliveTin will not start, actions error, API or auth problems), sharing **recent service log output** helps others see what the process reported. You do **not** need to be a Linux expert to copy logs from Docker, Podman, or `journalctl`.
| | Before posting publicly, scan the log text for passwords, API tokens, cookies, or internal hostnames. Remove or replace those strings if needed. If you enable [extra debug logging](log-debug-options.html), output can be more sensitive than usual. |
| --------------------------------------------------------------------------------------------------------------------------------------------------------------------------------------------------------------------------------------------------------- |
## [](#where-logs-go)Where logs come from
How you read logs depends on how OliveTin is installed:
* **Container (Docker / Podman):** logs are what the container runtime captured from OliveTin’s standard output.
* **systemd service:** logs are stored by the system journal for the `OliveTin` unit.
* **Manual / binary** (for example `./OliveTin` in a terminal): messages print to that terminal—copy them from there, or redirect output to a file when testing.
* **Windows (binary or service):** OliveTin writes process logs to a file under `%ProgramData%\OliveTin\logs\` by default. You can override this with [serviceLogs.directory](../install/windows%5Fservice.html#windows-service-logs) in `config.yaml`.
## [](#windows)Windows (binary or service)
By default, OliveTin on Windows writes process logs to:
```asciidoc
%ProgramData%\OliveTin\logs\OliveTin-service-.log
```
To use a custom directory (for portable installs), set in `config.yaml`:
```yaml
serviceLogs:
directory: C:\Path\To\Logs\
```
See [Windows service logs directory](../install/windows%5Fservice.html#windows-service-logs) for details. This setting is ignored on non-Windows platforms.
## [](#manual-binary)Manual or binary run
If you start OliveTin directly in a terminal window, **scroll back** and copy the text from startup through the error, or run it again and capture output:
```shell
./OliveTin 2>&1 | tee olivetin-run.log
```
That writes everything to `olivetin-run.log` while still showing it on screen. Stop OliveTin before sharing, then attach or paste the relevant part of the file.
## [](#docker-and-podman)Docker and Podman
Use the **same container name** you chose when you created the container (examples below use `olivetin`; yours may differ).
Show recent log lines (last \~200 lines)
```shell
docker logs --tail 200 olivetin
```
With Podman, use the same pattern:
```shell
podman logs --tail 200 olivetin
```
If OliveTin **crashes on startup** or you need the **full story from a restart**, show logs **after** reproducing the problem—either capture enough lines, or use a time window.
Limit output to the last few minutes (adjust the time as needed)
```shell
docker logs --since 10m olivetin
```
To **watch** logs live while you trigger an issue in another window:
```shell
docker logs -f olivetin
```
Press Ctrl+C to stop following; that does not stop OliveTin.
## [](#docker-compose)Docker Compose
From the directory that contains your `compose.yaml` (or `docker-compose.yml`):
```shell
docker compose logs --tail 200 olivetin
```
Use the **service name** from the compose file, not necessarily the container name. Add `-f` to follow logs live, same idea as above.
## [](#systemd)systemd (native Linux package)
Show whether the service is running and recent status:
```shell
systemctl status OliveTin
```
Read the journal for the OliveTin unit (scroll with arrow keys, quit with q):
```shell
journalctl -eu OliveTin
```
For a **time-bounded** slice (for example after a restart or failed action):
```shell
journalctl -eu OliveTin --since "30 minutes ago"
```
## [](#what-to-capture)What to capture
1. Reproduce the problem if you can (restart OliveTin, click the action, etc.), then collect logs **immediately after**.
2. Include lines from **startup** through the **error**—not only the last one line.
3. If the log is huge, prefer `--since` / `--tail` so the excerpt stays readable.
4. Note your **install type** (Docker, Podman, Compose, systemd) and OliveTin **version** if you know it (from the WebUI footer, [server diagnostics](server-diagnostics.html), or startup text).
For deeper server-side detail, you can temporarily enable [LogDebugOptions](log-debug-options.html)—then capture logs again with those settings in mind.
## [](#share-the-logs)Share the logs
Paste the text into a [Discord or GitHub support](wheretofindhelp.html) message (or attach a `.txt` file if it is long). Together with **how you run OliveTin** (direct port, reverse proxy, container flags) and **what you did** before the error, service logs make backend issues much easier to diagnose than a screenshot of the WebUI alone.
For WebUI-only behaviour (blank page, buttons not loading), also capture [browser console logs](browser-console-logs.html) when relevant.
Where to find help
====================
When something is wrong with the **WebUI** in the browser, capturing [browser console logs](browser-console-logs.html) (even as a screenshot) helps diagnose the issue.
When something is wrong with the **OliveTin process** (startup failures, actions, API, or auth), capturing [service logs](service-logs.html) from Docker, Podman, or `journalctl` helps diagnose the issue.
To get relatively quick access to help, **Discord** is where the chat community for OliveTin is. Note that this project is a free community open source project, and it relies on volenteers to spare their free time to help you. Please be patient and polite.
 [Chat on Discord](https://discord.gg/jhYWWpNJ3v)
If nobody is online, or you’re not getting the right level of support, you can raise a ticket with the project’s developers on GitHub. Again, please be patient and polite.
 [Open a support request on GitHub](https://github.com/OliveTin/OliveTin/issues/new?assignees=&labels=support&template=support%5Frequest.md&title=)
Understanding OliveTin 2k vs 3k
====================
| | OliveTin 3k is basically "rebuilding OliveTin for the future" - and aims to have high compatibility with OliveTin 2k while people migrate. However, as we all know, stuff will break when 3k is new - so please be patient, and report issues as you find them! OliveTin 2k isn’t going anywhere anytime soon! |
| ----------------------------------------------------------------------------------------------------------------------------------------------------------------------------------------------------------------------------------------------------------------------------------------------------------------- |
## [](#%5Fquick%5Fsummary%5Fof%5Fkey%5Fpoints)Quick summary of key points
| Release Series | Versioning Scheme | Supported Until |
| --------------------------------------------- | ---------------------------- | ----------------------------------------------------------------- |
| **OliveTin 2k** eg: 2022.11.11 eg: 2023.04.15 | Calendar Versioning (calver) | At least 31st December 2028 (bug fixes and security updates only) |
| **OliveTin 3k** eg: 3000.0.0 eg: 3000.1.0 | Semantic Versioning (semver) | Ongoing - new features and updates |
Users who are upgrading are encouraged to try OliveTin 3k, but understand that it represents several major technology changes, so subtle things might change or break in the first few releases. The objective is to maintain as much compatibility as is pragmatically possible, and highlight any breaking changes clearly.
The main reason for OliveTin 3k is to allow for major technology changes inside the project that enable new features at a later date.
## [](#%5Funderstanding%5Fwhy%5Fa%5Fchange%5Fwas%5Fnecessary%5Ffrom%5Fcalver%5Fto%5Fsemver)Understanding why a change was necessary - from calver to semver
The original version of OliveTin was released in May 2021, and it used a versioning system called [calver](https://calver.org) (Calendar Versioning). For those of you unfamiliar with the calver standard, it means that instead of using 1.0.0 as the first version, the first version was actually called **2021-05-19**. One of the benefits of this approach is that you can determine how old the version is just by looking at the version number alone. Unfortunately this is the only real benefit.
However, this worked just fine for a while, but as OliveTin grew, it became clearer that most packaging systems and users were more accustomed to the more traditional [semver](https://semver.org) (Semantic Versioning) system. As a stopgap measure, OliveTin switched the format of it’s versioning to use dots (".") instead of dashes ("-") in an attempt to make it look more like a traditional semver version. This resulted in a change with version **2022.11.11** (November 11th, 2022 - what a cool date!).
As OliveTin continued to mature, and more features were added, it became clear that there were some major architecture and library choices that were no longer ideal. Switching these out (like the configuration library, Viper), is a really major change, and isn’t something that is good to do without a lot of users being very aware of it. In May 2025, a proposal was launched to switch OliveTin to a more traditional semver versioning system. You can view the detail of that proposal here:
In short, the benefits of switching to semver are;
* Easier to understand versioning for most users
* Allows for major technology changes without confusing users (like the Viper change)
* Better compatibility with packaging systems
* Better reflects the maturity of versions, and allows people to opt out of minor patches for example
This proposal seemed to be positively received by the community, and so the James (founder) decided to move forward with the change.
## [](#%5Fwhat%5Fwere%5Fthe%5Fmajor%5Freasons%5Ffor%5Fthe%5Ftechnology%5Fchanges%5Fin%5Folivetin%5F3k)What were the major reasons for the technology changes in OliveTin 3k?
OliveTin 2k has the following technology choices which limited it’s potential for stability, maintainability and growth;
* The communication between the client and the server uses gRPC, which is then fronted by a REST API and messages are very hackily wrapped in JSON. This has worked remarkably well, but the web has moved on to offer websockets and streaming in a far better way, and connectrpc solves many of these challenges neatly and elegantly.
* The configuration library, Viper, is a defacto standard in Go several years ago - big projects like kubectl and others use it. However the library is extremely heavyweight (lots of dependencies), it has lots of open issues, and doesn’t support some commonly requested features like configuration file splitting and inclusion - which would really help user’s manage large configurations.
* The entity management inside OliveTin was written in a weekend, and is just a large map of strings inside OliveTin2k, again this has worked surprisingly well, but there are lots of interesting use cases with entities that would be much easier to implement with a proper typed backend - and far better mapping between actions and entities (which is extremely horrible in OliveTin 2k).
* The javascript in OliveTin 2k is raw web components, based on the "new" (at the time) specs from 2011\. It’s fast and standards compliant, but it’s also resulted in a LOT of spaghetti code that is very hard to test and maintain.
## [](#%5Fwhy%5Fversion%5F3000%5F0%5F0%5Fand%5Fnot%5F3%5F0%5F0)Why version 3000.0.0 (and not 3.0.0)?
If you look through the original proposal, it was to create a new package called "OliveTin-semver", and start the versioning at 1.0.0\. However, after some more thought, it was decided that this would actually create a lot of confusion, as users would have to figure out if they were using "OliveTin" or "OliveTin-semver" - and it duplicates the package in in places like Linux distributions, which is not a good idea.
However, starting with version "2.0.0" after versions like "2022.11.11" would break the logic of lots of update tools and scripts that people use. This is because major version "2" is below "2022", and so the version ordering, and logic would always think that version 2022.x.x is newer than 2.x.x. This would be very confusing for users, and would likely lead to people not updating, or even downgrading by mistake.
To avoid this confusion, it was decided to jump straight to version "3000.0.0" - which is clearly above "2022.11.11" and any other 2k version. This way, users can easily see that 3000.x.x is newer than any 2k version, and it avoids any confusion with version ordering.
* OliveTin versions like 2022.11.11 and 2023.04.15 are part of "**OliveTin 2k**" (2000 series) and use a **calendar versioning** (calver) scheme. These versions are stable and will continue to receive updates and support but will not receive new features.
* There is no plan to stop supporting OliveTin 2k versions until **at least 31st December 2028** (and I’ll probably keep extending that date, but it’s good to have a cutoff somewhere).
* OliveTin versions starting from 3000.0.0 and onwards are part of "**OliveTin 3k**" (3000 series) and also use a **semantic versioning scheme**. These versions will receive new features, improvements, and updates.
## [](#%5Fshould%5Fi%5Fautomatically%5Fupdate%5Fto%5Folivetin%5F3k)Should I automatically update to OliveTin 3k?
Users are encouraged to try OliveTin 3k, but understand that it represents several major technology changes, so subtle things might change or break in the first few releases. Please remember that OliveTin 2k will continue to be supported and receive updates until at least 31st December 2028, so there is no rush to upgrade.
The developers of this project have quite a lot of test infrastructure around OliveTin 3k (more than was possible with 2k), and would like to **strongly urge problems with updates to be reported, so that they can be fixed when possible**.
### [](#%5Fhow%5Fdo%5Fi%5Fstop%5Fmy%5Folivetin%5F2k%5Fcontainers%5Ffrom%5Fupgrading%5Fto%5Folivetin%5F3k%5Fautomatically)How do I stop my OliveTin 2k containers from upgrading to OliveTin 3k automatically?
Change your `latest` tag to `latest-2k` in your container definitions.
3 tags now exist for container images and container registries;
* `olivetin/olivetin:latest-2k` \- This tag will always point to the latest OliveTin 2k version (eg 2025.11.11)
* `olivetin/olivetin:latest-3k` \- This tag will always point to the latest OliveTin 3k version (eg 3000.2.0)
* `olivetin/olivetin:latest` \- This tag will always point to the latest OliveTin version (currently 3k)
[More information about installing OliveTin in containers](../install/container.html)
### [](#%5Fwhat%5Fdoes%5Fgithub%5Flatest%5Fpoint%5Fto)What does GitHub "latest" point to?
GitHub’s "latest" release tag isn’t super helpful. It currently points to the "release that was pushed last". So sometimes this will be 2k, and sometimes this will be 3k. We’re trying to find a way to fix this.
## [](#%5Fwhat%5Fare%5Fthe%5Fchanges%5Fi%5Fneed%5Fto%5Fmake%5Fto%5Fupgrade%5Ffrom%5Folivetin%5F2k%5Fto%5F3k)What are the changes I need to make to upgrade from OliveTin 2k to 3k?
### [](#%5Folivetin%5Fconfiguration%5Ffiles)OliveTin Configuration files
To date, no changes are required to the configuration file (and configs are being automatically migrated internally to OliveTin 3k - without rewriting the original config file).
However, it is possible that some configuration changes will be necessary as we learn more about people’s setups with OliveTin 2k.
### [](#%5Freverse%5Fproxy%5Fconfigurations)Reverse Proxy configurations
If you are using a reverse proxy (like Nginx, Apache, Caddy, Traefik etc), then you will need to make some changes to your configuration. This is because OliveTin 3k uses websockets for communication between the client and the server, instead of gRPC over HTTP/2\. Many proxies use short default timeouts and will close websocket connections; increase the websocket or proxy timeout in your proxy config to avoid disconnects (OliveTin will reconnect automatically). See [Reverse proxies will close websockets](../troubleshooting/err-websocket-connection.html#reverse-proxies-will-close-websockets) for more.
Please refer to the \[Reverse Proxies\](reverse-proxies/intro.adoc) section of the documentation for updated configuration examples for various reverse proxies.
* [Nginx: Updating your configuration from OliveTin 2k to OliveTin 3k](../reverse-proxies/nginx.html#upgrade3k)
Warning - GitHub Latest
====================
GitHub has a handy feature where releases can be marked as "latest". However, it does not understand that some projects, like OliveTin, have **two** active release streams, [2k and 3k](2k3k.html). Both of those individual streams can have a "latest" - the latest 2k version and the latest 3k version. Unfortunately, GitHub does not provide a way to mark a release at "latest-2k" or "latest-3k" - it only has "latest".
It often happens that a 2k release will come out AFTER a 3k release, and if we left GitHub to do what it does by default, the "latest" URL would be the 2k version - and then when a 3k release goes out, the "latest" URL would be point to a 3k version. This is probably not what you want - "latest" flipping between the "last release that went out". You want it to point to the latest 3k version.
Therefore, the OliveTin project has disabled "latest" releases for all the 2k versions, so that the GitHub "latest" URL will always be the latest 3k version.
This means that **GitHub "latest" URLs will now always point to a 3k version** (eg: `` \= 3k version).
| | If you have been using a script to download the latest version of OliveTin, **you will need to accept 3k, OR update your script to use the new workaround described below.** |
| ------------------------------------------------------------------------------------------------------------------------------------------------------------------------------- |
## [](#%5Fcontainer%5Ftags%5Fare%5Funaffected)Container Tags are unaffected
Container registries allow any number of arbitary tags, so containers DO have a "latest-2k" and "latest-3k" tags. The breaking change described above is only for GitHub release URLs. So, you can still pull the latest 2k or 3k version of the container if you want to. Learn more about available tags in the [Container Installation Guide](../install/container.html).
## [](#%5Fwhat%5Fif%5Fi%5Fwant%5Fto%5Fuse%5Fthe%5Flatest%5F2k%5Fdownload%5Furl%5Fin%5Fmy%5Fscripts)What if I want to use the "latest 2k" download URL in my scripts?
It is understood that some users will want to hard-code a "wget URL" for the latest 2k version into their scripts. Unfortunately the GitHub "latest" URL is now no longer a reliable way to do this. However, the OliveTin project has provided you with a workaround.
In the repository OliveTin/update-check.olivetin.app, there is a Python script that will return the latest 2k version number. You can use this to construct a URL for the latest 2k version. The file `versions.json` also contains the latest 3k versions, and provides download URLs and checksums for each package.
* [versions.json in the update-check.olivetin.app repository](https://raw.githubusercontent.com/OliveTin/update-check.olivetin.app/refs/heads/main/versions.json)
This repository is updated automatically whenever a new 2k or 3k version is released, so you can be sure that the URL you use will always point to the latest version. Please check this repository README for details on how to use this file in your scripts to get the relevant download URLs;
* [update-check.olivetin.app README](https://github.com/OliveTin/update-check.olivetin.app/tree/main)
Upgrade Notes
====================
OliveTin releases are published to GitHub, and the release notes are contained there. This page includes a summary of "Upgrade Notes" for breaking changes between releases.
## [](#%5F2024%5F08%5F14)2024.08.14
### [](#%5Fnavigation%5Fchange%5Fsubpaths%5Fno%5Flonger%5Fsupported)Navigation change - Subpaths no longer supported
In the past, OliveTin supported subpaths in the URL, for example, `` would load the OliveTin web interface. This was convenient for people who wanted to run OliveTin on a subpath of their domain for some reason, but it actually creates a lot of complexity in the code, and makes it harder to maintain. One particular change that was wanted was to be able to link to specific pages in OliveTin, for example, `` or `` \- this became incredibly difficult to implement with the subpath support.
Therefore, OliveTin no longer supports subpaths in the URL. If you have been using OliveTin with a subpath, you will need to change your configuration to use a subdomain or a different port.
## [](#%5F2024%5F04%5F09)2024.04.09
### [](#%5Fthemes%5Fdirectory%5Ffor%5Ftheme%5Fusers)Themes Directory (for theme users)
#### [](#%5Fbackground)Background
Until now, OliveTin has served the themes directory from the "webui" directory, normally `/var/www/olivetin/themes` on most installations. If you wanted to install a theme, you would put the theme in to that directory.
This was a bit cumbersome, because OliveTin treats the content of the "webui" directory as disposable / part of the system, whereas themes are much more like "user data" and "configuration". It also meant that people using Linux Containers had to bind-mount a separate directory for themes.
#### [](#%5Fupgrade)Upgrade
Now themes are stored in the "configdir" (wherever OliveTin finds it’s config file, eg `/config` in containers), under the subdirectory `custom-webui/themes`. OliveTin will try to create the `custom-webui` folder in your configdir if it doesn’t find it.
The advantage of this change is that themes are stored with your config, as part of your data.
To upgrade, simply move any themes you might have into your configdir, under `custom-webui/themes/`. eg:
```yaml
.
├── config.yaml
├── custom-webui
│ └── themes
│ └── custom-icons
│ ├── icon.png
│ └── theme.css
├── entities
│ ├── containers.json
│ ├── heating.yaml
│ ├── servers2.yml
│ ├── servers.yaml
│ └── systemd_units.json
└── installation-id.txt
```
### [](#%5Ftheme%5Fasset%5Fpaths%5Ffor%5Ftheme%5Fdevelopers)Theme Asset Paths (for theme developers)
#### [](#%5Fbackground%5F2)Background
OliveTin had to send the theme name to the browser, so that some javascript could then request ``, and load it as a stylesheet. This had the following problems;
1. This was slow (could take up to a second)
2. This creates a "flash" in the browser, as the new theme.css is loaded over the top of the existing stylesheet.
3. Browsers could not cache this theme.css with the page load.
#### [](#%5Fupgrade%5F2)Upgrade
The new behavior is that OliveTin will always try to load `` as part of the static HTML that is sent to the browser. This means that regular caching can cache the theme.css, and this effectively elliminates the slowness and "flashing" when the browser renders the page.
Internally, OliveTin maps `` to the `theme.css` of whatever the theme is set to with `themeName`, for example, it could map to `themes/myTheme/theme.css`.
As a theme developer, normally you would reference a background image, or similar using `./background.png`, but OliveTin is loading the theme.css as the directory root, and the themes' assets from the custom-webui theme directory. Therefore you need to update paths to be like; `background-image: "/custom-webui/themes/myTheme/background.png`.
Cloudflare Access & Tunnels
====================
| | This page is marked as "earlydoc", which means that it more of a collection of notes and an early draft before this page turns into good documentation later on. It is hoped that this early form of documentation is useful to you, but please understand that most documentation pages are higher quality than this. If you have suggestions or comments, please do get in contact or consider contributing your suggestions to the OliveTin documentation. |
| ---------------------------------------------------------------------------------------------------------------------------------------------------------------------------------------------------------------------------------------------------------------------------------------------------------------------------------------------------------------------------------------------------------------------------------------------------------------- |
Several uses use Cloudflare Access & Tunnels to grant access to OliveTin. There is no special configuration needed for OliveTin to work in this way, simply setup your Cloudflare tunnel to connect to OliveTin on port 1337.
## [](#%5Ftrusting%5Fthe%5Fcloudflare%5Fjwt%5Ftoken)Trusting the Cloudflare JWT Token
1. Get your **AUD** Tag (`authJwtAud`)
1. Login to your CloudFlare dashboard and go to [**Zero Trust**](https://one.dash.cloudflare.com/)
2. Go to **Access > Applications.**
3. Select **Configure** for your application.
4. On the Overview tab, copy the **Application Audience (AUD) Tag**.
2. Get your **Team Domain** (`authJwtDomain`)
1. Login to your CloudFlare dashboard and go to [**Zero Trust**](https://one.dash.cloudflare.com/)
2. Go to **Settings**
3. Go to **Custom Pages**
4. Your **Team Domain** is shown here
3. Get your Certs URL (`authJwtCertsURL`)
1. Simply add `cdn-cgi/access/certs` to your **Team Domain** for CloudFlare
4. CloudFlare gives you an `email` in the claim (`authJwtClaimUsername`) and the Cookie is always called `CF_Authorization` (`authJwtCookieName`)
5. Setup your OliveTin config.yaml like follows;
`config.yaml`
```yaml
authJwtAud: "asdf1234"
authJwtDomain: "https://mydomain.cloudflareaccess.com"
authJwtCertsURL: "https://mydomain.cloudflareaccess.com/cdn-cgi/access/certs"
authJwtClaimUsername: email
authJwtCookieName: "CF_Authorization"
```
You may well want to set `logLevel: DEBUG` and `insecureAllowDumpJwtClaims: true` in your config when testing JWT for the first time.
## [](#%5Ftrusting%5Fthe%5Fauthentication%5Fheader%5Fnot%5Frecommended)Trusting the authentication header (not recommended)
If you are using Cloudflare Access, and want to use the username given by Cloudflare in OliveTin ACLs, then you can use the Cloudflare cookie like this;
`config.yaml`
```yaml
authHttpHeaderUsername: "Cf-Access-Authenticated-User-Email"
defaultPermissions:
view: false
exec: false
accessControlLists:
- name: Admins
addToEveryAction: true
matchUsernames:
- contact@jread.com
permissions:
view: true
exec: true
actions:
- title: test apprise
shell: date
shellAfterCompleted: "apprise -c /config/apprise.yml -t 'notification: test' -b 'date is {{ stdout }}'"
```
| | OliveTin does support JWT cookies that Cloudflare uses, which is arguably more secure. It’s just that nobody in the Discord has worked out how to get the keys needed from Cloudflare to decrypt this cookie yet! See the [JWT](../../security/jwt.html) documentation for some starter points. If you figure this out, it would be most welcome to share your solution with the community. |
| ---------------------------------------------------------------------------------------------------------------------------------------------------------------------------------------------------------------------------------------------------------------------------------------------------------------------------------------------------------------------------------------------- |
Container Control Panel
====================
OliveTin is frequently used to create simple container control panels, this is one of the default examples that ships with the standard OliveTin config.yaml.

## [](#%5Fsetup%5Fif%5Frunning%5Finside%5Fa%5Fcontainer)Setup if running inside a container
You can control other containers, when running OliveTin inside a container itself, however you need to do some extra setup when creating the OliveTin container.
### [](#%5Fensure%5Fyour%5Fcontainer%5Fhas%5Fpermissions%5Fto%5Fcontrol%5Fdocker)Ensure your container has permissions to control docker
You have two alternatives to allow OliveTin (running inside a container) to talk to the Docker daemon through the bind-mounted socket. Pick one:
#### [](#%5Foption%5F1%5Fuse%5Fprivileged%5Fsimplest)Option 1 — Use `--privileged` (simplest)
| | Simplest for most users. Podman does not have this requirement. |
| ------------------------------------------------------------------ |
* Run the container with `--privileged` and as `root` (eg `--user root`).
* This avoids user/group permission issues on `/var/run/docker.sock`.
If you are getting "permission denied" errors it is probably because OliveTin runs as user UID 1000 by default, which is not allowed by your docker host. Running with `--user root` under `--privileged` resolves this quickly. Note that [PUID and PGID variables will not work](../../troubleshooting/puid-pgid.html).
#### [](#%5Foption%5F2%5Frun%5Fas%5Fnon%5Froot%5Fin%5Fthe%5Fhost%5Fdocker%5Fgroup%5Fno%5Fprivileged)Option 2 — Run as non-root in the host `docker` group (no `--privileged`)
Use the standard Docker guidance to manage Docker as a non-root user (becoming a member of the `docker` group) and match the group’s GID inside the container so the process can access the socket permissions.
* Docs: [Manage Docker as a non-root user](https://docs.docker.com/engine/install/linux-postinstall/#manage-docker-as-a-non-root-user)
* Find the `docker` group GID on the host, for example using `getent group docker`.
* Run the container with your user UID and the `docker` group GID, and bind-mount the socket. Using Compose:
docker-compose.yml
```yaml
services:
olivetin:
container_name: olivetin
image: jamesread/olivetin
user: ${UID}:${docker_group_id}
volumes:
- /var/run/docker.sock:/var/run/docker.sock
```
Where `UID` and `docker_group_id` are provided via your shell environment or a `.env` file next to your Compose file, for example:
env
```bash
UID=1000
docker_group_id=995
```
This allows you to run the container as a non-root user, while still allowing access to `/var/run/docker.sock`.
### [](#%5Fpass%5Fthe%5Fdocker%5Fsocket%5Finto%5Fthe%5Fcontainer)Pass the docker socket into the container
1. Pass `/var/run/docker.sock` as a bind mount to the container when creating it, eg:
```asciidoc
docker create --privileged --user root -v /var/run/docker.sock:/var/run/docker.sock ...additional args here...
```
Or, using the `docker run` syntax;
```asciidoc
docker run --privileged --user root -v /var/run/docker.sock:/var/run/docker.sock --name OliveTin jamesread/olivetin
```
2. The official x86\_64 docker container comes with the `docker` client pre-installed. If you are using `arm` or and `arm64` container, you will need to add Docker yourself.
[How to install additional packages in the container](../../reference/containerInstallPackages.html)
| | The reason that the arm and arm64 containers do not include docker, is that when these images are cross-compiled at build time, it takes FOREVER because we have to emulate arm. |
| ----------------------------------------------------------------------------------------------------------------------------------------------------------------------------------- |
After you have passed the socket into the container (and optionally installed docker), you should be able to setup docker actions like it’s shown in the example [above](#example-control-containers).
## [](#%5Fentity%5Ffile)Entity file
To build this Container Control dashboard, we use an [entity file](../../entities/intro.html) that stores and updates produced by `docker ps --format json > /etc/OliveTin/entities/containers.json`
`/etc/OliveTin/entities/containers.json`
```yaml
{"Command":"\"/bin/bash\"","CreatedAt":"2024-02-28 22:33:35 +0000 GMT","ID":"fcf468e18a0e","Image":"fedora","Labels":"maintainer=Clement Verna \u003ccverna@fedoraproject.org\u003e","LocalVolumes":"0","Mounts":"","Names":"minecraft","Networks":"bridge","Ports":"","RunningFor":"3 minutes ago","Size":"0B","State":"created","Status":"Created"}
{"Command":"\"/bin/bash\"","CreatedAt":"2024-02-23 23:18:57 +0000 GMT","ID":"442dd6fe316a","Image":"fedora","Labels":"maintainer=Clement Verna \u003ccverna@fedoraproject.org\u003e","LocalVolumes":"0","Mounts":"","Names":"brave_shirley","Networks":"bridge","Ports":"","RunningFor":"4 days ago","Size":"0B","State":"created","Status":"Created"}
```
You can generate this file yourself the first time, but the `config.yaml` below shows how OliveTin can run the `docker ps` command on startup, and on a schedule to update the file.
## [](#%5Fconfiguration)Configuration
Then use the following configuration file;
`config.yaml`
```yaml
# This config has two actions which are applied to all "container" entities
# found in the entity file.
#
# Docs: http://localhost/docs.olivetin.app/docs/entities.html
actions:
- title: Start {{ container.Names }}
icon: box
shell: docker start {{ container.Names }}
entity: container
triggers:
- Update container entity file
- title: Stop {{ container.Names }}
icon: box
shell: docker stop {{ container.Names }}
entity: container
triggers:
- Update container entity file
# This is a hidden action, that is run on startup, and every 5 minutes, and
# when the above start/stop commands are run (see the `triggers` property).
- title: Update container entity file
shell: 'docker ps -a --format json > /etc/OliveTin/entities/containers.json'
hidden: true
execOnStartup: true
execOnCron: '*/5 * * * *'
# Docs: http://docs.olivetin.app/entities.html
entities:
- file: /etc/OliveTin/entities/containers.json
name: container
# The only way to properly use entities, are to use them with a `fieldset` on
# a dashboard.
dashboards:
# This is the second dashboard.
- title: My Containers
contents:
- title: 'Container {{ container.Names }} ({{ container.Image }})'
entity: container
type: fieldset
contents:
- type: display
title: |
{{ container.RunningFor }}
{{ container.State }}
- title: 'Start {{ container.Names }}'
- title: 'Stop {{ container.Names }}'
```
Directory Actions
====================
Sometimes people want to use OliveTin to run standard commands on a directory, such a cleaning out a directory of logs.

## [](#%5Fconfig%5Ffile)Config file
This is a quick and simple way to build actions based on directories.
`/etc/OliveTin/config.yaml`
```yaml
actions:
- title: check log directory
hidden: true
shell: |
function addDirectory {
COUNT=$(ls -l $1 | wc -l)
echo "- directory: $1" >> /etc/OliveTin/entities/directories.yaml
echo " count: $COUNT" >> /etc/OliveTin/entities/directories.yaml
}
truncate -s 0 /etc/OliveTin/entities/directories.yaml
addDirectory /var/log/
addDirectory /home/xconspirisist/logs
execOnStartup: true
execOnCron: "* * * * *"
- title: clean {{ log_directory.directory }} ({{log_directory.count }} files)
shell: |
echo "Removing all files in {{ log_directory.directory }}"
entity: log_directory
entities:
- name: log_directory
file: /etc/OliveTin/entities/directories.yaml
dashboards:
- title: Log Actions
contents:
- entity: log_directory
type: fieldset
contents:
- title: clean {{ log_directory.directory }} ({{log_directory.count }} files)
```
Heating Control Panel
====================
This was inspired by a GitHub issue to control heating;
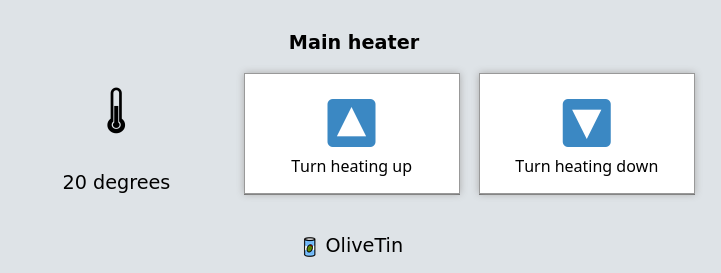
## [](#%5Fentity%5Ffile)Entity file
To build this, we use an [entity file](../../entities/intro.html) that stores and updates the status of a heater outside of OliveTin.
`/etc/OliveTin/entities/heating.yaml`
```yaml
- title: Main heater
temperature: 20 degrees
```
## [](#%5Fconfiguration)Configuration
Then use the following configuration file;
`config.yaml`
```yaml
logLevel: "INFO"
actions:
- title: Turn heating up
icon: '🔼'
shell: /opt/heating.sh up
- title: Turn heating down
icon: '🔽'
shell: /opt/heating.sh down
entities:
- file: /etc/OliveTin/entities/heating.yaml
name: heating
dashboards:
- title: Heating Control Panel
contents:
- title: "{{ heater.title }}"
entity: heating
type: fieldset
contents:
- type: display
title: |
🌡
{{ heating.temperature }}
- title: Turn heating up
- title: Turn heating down
```
Solution: Kubernetes Control Panel (Hosted)
====================
This solution gives you quick and easy buttons to run kubectl commands, when OliveTin is running on top of Kubernetes (this means OliveTin is "hosted" by Kubernetes). This can be very easy for quick debugging purposes when you cannot type (eg from a mobile phone), or to give junior sysadmins access to do basic predefined tasks.
This use case is enabled by simply providing the OliveTin pod access to talk to the kubernetes API, and using `kubectl` which is preinstalled with modern versions of OliveTin.
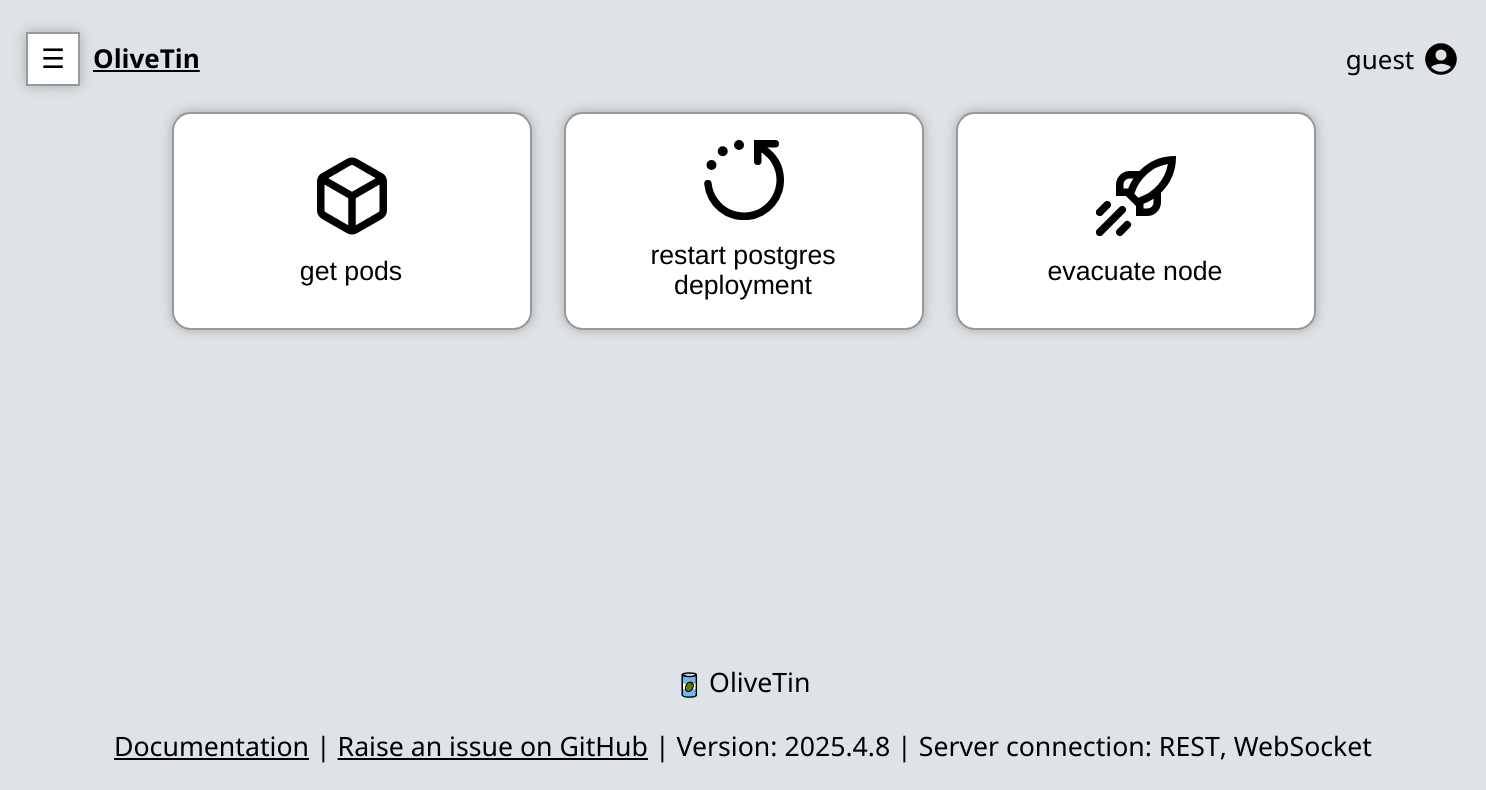
## [](#%5Frequirements%5Fassumptions)Requirements & Assumptions
### [](#%5Ftime%5Fskills)Time & skills
* This should take approximately **10 minutes** to configure if you are comfortable in using Kubernetes - using helm, kubectl, and editing basic YAML.
### [](#%5Fenvironment)Environment
* A Kubernetes cluster that is up and running.
* Kubernetes permissions to create a helm deployment, a `ClusterRole` and `ClusterRoleBinding`.
* A configured Ingress Controller, exposing the for web interface
### [](#%5Fsystem)System
* Approximately 128m RAM, 1vCPU to run the OliveTin pod.
## [](#%5Finstall%5Folivetin%5Fon%5Ftop%5Fof%5Fkubernetes)Install OliveTin on top of Kubernetes
* [Install OliveTin on Kubernetes with Helm](../../install/helm.html) (recommended)
* [Install OliveTin on Kubernetes with Manifests](../../install/k8s.html)
## [](#%5Fgrant%5Fpermissions%5Fto%5Fapi)Grant permissions to API
OliveTin needs a `ClusterRole` that allow it to access resources on your Kubernetes cluster. This is because by default, pods can communicate to the API using the credentials mounted in the pod by the default `ServiceAccount`, but they don’t have any permissions. This `ClusterRole` is being created to give permissions to the `ServiceAccount`. Create the `ClusterRole` like follows;
* kubectl cli
* manifest
```shell
user@host: kubectl create clusterrole --resource=pods --verb=get,list,watch olivetin-k8s-permissions
```
```yaml
kind: ClusterRole
apiVersion: rbac.authorization.k8s.io/v1
metadata:
name: olivetin-k8s-permissions
rules:
- apiGroups: [""]
resources: ["pods"]
verbs: ["get", "list", "watch"]
```
Now that the `ClusterRole` has been created, we need to associate it to a `ServiceAccount` with a `ClusterRoleBinding`. Create a cluster role binding;
* kubectl cli
```shell
user@host: kubectl create clusterrolebinding --clusterrole=olivetin-k8s-permissions --serviceaccount myolivetinnamespace:default --namespace myolivetinnamespace olivetin-crb
```
## [](#%5Fbuild%5Fa%5Fsimple%5Fkubernetes%5Fcontrol%5Fplanel)Build a simple kubernetes control planel
Add `kubectl` job to OliveTin config with `kubectl edit cm/olivetin-config -n olivetin`;
```yaml
apiVersion: v1
data:
config.yaml: |
defaultPopupOnStart: execution-dialog-output-only
actions:
- title: get pods
icon:
shell: kubectl get pods
- title: restart postgres deployment
icon:
shell: kubectl rollout restart deployment postgres
- title: evacuate node
icon:
shell: kubectl drain {{ NodeName }} --ignore-daemonsets --delete-emptydir-data
arguments:
- name: NodeName
choices:
- value: node1
- value: node2
- value: node3
kind: ConfigMap
metadata:
annotations:
meta.helm.sh/release-name: olivetin
meta.helm.sh/release-namespace: default
labels:
app.kubernetes.io/managed-by: Helm
name: olivetin-config
namespace: default
```
Don’t forget to restart the OliveTin deployment as good measure, because Kubernetes can be slow to update configmaps.
GitOps (run actions on Git Push)
====================
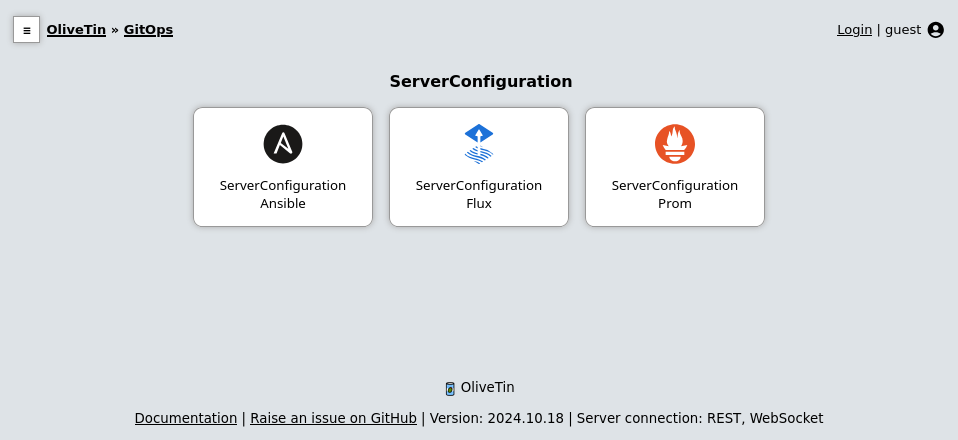
A really helpful thing to do with OliveTin is to have it run actions when you push to a Git repository. This is a great way to automate things like running tests, building your project, or deploying your code - this turns OliveTin into a powerful GitOps tool, or even a Continuous Integration tool.
This guide assumes that you are using a self-hosted Git repository, and uses a standard Git `post-receive` hook to trigger OliveTin actions.
| | **Using GitHub?** OliveTin has built-in support for GitHub webhooks with templates that make configuration simple. See [GitHub Webhooks](../../action%5Fexecution/onwebhook%5Fgithub.html) for an easier approach that doesn’t require writing hook scripts. |
| --------------------------------------------------------------------------------------------------------------------------------------------------------------------------------------------------------------------------------------------------------------- |
To set up OliveTin to run actions on Git push, you will need to:
1. Create a new OliveTin action that you want to run on push.
2. Set up a Git `post-receive` hook to trigger the OliveTin action.
## [](#%5Fcreate%5Fa%5Fnew%5Folivetin%5Faction)Create a New OliveTin Action
First, you will need to create a new OliveTin action that you want to run when you push to your Git repository. This could be anything you like - for example, running tests, building your project, or deploying your code. The example below is a simple action that echoes a message to the console:
OliveTin `config.yaml`
```yaml
actions:
- title: Run on Git Push
id: gitops
icon:
shell: |
echo "You just pushed commit $COMMIT to git, running action..."
date
arguments:
- name: commit
type: ascii
```
Note that OliveTin will expose all arguments as environment variables in uppercase as shown in the example above. You can of course use the `{{ commit }}` syntax instead and it will do the same thing.
## [](#%5Fadd%5Fa%5Fgit%5Fhook%5Fscript)Add a Git hook script
The following below assumes that you have a Git repository initialized as a bare repository, at `/opt/myrepo.git`. If you have a different repository location, you will need to adjust the paths accordingly.
First, create a new file at `/opt/myrepo.git/hooks/post-receive` with the following contents:
Script: `myrepo.git/hooks/post-receive`
```bash
#!/bin/bash
read OLDREV NEWREV REFNAME
CHANGED_FILES=$(git diff --name-only $OLDREV $NEWREV)
commit_contains_path() {
local filename=$1
if echo "$CHANGED_FILES" | grep -q "$filename"; then
return 0 # True
else
return 1 # False
fi
}
function run_olivetin_action() {
local ACTION_NAME=$1
echo "Requesting OliveTin job $ACTION_NAME"
OLIVETIN_REQUEST="$(cat <`. Just before that code statement, add this code, save and close the file.
```html
```
You will need to this every time you upgrade OliveTin.
3. Create the `password.js` using the code below, at `/etc/OliveTin/custom-webui/password.js`.
`password.js`
```javascript
const myPassword = 'sekrit'
const domMain = document.getElementsByTagName('main')[0]
domMain.style.display = 'none'
const domPassword = document.createElement('input')
const domLogin = document.createElement('button')
function checkPassword () {
if (domPassword.value === myPassword) {
domMain.style.display = 'block'
domPassword.remove()
domLogin.remove()
} else {
window.alert('Incorrect password. Please try again.')
}
}
function setupPasswordForm () {
domPassword.setAttribute('type', 'password')
domPassword.addEventListener('keydown', (e) => {
if (e.key === 'Enter') {
checkPassword()
}
})
domLogin.innerText = 'Login'
domLogin.onclick = checkPassword
const domHeader = document.querySelector('header')
domHeader.appendChild(domPassword)
domHeader.appendChild(domLogin)
}
document.addEventListener('DOMContentLoaded', setupPasswordForm)
```
Systemd Control Panel
====================
OliveTin can be used to manage selected systemd units (services) as well. This is powered by OliveTin’s powerful [entity support](../../entities/intro.html). Here is a screenshot of what that can look like (dark theme preference enabled).

| | To control systemd, you will need the root user. If you are running OliveTin systemd service itself, then OliveTin should be configured to run as root. The alternative is to use OliveTin in a container, and use [SSH](../../action%5Fexamples/ssh-easy.html) to connect back to the host (as a user that can manage systemd -usually root). This is not an OliveTin limitation, it’s just how systemd security works. |
| --------------------------------------------------------------------------------------------------------------------------------------------------------------------------------------------------------------------------------------------------------------------------------------------------------------------------------------------------------------------------------------------------------------------------- |
## [](#%5Fentity%5Ffile)Entity file
To build this Systemd Control dashboard, we use an [entity file](../../entities/intro.html) that stores and updates produced by `systemctl list-units..`, output to a json format, and then filtered with jq (JSON Query). Here is the full command that we will use in our config later;
```asciidoc
user@host: systemctl list-units -a -o json --no-pager | jq -c 'map(select (.unit | contains ("upsilon", "podman", "boot.mount"))) | .[]' > /etc/OliveTin/entities/systemd_units.json
```
That command will generate a file (example shown below). Let’s break down that long command a little bit to explain what it is doing;
1. `systemctl list-units -a -o json --no-pager` \- will list units, regardless of status - started, stopped, etc (`-a`), in JSON format, and output the results
2. `jq` (JSON Query) will select units from that output that match "upsilon", "podman", "boot.mount", and of course you can change this expression to add your own services.
3. The `map()` and `.[]` parts of the expression basically just put those units line by line into the file
An example generated `/etc/OliveTin/entities/systemd_units.json` file
```json
{"unit":"boot.mount","load":"loaded","active":"active","sub":"mounted","description":"/boot"}
{"unit":"podman.service","load":"loaded","active":"inactive","sub":"dead","description":"Podman API Service"}
{"unit":"upsilon-drone.service","load":"loaded","active":"active","sub":"running","description":"upsilon-drone"}
{"unit":"podman.socket","load":"loaded","active":"active","sub":"listening","description":"Podman API Socket"}
```
You can generate this file yourself the first time, but the `config.yaml` below shows how OliveTin can run the `systemctl list-units …` command on startup, and on a schedule to update the file.
Note that if the file does not exist the first time OliveTin starts up, then OliveTin will will issue an error about not finding the file to monitor it. An easy way around this is to simply restart OliveTin a 2nd time, so that on the 2nd startup it will find the file (because it will be created the first time OliveTin starts up).
## [](#%5Fconfiguration)Configuration
Finally, here is the example configuration file to build the dashboard;
`config.yaml`
```yaml
actions:
- title: Stop {{ systemd_unit.unit }}
shell: systemctl stop {{ systemd_unit.unit }}
icon:
entity: systemd_unit
triggers:
- Update services file
- title: Start {{ systemd_unit.unit }}
shell: systemctl start {{ systemd_unit.unit }}
icon:
entity: systemd_unit
triggers:
- Update services file
- title: Update services file
shell: systemctl list-units -a -o json --no-pager | jq -c 'map(select (.unit | contains ("upsilon", "podman", "boot.mount"))) | .[]' > /etc/OliveTin/entities/systemd_units.json
hidden: true
execOnStartup: true
entities:
- file: /etc/OliveTin/entities/systemd_units.json
name: systemd_unit
dashboards:
- title: My Services
contents:
- title: '{{ systemd_unit.description }}'
type: fieldset
entity: systemd_unit
contents:
- title: 'Status: {{ systemd_unit.sub }}'
type: display
- title: Start {{ systemd_unit.unit }}
- title: Stop {{ systemd_unit.unit }}
```
Wake On LAN from a container
====================
This is a simple solution that provides wake on lan capabilities from inside a container. It uses the simple `ether-wake` command to send the magic packet. This can be incredibly helpful if you just need a simple button to click to wake up a machine on your network.
Docker containers will normally use a docker network, which is a separate network from the host network. This means that the container will not be able to send the magic packet to the host network. Therefore, we need to create the container with the `--network host` option, which will allow the container to send the magic packet to the host network (not the docker network).
The container is also created with the `--user root` option, which allows the container to send the magic packet as root. This is necessary because the `ether-wake` command requires root privileges to send the magic packet, and also to install the `ether-wake` command, which is bundled with `net-tools` in the container.
Create the container as follows;
```bash
user@host: docker create -u root --network=host --name olivetin_wol -v /etc/OliveTin/:/config ghcr.io/olivetin/olivetin:latest
```
Create your OliveTin `config.yaml` file in the `/etc/OliveTin/` directory on the host, with the following content;
```yaml
actions:
- title: WakeOnLan Server1
shell: ether-wake A8:5E:45:E4:FF:2A
icon: ping
- title: Install ether-wake on startup
shell: microdnf install -y net-tools
hidden: true
execOnStartup: true
timeout: 120
```
Obviously adjust the config file with your own MAC addressses, creating new actions to send WOL commands as needed.
Then start the container with the following command;
```asciidoc
docker start olivetin_wol
```
Then visit your OliveTin web interface at and you should see something that looks like this;
## [](#%5Fwake%5Fon%5Flan%5Fvia%5Fdocker%5Fcontainer)Wake on LAN via docker container
This is an alternative solution that provides WoL capabilities to the OliveTin container,
but has the advantage the OliveTin container does not have to run on the host network ( `--network host` ). This may be useful if your networking configuration relies on docker `bridge`networks (or other more complex networking configurations).
It requires that OliveTin is configured with permissions that allow it to control docker.
## [](#%5Fsetup%5Fif%5Frunning%5Finside%5Fa%5Fcontainer)Setup if running inside a container
You can control other containers, when running OliveTin inside a container itself, however you need to do some extra setup when creating the OliveTin container.
### [](#%5Fensure%5Fyour%5Fcontainer%5Fhas%5Fpermissions%5Fto%5Fcontrol%5Fdocker)Ensure your container has permissions to control docker
You have two alternatives to allow OliveTin (running inside a container) to talk to the Docker daemon through the bind-mounted socket. Pick one:
#### [](#%5Foption%5F1%5Fuse%5Fprivileged%5Fsimplest)Option 1 — Use `--privileged` (simplest)
| | Simplest for most users. Podman does not have this requirement. |
| ------------------------------------------------------------------ |
* Run the container with `--privileged` and as `root` (eg `--user root`).
* This avoids user/group permission issues on `/var/run/docker.sock`.
If you are getting "permission denied" errors it is probably because OliveTin runs as user UID 1000 by default, which is not allowed by your docker host. Running with `--user root` under `--privileged` resolves this quickly. Note that [PUID and PGID variables will not work](../../troubleshooting/puid-pgid.html).
#### [](#%5Foption%5F2%5Frun%5Fas%5Fnon%5Froot%5Fin%5Fthe%5Fhost%5Fdocker%5Fgroup%5Fno%5Fprivileged)Option 2 — Run as non-root in the host `docker` group (no `--privileged`)
Use the standard Docker guidance to manage Docker as a non-root user (becoming a member of the `docker` group) and match the group’s GID inside the container so the process can access the socket permissions.
* Docs: [Manage Docker as a non-root user](https://docs.docker.com/engine/install/linux-postinstall/#manage-docker-as-a-non-root-user)
* Find the `docker` group GID on the host, for example using `getent group docker`.
* Run the container with your user UID and the `docker` group GID, and bind-mount the socket. Using Compose:
docker-compose.yml
```yaml
services:
olivetin:
container_name: olivetin
image: jamesread/olivetin
user: ${UID}:${docker_group_id}
volumes:
- /var/run/docker.sock:/var/run/docker.sock
```
Where `UID` and `docker_group_id` are provided via your shell environment or a `.env` file next to your Compose file, for example:
env
```bash
UID=1000
docker_group_id=995
```
This allows you to run the container as a non-root user, while still allowing access to `/var/run/docker.sock`.
### [](#%5Fpass%5Fthe%5Fdocker%5Fsocket%5Finto%5Fthe%5Fcontainer)Pass the docker socket into the container
1. Pass `/var/run/docker.sock` as a bind mount to the container when creating it, eg:
```asciidoc
docker create --privileged --user root -v /var/run/docker.sock:/var/run/docker.sock ...additional args here...
```
Or, using the `docker run` syntax;
```asciidoc
docker run --privileged --user root -v /var/run/docker.sock:/var/run/docker.sock --name OliveTin jamesread/olivetin
```
2. The official x86\_64 docker container comes with the `docker` client pre-installed. If you are using `arm` or and `arm64` container, you will need to add Docker yourself.
[How to install additional packages in the container](../../reference/containerInstallPackages.html)
| | The reason that the arm and arm64 containers do not include docker, is that when these images are cross-compiled at build time, it takes FOREVER because we have to emulate arm. |
| ----------------------------------------------------------------------------------------------------------------------------------------------------------------------------------- |
After you have passed the socket into the container (and optionally installed docker), you should be able to setup docker actions like it’s shown in the example [above](#example-control-containers).
Now you can add actions to your OliveTin config file that use a separate docker container (on the `host` network) to send the WOL commands.
```yaml
- title: WakeOnLan Server1
# The r0gger/docker-wake-on-lan is a minimal container for WOL
# that can be run on the host network.
# It is not required to run the OliveTin container on the host network.
shell: |
docker run --rm --name wake-on-lan --net=host -e MAC='A8:5E:45:E4:FF:2A' r0gger/docker-wake-on-lan
```
Configuration
====================
OliveTin is controlled by a `config.yaml` file. On startup, it looks for this file in the following locations;
1. The value specified by the `--configdir` argument, which defaults to the current working directory (`./`)
2. `/config/` \- Mostly used for containers
3. `/etc/OliveTin/` \- this is the recommended directory on Linux for your `config.yaml`.
The most simple `config.yaml` would be something like this;
The most simple `config.yaml` file.
```yaml
actions:
- title: "Hello world!"
shell: echo 'Hello World!'
```
The configuration does not really get more complicated than that. You can of course add more actions, and customize more, but the syntax otherwise extremely simple.
For building up from here, look at the following resources;
* See the [action examples](action%5Fexamples/intro.html) section for extra examples of what OliveTin could be configured to do.
* See the [action customization](action%5Fcustomization/intro.html) documentation to customize how those actions work.
* See the [Solutions](solutions/intro.html) documentation for just the essential configuration to achieve popular use cases.
All configuration options are covered in the sollution sections
## [](#config-list)Core functionality
| Option | Description | Default | Live Reloadable | Documentation |
| ---------- | ---------------------------------------------------------------------------------- | ------- | --------------------------------------------------------------- | ----------------------------------------------- |
| actions | The list of available actions. | \- | Live Reloadable, but refreshing the web browser is recommended. | [Action examples](action%5Fexamples/intro.html) |
| entities | A list of "things" you can attach actions to. | \- | Live Reloadable, but restart is recommended. | [Entities](entities/intro.html) |
| dashboards | A grouping of actions, with optional displays, or actions generated from entities. | \- | Live Reloadable | [Dashboards](dashboards/intro.html) |
## [](#%5Fui%5Fcustomization)UI Customization
| Option | Description | Default | Live Reloadable | Documentation |
| ------------------------- | ----------------------------------------------------- | --------- | ------------------------------------------------------------- | -------------------------------------------------------------- |
| pageTitle | A custom title for the OliveTin page. | OliveTin | Live reloadable | [Customize the web UI](advanced%5Fconfiguration/webui.html). |
| showFooter | Show (or hide) the footer. | true | Live reloadable | [Customize the web UI](advanced%5Fconfiguration/webui.html). |
| showNewVersions | Show (or hide) new versions in the footer. | true | Live reloadable | [Customize the web UI](advanced%5Fconfiguration/webui.html)\>. |
| showNavigation | Show (or hide) the sidebar/topbar section navigation. | true | Live reloadable | [Customize the web UI](advanced%5Fconfiguration/webui.html). |
| sectionNavigationStyle | The style of the section navigation. sidebar, topbar | sidebar | Live reloadable | [Customize the web UI](advanced%5Fconfiguration/webui.html). |
| defaultPopupOnStart | The default popup to show on start. | none | Live reloadable | [Popup On Start](action%5Fcustomization/popuponstart.html). |
| defaultIconForActions | The default icon to use for actions. | smile | Requires Restart | \- |
| defaultIconForDirectories | The default icon to use for directories. | directory | Requires Restart | \- |
| defaultIconForBack | The default icon to use for back (from directories). | « | Requires Restart | \- |
| enableCustomJs | Enable custom JavaScript. | false | Live Reloadable, band refreshing the web browser is required. | [Custom JS](advanced%5Fconfiguration/webui.html). |
| themeName | The theme to use. | \`\` | Restart recommended | [Themes](reference/reference%5Fthemes%5Ffor%5Fusers.html). |
## [](#%5Fsecurity%5Fconfiguration)Security Configuration
| Option | Description | Default | Live Reloadable | Documentation |
| ------------------------ | ------------------------------------------------------------------------------------------ | ------- | ---------------- | ---------------------------------------------------------------------------------------- |
| AuthJwtCookieName | The name of the cookie to use for JWT authentication. | \`\` | Requires restart | [JWT with HMAC>>, xref:security/jwt\_keys.adoc\[JWT with Keys](security/jwt%5Fhmac.html) |
| AuthJwtAud | The audience to use for JWT authentication. | \`\` | Requires restart | [JWT with Keys](security/jwt%5Fkeys.html) |
| AuthJwtDomain | The domain to use for JWT authentication. | \`\` | Requires restart | [JWT with HMAC](security/jwt%5Fhmac.html), [JWT with Keys](security/jwt%5Fkeys.html) |
| AuthJwtCertsURL | The URL to fetch the public keys from with JWKS | \`\` | Requires restart | [JWT with Keys](security/jwt%5Fkeys.html) |
| AuthJwtClaimUsername | The claim to use for the username. | sub | Requires restart | [JWT with HMAC](security/jwt%5Fhmac.html), [JWT with Keys](security/jwt%5Fkeys.html) |
| AuthJwtClaimUserGroup | The claim to use for the usergroup. | sub | Requires restart | [JWT with HMAC](security/jwt%5Fhmac.html), [JWT with Keys](security/jwt%5Fkeys.html) |
| AuthJwtHeader | The HTTP header to use for JWT authentication. | \`\` | Requires restart | [JWT with Key](security/jwt%5Fkeys.html) |
| AuthJwtPubKeyPath | The path to the public key to use for JWT authentication. | \`\` | Requires restart | [JWT with Key](security/jwt%5Fkeys.html) |
| AuthHttpHeaderUsername | The HTTP header to use for the username. | \`\` | Requires restart | [Trusted Headers](security/trusted%5Fheader.html) |
| AuthHttpHeaderUserGroup | The HTTP header to use for the usergroup. | \`\` | Requires restart | [Trusted Headers](security/trusted%5Fheader.html) |
| \`AuthLocalUsers | The list of local users. | \[\] | Requires restart | [Local Users](security/local.html) |
| AuthLoginUrl | The URL to redirect to for login. | \`\` | Requires restart | [Login URL](security/local.html) |
| AuthRequireGuestsToLogin | Basically disables all functionality for guests. It sets all default permissions to false. | false | Requires restart | [Access Control Lists](security/acl.html) |
| DefaultPermissions | The default permissions to use. | \[\] | Requires restart | [Access Control Lists](security/acl.html) |
| AccessControlLists | The list of access control lists. | \[\] | Requires restart | [Access Control Lists](security/acl.html) |
## [](#%5Fnetworking%5Fconfiguration)Networking Configuration
| Option | Description | Default | Live Reloadable | Documentation |
| ------------------------------- | --------------------------------------------------------------------------------------------------------------------------------------- | -------------- | ---------------- | ----------------------------------------------------------------------------------------------------- |
| UseSingleHttpFrontend | Whether or not to start the internal "microproxy" frontend. Disabling this is highly unusual and is only really useful for power users. | true | Requires Restart | [Network Ports](reference/network-ports.html) |
| ListenAddressSingleHTTPFrontend | The address to listen on for the internal "microproxy" frontend. | 0.0.0.0:1337 | Requires Restart | [Network Ports](reference/network-ports.html) |
| ListenAddressWebUI | The address to listen on for the web UI. | localhost:1340 | Requires Restart | [Network Ports](reference/network-ports.html) |
| ListenAddressRestActions | The address for the API | localhost:1338 | Requires Restart | [Network Ports](reference/network-ports.html) |
| ListenAddressGrpcActions | The address for the gRPC API | localhost:1339 | Requires Restart | [Network Ports](reference/network-ports.html) |
| ListenAddressPrometheus | The address for the Prometheus metrics | localhost:1341 | Requires Restart | [Network Ports](reference/network-ports.html), [Prometheus](advanced%5Fconfiguration/prometheus.html) |
| ExternalRestAddress | The address the web browser should use to connect to the API. | . | Requires Restart | [Network Ports](reference/network-ports.html) |
## [](#%5Fdebugging%5Fconfiguration)Debugging Configuration
| Option | Description | Default | Live Reloadable | Documentation |
| --------------- | --------------------------------------------- | ------- | ------------------- | --------------------------------------------------------- |
| LogLevel | The log level to use. INFO, DEBUG, WARN | INFO | Requires Restart | \- |
| LogDebugOptions | Enable various debug logs. | \- | Requires Restart | [Advanced Troubleshooting](troubleshooting/advanced.html) |
| Insecure\* | Various options to disable security features. | false | Restart recommended | [Advanced Troubleshooting](troubleshooting/advanced.html) |
## [](#%5Fmiscellaneous%5Fconfiguration)Miscellaneous Configuration
| Option | Description | Default | Live Reloadable | Documentation |
| --------------------- | ------------------------------------------------------ | ---------------------- | ---------------- | ------------------------------------------------------ |
| WebUIDir | The directory to serve the web UI from. | Calculated at runtime. | Requires Restart | \- |
| CronSupportForSeconds | Whether or not to support seconds in cron expressions. | false | Requires Restart | [Cron](action%5Fexecution/oncron.html) |
| SaveLogs | Whether or not to save logs to disk. | \[\] | Requires Restart | [Save Logs](action%5Fcustomization/savelogs.html) |
| Prometheus | Prometheus configuration. | \- | Requires Restart | [Prometheus](advanced%5Fconfiguration/prometheus.html) |
OliveTin Introduction
====================
**[OliveTin](https://www.olivetin.app)** gives **safe** and **simple** access to predefined shell commands from a web interface.
 [OliveTin on GitHub](https://github.com/jamesread/OliveTin)
 [Chat on Discord](https://discord.gg/jhYWWpNJ3v)
The [OliveTin Homepage is here](https://www.olivetin.app). This site that you are viewing is the documentation for OliveTin.
---
## [](#%5Fuse%5Fcases)Use cases
**Safely** give access to commands, for less technical people;
* eg: Give your family a button to `podman restart plex`
* eg: Give junior admins a simple web form with dropdowns, to start your custom script. `backupScript.sh --folder {{ customerName }}`
* eg: Enable SSH access to the server for the next 20 mins `firewall-cmd --add-service ssh --timeout 20m`
**Simplify** complex commands, make them accessible and repeatable;
* eg: Expose complex commands on touchscreen tablets stuck on walls around your house. `wake-on-lan aa:bb:cc:11:22:33`
* eg: Run long running on your servers from your cell phone. `dnf update -y`
* eg: Define complex commands with lots of preset arguments, and turn a few arguments into dropdown select boxes. `docker rm {{ container }} && docker create {{ container }} && docker start {{ container }}`
## [](#%5Fdemo)Demo
## [](#%5Ffeatures)Features
* **Responsive, touch-friendly UI** \- great for tablets and mobile
* **Super simple config in YAML** \- because if it’s not YAML now-a-days, it’s not "cloud native" :-)
* **Dark mode** \- for those of you that roll that way.
* **Accessible** \- passes all the accessibility checks in Firefox, and issues with accessibility are taken seriously.
* **Container** \- available for quickly testing and getting it up and running, great for the selfhosted community.
* **Integrate with anything** \- OliveTin just runs Linux shell commands, so theoretially you could integrate with a bunch of stuff just by using curl, ping, etc. However, writing your own shell scripts is a great way to extend OliveTin.
* **Lightweight on resources** \- uses only a few MB of RAM and barely any CPU. Written in Go, with a web interface written as a modern, responsive, Single Page App that uses the REST/gRPC API.
* **Good amount of unit tests and style checks** \- helps potential contributors be consistent, and helps with maintainability.
You can learn more about OliveTin in the [OliveTin Homepage](https://www.olivetin.app).
Concurrency
====================
By default, OliveTin will allow you to run several instances of an action at the same time. For example, an action might take 20 seconds, and if you click the button 3 times, for a time there will be 3 actions running at the same time.
Sometimes you don’t want to allow this - an example case where it would not make sense is in the case of a backup script. To stop this, we can set `maxConcurrent` to `1`.
```yaml
actions:
- title: Run Backup Script
icon: backup
shell: /opt/backupScript.sh
maxConcurrent: 1
```
If you try and run a 2nd instance of this action while the first is currently running, you’ll get a "blocked" message that looks like this;

Additionally, OliveTin will log a message that looks like this;
OliveTin log showing an action being blocked rom running.
```log
INFO Action requested actionTitle="Run backup script"
WARN Blocked from executing. This would mean this action is running 2 times concurrently, but this action has maxExecutions set to 1. actionTitle="Run backup script"
```
Naturally, you can set `maxConcurrent` to `3` or some other number, to limit the amount of times the action executes at once.
Icons
====================
You can specify any HTML for an icon. It’s a popular choice to use Unicode icons because they are extremely fast to load and there are a lot of them, but OliveTin also support Iconify, and simple PNG, JPG, WEBP and similar images.

Figure 1\. Examples of icons in OliveTin
For a quick reference, here are some examples of how to use different types of icons in OliveTin;
`config.yaml`
```yaml
actions:
- title: Unicode (emoji) alias icon
shell: echo "Hello!"
icon: smile
- title: Unicode (emoji) icon
shell: echo "Hello!"
icon: "😎"
- title: Iconify Icon
icon:
- title: HTML Image (jpg/png/gif/etc) icon
shell: echo "Hello!"
icon: ''
```
## [](#%5Ficonify%5Ficons)Iconify Icons
Browse over 200,000 icons that can be used with OliveTin here;
Note, the icons are loaded from the internet, but should be cached by your browser afer the first load.
On the Iconfiy website, you should select **Iconify Icon**

Then copy this icon code, and place it in your config;
`config.yaml`
```yaml
actions:
- title: Iconify Icon
icon:
```
And you should get something that looks like this;

## [](#%5Funicode%5Ficons%5Femoji)Unicode icons ("emoji")
Using simple emoji (unicode) icons from your browser’s font is extremely fast, and can look good on some platforms. However, the icons are platform specific, which mean’s they’ll look different between browsers and between operating systems.
There are great sites like [symbl.cc - a list of "Emoji" in unicode](https://symbl.cc/en/emoji/).
For example, if you find "[Smiling face with sunglasses](https://symbl.cc/en/1F60E/)" you can click on it to see it’s "HTML-code". In OliveTin, you’d setup the icon like this;
```asciidoc
actions:
- title: Unicode (emoji) icon
icon: "😎"
shell: echo "You are awesome"
```
## [](#%5Ffull%5Fhtml%5Ficons%5Fimg%5Fsrc)Full HTML icons (`![]() '
shell: docker ps
```
### [](#%5Fsaving%5Fand%5Fserving%5Ficons%5Ffor%5Foffline%5Fuse)Saving and serving icons for "offline" use
Sometimes you might want to store images to use as icons, with your installation of OliveTin. This can be useful when your installation is meant to be offline, or disconnected from the internet. This is easily done.
OliveTin will try to create a directory called `custom-webui` in the same directory as the `config.yaml` file. If this directory exists, OliveTin will serve files from this directory as if they were in the standard webui directory, in the same path as your OliveTin web UI.
Ideally, put your icons in a directory like `/custom-webui/icons/`. If this directory contained a file called "mrgreen.gif", then it would be served at ``. Below is a picture of Mr Green. Feel free to save his likeness and awesomeness for yourself, for future awesome offline usage.

Figure 2\. Mr Green, the original awesome smily.
In your OliveTin config, customize your command again using HTML, like this;
```asciidoc
actions:
- title: Mr Green
icon: ''
shell: echo "I don't like the word 'emoji' "
```
This will result in a locally hosted icon that will work offline, that looks like this;

Action IDs
====================
OliveTin actions do not require IDs to be specified in the `config.yaml`, as most users of OliveTin start off with the Web Interface. However, if you want to use OliveTin actions via the [API](../api/intro.html), then you will need to set your action IDs manually.
| | OliveTin will automatically generate a new ID for actions every time it starts up, for actions that don’t have an id: property set. |
| -------------------------------------------------------------------------------------------------------------------------------------- |
```yaml
actions:
- title: Start the reactor
id: start_reactor
shell: /bin/startReactor.sh
```
Action customisation
====================
There are several ways to customize actions. See the links in this section to see how to do it.
Popup on Start (Execution Feedback)
====================
OliveTin now has several options to control "execution feedback" when actions are started. This can be controlled on a per-action basis, using the `popupOnStart` configuration option.
You can also set the default for OliveTin using the `defaultPopupOnStart` configuration option.
## [](#%5Fbig%5Fflashy%5Fbuttons%5Fdefault)Big Flashy Buttons (default)
`config.yaml`
```yaml
actions:
- title: Ping the Internet
popupOnStart: default
```
This will also be the option that is used if no other values match.

## [](#%5Fexecution%5Fdialog%5Foutput%5Fonly)Execution Dialog (Output Only)
This can be useful for just displaying the output of a command, without too many additional details like the start time, end time, etc.
`config.yaml`
```yaml
actions:
- title: Check disk space
popupOnStart: execution-dialog-stdout-only
```
| | OliveTin used to separate out the Standard Output (stdout) and Standard Error (stderr) into two separate output streams. This made no sense, as lines would effectively be separated. This behavior has change to now display stdout and stderr in the same output stream. However, the configuration option execution-dialog-stdout-only was not renamed - and now it includes stderr as well. |
| -------------------------------------------------------------------------------------------------------------------------------------------------------------------------------------------------------------------------------------------------------------------------------------------------------------------------------------------------------------------------------------------------- |

## [](#%5Fexecution%5Fdialog)Execution Dialog
The `execution-dialog` option for `popupOnStart` is simialr to the above `execution-dialog-stdout-only`, but it includes the start time, end time, exit code and the duration of time it took for the command to execute.
`config.yaml`
```yaml
actions:
- title: Check dmesg logs
popupOnStart: execution-dialog
```

Figure 1\. Example of `popupOnStart: execution-dialog`
## [](#%5Fexecution%5Fbuttons)Execution Buttons
This mode of `popupOnStart` will create a new button for each individual execution. This can be useful for actions that are executed again and again.
The text of the button (eg, "0s" in the screenshot below), is the time it took to execute the action in seconds.
`config.yaml`
```yaml
actions:
- title: date
popupOnStart: execution-button
```

Rate limiting
====================
By default, OliveTin allows you to execute actions as fast as you can click the button. This is fine if you are running OliveTin with trusted users in a trusted environment, but otherwise you may want to rate limit actions.
Rate limiting is implemented like this;
`config.yaml`
```yaml
actions:
- title: date
shell: date
icon: clock
maxRate:
- limit: 3
duration: 5m
```
If you try to execute `date` more than 3 times in 5 minutes, you will get a log message in the UI that looks like this;

Additionally, OliveTin will also output this to it’s process log;
```asciidoc
INFO Blocked from executing. This action has run 3 out of 3 allowed times in the last 5m. actionTitle="date"
```
Saving logs
====================
By default, OliveTin only keeps logs in memory, meaning that if you restart OliveTin your logs will be lost. For some use cases this is acceptable, but you can configure OliveTin to save logs for you.
You can configure the global setting for saving logs, or override it on a per-action basis;
`config.yaml`
```yaml
saveLogs:
resultsDirectory: /var/log/OliveTin/results/
outputDirectory: /var/log/OliveTin/output/
actions:
# This will use the default `saveLogs` setting.
- title: date
shell: date
# This will override the default `saveLogs` setting.
- title: date2
shell: date
saveLogs:
resultsDirectory: /logs/
outputDirectory: /logs/
```
From the above example, you can see there There are two types of logs - **results (.yaml)** and **output (.log)**
* **Results (.yaml)** \- this captures almost everything that OliveTin knows about the action and looks like this.
Example results - date.1714333384.5e2dc9e5-b6b3-445b-bff9-c2082b0bbbb2.yaml
```yaml
datetimestarted: 2024-04-28T20:43:04.426754136+01:00
datetimefinished: 2024-04-28T20:43:04.436596926+01:00
stdout: |
Sun 28 Apr 20:43:04 BST 2024
stderr: ""
timedout: false
blocked: false
exitcode: 0
tags: []
executionstarted: true
executionfinished: true
executiontrackingid: 5e2dc9e5-b6b3-445b-bff9-c2082b0bbbb2
process:
pid: 4168638
actiontitle: date
actionicon: '😀'
actionid: d3cf6e25-8bab-432d-b4f9-e6f531b2b67b
```
* **output (.log)** \- this just captures the output - stdout, stderr from an execution,
Example output - date.1714333384.5e2dc9e5-b6b3-445b-bff9-c2082b0bbbb2.log
```asciidoc
Sun 28 Apr 20:43:04 BST 2024
```
Timeouts
====================
By default, actions in OliveTin have a **3 second timeout** for all actions. This means that OliveTin will kill the action if it is running for longer than the timeout, which can be useful to stop commands running for a long time.
You can set your own timeouts like this;
```yaml
actions:
- title: My special action
shell: sleep 5
timeout: 10
```
| | Allowing commands to run for infinity just doesn’t seem to make sense, or at least is probably a bad case for OliveTin. Therefore, if you set a timeout**less than 3 seconds**, OliveTin will overwrite your Timeout and default to 3 seconds. If you think you have a use case where a shorter (or infinite) timeout makes sense, please open an issue and let’s discuss. |
| ----------------------------------------------------------------------------------------------------------------------------------------------------------------------------------------------------------------------------------------------------------------------------------------------------------------------------------------------------------------------------- |
## [](#%5Fcheck%5Fthe%5Flogs)Check the logs
If a action really does "time out", it will show in the logs with "(timed out)" next to the exist code;

Run as different users
====================
OliveTin does not **need** to run as root. It does not request any special permissions from the operating system that require root (as long as you run on ports above 1024, and it can read/write it’s configuration). So, you can run as any non-root user if you wish.
However, it is very convenient to run as root, as many users will need to run actions and jobs that do require root permissions.
There are no ways in OliveTin to specify which user runs an action, because the Linux OS has several great ways to do this already, and adding support for it in OliveTin just adds bloat when there are perfectly good ways that already exist.
## [](#%5Feg%5Fusing%5Fsudo)EG: Using sudo;
```asciidoc
actions:
- title: Run echo as a different user
shell: sudo -u bob echo "I am Bob."
```
If you are worried about security, you could run OliveTin as a non-privileged user, and use sudo rules to control what it can and cannot do.
Ansible Playbooks
====================
| Installation type | Difficulty to do this |
| -------------------------------- | --------------------------------------------------------------------------------------------------------- |
| Running as a **Systemd service** | Easy |
| Running in a **container** | Install the \`ansible\` package in your [OliveTin container](../reference/containerInstallPackages.html). |
## [](#%5Fexample%5Fconfig%5Fyaml)Example config.yaml
Many users use OliveTin to easily execute Ansible playbooks, somtimes as a simple alternative to AWX.
Run an Ansible Playbook
```yaml
actions:
- title: Run Ansible Playbook
icon: "🇦"
shell: ansible-playbook -i /etc/hosts /root/myRepo/myPlaybook.yaml
timeout: 120
```
You probably want to set the [timeout](../action%5Fcustomization/timeouts.html) to more than the default 3 seconds.
Containers - start/stop
====================
| | There is a complete example of how to setup a [container control panel](../solutions/container-control-panel/index.html) in the solutions section. |
| ----------------------------------------------------------------------------------------------------------------------------------------------------- |
| Installation type | Difficulty to do this |
| -------------------------------- | ------------------------ |
| Running as a **Systemd service** | Easy |
| Running in a **container** | Setup needed - see below |
## [](#%5Fexample%5Fconfig%5Fyaml)Example config.yaml
actions:
- title: Stop Plex
shell: docker stop plex
- title: Start plex
shell: docker start plex
## [](#%5Fsetup%5Fif%5Frunning%5Finside%5Fa%5Fcontainer)Setup if running inside a container
You can control other containers, when running OliveTin inside a container itself, however you need to do some extra setup when creating the OliveTin container.
### [](#%5Fensure%5Fyour%5Fcontainer%5Fhas%5Fpermissions%5Fto%5Fcontrol%5Fdocker)Ensure your container has permissions to control docker
You have two alternatives to allow OliveTin (running inside a container) to talk to the Docker daemon through the bind-mounted socket. Pick one:
#### [](#%5Foption%5F1%5Fuse%5Fprivileged%5Fsimplest)Option 1 — Use `--privileged` (simplest)
| | Simplest for most users. Podman does not have this requirement. |
| ------------------------------------------------------------------ |
* Run the container with `--privileged` and as `root` (eg `--user root`).
* This avoids user/group permission issues on `/var/run/docker.sock`.
If you are getting "permission denied" errors it is probably because OliveTin runs as user UID 1000 by default, which is not allowed by your docker host. Running with `--user root` under `--privileged` resolves this quickly. Note that [PUID and PGID variables will not work](#no-puid-pgid).
#### [](#%5Foption%5F2%5Frun%5Fas%5Fnon%5Froot%5Fin%5Fthe%5Fhost%5Fdocker%5Fgroup%5Fno%5Fprivileged)Option 2 — Run as non-root in the host `docker` group (no `--privileged`)
Use the standard Docker guidance to manage Docker as a non-root user (becoming a member of the `docker` group) and match the group’s GID inside the container so the process can access the socket permissions.
* Docs: [Manage Docker as a non-root user](https://docs.docker.com/engine/install/linux-postinstall/#manage-docker-as-a-non-root-user)
* Find the `docker` group GID on the host, for example using `getent group docker`.
* Run the container with your user UID and the `docker` group GID, and bind-mount the socket. Using Compose:
docker-compose.yml
```yaml
services:
olivetin:
container_name: olivetin
image: jamesread/olivetin
user: ${UID}:${docker_group_id}
volumes:
- /var/run/docker.sock:/var/run/docker.sock
```
Where `UID` and `docker_group_id` are provided via your shell environment or a `.env` file next to your Compose file, for example:
env
```bash
UID=1000
docker_group_id=995
```
This allows you to run the container as a non-root user, while still allowing access to `/var/run/docker.sock`.
### [](#%5Fpass%5Fthe%5Fdocker%5Fsocket%5Finto%5Fthe%5Fcontainer)Pass the docker socket into the container
1. Pass `/var/run/docker.sock` as a bind mount to the container when creating it, eg:
```asciidoc
docker create --privileged --user root -v /var/run/docker.sock:/var/run/docker.sock ...additional args here...
```
Or, using the `docker run` syntax;
```asciidoc
docker run --privileged --user root -v /var/run/docker.sock:/var/run/docker.sock --name OliveTin jamesread/olivetin
```
2. The official x86\_64 docker container comes with the `docker` client pre-installed. If you are using `arm` or and `arm64` container, you will need to add Docker yourself.
[How to install additional packages in the container](../reference/containerInstallPackages.html)
| | The reason that the arm and arm64 containers do not include docker, is that when these images are cross-compiled at build time, it takes FOREVER because we have to emulate arm. |
| ----------------------------------------------------------------------------------------------------------------------------------------------------------------------------------- |
After you have passed the socket into the container (and optionally installed docker), you should be able to setup docker actions like it’s shown in the example [above](#example-control-containers).
Using the Docker socket proxy
====================
The OliveTin container comes with the official docker CLI pre-installed, as well as the compose plugin. This is because OliveTin is very often used to start and stop containers.
You can choose to directly bind-mount the docker control socket into OliveTin, or optionally use a docker socket proxy host if you feel you need more security. You can use a docker socket proxy as an additional security measure and as an alternative to mounting the docker socket directly.
Most people will want to add the docker socket proxy into the same compose file that they are running OliveTin from;
docker-compose.yaml
```yaml
services:
olivetin:
container_name: olivetin
image: jamesread/olivetin
...
socket-proxy:
image: lscr.io/linuxserver/socket-proxy:latest
container_name: socket-proxy
environment:
- ALLOW_START=1 #optional
- ALLOW_STOP=1 #optional
...
volumes:
- /var/run/docker.sock:/var/run/docker.sock:ro
```
You can find all the documentation for all the socket-proxy options here on the [LinuxServer.io socket-proxy page](https://github.com/linuxserver/docker-socket-proxy).
Assuming your docker socket proxy is running as `socket-proxy` running on port 1028;
OliveTin config.yaml
```yaml
actions:
- title: Stop container
shell: DOCKER_HOST=socket-proxy:1028 docker stop mycontainer
```
Action Examples
====================
Browse the action examples in this section of documentation.
Ping an address
====================
| Installation type | Difficulty to do this |
| -------------------------------- | --------------------- |
| Running as a **Systemd service** | Easy |
| Running in a **container** | Easy |
## [](#%5Fexample%5Fconfig%5Fyaml)Example config.yaml
```yaml
actions:
# This sends 1 ping to google.com.
- title: ping google.com
shell: ping google.com -c 1
icon: ping
timeout: 3
```
Powershell
====================
| Installation type | Difficulty to do this |
| -------------------------------- | --------------------- |
| Running as a **Systemd service** | Easy |
| Running in a **container** | Not possible |
## [](#%5Fexample%5Fconfig%5Fyaml)Example config.yaml
Powershell requires `pwsh` to execute commands.
`config.yaml`
```yaml
actions:
- title: Run Powershell Script:
shell: pwsh C:/Scripts/MyScript.ps1
```
SSH (easy setup)
====================
This is probably one of the most useful things OliveTin is used for - just plain old SSH, which allows it to easily connect from a container to any server running on your network to run commands. This is also the preferred method of running commands on the server that is hosting the OliveTin container image as well.
| | This is the easy method of setting up SSH with OliveTin - this generates a new SSH key for you, and a configuration file that disables SSH host key checking, to make it faster to do useful things with OliveTin. This is fine for most homelab setups, but if you are using OliveTin in a production environment, you should use the more secure method of setting up SSH and set it up manually, see [SSH (manual setup)](#). |
| ----------------------------------------------------------------------------------------------------------------------------------------------------------------------------------------------------------------------------------------------------------------------------------------------------------------------------------------------------------------------------------------------------------------------------------- |
## [](#%5Fssh%5Ffrom%5Finside%5Fa%5Fcontainer%5Fsetup%5Finstructions)SSH from inside a Container - setup instructions
* [Step 1](#ssh-easy-step-1) Use the olivetin-setup-easy-ssh script to generate a new SSH key and configuration file
* Add this key fingerprint to servers and hosts that you want to SSH to.
* [Step 2](#ssh-easy-step-2) Setup actions that use SSH with this configuration file (which points to the key)
Visually, this is what it looks like - OliveTin is running in the (orange) container, and then can either connect back to _server-with-olivetin_ or _server2_.

## [](#ssh-easy-step-1)Step 1: Run the olivetin-setup-easy-ssh script
Setup an action as follows, to use the builtin olivetin-setup-easy-ssh script that comes with OliveTin containers. This script does **not** work on Windows, MacOS, or outside of a container.
config.yaml
```yaml
actions:
- title: Setup SSH
shell: olivetin-setup-easy-ssh
popupOnStart: execution-dialog
```
## [](#ssh-easy-step-2)Step 2: Use the configuration file in your actions
To use the configuration file generated by the script, you can use the following in your other actions:
config.yaml
```yaml
actions:
- title: SSH into a server
shell: ssh -F /config/ssh/config root@myserver '/opt/script-on-my-server.sh'
```
SSH (manual setup)
====================
This is probably one of the most useful things OliveTin is used for - just plain old SSH, which allows it to easily connect from a container to any server running on your network to run commands. This is also the preferred method of running commands on the server that is hosting the OliveTin container image as well.
| | There is an easy method of setting up SSH with OliveTin, which is described in the [SSH (easy setup)](#action-ssh-easy) section. This section is for those who want to set up SSH manually. |
| ---------------------------------------------------------------------------------------------------------------------------------------------------------------------------------------------- |
| Installation type | Difficulty to do this |
| -------------------------------- | ---------------------------------------------------------------------------------- |
| Running as a **Systemd service** | Easy |
| Running in a **container** | Needs some setting up - see the [SSH Container setup instructions](#ssh-container) |
## [](#%5Fexample%5Fconfig%5Fyaml)Example config.yaml
OliveTin `config.yaml`
```yaml
actions:
# This will SSH into a server an run the command 'service httpd restart'
- title: Restart httpd on Server 1
shell: ssh root@server-with-olivetin 'service httpd restart'
icon: ping
timeout: 5
```
**Note about SSH keys**: You should make sure that the user that OliveTin is running as has access to a SSH key. This applies to container images as well. The setup instructions below briefly explain how to generate a SSH key and make it accessible to OliveTin which is running inside a container.
SSH from inside a Container - setup instructions
This is a two step process;
* [Step 1](#ssh-step-1) Give OliveTin a SSH key
* [Step 2](#ssh-step-2) Setup actions that use SSH with this key
Visually, this is what it looks like - OliveTin is running in the (orange) container, and then can either connect back to _server-with-olivetin_ or _server2_.

The steps in detail are below;
[red]#Step 1#: Give OliveTin a SSH key
Open a terminal window on _server-with-olivetin_.
1. Create the `/opt/OliveTinSshKeys` directory, to create a shared directory for your SSH key file.
```bash
root@server-with-olivetin: mkdir /opt/OliveTinSshKeys
```
This will later be used as a "volume mount" when you create a docker container.
2. Run `ssh-keygen` to generate a SSH key just for OliveTin.
```bash
root@server-with-olivetin: ssh-keygen
```
1. Enter the file in which to save the key: `/opt/OliveTinSshKeys/id_rsa`
2. Enter passphrase (empty for no passphrase): ``
This will create a passwordless SSH key that OliveTin can use. It is safe as long as nobody steals your SSH key file! OliveTin cannot enter passwords into SSH keys, so you have to leave the password blank.
3. You should get something that looks like this. If you get a "permission denied" error when creating files, try running `chmod 0777 /opt/OliveTinSshKeys` and try again.
```asciidoc
root@server-with-olivetin: ssh-keygen
Generating public/private rsa key pair.
Enter file in which to save the key (/root/.ssh/id_rsa): /opt/OliveTinSshKeys/id_rsa
Enter passphrase (empty for no passphrase):
Enter same passphrase again:
Your identification has been saved in /opt/OliveTinSshKeys/id_rsa
Your public key has been saved in /opt/OliveTinSshKeys/id_rsa.pub
The key fingerprint is:
SHA256:t+vGUn+MTeOtRDpxKanO3Cg63+gvAHslZCe3YVNnfWU root@server-with-olivetin
The key's randomart image is:
+---[RSA 3072]----+
| .. o. E|
| + * o ...|
| o = + . |
| . . o . . |
| o oS . + + |
| . o ..o *o |
| . . oo.o*.o |
| . +*o+oo= .|
| .=+BX .... |
+----[SHA256------+
```
This will create two files, `/opt/OliveTinSshKeys/id_rsa` (your private key) and `/opt/OliveTinSshKeys/id_rsa.pub` (your public key).
4. Copy your public key to every server you want to connect to.
Using the `ssh-copy-id` command is a really quick and safe way to do this.
```asciidoc
root@server-with-olivetin: ssh-copy-id -i /opt/OliveTinSshKeys/id_rsa.pub root@localhost
(enter your SSH password)
root@server2: ssh-copy-id ssh-copy-id -i /opt/OliveTinSshKeys/id_rsa.pub root@server2
(enter your SSH password)
```
You will be asked to login with a password for each server.
After you have done that, you will then be able to login with the ssh key instead. Here is a quick way that you can test your SSH key manually;
```asciidoc
root@server-with-olivetin: ssh -i /opt/OliveTinSshKeys/id_rsa root@server2
(you should login without a password)
```
5. Give the SSH key to the OliveTin container.
The way to do this is via a "volume mount". When you create the container, you use "-v" to specify a volume.
You should mount your SSH keys directory into the OliveTin user’s home directory by creating the container like this;
If you want to create the container from the command line
```asciidoc
docker run -v /opt/OliveTinSshKeys/:/home/olivetin/.ssh/ -v /etc/OliveTin/:/config --name OliveTin jamesread/olivetin
```
If you are using docker-compose
```yaml
services:
olivetin:
container_name: olivetin
image: jamesread/olivetin
volumes:
- "/etc/OliveTin/:/config"
- "/opt/OliveTinSshKeys:/home/olivetin/.ssh"
ports:
- "1337:1337"
restart: unless-stopped
```
This also works for things like SSH configuration files, if you want to use them. This is step 1 complete from the diagram above.
[red]#Step 2#: Setup actions that use SSH with this key
Thankfully, step 2 is very simple! `ssh` commands in your OliveTin `config.yaml` should work without a password!, and allow OliveTin to access services, files, and other stuff outside of the OliveTin container.
OliveTin `config.yaml`
```shell
actions:
# This will SSH into a server an run the command 'service httpd restart'
- title: Restart httpd on Server 1
shell: ssh root@server-with-olivetin 'service httpd restart'
icon: ping
timeout: 5
```
Restart a systemd service
====================
| Installation type | Difficulty to do this |
| -------------------------------- | -------------------------- |
| Running as a **Systemd service** | Easy |
| Running in a **container** | Not really possible to do. |
## [](#%5Fexample%5Fconfig%5Fyaml)Example config.yaml
```yaml
actions:
- title: Start httpd
shell: systemctl start httpd
- title: Stop httpd
shell: systemctl stop httpd
- title: Restart httpd
shell: systemctl restart httpd
# https://docs.olivetin.app/action-ssh.html
- title: Restart httpd on server 1
shell: ssh root@server1 'service httpd restart'
```
Execute after completion
====================
Sometimes you want to execute another command after the main command executes, this is often the case when you want to check the status of the main command, or if you want to send a notification.
`config.yaml`
```yaml
actions:
- title: Check date and send notification via apprise
icon: date
shell: date
shellAfterCompleted: "apprise -c /config/apprise.yml -t 'Notification: Backup script completed' -b 'The backup script completed with code {{ exitCode}}. The log is: \n {{ output }} '"
```
When running shellAfterCompleted, you **cannot** use argument values - they are not passed to the command. However the following special arguments are defined;
* `{{ exitCode }}` \- The exit code of the previous shell command
* `{{ output }}` \- The standard output of the previous shell command
* `{{ ot_executionTrackingId }}` \- The unique execution tracking id for this execution
* `{{ ot_username }}` \- The username of the user who started the execution (if any - could be `guest` or `cron`).
You can only use a single `shellAfterCompleted`, so use it for notifications, or similar. It would be an antipattern to use this do run 2 commands making up a mini script.
The official OliveTin container images from version 2024.03.24 onwards include the fantastic apprise tool, which makes chat notifications on many protocols very easy.
*
*
`/config/apprise.yaml`
```yaml
urls:
- tgram://bottoken/ChatID
```
## [](#%5Fsee%5Falso)See Also
* [Triggers](triggers.html) \- Executing full actions after this one (with separate arguments, etc).
Create your first action
====================
This is an example of your very first action. First of all, edit your config.yaml, and enter this YAML markup;
config.yaml
```yaml
actions:
- title: Say hello
shell: echo "Hello!"
icon: smile
```
If OliveTin is running, it should popup on your dashboard like this;

Simply click on the button to execute the shell command. You can expand the executions to view the logs.
## [](#%5Fimportant%5Fconsiderations)Important considerations
* The action title must be unique. If you have multiple actions with the same title, only one will be shown.
## [](#%5Fwhat%5Fdo%5Fi%5Ftry%5Fnext)What do I try next?
* [Customize](../action%5Fcustomization/intro.html) the action icon, timeout, etc.
* [Execute on a schedule (cron)](oncron.html)
* [Execute on startup](onstartup.html)
* [Execute on webhook](onwebhook.html)
* [Execute on file created](onfilecreated.html)
* [Execute on file changed](onfilechanged.html)
Execute on calendar file
====================
| | The feature is currently experimental. |
| ----------------------------------------- |
Sometimes you want to schedule an action to run at a specific date and time, like at 2024-02-07 at 15:30\. This is technically called "an instant", and OliveTin can watch a file that contains a list of instants for new additions.
`start-server-calendar.yaml`
```yaml
- 2024-03-08T20:11:45+00:00
- 2024-03-08T20:12:30+00:00
```
OliveTin will watch this file, and also load it on startup. If an instant is seen that is in the past, it is just ignored. If it is in the future then it is scheduled.
This is how you setup an action to use the calendar file:
`config.yaml`
```yaml
actions:
- title: start server
shell: echo "Starting Server!"
execOnCalendarFile: start-server-calendar.yaml
```
You will often want an easy way to schedule actions from the web interface as well, you can do this by creating a separate schedule action that adds an instant to the calendar file.
You can use an argument with `type: datetime` to create a date selector in the web interface, to easily select dates to be added to the calendar file. You will have to add hardcoded timezone to suit your needs, you can see below that "+00:00" is being added to "{{ when }}" to create an instant in the UTC timezone.
`config.yaml`
```yaml
actions:
- title: Schedule server
shell: echo '- {{ when }}+00:00' >> start-server-calendar.yaml
arguments:
- name: when
title: When?
type: datetime
- title: start server
shell: echo "Starting Server!"
execOnCalendarFile: start-server-calendar.yaml
```
Execute on schedule (cron)
====================
OliveTin can execute actions on a schedule, and uses a cron format for configuration.
`config.yaml`
```yaml
actions:
- title: Say hello
shell: echo "Hello!"
execOnCron:
- "@hourly"
- title: Say goodbye
shell: echo "Say Goodbye"
execOnCron:
- "*/5 * * * *" # Every 5 minutes
```
This is a fantastic website:
## [](#%5Fsupport%5Ffor%5Fseconds%5Fin%5Fcron)Support for seconds in cron
The default cron format for OliveTin supports the Unix/Linux format - 5 fields, with no support for seconds. This is by far the most popular format that most people are used to.
If you need per-second resolution for your actions, this can be enabled in your config - meaning that your cronlines will support 6 columns. The first "new" column is seconds. For example, to execute `date` every 5 seconds;
`config.yaml`
```yaml
cronSupportForSeconds: true
actions:
title: Execute every 5 seconds
shell: date
execOnCron:
- "*/5 * * * * *"
```
## [](#%5Fcron%5Fand%5Facls)Cron and ACLs
If you have enabled ACL, cron tasks are run as the user `cron`, which means that your ACL needs to allow the cron user to execute the action. This is one possibilty:
`config.yaml`
```yaml
accessControlLists:
- name: "cron"
matchUsernames:
- cron
permissions:
exec: true
actions:
- title: Say hello
shell: echo "Hello!"
execOnCron:
- "@hourly"
acls:
- "cron"
```
Execute on demand
====================
This is the default, meaning that the action shows up on a dashboard, and at the moment cannot be changed.
Execute on file changed
====================
You can execute an action when a file is changed in a directory. The argument `filename` is pre-populated for you.
```yaml
actions:
- title: Print names of new files
shell: "echo Filename: {{ filename }} Filedir: {{ filedir }} Filext: {{ fileext }}"
arguments:
- name: filename
type: unicode_identifier
- name: filedir
type: unicode_identifier
- name: fileext
type: unicode_identifier
execOnFileChangedInDir:
- /home/user/Downloads/
```
## [](#%5Ffile%5Fin%5Fdir%5Farguments)File in dir arguments
| Predefined Argument | Example |
| ------------------- | --------------------------------------- |
| filepath | /Downloads/txt1.txt |
| filedir | /Downloads |
| filename | test1.txt |
| fileext | .txt |
| filesizebytes | 100 |
| filemode | 0644 |
| filemtime | 2024-04-27 20:09:42.465235047 +0100 BST |
| fileisdir | false |
Like all arguments, OliveTin also passes these arguments as [environment variables](#env-vars) if this is better for your use case.
Execute on file created
====================
You can execute an action when a file is created in a directory. The argument `filename` is pre-populated for you.
`config.yaml`
```yaml
actions:
- title: Print names of new files
shell: echo {{ filename }}
arguments:
- name: filename
type: unicode_identifier
- name: filedir
type: unicode_identifier
- name: fileext
type: unicode_identifier
execOnFileCreatedInDir:
- /home/user/Downloads/
```
## [](#%5Ffile%5Fin%5Fdir%5Farguments)File in dir arguments
| Predefined Argument | Example |
| ------------------- | --------------------------------------- |
| filepath | /Downloads/txt1.txt |
| filedir | /Downloads |
| filename | test1.txt |
| fileext | .txt |
| filesizebytes | 100 |
| filemode | 0644 |
| filemtime | 2024-04-27 20:09:42.465235047 +0100 BST |
| fileisdir | false |
Like all arguments, OliveTin also passes these arguments as [environment variables](#env-vars) if this is better for your use case.
Execute on startup
====================
OliveTin can execute actions on a startup.
`config.yaml`
```yaml
actions:
- title: Say hello
shell: echo "Hello!"
execOnStartup: true
```
## [](#dnf-startup)Example: Install additional commands into OliveTin
This functionality to execute actions on startup is a very easy way to install additional commands in OliveTin, however it requires running OliveTin as a root user to be able to use `microdnf`;
`config.yaml`
```yaml
actions:
- title: Install dnsmasq
shell: microdnf install bind-utils
execOnStartup: true
```
A more secure method than running DNF as root, is a manual command the temporarily runs as root. To learn more about how to install additional packages into the container in this more secure way, see [Installing extra container packages](../reference/containerInstallPackages.html).
Execute on webhook
====================
"Webhooks" are nothing more and a name for a type of REST API call, typically using the HTTP POST method. This is already what OliveTin uses to drive it’s web interface - specifically the `StartAction` API call.
For examples of how to use all of these functions, check out the [Start Action API reference](../api/start%5Faction.html).
Shell vs Exec
====================
OliveTin supports two different methods to run commands: `shell` and `exec`. The difference between these two is thta "shell" accepts strings, and will wrap that whole command in a shall with "bash -c". Exec uses a syscall directly to execute commands.
* **Shell** is more flexible, because it allows you to chain commands (eg, using &&) and redirect or pipe output (eg: ">" or "|").
* **Exec** is more secure, because it does not invoke a shell, and thus avoids shell injection attacks.
Shell can be safe and secure with simple argument types (like ascii\_identifier), but some argument types like URL can contain basically any character - /, :, ?, &, etc - which can lead to shell injection vulnerabilities while still being a valid URL.
OliveTin will try and prevent you from using dangerous characters in shell commands (eg, URL is no longer permitted with Shell).
The way that you specify these two types of execution is different - `shell` expects a single string, while `exec` expects a list of strings (the first being the command, the rest being the arguments).
Using Shell
```yaml
actions:
- title: List files
shell: ls -l /some/directory
```
Using Exec
```yaml
actions:
- title: List files
exec:
- ls
- -l
- /some/directory
```
When in doubt, prefer `exec` over `shell` for better security. Shell was added in both OliveTin 3k and OliveTin 2k in October 2025.
Triggers
====================
Sometimes you want to trigger another action after the first one completes. This is mostly useful for updating hidden actions that update entity files, without having to run those updates on a cron job every 10 seconds!
| | OliveTin used to support a single action trigger, but now supports multiple triggers. The field trigger was renamed to triggers and is now an array of triggers. |
| ------------------------------------------------------------------------------------------------------------------------------------------------------------------- |
```yaml
entities:
- file: /etc/OliveTin/entities/containers.json
name: container
actions:
- title: stop {{ container.Names }}
shell: docker stop {{ container.Names}}
entity: container
triggers:
- update containers
- title: update containers
shell: docker ps -a --format=json > /etc/OliveTin/entities/containers.json
hidden: true
```
Environment Variables in the Config File
====================
You can pull configuration values from environment variables like this:
`config.yaml`
```yaml
logLevel: ${{ LOG_LEVEL }}
pageTitle: Olivetin - ${{ DEPLOY_ENV }}
actions:
...
```
While loading the config file, Olivetin will substitute the value of the named environment variable for the token. If the variable is unset, Olivetin will use an empty string as the value and log a warning. This syntax works even for configuration values that aren’t strings, as long as the final string value can be converted to the proper type.
## [](#%5Fnotes)Notes
1. These variables are read while loading the config file. Changes in the environment won’t be reflected until the config file is reloaded. If you want to read environment variables at execution time in your action’s `shell` line, make sure to use regular shell syntax, i.e., `$FOO` rather than `${{ FOO }}`. See [environment variables](../args/env.html)for info on using environment variables in your actions.
Diagnostics
====================
OliveTin provides a built-in diagnostics page that can be used to help check how OliveTin is running and help to troubleshoot issues. It’s mainly designed for checking SSH configuration at the moment.
This is a screenshot of the diagnostics page, which can be accessed by clicking the "Diagnostics" link in the navigation bar:

## [](#%5Fdisabling%5Fdiagnostics)Disabling Diagnostics
The diagnostics page is enabled by default, but you can disable it by using the OliveTin [security policy configuration](../security/acl.html#%5Facls%5Fand%5Fpolicies%5Fglobal), using the defaults, or via an ACL. Examples are shown below for each of these methods.
### [](#%5Fdisable%5Fdiagnostics%5Ffor%5Fall%5Fusers)Disable Diagnostics for all users;
```yaml
logLevel: info
defaultPolicy:
showDiagnostics: false
```
### [](#%5Fdisable%5Fdiagnostics%5Fexpect%5Ffor%5Fadmin%5Fusers)Disable Diagnostics expect for admin users
```yaml
logLevel: info
defaultPolicy:
showDiagnostics: false
accessControlLists:
- name: admin
matchUsernames:
- alice
- bob
policy:
showDiagnostics: true
```
Advanced Configuration
====================
This section includes optional configuration options that are used less frequently by most users.
Logging - Actions
====================
| | There are two different types of logs in OliveTin - [application logs](logs.html) and [action logs](#). This page is about the _action logs_, which are the logs that are generated by the actions that you run in OliveTin. |
| ------------------------------------------------------------------------------------------------------------------------------------------------------------------------------------------------------------------------------- |
## [](#%5Fcontrolling%5Faccess%5Fto%5Fsee%5Faction%5Flogs)Controlling access to see action logs
You can control access to action logs using **permissions**, which are assigned to actions.
### [](#%5Fdisabling%5Flogs%5Ffor%5Fall%5Fusers)Disabling logs for all users
```yaml
logLevel: info
defaultPermissions:
logs: false
```
### [](#%5Fenabling%5Flogs%5Ffor%5Fa%5Fspecific%5Facl)Enabling logs for a specific ACL
```yaml
logLevel: info
defaultPermissions:
logs: false
accessControlLists:
- name: admin
matchUsernames:
- alice
- bob
permissions:
logs: true
addToEveryAction: true
actions:
- title: My Action
shell: echo "Hello World"
```
## [](#%5Fdisabling%5Fthe%5Flog%5Fviewer)Disabling the log viewer
You can disable the log viewer in the interface with [security policy configuration](../security/acl.html#%5Facls%5Fand%5Fpolicies%5Fglobal), using the defaults, or via an ACL. Examples are shown below for each of these methods.
### [](#%5Fdisable%5Flog%5Fviewer%5Ffor%5Fall%5Fusers)Disable log viewer for all users;
```yaml
logLevel: info
defaultPolicy:
showLogList: false
```
### [](#%5Fdisable%5Flog%5Fviewer%5Fexpect%5Ffor%5Fadmin%5Fusers)Disable log viewer expect for admin users
```yaml
logLevel: info
defaultPolicy:
showLogList: false
accessControlLists:
- name: admin
matchUsernames:
- alice
- bob
policy:
showLogList: true
```
## [](#%5Fsee%5Falso)See Also
* [Saving Action logs](../action%5Fcustomization/savelogs.html)
* [Application Logs](logs.html)
Logging - Application
====================
| | There are two different types of logs in OliveTin - [application logs](#) and [action logs](logs-actions.html). This page is about the _application logs_, which are the logs that OliveTin itself generates. The action logs are the logs that are generated by the actions that you run in OliveTin. |
| --------------------------------------------------------------------------------------------------------------------------------------------------------------------------------------------------------------------------------------------------------------------------------------------------------- |
OliveTin supports a few different log levels. The default logLevel is `INFO`.
You can set a `logLevel` in config.yaml like this;
`config.yaml`
```yaml
logLevel: "INFO"
actions:
....
```
The supported log levels are;
* `DEBUG` \- Every possible log message will be shown. This will use a lot of disk space and is not recommended unless you are a developer / like reading code.
* `ERROR` \- OliveTin rarely uses the `ERROR` log level.
* `WARN` \- Very few messages, only warnings are shown.
* `INFO` \- The defualt log level.
You can change the `logLevel` while OliveTin is running, and it should update as soon as you save your config.yaml. You will always get a log message like this;
```bash
INFO Setting log level to warning
```
## [](#%5Fjson%5Flog%5Fformat)JSON Log Format
* OliveTin 2k supports JSON log format from version **2025.10.30**.
* OliveTin 3k supports JSON log format from version **3000.2.2**.
You can enable JSON log format by setting the `OLIVETIN_LOG_FORMAT` environment variable to `json`.
Example of setting `OLIVETIN_LOG_FORMAT` to `json`.
```bash
root@server: ./OliveTin
{"commit":"nocommit","date":"nodate","level":"info","msg":"OliveTin initializing","time":"2025-10-30T10:09:55Z","version":"dev"}
{"level":"debug","msg":"Value of -configdir flag","time":"2025-10-30T10:09:55Z","value":"."}
{"level":"debug","msg":"servicehost nonwin","time":"2025-10-30T10:09:55Z"}
{"level":"info","msg":"Setting log level to info","time":"2025-10-30T10:09:55Z"}
{"level":"info","msg":"OliveTin initialization complete","time":"2025-10-30T10:09:55Z"}
{"configDir":"/home/xconspirisist/sandbox/Development/OliveTin/OliveTin","level":"info","msg":"OliveTin started","time":"2025-10-30T10:09:55Z"}
```
Ports
====================
See [the network ports](../reference/network-ports.html) documentation in the reference section.
Prometheus
====================
OliveTin supports basic Prometheus metrics, and the project is interested to hear about what more metrics people would find useful, as well!
To enable Prometheus support;
`config.yaml`
```yaml
logLevel: INFO
prometheus:
enabled: true
defaultGoMetrics: false
```
It is required to restart OliveTin after changing the `prometheus` configuration.
The `defaultGoMetrics` option will enable the default Go metrics, which expose metrics like go\_memstats\_alloc\_bytes, or go\_memstats\_heap\_alloc\_bytes, and generally most people don’t need these.
This will give you metrics available at . The page should look something like this;
```asciidoc
# HELP olivetin_actions_requested_count The actions requested count
# TYPE olivetin_actions_requested_count gauge
olivetin_actions_requested_count 0
# HELP olivetin_config_action_count Then number of actions in the config file
# TYPE olivetin_config_action_count gauge
olivetin_config_action_count 18
# HELP olivetin_config_reloaded_count The number of times the config has been reloaded
# TYPE olivetin_config_reloaded_count counter
olivetin_config_reloaded_count 1
# HELP olivetin_sv_count The number entries in the sv map
# TYPE olivetin_sv_count gauge
olivetin_sv_count 49
```
Stylemods
====================
There are several style modifications that some people like to use, which can easily be added to OliveTin. The configuration syntax in your .config.yaml is very simple, and looks like this with a single style mod;
```yaml
stylemods:
- sm-side-icons
```
You can add as many style mods as you like, but note that some of them may conflict with each other. The style mods are applied in the order they are listed, so if you have a conflict, the last one in the list will take precedence.
## [](#%5Favailable%5Fstyle%5Fmods)Available Style Mods
* `sm-side-icons`: Display action buttons with the icons on the left hand side rather than above the text.
* `sm-imageicons-fullwidth`: Display image icons in full width, rather than the default size.
The list of style mods on this page
## [](#%5Ffeature%5Fhistory)Feature history
* OliveTin `2025.7.29` introduced the ability to use style modifications, or "style mods".
Timezones
====================
OliveTin will obviously use the system time just like all other programs, but when running in a container, time works in a slightly unusual way.
You may be used to using a TZ or TIMEZONE environment variable in your Linux container inages, but this is not a standard that works for all Linux distributions - it’s mostly supported by Debain based containers. OliveTin’s base container image is fedora-minimal, which deliberately does not include timezone data, to reduce storage space.
To change the time in the OliveTin container, simply bind-mount the correct zone file;
Same as the container host
```asciidoc
docker create -v /etc/localtime:/etc/localtime -v /etc/OliveTin:/config --name OliveTin docker.io/jamesread/olivetin
```
Different timezone to the container host
```asciidoc
docker create -v /usr/share/zoneinfo/Japan:/etc/localtime -v /etc/OliveTin:/config --name OliveTin docker.io/jamesread/olivetin
```
Customize the web UI
====================
The OliveTin web UI is reasonably customizable - parts of the page that you don’t need can be hidden when they’re not needed.
## [](#%5Fpage%5Ftitle)Page Title
You can customize the page title;

`config.yaml`
```yaml
pageTitle: My OliveTin Instance
```
## [](#show-nav)Navigation - show / hide
You can choose to hide the navigation elements in OliveTin, to present a simplified user interface.

Figure 1\. The default user interface with the sidebar shown
To have OliveTin hide these buttons, add `showNavigation: false` to your config.yaml;
`config.yaml`
```yaml
logLevel: "INFO"
showNavigation: false
actions:
....
```

Figure 2\. The same user interface, but with the sidebar hidden (`showNavigation: false`)
## [](#section-navgiation-style)Section Navigation Style
`sectionNavigationStyle` \- You can choose to have the section navigation buttons displayed as a Sidebar (`sidebar` \- default), or along the top (`topbar`).
### [](#%5Fsidebar%5Fnavigation%5Fstyle%5Fdefault)Sidebar navigation style (default)
`sectionNavigationStyle: sidebar` looks like this;

### [](#%5Ftopbar%5Fnavigation%5Fstyle)Topbar navigation style
`sectionNavigationStyle: topbar` looks like this;

## [](#show-new-versions)New version available - show/hide
You can disable the "new version" information in the footer - the default for `showNewVersions` is `true`;
`config.yaml`
```yaml
logLevel: "INFO"
showNewVersions: false
```
OliveTin does not check for updates by default. To enable it, see [enable update checking](../reference/updateChecks.html).
## [](#show-footer)Footer visibility - show / hide
You can disable the entire footer, if you would like a really minimal interface. The default for `showFooter` is `true`.
`config.yaml`
```yaml
logLevel: "INFO"
showFooter: false
```
This means the [showNewVersions](#show-new-versions) configuration option will automatically be `false` as well.
## [](#%5Fadditional%5Fsection%5Fnavigation%5Flinks)Additional section navigation links
You can add custom links to the OliveTin navigation bar. This is useful if you want to link to other OliveTin instances, or other web applications.
```yaml
additionalNavigationLinks:
- title: Duck Duck Go
url: https://duckduckgo.com
target: _blank
```
This will render like this;

## [](#custom-js)Custom JavaScript
This is considered an advanced feature, and is not recommended unless you like writing your own code.
You can add custom JavaScript to OliveTin, which will be executed on every page load. This can be useful for adding custom functionality to the web UI.
1. The custom javascript should be in a file called `custom.js` and saved in `custom-webui/`, which should be in the same directory as your `config.yaml`.
2. You can put whatever code you like really in your `custom.js` file.
3. Set `enableCustomJs: true` in your `config.yaml` to enable this feature.
4. Restart OliveTin. Note that the custom JavaScript will only be loaded once on startup, so if you are changing the custom JavaScript while OliveTin is running, you will need to restart OliveTin to see the changes.
## [](#%5Fcustom%5Fcss%5Fwith%5Fa%5Fcustom%5Ftheme)Custom CSS (with a custom theme)
You can customize OliveTin with themes, but it’s also possible to write your on very simple theme that contains just a few CSS rules to change the look and feel of OliveTin. This is very useful if you just want to change the colours of OliveTin, or hide a few elements.
### [](#%5Fwriting%5Fa%5Fsimple%5Ftheme%5Fwith%5Fa%5Fcss%5Fchange)Writing a simple theme with a CSS change
You’ll need to create a new theme, and let’s assume our theme namme is going to be called `uihack`. OliveTin themes are simply a directory of CSS and other assets. OliveTin looks for a directory called `custom-webui/themes/` in the same directory as your `config.yaml` file.
Start by creating a directory called `custom-webui/themes/uihack` relative to the same directory as your `config.yaml` file. In this directory, create a file called `theme.css`.
```yaml
├── config.yaml
└── custom-webui
└── themes
└── uihack
└── theme.css
```
Here’s an example of what your `theme.css` should contain;
```css
body {
background-color: red;
}
```
### [](#%5Fsetup%5Folivetin%5Fconfig%5Fto%5Fuse%5Fyour%5Ftheme)Setup OliveTin config to use your theme
Now you need to tell OliveTin to use your new theme. To do this, set `themeName: uihack` in your OliveTin config.yaml and restart OliveTin.
```yaml
logLevel: "INFO"
themeName: uihack
```
| | OliveTin will by default only read theme.css once on startup. If you are intending to change theme.css while OliveTin is running, set themeCacheDisabled: true in your config.yaml. This will make OliveTin read theme.css on every request, and is useful for development. |
| ------------------------------------------------------------------------------------------------------------------------------------------------------------------------------------------------------------------------------------------------------------------------------ |
Restart OliveTin for the theme change to take effect. Beware of the theme cache mentioned above, if you are making changes to the CCS and refreshing the page a few times.
* [More information on theme development](../reference/reference%5Fthemes%5Ffor%5Fdevelopers.html)
undefined
====================
The OliveTin 2k API is different to the OliveTin 3k API.
# [](#%5Fapi%5Foverview)API Overview
This section of the documentation is intended for developers, and those who want to hack around with OliveTin and extend it. This page provides a few pointers to get started.
**Short version**:
* on your OliveTin server to get the REST API.
* [Swagger](http://docs.olivetin.app/api/swagger/) documents the API.
**Longer version**: The OliveTin API is formally defined using the Protobuf IDL, which generates gRPC stubs, as well as a REST Gateway.
The REST API gateway is used by the WebUI, and you can use it too by default - it is exposed at "/api" by default.
The gRPC API only listens on localhost default, but it can be set to listen publicly. See [the network ports documentation](../reference/network-ports.html) for a better description of how the APIs are exposed. Most people do not need to use the gRPC API.
## [](#%5Flinks)Links
* [OliveTin 2k API: Swagger UI](http://docs.olivetin.app/api/swagger/)
* [OliveTin 2k API: OpenAPI JSON Definition](http://docs.olivetin.app/api/swagger/OliveTin.openapi.json)
* [OliveTin 3k API: Swagger UI](http://docs.olivetin.app/api/swagger/3k/)
* [OliveTin 3k API: OpenAPI JSON Definition](http://docs.olivetin.app/api/swagger/3k/OliveTin.openapi.json)
* [The OliveTin Protobuf file](https://github.com/OliveTin/OliveTin/blob/main/proto/olivetin/api/v1/olivetin.proto).
Please do talk to the developers on Discord if you’d like help using the API, or you’re thinking about building something interesting using the API!
Local User Login via API
====================
OliveTin supports serveral different ways to login, and most installations will probably login via reverse proxy, or via local user login.
To login via local user login, you can use the following API call: `/LocalUserLogin`. This is documented in the API documentation which can be found here;
The API call is a POST request, and you need to provide a `username` and `password` as a JSON object in the body of the request. Here is an example of how you can login via a cURL request;
```bash
user@host: curl -X POST "http://olivetin-server:1337/api/LocalUserLogin" -H "accept: application/json" -H "Content-Type: application/json" -d '{"username":"admin","password":"toomanysecrets"}' -v
...
< Set-Cookie: olivetin-sid-local=c6c5b2b3-a58b-4dbc-b070-ed7bdd3f1956; Path=/; Max-Age=31556952; HttpOnly
...
{"success":true}
```
You can see from the above example that the header response sets a cookie called "olivetin-sid-local" to a UUID which is your session ID. You must include this cookie with future requests to authenticate yourself.
You can also that the body of the response is a JSON object with a simple `success` key, which will be `true` if the login was successful, and `false` if it was not.
## [](#%5Fcheck%5Flogin%5Fwith%5Fwhoami)Check login with `WhoAmI`
You can check your current login status by using the `/WhoAmI` API call. This is a GET request, and you need to provide the `olivetin-sid-local` cookie in the request. Here is an example of how you can check your login status via a cURL request;
```bash
user@host: curl -X GET http://localhost:1337/api/WhoAmI -H "accept: application/json" -H 'Content-Type: application/json' -b "olivetin-sid-local=cd33aa9c-c613-473e-8581-2b742716ab8e"
{"authenticatedUser":"admin", "usergroup":"", "provider":"local", "acls":[], "sid":""}
```
API Method: StartAction
====================
This is the method the OliveTin web UI uses to start actions, and is probably the best method to use if you are writing scripts.
* **HTTP Method**: `POST`
* **Request Type**: OliveTin request object
* **Response Type**: Execution Tracking ID
There are several variants of this API call available which might be easier for scripts (or humans) to work with:
There are 4 main methods to start an action in OliveTin, which can be used in scripts or other applications. These methods allow you to trigger actions either immediately or wait for them to complete, and they can be accessed via HTTP requests.
__Webhook/API reference table__
| Function | HTTP Method | Request Type (How to select an action) | Response Type |
| ---------------------------------------------------------------- | ----------- | -------------------------------------------------------------- | --------------------------------------------------------------------------------------- |
| [StartAction](#) | POST | [OliveTin request object](start%5Faction.html#api-request-obj) | [Execution Tracking ID](start%5Faction.html#api-response-trackingid) |
| [StartActionByGet](method%5FStartActionByGet.html) | GET | [Action ID in the URL](start%5Faction.html#api-request-idurl) | [Execution Tracking ID](start%5Faction.html#api-response-trackingid) |
| [StartActionAndWait](method%5FStartActionAndWait.html) | POST | [OliveTin request object](start%5Faction.html#api-request-obj) | [Log Entry (waits for the action to finish)](start%5Faction.html#api-response-logentry) |
| [StartActionByGetAndWait](method%5FStartActionByGetAndWait.html) | GET | [Action ID in the URL](start%5Faction.html#api-request-idurl) | [Log Entry (waits for the action to finish)](start%5Faction.html#api-response-logentry) |
You can also browse these methods in the [OpenAPI/Swagger](htts://docs.olivetin.app/api/swagger/) docs if you prefer.
## [](#%5Fexample%5Fapi%5Fcall%5Fstart%5Fan%5Faction%5Fusing%5Fstartaction)Example API call: Start an action using `StartAction`
curl
```bash
user@host: curl -X POST "http://olivetin.webapps.teratan.lan/api/StartAction" -d '{"actionId": "nuclear_reactor_shutdown"}'
```
Powershell
```powershell
PS C:\Users\xcons> $json = '{"actionId": "deploy_attack_gnomes"}'
PS C:\Users\xcons> Invoke-RestMethod -Method "Post" -Uri "http://olivetinServer:1337/api/StartAction" -Body $json
```
## [](#%5Fexample%5Fapi%5Fcall%5Fstart%5Fan%5Faction%5Fusing%5Fstartaction%5Fwith%5Farguments)Example API call: Start an action using `StartAction` with arguments
curl
```bash
user:host: curl -X POST 'http://olivetin.example.com/api/StartAction' -d '{"actionId": "Ping_host", "arguments": [{"name": "host", "value": "example.com"},{"name": "count", "value": "1"}]}'
```
API Method: StartActionAndWait
====================
This method is useful is you are writing a script, and want to wait for the action to finish so that you can check the result, or get the output.
* **HTTP Method**: `POST`
* **Request Type**: OliveTin request object
* **Response Type**: Log Entry (waits for the action to finish)
There are several variants of this API call available which might be easier for scripts (or humans) to work with:
There are 4 main methods to start an action in OliveTin, which can be used in scripts or other applications. These methods allow you to trigger actions either immediately or wait for them to complete, and they can be accessed via HTTP requests.
__Webhook/API reference table__
| Function | HTTP Method | Request Type (How to select an action) | Response Type |
| ---------------------------------------------------------------- | ----------- | -------------------------------------------------------------- | --------------------------------------------------------------------------------------- |
| [StartAction](method%5FStartAction.html) | POST | [OliveTin request object](start%5Faction.html#api-request-obj) | [Execution Tracking ID](start%5Faction.html#api-response-trackingid) |
| [StartActionByGet](method%5FStartActionByGet.html) | GET | [Action ID in the URL](start%5Faction.html#api-request-idurl) | [Execution Tracking ID](start%5Faction.html#api-response-trackingid) |
| [StartActionAndWait](#) | POST | [OliveTin request object](start%5Faction.html#api-request-obj) | [Log Entry (waits for the action to finish)](start%5Faction.html#api-response-logentry) |
| [StartActionByGetAndWait](method%5FStartActionByGetAndWait.html) | GET | [Action ID in the URL](start%5Faction.html#api-request-idurl) | [Log Entry (waits for the action to finish)](start%5Faction.html#api-response-logentry) |
You can also browse these methods in the [OpenAPI/Swagger](htts://docs.olivetin.app/api/swagger/) docs if you prefer.
API Method: StartActionByGet
====================
This is the method that allows you to specify the action ID in the URL, and is probably the best to do quick integrations - QR Codes, streamdeck, etc. You cannot pass arguments using this method.
* **HTTP Method**: `GET`
* **Request Type**: Action ID in the URL
* **Response Type**: Execution Tracking ID
There are 4 main methods to start an action in OliveTin, which can be used in scripts or other applications. These methods allow you to trigger actions either immediately or wait for them to complete, and they can be accessed via HTTP requests.
__Webhook/API reference table__
| Function | HTTP Method | Request Type (How to select an action) | Response Type |
| ---------------------------------------------------------------- | ----------- | -------------------------------------------------------------- | --------------------------------------------------------------------------------------- |
| [StartAction](method%5FStartAction.html) | POST | [OliveTin request object](start%5Faction.html#api-request-obj) | [Execution Tracking ID](start%5Faction.html#api-response-trackingid) |
| [StartActionByGet](#) | GET | [Action ID in the URL](start%5Faction.html#api-request-idurl) | [Execution Tracking ID](start%5Faction.html#api-response-trackingid) |
| [StartActionAndWait](method%5FStartActionAndWait.html) | POST | [OliveTin request object](start%5Faction.html#api-request-obj) | [Log Entry (waits for the action to finish)](start%5Faction.html#api-response-logentry) |
| [StartActionByGetAndWait](method%5FStartActionByGetAndWait.html) | GET | [Action ID in the URL](start%5Faction.html#api-request-idurl) | [Log Entry (waits for the action to finish)](start%5Faction.html#api-response-logentry) |
You can also browse these methods in the [OpenAPI/Swagger](htts://docs.olivetin.app/api/swagger/) docs if you prefer.
## [](#%5Fexample%5Fapi%5Fcall%5Fstart%5Fan%5Faction%5Fby%5Fid%5Fin%5Fthe%5Furl)Example API call; Start an action by ID in the URL
curl
```asciidoc
user@host: curl http://olivetin.example.com/api/StartActionByGet/pingGithub
```
The corresponding config.yaml would look like this;
```yaml
actions:
- title: Ping GitHub.com
id: pingGithub
shell: ping github.com -c 1
```
IDs are used by these API calls, as you probably want the interface to display a human-readable title, whereas the API call doesn’t want to have spaces or punctuation.
API Method: StartActionByGetAndWait
====================
This method is also a very easy way to quickly start an action, but it waits for the action to finish before returning the result. This is useful if you want to get the output of the action or check its result without having to poll for it.
* **HTTP Method**: `GET`
* **Request Type**: Action ID in the URL
* **Response Type**: Log Entry (waits for the action to finish)
There are several variants of this API call available which might be easier for scripts (or humans) to work with:
There are 4 main methods to start an action in OliveTin, which can be used in scripts or other applications. These methods allow you to trigger actions either immediately or wait for them to complete, and they can be accessed via HTTP requests.
__Webhook/API reference table__
| Function | HTTP Method | Request Type (How to select an action) | Response Type |
| ------------------------------------------------------ | ----------- | -------------------------------------------------------------- | --------------------------------------------------------------------------------------- |
| [StartAction](method%5FStartAction.html) | POST | [OliveTin request object](start%5Faction.html#api-request-obj) | [Execution Tracking ID](start%5Faction.html#api-response-trackingid) |
| [StartActionByGet](method%5FStartActionByGet.html) | GET | [Action ID in the URL](start%5Faction.html#api-request-idurl) | [Execution Tracking ID](start%5Faction.html#api-response-trackingid) |
| [StartActionAndWait](method%5FStartActionAndWait.html) | POST | [OliveTin request object](start%5Faction.html#api-request-obj) | [Log Entry (waits for the action to finish)](start%5Faction.html#api-response-logentry) |
| [StartActionByGetAndWait](#) | GET | [Action ID in the URL](start%5Faction.html#api-request-idurl) | [Log Entry (waits for the action to finish)](start%5Faction.html#api-response-logentry) |
You can also browse these methods in the [OpenAPI/Swagger](htts://docs.olivetin.app/api/swagger/) docs if you prefer.
Misc API calls
====================
## [](#%5Fexample%5Fapi%5Fcall%5Fget%5Fthe%5Fdashboard%5Fbuttons%5Fcomponents)Example API call: Get the dashboard buttons ("components")
curl
```asciidoc
user@host: curl http://olivetinServer:1337/api/GetDashboardComponents
```
## [](#%5Fexample%5Fapi%5Fcall%5Freadyz%5Fhealthcheck)Example API call: readyz Healthcheck
This is useful for configuring healthchecks in docker containers, or on Kubernetes.
curl
```asciidoc
user@host: curl http://olivetinServer:1337/api/readyz
{"status": "ok"}
```
The response will always be "status: ok" to indicate that the API is up, or it will timeout.
Starting Actions from the API
====================
There are several variants of this API call available which might be easier for scripts (or humans) to work with!
There are 4 main methods to start an action in OliveTin, which can be used in scripts or other applications. These methods allow you to trigger actions either immediately or wait for them to complete, and they can be accessed via HTTP requests.
__Webhook/API reference table__
| Function | HTTP Method | Request Type (How to select an action) | Response Type |
| ---------------------------------------------------------------- | ----------- | ------------------------------------------- | -------------------------------------------------------------------- |
| [StartAction](method%5FStartAction.html) | POST | [OliveTin request object](#api-request-obj) | [Execution Tracking ID](#api-response-trackingid) |
| [StartActionByGet](method%5FStartActionByGet.html) | GET | [Action ID in the URL](#api-request-idurl) | [Execution Tracking ID](#api-response-trackingid) |
| [StartActionAndWait](method%5FStartActionAndWait.html) | POST | [OliveTin request object](#api-request-obj) | [Log Entry (waits for the action to finish)](#api-response-logentry) |
| [StartActionByGetAndWait](method%5FStartActionByGetAndWait.html) | GET | [Action ID in the URL](#api-request-idurl) | [Log Entry (waits for the action to finish)](#api-response-logentry) |
You can also browse these methods in the [OpenAPI/Swagger](htts://docs.olivetin.app/api/swagger/) docs if you prefer.
## [](#api-request-idurl)Request type: Action ID in the URL
Used by:
* [StartActionByGet](method%5FStartActionByGet.html)
* [StartActionByGetAndWait](method%5FStartActionByGetAndWait.html)
If you are trying to integrate OliveTin with your own scripts or processes, it’s probably easiest to start actions by using an ID directly in the URL, [see the example](#api-eg-startIdUrl).
## [](#api-request-obj)Request type: OliveTin request object
Used by:
* [StartAction](method%5FStartAction.html)
* [StartActionAndWait](method%5FStartActionAndWait.html)
OliveTin request object structure
```json
{
"actionId": "string",
"arguments": [
{
"name": "string",
"value": "string"
}
],
"uniqueTrackingId": "string"
}
```
To find your Action ID, and understand how Action IDs work, see the [Action ID](../action%5Fcustomization/ids.html) documentation
If you need more control over the execution, then the only other option is to submit a `OliveTin reqjest object`, which is just a very simple JSON structure like this;
```json
{
"actionId": "Generate cryptocurrency",
"arguments": [],
"uniqueTrackingId": "my-tracking-id",
}
```
More detailed examples can be seen below.
## [](#api-response-trackingid)Response type: Execution Tracking ID
Used by:
* [StartAction](method%5FStartAction.html)
* [StartActionByGet](method%5FStartActionByGet.html)
Example Execution Tracking ID response
```json
{"executionTrackingId":"5bb4860c-bbd0-4bc9-a7d6-42240551500c"}
```
## [](#api-response-logentry)Response type: LogEntry
Used by:
* [StartActionAndWait](method%5FStartActionAndWait.html)
* [StartActionByGetAndWait](method%5FStartActionByGetAndWait.html)
Example log entry
```json
{
"logEntry": {
"datetimeStarted": "2024-02-27 14:14:49",
"actionTitle": "Restart httpd on server1",
"stdout": "",
"stderr": "",
"timedOut": true,
"exitCode": -1,
"user": "",
"userClass": "",
"actionIcon": "🔄",
"tags": [
],
"executionTrackingId": "b04b1e90-d457-4158-b7dc-da9e81f21568",
"datetimeFinished": "2024-02-27 14:14:52",
"actionId": "restart_httpd",
"executionStarted": true,
"executionFinished": true,
"blocked": false
}
}
```
Environment variables
====================
All argument names and values are also passed as environment variables as well, which can be very useful when passing several arguments to a script, for example.
`config.yaml`
```yaml
actions:
- title: Print names of new files
shell: /opt/newfile.py
arguments:
- name: filename
type: unicode_identifier
- name: filesizebytes
type: unicode_identifier
- name: fileisdir
type: unicode_identifier
execOnFileCreatedInDir:
- /home/user/Downloads/
```
This is an example of a python script using the environment variables;
`/opt/newfile.py`
```python
#!/usr/bin/env python
import os
print(os.environ['OLIVETIN'])
print(os.environ['FILENAME'])
print(os.environ['FILESIZEBYTES'])
print(os.environ['FILEISDIR'])
```
## [](#%5Fnotes)Notes
1. Argument names are converted to uppercase for environment variables, `name: filename` becomes `FILENAME`.
2. OliveTin also passes an environment variable called `OLIVETIN` which is always just set to `1`, which allow for scripts to detect if they are being run within OliveTin.
3. The environment variables are passed into the execution context which uses a shell (/bin/sh on Linux), so it is also possible to use them with the $ notation in the `shell` line, like this; `shell: echo $FILENAME` for example.
Input: Textbox
====================
Many times you need to customize how an action/shell command is run, with arguments. For example;
```asciidoc
echo "Hello world"
```
In the example above, `Hello world` is an argument passed to the `echo` command. OliveTin allows you to add pre-defined, and free-text arguments to commands in this way. Below is the OliveTin version of the `echo` command shown above;
`config.yaml`
```yaml
actions:
- title: echo a message
icon: smile
shell: echo {{ message }}
arguments:
- name: message
default: Hello World
type: ascii_sentence
actions:
- title: Print a message
shell: echo {{ message }}
arguments:
- name: message
description: The message you want to print out on the shell.
title: Your Message
default: Hello World
type: ascii_sentence
```
This will give you a normal button, like this;

However, when you click on it, you’ll get a prompt to enter arguments, like this;

You’ll see that the type is set to `ascii_sentence`. This applies fairly safe input validation to arguments, so that only a-z, 0-9, spaces and .'s are allowed.
When you start the action, and it’s finished, go to the "logs" view to view the output of the command we’ve just run.

Input: Checkbox/Boolean
====================
The `checkbox` type argument is a simple checkbox that can be used to toggle a boolean value. It can be especially useful to pass flags to your actions.
```yaml
actions:
- title: remove files
shell: rm {{ useTheForce }} /tmp/Downloads/
arguments:
- title: Use rm -rf?
name: useTheForce
type: checkbox
choices:
- title: 1
value: "-rf"
- title: 0
value: ""
```
Input: Confirmation
====================
The `confirmation` type argument is a special argument type, which simply disables the "Start" button until a checkbox is ticked. This can be useful if you have an action with no other arguments, but you want to prevent accidental button-clicks starting the action.
```yaml
actions:
- title: Delete old backups
icon: ashtonished
shell: rm -rf /opt/oldBackups/
arguments:
- type: confirmation
title: Are you sure?!
```

Notice in the webui the "start" button is disabled.
Input: DateTime
====================
OliveTin supports datetime pickers - note that these do NOT add your timezone, so it up to your scripts / commands to interpret which timezone is being used.
`config.yaml`
```yaml
actions:
- title: Print your favourite datetime!
shell: echo {{ my_favourite_time }}
arguments:
- type: datetime
title: My Favourite DateTime
```

## [](#%5Fformat%5Fvalidation)Format & Validation
| | The OliveTin server does try to parse and validate the date on the server side to prevent dangerous input, but there is no validation in the browser, beyond what your browser might do to prevent you from picking an invalid date. **This is safe**, as what really matters is what the server allows to be passed to be executed - and that is checked. |
| ------------------------------------------------------------------------------------------------------------------------------------------------------------------------------------------------------------------------------------------------------------------------------------------------------------------------------------------------------------- |
At the time of writing, it is not yet possible to specify only a date, or only a time, or change the date / time format.
## [](#%5Frejecting%5Fempty%5Fvalues%5Fnull)Rejecting empty values (null)
```yaml
actions:
- shell: echo "Hello {{ name }}!"
arguments:
- name: name
rejectNull: true`
```
Input: Dropdowns
====================
Predefined choices are normally the safest type of arguments, because users are limited to only enter values that you specify.
```yaml
actions:
- title: Print a message
icon: smile
shell: echo "{{ message }}"
arguments:
- name: message
description: The message you want to print out.
choices:
- title: Hello
value: Hello there!
- title: Goodbye
value: Aww, goodbye. :-(
```
Note that when predefined choices are used, the argument type is ignored.
This is what it looks like in the web interface;

Then finally, when you execute this command, it would look something like this (remember that this is just a basic "echo" command).

In the logs, you can then click on the log entry link to open the results;

## [](#args-dropdown-entities)Using Entities in Dropdowns
Dropdowns can also be populated with a list of entities, like this;
`config.yaml`
```yaml
actions:
- title: restart container
shell: 'docker restart {{ containerToRestart }}'
arguments:
- name: containerToRestart
entity: container
title: 'Select Container'
choices:
- value: '{{ container.Names }}'
title: '{{ container.Names }}'
entities:
- file: entities/containers.json
name: container
```
This is what it looks like in the web interface;

## [](#%5Frejecting%5Fempty%5Fvalues%5Fnull)Rejecting empty values (null)
```yaml
actions:
- shell: echo "Hello {{ name }}!"
arguments:
- name: name
rejectNull: true`
```
## [](#%5Fdefault%5Fvalues)Default values
Dropdown arguments can also have default values. This is done by adding a `default` key to the argument definition.
`config.yaml`
```yaml
actions:
- title: "Print your favorite movie"
shell: echo '{{ movie }} is amazing'
arguments:
- name: movie
choices:
- value: "Star Wars"
- value: "Star Trek"
- value: "The Matrix"
default: "Star Trek"
```
Input: Textarea
====================
OliveTin supports multi-line text inputs, which can be useful for longer messages or scripts. You should set your argument `type` to `raw_string_multiline` to use these.
As the name implies, textareas are raw, and are NOT validated by any regex.
`config.yaml`
```yaml
actions:
- title: Save text to file
shell: echo "$CONTENT" > file
arguments:
- type: raw_string_multiline
name: content
```
This renders like this;

Introduction to Arguments
====================
Actions and commands that OliveTin runs, without arguments, are generally quite safe - only that command can be run, without modifications. However, many users need the flexibility to set options on that command - normally called command line arguments. In OliveTin, arguments are defined in a shell commands like `echo {{ message }}`, with a bit of extra configuration.
Examples of valid argument names are `{{ personName }}`, `{{ customer_number }}` and `{{ ISBN11_code }}`.
* a-z (case insensitive)
* \_ is allowed
* numbers are allowed (argument names can also start with numbers)
* all other characters are invalid for argument names.
Password
====================
Sometimes you want to mask the input you pass, and a password field is useful for this.
| | Passwords are passed to the OliveTin server in cleartext (unless you’re using HTTPS), and are just treated as a string on the server side. |
| --------------------------------------------------------------------------------------------------------------------------------------------- |
`config.yaml`
```yaml
actions:
- title: echo a message
icon: smile
shell: echo {{ my_password }}
arguments:
- name: my_password
type: password
```
Custom regex
====================
OliveTin version 2024.02.081 and above support custom regex patterns for argument types. Here is an example to validate against any 3 letter word;
| | The regex pattern should be enclosed in single quotes, otherwise you will probably get a YAML error when starting OliveTin. |
| ------------------------------------------------------------------------------------------------------------------------------ |
`config.yaml`
```yaml
actions:
- title: echo a message
icon: smile
shell: echo "{{ message }}"
arguments:
- name: message
type: 'regex:^\w\w\w$'
```
The site is a good place to test your regex patterns. OliveTin checks your regex 2 times;
1. **Regex in the browser** (which probably uses PCRE or Perl Compatible Regular Expressions) - this is so that the browser can give you a nice validation message. This is ignored when it reaches the server though, or if you are using the API directly. Select "PCRE" on the regex101 site when testing.
2. **Regex on the server** (which uses Golang’s regex engine) - this is the one that actually validates the input. Select "Golang" on the regex101 site when testing.
You cannot specify different regex patterns for the browser and server. The regex pattern you create will need to be compatible with both types of regex engine.
Important Safety Warning
====================
Before you continue, it’s important to read through this safety warning.
OliveTin supports customization of command line arguments, but there is a element of risk. For example, if your command is `echo {{ message }}`, and you allow your users to set `{{ message }}` to the value `"" && rm -rf /` , then you’ve got real problems. For this reason, OliveTin tries to give you useful ways to restrict what users are allowed to enter - with **argument types**.
However, here are some important rules to try and follow with argument types;
* Use the most restrictive argument types when possible - `ascii` and `int`. This will stop users entering argument values that might be used dangerously, but it’s not foolproof. For example, if you have a command like `createSnapshot.sh --count {{ snapshotCount }}`, and set `snapshotCount` to `int`, then at least users will only be able to enter integer numbers. However, nothing stops them entering crazy values like 9999.
* Don’t give access to actions with arguments to people you don’t trust. Please don’t ever put your OliveTin install on the public internet!
Suggestions
====================
Argument inputs can also have "suggested" values, which can make it quicker to type commonly used options. The way that these are displayed will vary depending on your browser, as they are implemented as a modern HTML5 browser feature called "datalist".
Suggestions are configured like this;
Configuration example of input suggestions
```yaml
actions:
- title: Restart Docker Container
icon: restart
shell: docker restart {{ container }}
arguments:
- name: container
title: Container name
suggestions:
- plex:
- graefik:
- grafana:
- wifi-controller: WiFi Controller
- firewall-controller: Firewall Controller
```
In the examples above, there are 5 suggestions. The first 3 suggestions contain a suggestion with a blank title. The last 2 suggestions contain a human readable title (eg: `wifi-controller` is the suggestion, and `WiFi Controller` is the title).
| | suggestions: is a yaml **map**, not a **list**. If you leave the title empty you must still end the suggestion with a ":". |
| ----------------------------------------------------------------------------------------------------------------------------- |
## [](#%5Fexamples)Examples

Figure 1\. Screenshot of input suggestions with Firefox on Linux.

Figure 2\. Screenshot of input suggestions with Chrome on Linux.
## [](#%5Fbrowser%5Fsupport)Browser Support
`datalist` is widely supported now-a-days, but Firefox on Android notably lacks support; . See the upstream bug here; .
Argument types
====================
A full list of argument types are below;
__Argument types reference table__
| Type | Rendered as | Allowed values |
| ---------------------------- | ----------------------------------------- | -------------------------------------------------------------------------------------------------------------------------------------------------------------------------------------------------------------------------------------------------------------------------- |
| (default) | [Textbox](input.html) | If a type: is not set, and choices: is empty, then ascii will be used, and a warning will be logged. It is recommended that you set the type explicitly, rather than relying on defaults. |
| ascii | [Textbox](input.html) | a-z (case insensitive), 0-9, but no spaces or punctuation |
| ascii\_identifier | [Textbox](input.html) | Like a DNS name, a-Z (case insensitive), 0-9, \-, ., and \_. |
| ascii\_sentence | [Textbox](input.html) | a-z (case insensitive), 0-9, with spaces, . and ,. |
| unicode\_identifier | [Textbox](input.html) | Like an ascii identifier, but allows unicode characters. This is useful for languages that use non-ascii characters, such as Chinese, Japanese, etc. |
| email | [Textbox](input.html) | An email address. |
| password | [Password](password.html) | A password, which is hidden when typed. |
| very\_dangerous\_raw\_string | [Textbox](input.html) | Anything. This is **incredibly dangerous**, as effectively people can type anything they like, including executing additional commands beyond what you specify. Absolutely should not be used unless your OliveTin instance can only be used by people you trust entirely. |
| regex:… | [Textbox](input.html) | Version 2024.03.081 and above support custom regex patterns. See [Custom regex arguments](regex.html). |
| int | [Textbox](input.html) | Any number, made up of the characters 0 to 9\. Negative numbers are not supported. |
| url | [Textbox](input.html) | A url, e.g. |
| confirmation | [Confirmation](input%5Fconfirmation.html) | A "hidden" argument that makes the action require a confirmation before launching. |
| n/a, but choices used | [Dropdown](input%5Fdropdown.html) | A "hidden" argument that makes the action require a confirmation before launching. |
| raw\_string\_multiline | [Textarea](input%5Ftextarea.html) | Anything. This is **dangerous**, as effectively people can type anything they like |
Fieldsets
====================
It is possible to group actions together in a "group", which is not a directory, but is called a "fieldset". This is an example of a fieldset that contains two [Folders](3-folders.html).

Fieldsets are defined under a [Dashboards](intro.html) in your config.yaml.
`config.yaml`
```yaml
dashboards:
- title: My First Dashboard
contents:
- title: Fieldset 1
type: fieldset
contents: []
- title: Fieldset 2
type: fieldset
contents: []
```
Fieldsets are also generated for you when you use [Entities](../entities/intro.html).
`config.yaml`
```yaml
dashboards:
- title: My First Dashboard
contents:
- title: Fieldset 1
type: fieldset
entity: server
contents:
- title: Start {{ server.Name }}
- title: Shutdown {{ server.Name }}
```
Folders (Directories)
====================
Folders (Directories) are a good way to group up actions in the same way that you would organize files on your computer into directories.

You must first create a dashboard to use a directory, and then you "reference" actions that you want in that folder based on the action name. Anything without a "contents" property is treated as an action.
Let’s look at the example below with 4 actions, 2 top level folders and 1 subfolder.
`config.yaml`
```yaml
actions:
- title: Action 1
shell: echo "action1"
- title: Action 2
shell: echo "action2"
- title: Action 3
shell: echo "action3"
- title: Action 4
shell: echo "action4"
dashboards:
- title: My First Dashboard
contents:
- title: Fieldset 1
type: fieldset
contents:
- title: Folder 1
contents:
- title: Action 1
- title: Action 2
- title: Subfolder 2
contents:
- title: Action 3
- title: Folder 2
contents:
- title: Action 4
```
Displays
====================
Displays are a way of displaying text, values, variables and similar on a dashboard.
They are rendered as just a simple box, that shown alongside actions. You can add arbitary HTML to a display, which makes it useful for showing links, etc.

`config.yaml`
```yaml
dashboards:
# This the second dashboard.
- title: My Containers
contents:
# This is a fieldset, which is a way of dashboard items together actions together.
- title: Container {{ container.Names }}
entity: container
type: fieldset
contents:
# This is a display
- type: display
title: |
{{ container.Names }}
'
shell: docker ps
```
### [](#%5Fsaving%5Fand%5Fserving%5Ficons%5Ffor%5Foffline%5Fuse)Saving and serving icons for "offline" use
Sometimes you might want to store images to use as icons, with your installation of OliveTin. This can be useful when your installation is meant to be offline, or disconnected from the internet. This is easily done.
OliveTin will try to create a directory called `custom-webui` in the same directory as the `config.yaml` file. If this directory exists, OliveTin will serve files from this directory as if they were in the standard webui directory, in the same path as your OliveTin web UI.
Ideally, put your icons in a directory like `/custom-webui/icons/`. If this directory contained a file called "mrgreen.gif", then it would be served at ``. Below is a picture of Mr Green. Feel free to save his likeness and awesomeness for yourself, for future awesome offline usage.

Figure 2\. Mr Green, the original awesome smily.
In your OliveTin config, customize your command again using HTML, like this;
```asciidoc
actions:
- title: Mr Green
icon: ''
shell: echo "I don't like the word 'emoji' "
```
This will result in a locally hosted icon that will work offline, that looks like this;

Action IDs
====================
OliveTin actions do not require IDs to be specified in the `config.yaml`, as most users of OliveTin start off with the Web Interface. However, if you want to use OliveTin actions via the [API](../api/intro.html), then you will need to set your action IDs manually.
| | OliveTin will automatically generate a new ID for actions every time it starts up, for actions that don’t have an id: property set. |
| -------------------------------------------------------------------------------------------------------------------------------------- |
```yaml
actions:
- title: Start the reactor
id: start_reactor
shell: /bin/startReactor.sh
```
Action customisation
====================
There are several ways to customize actions. See the links in this section to see how to do it.
Popup on Start (Execution Feedback)
====================
OliveTin now has several options to control "execution feedback" when actions are started. This can be controlled on a per-action basis, using the `popupOnStart` configuration option.
You can also set the default for OliveTin using the `defaultPopupOnStart` configuration option.
## [](#%5Fbig%5Fflashy%5Fbuttons%5Fdefault)Big Flashy Buttons (default)
`config.yaml`
```yaml
actions:
- title: Ping the Internet
popupOnStart: default
```
This will also be the option that is used if no other values match.

## [](#%5Fexecution%5Fdialog%5Foutput%5Fonly)Execution Dialog (Output Only)
This can be useful for just displaying the output of a command, without too many additional details like the start time, end time, etc.
`config.yaml`
```yaml
actions:
- title: Check disk space
popupOnStart: execution-dialog-stdout-only
```
| | OliveTin used to separate out the Standard Output (stdout) and Standard Error (stderr) into two separate output streams. This made no sense, as lines would effectively be separated. This behavior has change to now display stdout and stderr in the same output stream. However, the configuration option execution-dialog-stdout-only was not renamed - and now it includes stderr as well. |
| -------------------------------------------------------------------------------------------------------------------------------------------------------------------------------------------------------------------------------------------------------------------------------------------------------------------------------------------------------------------------------------------------- |

## [](#%5Fexecution%5Fdialog)Execution Dialog
The `execution-dialog` option for `popupOnStart` is simialr to the above `execution-dialog-stdout-only`, but it includes the start time, end time, exit code and the duration of time it took for the command to execute.
`config.yaml`
```yaml
actions:
- title: Check dmesg logs
popupOnStart: execution-dialog
```

Figure 1\. Example of `popupOnStart: execution-dialog`
## [](#%5Fexecution%5Fbuttons)Execution Buttons
This mode of `popupOnStart` will create a new button for each individual execution. This can be useful for actions that are executed again and again.
The text of the button (eg, "0s" in the screenshot below), is the time it took to execute the action in seconds.
`config.yaml`
```yaml
actions:
- title: date
popupOnStart: execution-button
```

Rate limiting
====================
By default, OliveTin allows you to execute actions as fast as you can click the button. This is fine if you are running OliveTin with trusted users in a trusted environment, but otherwise you may want to rate limit actions.
Rate limiting is implemented like this;
`config.yaml`
```yaml
actions:
- title: date
shell: date
icon: clock
maxRate:
- limit: 3
duration: 5m
```
If you try to execute `date` more than 3 times in 5 minutes, you will get a log message in the UI that looks like this;

Additionally, OliveTin will also output this to it’s process log;
```asciidoc
INFO Blocked from executing. This action has run 3 out of 3 allowed times in the last 5m. actionTitle="date"
```
Saving logs
====================
By default, OliveTin only keeps logs in memory, meaning that if you restart OliveTin your logs will be lost. For some use cases this is acceptable, but you can configure OliveTin to save logs for you.
You can configure the global setting for saving logs, or override it on a per-action basis;
`config.yaml`
```yaml
saveLogs:
resultsDirectory: /var/log/OliveTin/results/
outputDirectory: /var/log/OliveTin/output/
actions:
# This will use the default `saveLogs` setting.
- title: date
shell: date
# This will override the default `saveLogs` setting.
- title: date2
shell: date
saveLogs:
resultsDirectory: /logs/
outputDirectory: /logs/
```
From the above example, you can see there There are two types of logs - **results (.yaml)** and **output (.log)**
* **Results (.yaml)** \- this captures almost everything that OliveTin knows about the action and looks like this.
Example results - date.1714333384.5e2dc9e5-b6b3-445b-bff9-c2082b0bbbb2.yaml
```yaml
datetimestarted: 2024-04-28T20:43:04.426754136+01:00
datetimefinished: 2024-04-28T20:43:04.436596926+01:00
stdout: |
Sun 28 Apr 20:43:04 BST 2024
stderr: ""
timedout: false
blocked: false
exitcode: 0
tags: []
executionstarted: true
executionfinished: true
executiontrackingid: 5e2dc9e5-b6b3-445b-bff9-c2082b0bbbb2
process:
pid: 4168638
actiontitle: date
actionicon: '😀'
actionid: d3cf6e25-8bab-432d-b4f9-e6f531b2b67b
```
* **output (.log)** \- this just captures the output - stdout, stderr from an execution,
Example output - date.1714333384.5e2dc9e5-b6b3-445b-bff9-c2082b0bbbb2.log
```asciidoc
Sun 28 Apr 20:43:04 BST 2024
```
Timeouts
====================
By default, actions in OliveTin have a **3 second timeout** for all actions. This means that OliveTin will kill the action if it is running for longer than the timeout, which can be useful to stop commands running for a long time.
You can set your own timeouts like this;
```yaml
actions:
- title: My special action
shell: sleep 5
timeout: 10
```
| | Allowing commands to run for infinity just doesn’t seem to make sense, or at least is probably a bad case for OliveTin. Therefore, if you set a timeout**less than 3 seconds**, OliveTin will overwrite your Timeout and default to 3 seconds. If you think you have a use case where a shorter (or infinite) timeout makes sense, please open an issue and let’s discuss. |
| ----------------------------------------------------------------------------------------------------------------------------------------------------------------------------------------------------------------------------------------------------------------------------------------------------------------------------------------------------------------------------- |
## [](#%5Fcheck%5Fthe%5Flogs)Check the logs
If a action really does "time out", it will show in the logs with "(timed out)" next to the exist code;

Run as different users
====================
OliveTin does not **need** to run as root. It does not request any special permissions from the operating system that require root (as long as you run on ports above 1024, and it can read/write it’s configuration). So, you can run as any non-root user if you wish.
However, it is very convenient to run as root, as many users will need to run actions and jobs that do require root permissions.
There are no ways in OliveTin to specify which user runs an action, because the Linux OS has several great ways to do this already, and adding support for it in OliveTin just adds bloat when there are perfectly good ways that already exist.
## [](#%5Feg%5Fusing%5Fsudo)EG: Using sudo;
```asciidoc
actions:
- title: Run echo as a different user
shell: sudo -u bob echo "I am Bob."
```
If you are worried about security, you could run OliveTin as a non-privileged user, and use sudo rules to control what it can and cannot do.
Ansible Playbooks
====================
| Installation type | Difficulty to do this |
| -------------------------------- | --------------------------------------------------------------------------------------------------------- |
| Running as a **Systemd service** | Easy |
| Running in a **container** | Install the \`ansible\` package in your [OliveTin container](../reference/containerInstallPackages.html). |
## [](#%5Fexample%5Fconfig%5Fyaml)Example config.yaml
Many users use OliveTin to easily execute Ansible playbooks, somtimes as a simple alternative to AWX.
Run an Ansible Playbook
```yaml
actions:
- title: Run Ansible Playbook
icon: "🇦"
shell: ansible-playbook -i /etc/hosts /root/myRepo/myPlaybook.yaml
timeout: 120
```
You probably want to set the [timeout](../action%5Fcustomization/timeouts.html) to more than the default 3 seconds.
Containers - start/stop
====================
| | There is a complete example of how to setup a [container control panel](../solutions/container-control-panel/index.html) in the solutions section. |
| ----------------------------------------------------------------------------------------------------------------------------------------------------- |
| Installation type | Difficulty to do this |
| -------------------------------- | ------------------------ |
| Running as a **Systemd service** | Easy |
| Running in a **container** | Setup needed - see below |
## [](#%5Fexample%5Fconfig%5Fyaml)Example config.yaml
actions:
- title: Stop Plex
shell: docker stop plex
- title: Start plex
shell: docker start plex
## [](#%5Fsetup%5Fif%5Frunning%5Finside%5Fa%5Fcontainer)Setup if running inside a container
You can control other containers, when running OliveTin inside a container itself, however you need to do some extra setup when creating the OliveTin container.
### [](#%5Fensure%5Fyour%5Fcontainer%5Fhas%5Fpermissions%5Fto%5Fcontrol%5Fdocker)Ensure your container has permissions to control docker
You have two alternatives to allow OliveTin (running inside a container) to talk to the Docker daemon through the bind-mounted socket. Pick one:
#### [](#%5Foption%5F1%5Fuse%5Fprivileged%5Fsimplest)Option 1 — Use `--privileged` (simplest)
| | Simplest for most users. Podman does not have this requirement. |
| ------------------------------------------------------------------ |
* Run the container with `--privileged` and as `root` (eg `--user root`).
* This avoids user/group permission issues on `/var/run/docker.sock`.
If you are getting "permission denied" errors it is probably because OliveTin runs as user UID 1000 by default, which is not allowed by your docker host. Running with `--user root` under `--privileged` resolves this quickly. Note that [PUID and PGID variables will not work](#no-puid-pgid).
#### [](#%5Foption%5F2%5Frun%5Fas%5Fnon%5Froot%5Fin%5Fthe%5Fhost%5Fdocker%5Fgroup%5Fno%5Fprivileged)Option 2 — Run as non-root in the host `docker` group (no `--privileged`)
Use the standard Docker guidance to manage Docker as a non-root user (becoming a member of the `docker` group) and match the group’s GID inside the container so the process can access the socket permissions.
* Docs: [Manage Docker as a non-root user](https://docs.docker.com/engine/install/linux-postinstall/#manage-docker-as-a-non-root-user)
* Find the `docker` group GID on the host, for example using `getent group docker`.
* Run the container with your user UID and the `docker` group GID, and bind-mount the socket. Using Compose:
docker-compose.yml
```yaml
services:
olivetin:
container_name: olivetin
image: jamesread/olivetin
user: ${UID}:${docker_group_id}
volumes:
- /var/run/docker.sock:/var/run/docker.sock
```
Where `UID` and `docker_group_id` are provided via your shell environment or a `.env` file next to your Compose file, for example:
env
```bash
UID=1000
docker_group_id=995
```
This allows you to run the container as a non-root user, while still allowing access to `/var/run/docker.sock`.
### [](#%5Fpass%5Fthe%5Fdocker%5Fsocket%5Finto%5Fthe%5Fcontainer)Pass the docker socket into the container
1. Pass `/var/run/docker.sock` as a bind mount to the container when creating it, eg:
```asciidoc
docker create --privileged --user root -v /var/run/docker.sock:/var/run/docker.sock ...additional args here...
```
Or, using the `docker run` syntax;
```asciidoc
docker run --privileged --user root -v /var/run/docker.sock:/var/run/docker.sock --name OliveTin jamesread/olivetin
```
2. The official x86\_64 docker container comes with the `docker` client pre-installed. If you are using `arm` or and `arm64` container, you will need to add Docker yourself.
[How to install additional packages in the container](../reference/containerInstallPackages.html)
| | The reason that the arm and arm64 containers do not include docker, is that when these images are cross-compiled at build time, it takes FOREVER because we have to emulate arm. |
| ----------------------------------------------------------------------------------------------------------------------------------------------------------------------------------- |
After you have passed the socket into the container (and optionally installed docker), you should be able to setup docker actions like it’s shown in the example [above](#example-control-containers).
Using the Docker socket proxy
====================
The OliveTin container comes with the official docker CLI pre-installed, as well as the compose plugin. This is because OliveTin is very often used to start and stop containers.
You can choose to directly bind-mount the docker control socket into OliveTin, or optionally use a docker socket proxy host if you feel you need more security. You can use a docker socket proxy as an additional security measure and as an alternative to mounting the docker socket directly.
Most people will want to add the docker socket proxy into the same compose file that they are running OliveTin from;
docker-compose.yaml
```yaml
services:
olivetin:
container_name: olivetin
image: jamesread/olivetin
...
socket-proxy:
image: lscr.io/linuxserver/socket-proxy:latest
container_name: socket-proxy
environment:
- ALLOW_START=1 #optional
- ALLOW_STOP=1 #optional
...
volumes:
- /var/run/docker.sock:/var/run/docker.sock:ro
```
You can find all the documentation for all the socket-proxy options here on the [LinuxServer.io socket-proxy page](https://github.com/linuxserver/docker-socket-proxy).
Assuming your docker socket proxy is running as `socket-proxy` running on port 1028;
OliveTin config.yaml
```yaml
actions:
- title: Stop container
shell: DOCKER_HOST=socket-proxy:1028 docker stop mycontainer
```
Action Examples
====================
Browse the action examples in this section of documentation.
Ping an address
====================
| Installation type | Difficulty to do this |
| -------------------------------- | --------------------- |
| Running as a **Systemd service** | Easy |
| Running in a **container** | Easy |
## [](#%5Fexample%5Fconfig%5Fyaml)Example config.yaml
```yaml
actions:
# This sends 1 ping to google.com.
- title: ping google.com
shell: ping google.com -c 1
icon: ping
timeout: 3
```
Powershell
====================
| Installation type | Difficulty to do this |
| -------------------------------- | --------------------- |
| Running as a **Systemd service** | Easy |
| Running in a **container** | Not possible |
## [](#%5Fexample%5Fconfig%5Fyaml)Example config.yaml
Powershell requires `pwsh` to execute commands.
`config.yaml`
```yaml
actions:
- title: Run Powershell Script:
shell: pwsh C:/Scripts/MyScript.ps1
```
SSH (easy setup)
====================
This is probably one of the most useful things OliveTin is used for - just plain old SSH, which allows it to easily connect from a container to any server running on your network to run commands. This is also the preferred method of running commands on the server that is hosting the OliveTin container image as well.
| | This is the easy method of setting up SSH with OliveTin - this generates a new SSH key for you, and a configuration file that disables SSH host key checking, to make it faster to do useful things with OliveTin. This is fine for most homelab setups, but if you are using OliveTin in a production environment, you should use the more secure method of setting up SSH and set it up manually, see [SSH (manual setup)](#). |
| ----------------------------------------------------------------------------------------------------------------------------------------------------------------------------------------------------------------------------------------------------------------------------------------------------------------------------------------------------------------------------------------------------------------------------------- |
## [](#%5Fssh%5Ffrom%5Finside%5Fa%5Fcontainer%5Fsetup%5Finstructions)SSH from inside a Container - setup instructions
* [Step 1](#ssh-easy-step-1) Use the olivetin-setup-easy-ssh script to generate a new SSH key and configuration file
* Add this key fingerprint to servers and hosts that you want to SSH to.
* [Step 2](#ssh-easy-step-2) Setup actions that use SSH with this configuration file (which points to the key)
Visually, this is what it looks like - OliveTin is running in the (orange) container, and then can either connect back to _server-with-olivetin_ or _server2_.

## [](#ssh-easy-step-1)Step 1: Run the olivetin-setup-easy-ssh script
Setup an action as follows, to use the builtin olivetin-setup-easy-ssh script that comes with OliveTin containers. This script does **not** work on Windows, MacOS, or outside of a container.
config.yaml
```yaml
actions:
- title: Setup SSH
shell: olivetin-setup-easy-ssh
popupOnStart: execution-dialog
```
## [](#ssh-easy-step-2)Step 2: Use the configuration file in your actions
To use the configuration file generated by the script, you can use the following in your other actions:
config.yaml
```yaml
actions:
- title: SSH into a server
shell: ssh -F /config/ssh/config root@myserver '/opt/script-on-my-server.sh'
```
SSH (manual setup)
====================
This is probably one of the most useful things OliveTin is used for - just plain old SSH, which allows it to easily connect from a container to any server running on your network to run commands. This is also the preferred method of running commands on the server that is hosting the OliveTin container image as well.
| | There is an easy method of setting up SSH with OliveTin, which is described in the [SSH (easy setup)](#action-ssh-easy) section. This section is for those who want to set up SSH manually. |
| ---------------------------------------------------------------------------------------------------------------------------------------------------------------------------------------------- |
| Installation type | Difficulty to do this |
| -------------------------------- | ---------------------------------------------------------------------------------- |
| Running as a **Systemd service** | Easy |
| Running in a **container** | Needs some setting up - see the [SSH Container setup instructions](#ssh-container) |
## [](#%5Fexample%5Fconfig%5Fyaml)Example config.yaml
OliveTin `config.yaml`
```yaml
actions:
# This will SSH into a server an run the command 'service httpd restart'
- title: Restart httpd on Server 1
shell: ssh root@server-with-olivetin 'service httpd restart'
icon: ping
timeout: 5
```
**Note about SSH keys**: You should make sure that the user that OliveTin is running as has access to a SSH key. This applies to container images as well. The setup instructions below briefly explain how to generate a SSH key and make it accessible to OliveTin which is running inside a container.
SSH from inside a Container - setup instructions
This is a two step process;
* [Step 1](#ssh-step-1) Give OliveTin a SSH key
* [Step 2](#ssh-step-2) Setup actions that use SSH with this key
Visually, this is what it looks like - OliveTin is running in the (orange) container, and then can either connect back to _server-with-olivetin_ or _server2_.

The steps in detail are below;
[red]#Step 1#: Give OliveTin a SSH key
Open a terminal window on _server-with-olivetin_.
1. Create the `/opt/OliveTinSshKeys` directory, to create a shared directory for your SSH key file.
```bash
root@server-with-olivetin: mkdir /opt/OliveTinSshKeys
```
This will later be used as a "volume mount" when you create a docker container.
2. Run `ssh-keygen` to generate a SSH key just for OliveTin.
```bash
root@server-with-olivetin: ssh-keygen
```
1. Enter the file in which to save the key: `/opt/OliveTinSshKeys/id_rsa`
2. Enter passphrase (empty for no passphrase): ``
This will create a passwordless SSH key that OliveTin can use. It is safe as long as nobody steals your SSH key file! OliveTin cannot enter passwords into SSH keys, so you have to leave the password blank.
3. You should get something that looks like this. If you get a "permission denied" error when creating files, try running `chmod 0777 /opt/OliveTinSshKeys` and try again.
```asciidoc
root@server-with-olivetin: ssh-keygen
Generating public/private rsa key pair.
Enter file in which to save the key (/root/.ssh/id_rsa): /opt/OliveTinSshKeys/id_rsa
Enter passphrase (empty for no passphrase):
Enter same passphrase again:
Your identification has been saved in /opt/OliveTinSshKeys/id_rsa
Your public key has been saved in /opt/OliveTinSshKeys/id_rsa.pub
The key fingerprint is:
SHA256:t+vGUn+MTeOtRDpxKanO3Cg63+gvAHslZCe3YVNnfWU root@server-with-olivetin
The key's randomart image is:
+---[RSA 3072]----+
| .. o. E|
| + * o ...|
| o = + . |
| . . o . . |
| o oS . + + |
| . o ..o *o |
| . . oo.o*.o |
| . +*o+oo= .|
| .=+BX .... |
+----[SHA256------+
```
This will create two files, `/opt/OliveTinSshKeys/id_rsa` (your private key) and `/opt/OliveTinSshKeys/id_rsa.pub` (your public key).
4. Copy your public key to every server you want to connect to.
Using the `ssh-copy-id` command is a really quick and safe way to do this.
```asciidoc
root@server-with-olivetin: ssh-copy-id -i /opt/OliveTinSshKeys/id_rsa.pub root@localhost
(enter your SSH password)
root@server2: ssh-copy-id ssh-copy-id -i /opt/OliveTinSshKeys/id_rsa.pub root@server2
(enter your SSH password)
```
You will be asked to login with a password for each server.
After you have done that, you will then be able to login with the ssh key instead. Here is a quick way that you can test your SSH key manually;
```asciidoc
root@server-with-olivetin: ssh -i /opt/OliveTinSshKeys/id_rsa root@server2
(you should login without a password)
```
5. Give the SSH key to the OliveTin container.
The way to do this is via a "volume mount". When you create the container, you use "-v" to specify a volume.
You should mount your SSH keys directory into the OliveTin user’s home directory by creating the container like this;
If you want to create the container from the command line
```asciidoc
docker run -v /opt/OliveTinSshKeys/:/home/olivetin/.ssh/ -v /etc/OliveTin/:/config --name OliveTin jamesread/olivetin
```
If you are using docker-compose
```yaml
services:
olivetin:
container_name: olivetin
image: jamesread/olivetin
volumes:
- "/etc/OliveTin/:/config"
- "/opt/OliveTinSshKeys:/home/olivetin/.ssh"
ports:
- "1337:1337"
restart: unless-stopped
```
This also works for things like SSH configuration files, if you want to use them. This is step 1 complete from the diagram above.
[red]#Step 2#: Setup actions that use SSH with this key
Thankfully, step 2 is very simple! `ssh` commands in your OliveTin `config.yaml` should work without a password!, and allow OliveTin to access services, files, and other stuff outside of the OliveTin container.
OliveTin `config.yaml`
```shell
actions:
# This will SSH into a server an run the command 'service httpd restart'
- title: Restart httpd on Server 1
shell: ssh root@server-with-olivetin 'service httpd restart'
icon: ping
timeout: 5
```
Restart a systemd service
====================
| Installation type | Difficulty to do this |
| -------------------------------- | -------------------------- |
| Running as a **Systemd service** | Easy |
| Running in a **container** | Not really possible to do. |
## [](#%5Fexample%5Fconfig%5Fyaml)Example config.yaml
```yaml
actions:
- title: Start httpd
shell: systemctl start httpd
- title: Stop httpd
shell: systemctl stop httpd
- title: Restart httpd
shell: systemctl restart httpd
# https://docs.olivetin.app/action-ssh.html
- title: Restart httpd on server 1
shell: ssh root@server1 'service httpd restart'
```
Execute after completion
====================
Sometimes you want to execute another command after the main command executes, this is often the case when you want to check the status of the main command, or if you want to send a notification.
`config.yaml`
```yaml
actions:
- title: Check date and send notification via apprise
icon: date
shell: date
shellAfterCompleted: "apprise -c /config/apprise.yml -t 'Notification: Backup script completed' -b 'The backup script completed with code {{ exitCode}}. The log is: \n {{ output }} '"
```
When running shellAfterCompleted, you **cannot** use argument values - they are not passed to the command. However the following special arguments are defined;
* `{{ exitCode }}` \- The exit code of the previous shell command
* `{{ output }}` \- The standard output of the previous shell command
* `{{ ot_executionTrackingId }}` \- The unique execution tracking id for this execution
* `{{ ot_username }}` \- The username of the user who started the execution (if any - could be `guest` or `cron`).
You can only use a single `shellAfterCompleted`, so use it for notifications, or similar. It would be an antipattern to use this do run 2 commands making up a mini script.
The official OliveTin container images from version 2024.03.24 onwards include the fantastic apprise tool, which makes chat notifications on many protocols very easy.
*
*
`/config/apprise.yaml`
```yaml
urls:
- tgram://bottoken/ChatID
```
## [](#%5Fsee%5Falso)See Also
* [Triggers](triggers.html) \- Executing full actions after this one (with separate arguments, etc).
Create your first action
====================
This is an example of your very first action. First of all, edit your config.yaml, and enter this YAML markup;
config.yaml
```yaml
actions:
- title: Say hello
shell: echo "Hello!"
icon: smile
```
If OliveTin is running, it should popup on your dashboard like this;

Simply click on the button to execute the shell command. You can expand the executions to view the logs.
## [](#%5Fimportant%5Fconsiderations)Important considerations
* The action title must be unique. If you have multiple actions with the same title, only one will be shown.
## [](#%5Fwhat%5Fdo%5Fi%5Ftry%5Fnext)What do I try next?
* [Customize](../action%5Fcustomization/intro.html) the action icon, timeout, etc.
* [Execute on a schedule (cron)](oncron.html)
* [Execute on startup](onstartup.html)
* [Execute on webhook](onwebhook.html)
* [Execute on file created](onfilecreated.html)
* [Execute on file changed](onfilechanged.html)
Execute on calendar file
====================
| | The feature is currently experimental. |
| ----------------------------------------- |
Sometimes you want to schedule an action to run at a specific date and time, like at 2024-02-07 at 15:30\. This is technically called "an instant", and OliveTin can watch a file that contains a list of instants for new additions.
`start-server-calendar.yaml`
```yaml
- 2024-03-08T20:11:45+00:00
- 2024-03-08T20:12:30+00:00
```
OliveTin will watch this file, and also load it on startup. If an instant is seen that is in the past, it is just ignored. If it is in the future then it is scheduled.
This is how you setup an action to use the calendar file:
`config.yaml`
```yaml
actions:
- title: start server
shell: echo "Starting Server!"
execOnCalendarFile: start-server-calendar.yaml
```
You will often want an easy way to schedule actions from the web interface as well, you can do this by creating a separate schedule action that adds an instant to the calendar file.
You can use an argument with `type: datetime` to create a date selector in the web interface, to easily select dates to be added to the calendar file. You will have to add hardcoded timezone to suit your needs, you can see below that "+00:00" is being added to "{{ when }}" to create an instant in the UTC timezone.
`config.yaml`
```yaml
actions:
- title: Schedule server
shell: echo '- {{ when }}+00:00' >> start-server-calendar.yaml
arguments:
- name: when
title: When?
type: datetime
- title: start server
shell: echo "Starting Server!"
execOnCalendarFile: start-server-calendar.yaml
```
Execute on schedule (cron)
====================
OliveTin can execute actions on a schedule, and uses a cron format for configuration.
`config.yaml`
```yaml
actions:
- title: Say hello
shell: echo "Hello!"
execOnCron:
- "@hourly"
- title: Say goodbye
shell: echo "Say Goodbye"
execOnCron:
- "*/5 * * * *" # Every 5 minutes
```
This is a fantastic website:
## [](#%5Fsupport%5Ffor%5Fseconds%5Fin%5Fcron)Support for seconds in cron
The default cron format for OliveTin supports the Unix/Linux format - 5 fields, with no support for seconds. This is by far the most popular format that most people are used to.
If you need per-second resolution for your actions, this can be enabled in your config - meaning that your cronlines will support 6 columns. The first "new" column is seconds. For example, to execute `date` every 5 seconds;
`config.yaml`
```yaml
cronSupportForSeconds: true
actions:
title: Execute every 5 seconds
shell: date
execOnCron:
- "*/5 * * * * *"
```
## [](#%5Fcron%5Fand%5Facls)Cron and ACLs
If you have enabled ACL, cron tasks are run as the user `cron`, which means that your ACL needs to allow the cron user to execute the action. This is one possibilty:
`config.yaml`
```yaml
accessControlLists:
- name: "cron"
matchUsernames:
- cron
permissions:
exec: true
actions:
- title: Say hello
shell: echo "Hello!"
execOnCron:
- "@hourly"
acls:
- "cron"
```
Execute on demand
====================
This is the default, meaning that the action shows up on a dashboard, and at the moment cannot be changed.
Execute on file changed
====================
You can execute an action when a file is changed in a directory. The argument `filename` is pre-populated for you.
```yaml
actions:
- title: Print names of new files
shell: "echo Filename: {{ filename }} Filedir: {{ filedir }} Filext: {{ fileext }}"
arguments:
- name: filename
type: unicode_identifier
- name: filedir
type: unicode_identifier
- name: fileext
type: unicode_identifier
execOnFileChangedInDir:
- /home/user/Downloads/
```
## [](#%5Ffile%5Fin%5Fdir%5Farguments)File in dir arguments
| Predefined Argument | Example |
| ------------------- | --------------------------------------- |
| filepath | /Downloads/txt1.txt |
| filedir | /Downloads |
| filename | test1.txt |
| fileext | .txt |
| filesizebytes | 100 |
| filemode | 0644 |
| filemtime | 2024-04-27 20:09:42.465235047 +0100 BST |
| fileisdir | false |
Like all arguments, OliveTin also passes these arguments as [environment variables](#env-vars) if this is better for your use case.
Execute on file created
====================
You can execute an action when a file is created in a directory. The argument `filename` is pre-populated for you.
`config.yaml`
```yaml
actions:
- title: Print names of new files
shell: echo {{ filename }}
arguments:
- name: filename
type: unicode_identifier
- name: filedir
type: unicode_identifier
- name: fileext
type: unicode_identifier
execOnFileCreatedInDir:
- /home/user/Downloads/
```
## [](#%5Ffile%5Fin%5Fdir%5Farguments)File in dir arguments
| Predefined Argument | Example |
| ------------------- | --------------------------------------- |
| filepath | /Downloads/txt1.txt |
| filedir | /Downloads |
| filename | test1.txt |
| fileext | .txt |
| filesizebytes | 100 |
| filemode | 0644 |
| filemtime | 2024-04-27 20:09:42.465235047 +0100 BST |
| fileisdir | false |
Like all arguments, OliveTin also passes these arguments as [environment variables](#env-vars) if this is better for your use case.
Execute on startup
====================
OliveTin can execute actions on a startup.
`config.yaml`
```yaml
actions:
- title: Say hello
shell: echo "Hello!"
execOnStartup: true
```
## [](#dnf-startup)Example: Install additional commands into OliveTin
This functionality to execute actions on startup is a very easy way to install additional commands in OliveTin, however it requires running OliveTin as a root user to be able to use `microdnf`;
`config.yaml`
```yaml
actions:
- title: Install dnsmasq
shell: microdnf install bind-utils
execOnStartup: true
```
A more secure method than running DNF as root, is a manual command the temporarily runs as root. To learn more about how to install additional packages into the container in this more secure way, see [Installing extra container packages](../reference/containerInstallPackages.html).
Execute on webhook
====================
"Webhooks" are nothing more and a name for a type of REST API call, typically using the HTTP POST method. This is already what OliveTin uses to drive it’s web interface - specifically the `StartAction` API call.
For examples of how to use all of these functions, check out the [Start Action API reference](../api/start%5Faction.html).
Shell vs Exec
====================
OliveTin supports two different methods to run commands: `shell` and `exec`. The difference between these two is thta "shell" accepts strings, and will wrap that whole command in a shall with "bash -c". Exec uses a syscall directly to execute commands.
* **Shell** is more flexible, because it allows you to chain commands (eg, using &&) and redirect or pipe output (eg: ">" or "|").
* **Exec** is more secure, because it does not invoke a shell, and thus avoids shell injection attacks.
Shell can be safe and secure with simple argument types (like ascii\_identifier), but some argument types like URL can contain basically any character - /, :, ?, &, etc - which can lead to shell injection vulnerabilities while still being a valid URL.
OliveTin will try and prevent you from using dangerous characters in shell commands (eg, URL is no longer permitted with Shell).
The way that you specify these two types of execution is different - `shell` expects a single string, while `exec` expects a list of strings (the first being the command, the rest being the arguments).
Using Shell
```yaml
actions:
- title: List files
shell: ls -l /some/directory
```
Using Exec
```yaml
actions:
- title: List files
exec:
- ls
- -l
- /some/directory
```
When in doubt, prefer `exec` over `shell` for better security. Shell was added in both OliveTin 3k and OliveTin 2k in October 2025.
Triggers
====================
Sometimes you want to trigger another action after the first one completes. This is mostly useful for updating hidden actions that update entity files, without having to run those updates on a cron job every 10 seconds!
| | OliveTin used to support a single action trigger, but now supports multiple triggers. The field trigger was renamed to triggers and is now an array of triggers. |
| ------------------------------------------------------------------------------------------------------------------------------------------------------------------- |
```yaml
entities:
- file: /etc/OliveTin/entities/containers.json
name: container
actions:
- title: stop {{ container.Names }}
shell: docker stop {{ container.Names}}
entity: container
triggers:
- update containers
- title: update containers
shell: docker ps -a --format=json > /etc/OliveTin/entities/containers.json
hidden: true
```
Environment Variables in the Config File
====================
You can pull configuration values from environment variables like this:
`config.yaml`
```yaml
logLevel: ${{ LOG_LEVEL }}
pageTitle: Olivetin - ${{ DEPLOY_ENV }}
actions:
...
```
While loading the config file, Olivetin will substitute the value of the named environment variable for the token. If the variable is unset, Olivetin will use an empty string as the value and log a warning. This syntax works even for configuration values that aren’t strings, as long as the final string value can be converted to the proper type.
## [](#%5Fnotes)Notes
1. These variables are read while loading the config file. Changes in the environment won’t be reflected until the config file is reloaded. If you want to read environment variables at execution time in your action’s `shell` line, make sure to use regular shell syntax, i.e., `$FOO` rather than `${{ FOO }}`. See [environment variables](../args/env.html)for info on using environment variables in your actions.
Diagnostics
====================
OliveTin provides a built-in diagnostics page that can be used to help check how OliveTin is running and help to troubleshoot issues. It’s mainly designed for checking SSH configuration at the moment.
This is a screenshot of the diagnostics page, which can be accessed by clicking the "Diagnostics" link in the navigation bar:

## [](#%5Fdisabling%5Fdiagnostics)Disabling Diagnostics
The diagnostics page is enabled by default, but you can disable it by using the OliveTin [security policy configuration](../security/acl.html#%5Facls%5Fand%5Fpolicies%5Fglobal), using the defaults, or via an ACL. Examples are shown below for each of these methods.
### [](#%5Fdisable%5Fdiagnostics%5Ffor%5Fall%5Fusers)Disable Diagnostics for all users;
```yaml
logLevel: info
defaultPolicy:
showDiagnostics: false
```
### [](#%5Fdisable%5Fdiagnostics%5Fexpect%5Ffor%5Fadmin%5Fusers)Disable Diagnostics expect for admin users
```yaml
logLevel: info
defaultPolicy:
showDiagnostics: false
accessControlLists:
- name: admin
matchUsernames:
- alice
- bob
policy:
showDiagnostics: true
```
Advanced Configuration
====================
This section includes optional configuration options that are used less frequently by most users.
Logging - Actions
====================
| | There are two different types of logs in OliveTin - [application logs](logs.html) and [action logs](#). This page is about the _action logs_, which are the logs that are generated by the actions that you run in OliveTin. |
| ------------------------------------------------------------------------------------------------------------------------------------------------------------------------------------------------------------------------------- |
## [](#%5Fcontrolling%5Faccess%5Fto%5Fsee%5Faction%5Flogs)Controlling access to see action logs
You can control access to action logs using **permissions**, which are assigned to actions.
### [](#%5Fdisabling%5Flogs%5Ffor%5Fall%5Fusers)Disabling logs for all users
```yaml
logLevel: info
defaultPermissions:
logs: false
```
### [](#%5Fenabling%5Flogs%5Ffor%5Fa%5Fspecific%5Facl)Enabling logs for a specific ACL
```yaml
logLevel: info
defaultPermissions:
logs: false
accessControlLists:
- name: admin
matchUsernames:
- alice
- bob
permissions:
logs: true
addToEveryAction: true
actions:
- title: My Action
shell: echo "Hello World"
```
## [](#%5Fdisabling%5Fthe%5Flog%5Fviewer)Disabling the log viewer
You can disable the log viewer in the interface with [security policy configuration](../security/acl.html#%5Facls%5Fand%5Fpolicies%5Fglobal), using the defaults, or via an ACL. Examples are shown below for each of these methods.
### [](#%5Fdisable%5Flog%5Fviewer%5Ffor%5Fall%5Fusers)Disable log viewer for all users;
```yaml
logLevel: info
defaultPolicy:
showLogList: false
```
### [](#%5Fdisable%5Flog%5Fviewer%5Fexpect%5Ffor%5Fadmin%5Fusers)Disable log viewer expect for admin users
```yaml
logLevel: info
defaultPolicy:
showLogList: false
accessControlLists:
- name: admin
matchUsernames:
- alice
- bob
policy:
showLogList: true
```
## [](#%5Fsee%5Falso)See Also
* [Saving Action logs](../action%5Fcustomization/savelogs.html)
* [Application Logs](logs.html)
Logging - Application
====================
| | There are two different types of logs in OliveTin - [application logs](#) and [action logs](logs-actions.html). This page is about the _application logs_, which are the logs that OliveTin itself generates. The action logs are the logs that are generated by the actions that you run in OliveTin. |
| --------------------------------------------------------------------------------------------------------------------------------------------------------------------------------------------------------------------------------------------------------------------------------------------------------- |
OliveTin supports a few different log levels. The default logLevel is `INFO`.
You can set a `logLevel` in config.yaml like this;
`config.yaml`
```yaml
logLevel: "INFO"
actions:
....
```
The supported log levels are;
* `DEBUG` \- Every possible log message will be shown. This will use a lot of disk space and is not recommended unless you are a developer / like reading code.
* `ERROR` \- OliveTin rarely uses the `ERROR` log level.
* `WARN` \- Very few messages, only warnings are shown.
* `INFO` \- The defualt log level.
You can change the `logLevel` while OliveTin is running, and it should update as soon as you save your config.yaml. You will always get a log message like this;
```bash
INFO Setting log level to warning
```
## [](#%5Fjson%5Flog%5Fformat)JSON Log Format
* OliveTin 2k supports JSON log format from version **2025.10.30**.
* OliveTin 3k supports JSON log format from version **3000.2.2**.
You can enable JSON log format by setting the `OLIVETIN_LOG_FORMAT` environment variable to `json`.
Example of setting `OLIVETIN_LOG_FORMAT` to `json`.
```bash
root@server: ./OliveTin
{"commit":"nocommit","date":"nodate","level":"info","msg":"OliveTin initializing","time":"2025-10-30T10:09:55Z","version":"dev"}
{"level":"debug","msg":"Value of -configdir flag","time":"2025-10-30T10:09:55Z","value":"."}
{"level":"debug","msg":"servicehost nonwin","time":"2025-10-30T10:09:55Z"}
{"level":"info","msg":"Setting log level to info","time":"2025-10-30T10:09:55Z"}
{"level":"info","msg":"OliveTin initialization complete","time":"2025-10-30T10:09:55Z"}
{"configDir":"/home/xconspirisist/sandbox/Development/OliveTin/OliveTin","level":"info","msg":"OliveTin started","time":"2025-10-30T10:09:55Z"}
```
Ports
====================
See [the network ports](../reference/network-ports.html) documentation in the reference section.
Prometheus
====================
OliveTin supports basic Prometheus metrics, and the project is interested to hear about what more metrics people would find useful, as well!
To enable Prometheus support;
`config.yaml`
```yaml
logLevel: INFO
prometheus:
enabled: true
defaultGoMetrics: false
```
It is required to restart OliveTin after changing the `prometheus` configuration.
The `defaultGoMetrics` option will enable the default Go metrics, which expose metrics like go\_memstats\_alloc\_bytes, or go\_memstats\_heap\_alloc\_bytes, and generally most people don’t need these.
This will give you metrics available at . The page should look something like this;
```asciidoc
# HELP olivetin_actions_requested_count The actions requested count
# TYPE olivetin_actions_requested_count gauge
olivetin_actions_requested_count 0
# HELP olivetin_config_action_count Then number of actions in the config file
# TYPE olivetin_config_action_count gauge
olivetin_config_action_count 18
# HELP olivetin_config_reloaded_count The number of times the config has been reloaded
# TYPE olivetin_config_reloaded_count counter
olivetin_config_reloaded_count 1
# HELP olivetin_sv_count The number entries in the sv map
# TYPE olivetin_sv_count gauge
olivetin_sv_count 49
```
Stylemods
====================
There are several style modifications that some people like to use, which can easily be added to OliveTin. The configuration syntax in your .config.yaml is very simple, and looks like this with a single style mod;
```yaml
stylemods:
- sm-side-icons
```
You can add as many style mods as you like, but note that some of them may conflict with each other. The style mods are applied in the order they are listed, so if you have a conflict, the last one in the list will take precedence.
## [](#%5Favailable%5Fstyle%5Fmods)Available Style Mods
* `sm-side-icons`: Display action buttons with the icons on the left hand side rather than above the text.
* `sm-imageicons-fullwidth`: Display image icons in full width, rather than the default size.
The list of style mods on this page
## [](#%5Ffeature%5Fhistory)Feature history
* OliveTin `2025.7.29` introduced the ability to use style modifications, or "style mods".
Timezones
====================
OliveTin will obviously use the system time just like all other programs, but when running in a container, time works in a slightly unusual way.
You may be used to using a TZ or TIMEZONE environment variable in your Linux container inages, but this is not a standard that works for all Linux distributions - it’s mostly supported by Debain based containers. OliveTin’s base container image is fedora-minimal, which deliberately does not include timezone data, to reduce storage space.
To change the time in the OliveTin container, simply bind-mount the correct zone file;
Same as the container host
```asciidoc
docker create -v /etc/localtime:/etc/localtime -v /etc/OliveTin:/config --name OliveTin docker.io/jamesread/olivetin
```
Different timezone to the container host
```asciidoc
docker create -v /usr/share/zoneinfo/Japan:/etc/localtime -v /etc/OliveTin:/config --name OliveTin docker.io/jamesread/olivetin
```
Customize the web UI
====================
The OliveTin web UI is reasonably customizable - parts of the page that you don’t need can be hidden when they’re not needed.
## [](#%5Fpage%5Ftitle)Page Title
You can customize the page title;

`config.yaml`
```yaml
pageTitle: My OliveTin Instance
```
## [](#show-nav)Navigation - show / hide
You can choose to hide the navigation elements in OliveTin, to present a simplified user interface.

Figure 1\. The default user interface with the sidebar shown
To have OliveTin hide these buttons, add `showNavigation: false` to your config.yaml;
`config.yaml`
```yaml
logLevel: "INFO"
showNavigation: false
actions:
....
```

Figure 2\. The same user interface, but with the sidebar hidden (`showNavigation: false`)
## [](#section-navgiation-style)Section Navigation Style
`sectionNavigationStyle` \- You can choose to have the section navigation buttons displayed as a Sidebar (`sidebar` \- default), or along the top (`topbar`).
### [](#%5Fsidebar%5Fnavigation%5Fstyle%5Fdefault)Sidebar navigation style (default)
`sectionNavigationStyle: sidebar` looks like this;

### [](#%5Ftopbar%5Fnavigation%5Fstyle)Topbar navigation style
`sectionNavigationStyle: topbar` looks like this;

## [](#show-new-versions)New version available - show/hide
You can disable the "new version" information in the footer - the default for `showNewVersions` is `true`;
`config.yaml`
```yaml
logLevel: "INFO"
showNewVersions: false
```
OliveTin does not check for updates by default. To enable it, see [enable update checking](../reference/updateChecks.html).
## [](#show-footer)Footer visibility - show / hide
You can disable the entire footer, if you would like a really minimal interface. The default for `showFooter` is `true`.
`config.yaml`
```yaml
logLevel: "INFO"
showFooter: false
```
This means the [showNewVersions](#show-new-versions) configuration option will automatically be `false` as well.
## [](#%5Fadditional%5Fsection%5Fnavigation%5Flinks)Additional section navigation links
You can add custom links to the OliveTin navigation bar. This is useful if you want to link to other OliveTin instances, or other web applications.
```yaml
additionalNavigationLinks:
- title: Duck Duck Go
url: https://duckduckgo.com
target: _blank
```
This will render like this;

## [](#custom-js)Custom JavaScript
This is considered an advanced feature, and is not recommended unless you like writing your own code.
You can add custom JavaScript to OliveTin, which will be executed on every page load. This can be useful for adding custom functionality to the web UI.
1. The custom javascript should be in a file called `custom.js` and saved in `custom-webui/`, which should be in the same directory as your `config.yaml`.
2. You can put whatever code you like really in your `custom.js` file.
3. Set `enableCustomJs: true` in your `config.yaml` to enable this feature.
4. Restart OliveTin. Note that the custom JavaScript will only be loaded once on startup, so if you are changing the custom JavaScript while OliveTin is running, you will need to restart OliveTin to see the changes.
## [](#%5Fcustom%5Fcss%5Fwith%5Fa%5Fcustom%5Ftheme)Custom CSS (with a custom theme)
You can customize OliveTin with themes, but it’s also possible to write your on very simple theme that contains just a few CSS rules to change the look and feel of OliveTin. This is very useful if you just want to change the colours of OliveTin, or hide a few elements.
### [](#%5Fwriting%5Fa%5Fsimple%5Ftheme%5Fwith%5Fa%5Fcss%5Fchange)Writing a simple theme with a CSS change
You’ll need to create a new theme, and let’s assume our theme namme is going to be called `uihack`. OliveTin themes are simply a directory of CSS and other assets. OliveTin looks for a directory called `custom-webui/themes/` in the same directory as your `config.yaml` file.
Start by creating a directory called `custom-webui/themes/uihack` relative to the same directory as your `config.yaml` file. In this directory, create a file called `theme.css`.
```yaml
├── config.yaml
└── custom-webui
└── themes
└── uihack
└── theme.css
```
Here’s an example of what your `theme.css` should contain;
```css
body {
background-color: red;
}
```
### [](#%5Fsetup%5Folivetin%5Fconfig%5Fto%5Fuse%5Fyour%5Ftheme)Setup OliveTin config to use your theme
Now you need to tell OliveTin to use your new theme. To do this, set `themeName: uihack` in your OliveTin config.yaml and restart OliveTin.
```yaml
logLevel: "INFO"
themeName: uihack
```
| | OliveTin will by default only read theme.css once on startup. If you are intending to change theme.css while OliveTin is running, set themeCacheDisabled: true in your config.yaml. This will make OliveTin read theme.css on every request, and is useful for development. |
| ------------------------------------------------------------------------------------------------------------------------------------------------------------------------------------------------------------------------------------------------------------------------------ |
Restart OliveTin for the theme change to take effect. Beware of the theme cache mentioned above, if you are making changes to the CCS and refreshing the page a few times.
* [More information on theme development](../reference/reference%5Fthemes%5Ffor%5Fdevelopers.html)
undefined
====================
The OliveTin 2k API is different to the OliveTin 3k API.
# [](#%5Fapi%5Foverview)API Overview
This section of the documentation is intended for developers, and those who want to hack around with OliveTin and extend it. This page provides a few pointers to get started.
**Short version**:
* on your OliveTin server to get the REST API.
* [Swagger](http://docs.olivetin.app/api/swagger/) documents the API.
**Longer version**: The OliveTin API is formally defined using the Protobuf IDL, which generates gRPC stubs, as well as a REST Gateway.
The REST API gateway is used by the WebUI, and you can use it too by default - it is exposed at "/api" by default.
The gRPC API only listens on localhost default, but it can be set to listen publicly. See [the network ports documentation](../reference/network-ports.html) for a better description of how the APIs are exposed. Most people do not need to use the gRPC API.
## [](#%5Flinks)Links
* [OliveTin 2k API: Swagger UI](http://docs.olivetin.app/api/swagger/)
* [OliveTin 2k API: OpenAPI JSON Definition](http://docs.olivetin.app/api/swagger/OliveTin.openapi.json)
* [OliveTin 3k API: Swagger UI](http://docs.olivetin.app/api/swagger/3k/)
* [OliveTin 3k API: OpenAPI JSON Definition](http://docs.olivetin.app/api/swagger/3k/OliveTin.openapi.json)
* [The OliveTin Protobuf file](https://github.com/OliveTin/OliveTin/blob/main/proto/olivetin/api/v1/olivetin.proto).
Please do talk to the developers on Discord if you’d like help using the API, or you’re thinking about building something interesting using the API!
Local User Login via API
====================
OliveTin supports serveral different ways to login, and most installations will probably login via reverse proxy, or via local user login.
To login via local user login, you can use the following API call: `/LocalUserLogin`. This is documented in the API documentation which can be found here;
The API call is a POST request, and you need to provide a `username` and `password` as a JSON object in the body of the request. Here is an example of how you can login via a cURL request;
```bash
user@host: curl -X POST "http://olivetin-server:1337/api/LocalUserLogin" -H "accept: application/json" -H "Content-Type: application/json" -d '{"username":"admin","password":"toomanysecrets"}' -v
...
< Set-Cookie: olivetin-sid-local=c6c5b2b3-a58b-4dbc-b070-ed7bdd3f1956; Path=/; Max-Age=31556952; HttpOnly
...
{"success":true}
```
You can see from the above example that the header response sets a cookie called "olivetin-sid-local" to a UUID which is your session ID. You must include this cookie with future requests to authenticate yourself.
You can also that the body of the response is a JSON object with a simple `success` key, which will be `true` if the login was successful, and `false` if it was not.
## [](#%5Fcheck%5Flogin%5Fwith%5Fwhoami)Check login with `WhoAmI`
You can check your current login status by using the `/WhoAmI` API call. This is a GET request, and you need to provide the `olivetin-sid-local` cookie in the request. Here is an example of how you can check your login status via a cURL request;
```bash
user@host: curl -X GET http://localhost:1337/api/WhoAmI -H "accept: application/json" -H 'Content-Type: application/json' -b "olivetin-sid-local=cd33aa9c-c613-473e-8581-2b742716ab8e"
{"authenticatedUser":"admin", "usergroup":"", "provider":"local", "acls":[], "sid":""}
```
API Method: StartAction
====================
This is the method the OliveTin web UI uses to start actions, and is probably the best method to use if you are writing scripts.
* **HTTP Method**: `POST`
* **Request Type**: OliveTin request object
* **Response Type**: Execution Tracking ID
There are several variants of this API call available which might be easier for scripts (or humans) to work with:
There are 4 main methods to start an action in OliveTin, which can be used in scripts or other applications. These methods allow you to trigger actions either immediately or wait for them to complete, and they can be accessed via HTTP requests.
__Webhook/API reference table__
| Function | HTTP Method | Request Type (How to select an action) | Response Type |
| ---------------------------------------------------------------- | ----------- | -------------------------------------------------------------- | --------------------------------------------------------------------------------------- |
| [StartAction](#) | POST | [OliveTin request object](start%5Faction.html#api-request-obj) | [Execution Tracking ID](start%5Faction.html#api-response-trackingid) |
| [StartActionByGet](method%5FStartActionByGet.html) | GET | [Action ID in the URL](start%5Faction.html#api-request-idurl) | [Execution Tracking ID](start%5Faction.html#api-response-trackingid) |
| [StartActionAndWait](method%5FStartActionAndWait.html) | POST | [OliveTin request object](start%5Faction.html#api-request-obj) | [Log Entry (waits for the action to finish)](start%5Faction.html#api-response-logentry) |
| [StartActionByGetAndWait](method%5FStartActionByGetAndWait.html) | GET | [Action ID in the URL](start%5Faction.html#api-request-idurl) | [Log Entry (waits for the action to finish)](start%5Faction.html#api-response-logentry) |
You can also browse these methods in the [OpenAPI/Swagger](htts://docs.olivetin.app/api/swagger/) docs if you prefer.
## [](#%5Fexample%5Fapi%5Fcall%5Fstart%5Fan%5Faction%5Fusing%5Fstartaction)Example API call: Start an action using `StartAction`
curl
```bash
user@host: curl -X POST "http://olivetin.webapps.teratan.lan/api/StartAction" -d '{"actionId": "nuclear_reactor_shutdown"}'
```
Powershell
```powershell
PS C:\Users\xcons> $json = '{"actionId": "deploy_attack_gnomes"}'
PS C:\Users\xcons> Invoke-RestMethod -Method "Post" -Uri "http://olivetinServer:1337/api/StartAction" -Body $json
```
## [](#%5Fexample%5Fapi%5Fcall%5Fstart%5Fan%5Faction%5Fusing%5Fstartaction%5Fwith%5Farguments)Example API call: Start an action using `StartAction` with arguments
curl
```bash
user:host: curl -X POST 'http://olivetin.example.com/api/StartAction' -d '{"actionId": "Ping_host", "arguments": [{"name": "host", "value": "example.com"},{"name": "count", "value": "1"}]}'
```
API Method: StartActionAndWait
====================
This method is useful is you are writing a script, and want to wait for the action to finish so that you can check the result, or get the output.
* **HTTP Method**: `POST`
* **Request Type**: OliveTin request object
* **Response Type**: Log Entry (waits for the action to finish)
There are several variants of this API call available which might be easier for scripts (or humans) to work with:
There are 4 main methods to start an action in OliveTin, which can be used in scripts or other applications. These methods allow you to trigger actions either immediately or wait for them to complete, and they can be accessed via HTTP requests.
__Webhook/API reference table__
| Function | HTTP Method | Request Type (How to select an action) | Response Type |
| ---------------------------------------------------------------- | ----------- | -------------------------------------------------------------- | --------------------------------------------------------------------------------------- |
| [StartAction](method%5FStartAction.html) | POST | [OliveTin request object](start%5Faction.html#api-request-obj) | [Execution Tracking ID](start%5Faction.html#api-response-trackingid) |
| [StartActionByGet](method%5FStartActionByGet.html) | GET | [Action ID in the URL](start%5Faction.html#api-request-idurl) | [Execution Tracking ID](start%5Faction.html#api-response-trackingid) |
| [StartActionAndWait](#) | POST | [OliveTin request object](start%5Faction.html#api-request-obj) | [Log Entry (waits for the action to finish)](start%5Faction.html#api-response-logentry) |
| [StartActionByGetAndWait](method%5FStartActionByGetAndWait.html) | GET | [Action ID in the URL](start%5Faction.html#api-request-idurl) | [Log Entry (waits for the action to finish)](start%5Faction.html#api-response-logentry) |
You can also browse these methods in the [OpenAPI/Swagger](htts://docs.olivetin.app/api/swagger/) docs if you prefer.
API Method: StartActionByGet
====================
This is the method that allows you to specify the action ID in the URL, and is probably the best to do quick integrations - QR Codes, streamdeck, etc. You cannot pass arguments using this method.
* **HTTP Method**: `GET`
* **Request Type**: Action ID in the URL
* **Response Type**: Execution Tracking ID
There are 4 main methods to start an action in OliveTin, which can be used in scripts or other applications. These methods allow you to trigger actions either immediately or wait for them to complete, and they can be accessed via HTTP requests.
__Webhook/API reference table__
| Function | HTTP Method | Request Type (How to select an action) | Response Type |
| ---------------------------------------------------------------- | ----------- | -------------------------------------------------------------- | --------------------------------------------------------------------------------------- |
| [StartAction](method%5FStartAction.html) | POST | [OliveTin request object](start%5Faction.html#api-request-obj) | [Execution Tracking ID](start%5Faction.html#api-response-trackingid) |
| [StartActionByGet](#) | GET | [Action ID in the URL](start%5Faction.html#api-request-idurl) | [Execution Tracking ID](start%5Faction.html#api-response-trackingid) |
| [StartActionAndWait](method%5FStartActionAndWait.html) | POST | [OliveTin request object](start%5Faction.html#api-request-obj) | [Log Entry (waits for the action to finish)](start%5Faction.html#api-response-logentry) |
| [StartActionByGetAndWait](method%5FStartActionByGetAndWait.html) | GET | [Action ID in the URL](start%5Faction.html#api-request-idurl) | [Log Entry (waits for the action to finish)](start%5Faction.html#api-response-logentry) |
You can also browse these methods in the [OpenAPI/Swagger](htts://docs.olivetin.app/api/swagger/) docs if you prefer.
## [](#%5Fexample%5Fapi%5Fcall%5Fstart%5Fan%5Faction%5Fby%5Fid%5Fin%5Fthe%5Furl)Example API call; Start an action by ID in the URL
curl
```asciidoc
user@host: curl http://olivetin.example.com/api/StartActionByGet/pingGithub
```
The corresponding config.yaml would look like this;
```yaml
actions:
- title: Ping GitHub.com
id: pingGithub
shell: ping github.com -c 1
```
IDs are used by these API calls, as you probably want the interface to display a human-readable title, whereas the API call doesn’t want to have spaces or punctuation.
API Method: StartActionByGetAndWait
====================
This method is also a very easy way to quickly start an action, but it waits for the action to finish before returning the result. This is useful if you want to get the output of the action or check its result without having to poll for it.
* **HTTP Method**: `GET`
* **Request Type**: Action ID in the URL
* **Response Type**: Log Entry (waits for the action to finish)
There are several variants of this API call available which might be easier for scripts (or humans) to work with:
There are 4 main methods to start an action in OliveTin, which can be used in scripts or other applications. These methods allow you to trigger actions either immediately or wait for them to complete, and they can be accessed via HTTP requests.
__Webhook/API reference table__
| Function | HTTP Method | Request Type (How to select an action) | Response Type |
| ------------------------------------------------------ | ----------- | -------------------------------------------------------------- | --------------------------------------------------------------------------------------- |
| [StartAction](method%5FStartAction.html) | POST | [OliveTin request object](start%5Faction.html#api-request-obj) | [Execution Tracking ID](start%5Faction.html#api-response-trackingid) |
| [StartActionByGet](method%5FStartActionByGet.html) | GET | [Action ID in the URL](start%5Faction.html#api-request-idurl) | [Execution Tracking ID](start%5Faction.html#api-response-trackingid) |
| [StartActionAndWait](method%5FStartActionAndWait.html) | POST | [OliveTin request object](start%5Faction.html#api-request-obj) | [Log Entry (waits for the action to finish)](start%5Faction.html#api-response-logentry) |
| [StartActionByGetAndWait](#) | GET | [Action ID in the URL](start%5Faction.html#api-request-idurl) | [Log Entry (waits for the action to finish)](start%5Faction.html#api-response-logentry) |
You can also browse these methods in the [OpenAPI/Swagger](htts://docs.olivetin.app/api/swagger/) docs if you prefer.
Misc API calls
====================
## [](#%5Fexample%5Fapi%5Fcall%5Fget%5Fthe%5Fdashboard%5Fbuttons%5Fcomponents)Example API call: Get the dashboard buttons ("components")
curl
```asciidoc
user@host: curl http://olivetinServer:1337/api/GetDashboardComponents
```
## [](#%5Fexample%5Fapi%5Fcall%5Freadyz%5Fhealthcheck)Example API call: readyz Healthcheck
This is useful for configuring healthchecks in docker containers, or on Kubernetes.
curl
```asciidoc
user@host: curl http://olivetinServer:1337/api/readyz
{"status": "ok"}
```
The response will always be "status: ok" to indicate that the API is up, or it will timeout.
Starting Actions from the API
====================
There are several variants of this API call available which might be easier for scripts (or humans) to work with!
There are 4 main methods to start an action in OliveTin, which can be used in scripts or other applications. These methods allow you to trigger actions either immediately or wait for them to complete, and they can be accessed via HTTP requests.
__Webhook/API reference table__
| Function | HTTP Method | Request Type (How to select an action) | Response Type |
| ---------------------------------------------------------------- | ----------- | ------------------------------------------- | -------------------------------------------------------------------- |
| [StartAction](method%5FStartAction.html) | POST | [OliveTin request object](#api-request-obj) | [Execution Tracking ID](#api-response-trackingid) |
| [StartActionByGet](method%5FStartActionByGet.html) | GET | [Action ID in the URL](#api-request-idurl) | [Execution Tracking ID](#api-response-trackingid) |
| [StartActionAndWait](method%5FStartActionAndWait.html) | POST | [OliveTin request object](#api-request-obj) | [Log Entry (waits for the action to finish)](#api-response-logentry) |
| [StartActionByGetAndWait](method%5FStartActionByGetAndWait.html) | GET | [Action ID in the URL](#api-request-idurl) | [Log Entry (waits for the action to finish)](#api-response-logentry) |
You can also browse these methods in the [OpenAPI/Swagger](htts://docs.olivetin.app/api/swagger/) docs if you prefer.
## [](#api-request-idurl)Request type: Action ID in the URL
Used by:
* [StartActionByGet](method%5FStartActionByGet.html)
* [StartActionByGetAndWait](method%5FStartActionByGetAndWait.html)
If you are trying to integrate OliveTin with your own scripts or processes, it’s probably easiest to start actions by using an ID directly in the URL, [see the example](#api-eg-startIdUrl).
## [](#api-request-obj)Request type: OliveTin request object
Used by:
* [StartAction](method%5FStartAction.html)
* [StartActionAndWait](method%5FStartActionAndWait.html)
OliveTin request object structure
```json
{
"actionId": "string",
"arguments": [
{
"name": "string",
"value": "string"
}
],
"uniqueTrackingId": "string"
}
```
To find your Action ID, and understand how Action IDs work, see the [Action ID](../action%5Fcustomization/ids.html) documentation
If you need more control over the execution, then the only other option is to submit a `OliveTin reqjest object`, which is just a very simple JSON structure like this;
```json
{
"actionId": "Generate cryptocurrency",
"arguments": [],
"uniqueTrackingId": "my-tracking-id",
}
```
More detailed examples can be seen below.
## [](#api-response-trackingid)Response type: Execution Tracking ID
Used by:
* [StartAction](method%5FStartAction.html)
* [StartActionByGet](method%5FStartActionByGet.html)
Example Execution Tracking ID response
```json
{"executionTrackingId":"5bb4860c-bbd0-4bc9-a7d6-42240551500c"}
```
## [](#api-response-logentry)Response type: LogEntry
Used by:
* [StartActionAndWait](method%5FStartActionAndWait.html)
* [StartActionByGetAndWait](method%5FStartActionByGetAndWait.html)
Example log entry
```json
{
"logEntry": {
"datetimeStarted": "2024-02-27 14:14:49",
"actionTitle": "Restart httpd on server1",
"stdout": "",
"stderr": "",
"timedOut": true,
"exitCode": -1,
"user": "",
"userClass": "",
"actionIcon": "🔄",
"tags": [
],
"executionTrackingId": "b04b1e90-d457-4158-b7dc-da9e81f21568",
"datetimeFinished": "2024-02-27 14:14:52",
"actionId": "restart_httpd",
"executionStarted": true,
"executionFinished": true,
"blocked": false
}
}
```
Environment variables
====================
All argument names and values are also passed as environment variables as well, which can be very useful when passing several arguments to a script, for example.
`config.yaml`
```yaml
actions:
- title: Print names of new files
shell: /opt/newfile.py
arguments:
- name: filename
type: unicode_identifier
- name: filesizebytes
type: unicode_identifier
- name: fileisdir
type: unicode_identifier
execOnFileCreatedInDir:
- /home/user/Downloads/
```
This is an example of a python script using the environment variables;
`/opt/newfile.py`
```python
#!/usr/bin/env python
import os
print(os.environ['OLIVETIN'])
print(os.environ['FILENAME'])
print(os.environ['FILESIZEBYTES'])
print(os.environ['FILEISDIR'])
```
## [](#%5Fnotes)Notes
1. Argument names are converted to uppercase for environment variables, `name: filename` becomes `FILENAME`.
2. OliveTin also passes an environment variable called `OLIVETIN` which is always just set to `1`, which allow for scripts to detect if they are being run within OliveTin.
3. The environment variables are passed into the execution context which uses a shell (/bin/sh on Linux), so it is also possible to use them with the $ notation in the `shell` line, like this; `shell: echo $FILENAME` for example.
Input: Textbox
====================
Many times you need to customize how an action/shell command is run, with arguments. For example;
```asciidoc
echo "Hello world"
```
In the example above, `Hello world` is an argument passed to the `echo` command. OliveTin allows you to add pre-defined, and free-text arguments to commands in this way. Below is the OliveTin version of the `echo` command shown above;
`config.yaml`
```yaml
actions:
- title: echo a message
icon: smile
shell: echo {{ message }}
arguments:
- name: message
default: Hello World
type: ascii_sentence
actions:
- title: Print a message
shell: echo {{ message }}
arguments:
- name: message
description: The message you want to print out on the shell.
title: Your Message
default: Hello World
type: ascii_sentence
```
This will give you a normal button, like this;

However, when you click on it, you’ll get a prompt to enter arguments, like this;

You’ll see that the type is set to `ascii_sentence`. This applies fairly safe input validation to arguments, so that only a-z, 0-9, spaces and .'s are allowed.
When you start the action, and it’s finished, go to the "logs" view to view the output of the command we’ve just run.

Input: Checkbox/Boolean
====================
The `checkbox` type argument is a simple checkbox that can be used to toggle a boolean value. It can be especially useful to pass flags to your actions.
```yaml
actions:
- title: remove files
shell: rm {{ useTheForce }} /tmp/Downloads/
arguments:
- title: Use rm -rf?
name: useTheForce
type: checkbox
choices:
- title: 1
value: "-rf"
- title: 0
value: ""
```
Input: Confirmation
====================
The `confirmation` type argument is a special argument type, which simply disables the "Start" button until a checkbox is ticked. This can be useful if you have an action with no other arguments, but you want to prevent accidental button-clicks starting the action.
```yaml
actions:
- title: Delete old backups
icon: ashtonished
shell: rm -rf /opt/oldBackups/
arguments:
- type: confirmation
title: Are you sure?!
```

Notice in the webui the "start" button is disabled.
Input: DateTime
====================
OliveTin supports datetime pickers - note that these do NOT add your timezone, so it up to your scripts / commands to interpret which timezone is being used.
`config.yaml`
```yaml
actions:
- title: Print your favourite datetime!
shell: echo {{ my_favourite_time }}
arguments:
- type: datetime
title: My Favourite DateTime
```

## [](#%5Fformat%5Fvalidation)Format & Validation
| | The OliveTin server does try to parse and validate the date on the server side to prevent dangerous input, but there is no validation in the browser, beyond what your browser might do to prevent you from picking an invalid date. **This is safe**, as what really matters is what the server allows to be passed to be executed - and that is checked. |
| ------------------------------------------------------------------------------------------------------------------------------------------------------------------------------------------------------------------------------------------------------------------------------------------------------------------------------------------------------------- |
At the time of writing, it is not yet possible to specify only a date, or only a time, or change the date / time format.
## [](#%5Frejecting%5Fempty%5Fvalues%5Fnull)Rejecting empty values (null)
```yaml
actions:
- shell: echo "Hello {{ name }}!"
arguments:
- name: name
rejectNull: true`
```
Input: Dropdowns
====================
Predefined choices are normally the safest type of arguments, because users are limited to only enter values that you specify.
```yaml
actions:
- title: Print a message
icon: smile
shell: echo "{{ message }}"
arguments:
- name: message
description: The message you want to print out.
choices:
- title: Hello
value: Hello there!
- title: Goodbye
value: Aww, goodbye. :-(
```
Note that when predefined choices are used, the argument type is ignored.
This is what it looks like in the web interface;

Then finally, when you execute this command, it would look something like this (remember that this is just a basic "echo" command).

In the logs, you can then click on the log entry link to open the results;

## [](#args-dropdown-entities)Using Entities in Dropdowns
Dropdowns can also be populated with a list of entities, like this;
`config.yaml`
```yaml
actions:
- title: restart container
shell: 'docker restart {{ containerToRestart }}'
arguments:
- name: containerToRestart
entity: container
title: 'Select Container'
choices:
- value: '{{ container.Names }}'
title: '{{ container.Names }}'
entities:
- file: entities/containers.json
name: container
```
This is what it looks like in the web interface;

## [](#%5Frejecting%5Fempty%5Fvalues%5Fnull)Rejecting empty values (null)
```yaml
actions:
- shell: echo "Hello {{ name }}!"
arguments:
- name: name
rejectNull: true`
```
## [](#%5Fdefault%5Fvalues)Default values
Dropdown arguments can also have default values. This is done by adding a `default` key to the argument definition.
`config.yaml`
```yaml
actions:
- title: "Print your favorite movie"
shell: echo '{{ movie }} is amazing'
arguments:
- name: movie
choices:
- value: "Star Wars"
- value: "Star Trek"
- value: "The Matrix"
default: "Star Trek"
```
Input: Textarea
====================
OliveTin supports multi-line text inputs, which can be useful for longer messages or scripts. You should set your argument `type` to `raw_string_multiline` to use these.
As the name implies, textareas are raw, and are NOT validated by any regex.
`config.yaml`
```yaml
actions:
- title: Save text to file
shell: echo "$CONTENT" > file
arguments:
- type: raw_string_multiline
name: content
```
This renders like this;

Introduction to Arguments
====================
Actions and commands that OliveTin runs, without arguments, are generally quite safe - only that command can be run, without modifications. However, many users need the flexibility to set options on that command - normally called command line arguments. In OliveTin, arguments are defined in a shell commands like `echo {{ message }}`, with a bit of extra configuration.
Examples of valid argument names are `{{ personName }}`, `{{ customer_number }}` and `{{ ISBN11_code }}`.
* a-z (case insensitive)
* \_ is allowed
* numbers are allowed (argument names can also start with numbers)
* all other characters are invalid for argument names.
Password
====================
Sometimes you want to mask the input you pass, and a password field is useful for this.
| | Passwords are passed to the OliveTin server in cleartext (unless you’re using HTTPS), and are just treated as a string on the server side. |
| --------------------------------------------------------------------------------------------------------------------------------------------- |
`config.yaml`
```yaml
actions:
- title: echo a message
icon: smile
shell: echo {{ my_password }}
arguments:
- name: my_password
type: password
```
Custom regex
====================
OliveTin version 2024.02.081 and above support custom regex patterns for argument types. Here is an example to validate against any 3 letter word;
| | The regex pattern should be enclosed in single quotes, otherwise you will probably get a YAML error when starting OliveTin. |
| ------------------------------------------------------------------------------------------------------------------------------ |
`config.yaml`
```yaml
actions:
- title: echo a message
icon: smile
shell: echo "{{ message }}"
arguments:
- name: message
type: 'regex:^\w\w\w$'
```
The site is a good place to test your regex patterns. OliveTin checks your regex 2 times;
1. **Regex in the browser** (which probably uses PCRE or Perl Compatible Regular Expressions) - this is so that the browser can give you a nice validation message. This is ignored when it reaches the server though, or if you are using the API directly. Select "PCRE" on the regex101 site when testing.
2. **Regex on the server** (which uses Golang’s regex engine) - this is the one that actually validates the input. Select "Golang" on the regex101 site when testing.
You cannot specify different regex patterns for the browser and server. The regex pattern you create will need to be compatible with both types of regex engine.
Important Safety Warning
====================
Before you continue, it’s important to read through this safety warning.
OliveTin supports customization of command line arguments, but there is a element of risk. For example, if your command is `echo {{ message }}`, and you allow your users to set `{{ message }}` to the value `"" && rm -rf /` , then you’ve got real problems. For this reason, OliveTin tries to give you useful ways to restrict what users are allowed to enter - with **argument types**.
However, here are some important rules to try and follow with argument types;
* Use the most restrictive argument types when possible - `ascii` and `int`. This will stop users entering argument values that might be used dangerously, but it’s not foolproof. For example, if you have a command like `createSnapshot.sh --count {{ snapshotCount }}`, and set `snapshotCount` to `int`, then at least users will only be able to enter integer numbers. However, nothing stops them entering crazy values like 9999.
* Don’t give access to actions with arguments to people you don’t trust. Please don’t ever put your OliveTin install on the public internet!
Suggestions
====================
Argument inputs can also have "suggested" values, which can make it quicker to type commonly used options. The way that these are displayed will vary depending on your browser, as they are implemented as a modern HTML5 browser feature called "datalist".
Suggestions are configured like this;
Configuration example of input suggestions
```yaml
actions:
- title: Restart Docker Container
icon: restart
shell: docker restart {{ container }}
arguments:
- name: container
title: Container name
suggestions:
- plex:
- graefik:
- grafana:
- wifi-controller: WiFi Controller
- firewall-controller: Firewall Controller
```
In the examples above, there are 5 suggestions. The first 3 suggestions contain a suggestion with a blank title. The last 2 suggestions contain a human readable title (eg: `wifi-controller` is the suggestion, and `WiFi Controller` is the title).
| | suggestions: is a yaml **map**, not a **list**. If you leave the title empty you must still end the suggestion with a ":". |
| ----------------------------------------------------------------------------------------------------------------------------- |
## [](#%5Fexamples)Examples

Figure 1\. Screenshot of input suggestions with Firefox on Linux.

Figure 2\. Screenshot of input suggestions with Chrome on Linux.
## [](#%5Fbrowser%5Fsupport)Browser Support
`datalist` is widely supported now-a-days, but Firefox on Android notably lacks support; . See the upstream bug here; .
Argument types
====================
A full list of argument types are below;
__Argument types reference table__
| Type | Rendered as | Allowed values |
| ---------------------------- | ----------------------------------------- | -------------------------------------------------------------------------------------------------------------------------------------------------------------------------------------------------------------------------------------------------------------------------- |
| (default) | [Textbox](input.html) | If a type: is not set, and choices: is empty, then ascii will be used, and a warning will be logged. It is recommended that you set the type explicitly, rather than relying on defaults. |
| ascii | [Textbox](input.html) | a-z (case insensitive), 0-9, but no spaces or punctuation |
| ascii\_identifier | [Textbox](input.html) | Like a DNS name, a-Z (case insensitive), 0-9, \-, ., and \_. |
| ascii\_sentence | [Textbox](input.html) | a-z (case insensitive), 0-9, with spaces, . and ,. |
| unicode\_identifier | [Textbox](input.html) | Like an ascii identifier, but allows unicode characters. This is useful for languages that use non-ascii characters, such as Chinese, Japanese, etc. |
| email | [Textbox](input.html) | An email address. |
| password | [Password](password.html) | A password, which is hidden when typed. |
| very\_dangerous\_raw\_string | [Textbox](input.html) | Anything. This is **incredibly dangerous**, as effectively people can type anything they like, including executing additional commands beyond what you specify. Absolutely should not be used unless your OliveTin instance can only be used by people you trust entirely. |
| regex:… | [Textbox](input.html) | Version 2024.03.081 and above support custom regex patterns. See [Custom regex arguments](regex.html). |
| int | [Textbox](input.html) | Any number, made up of the characters 0 to 9\. Negative numbers are not supported. |
| url | [Textbox](input.html) | A url, e.g. |
| confirmation | [Confirmation](input%5Fconfirmation.html) | A "hidden" argument that makes the action require a confirmation before launching. |
| n/a, but choices used | [Dropdown](input%5Fdropdown.html) | A "hidden" argument that makes the action require a confirmation before launching. |
| raw\_string\_multiline | [Textarea](input%5Ftextarea.html) | Anything. This is **dangerous**, as effectively people can type anything they like |
Fieldsets
====================
It is possible to group actions together in a "group", which is not a directory, but is called a "fieldset". This is an example of a fieldset that contains two [Folders](3-folders.html).

Fieldsets are defined under a [Dashboards](intro.html) in your config.yaml.
`config.yaml`
```yaml
dashboards:
- title: My First Dashboard
contents:
- title: Fieldset 1
type: fieldset
contents: []
- title: Fieldset 2
type: fieldset
contents: []
```
Fieldsets are also generated for you when you use [Entities](../entities/intro.html).
`config.yaml`
```yaml
dashboards:
- title: My First Dashboard
contents:
- title: Fieldset 1
type: fieldset
entity: server
contents:
- title: Start {{ server.Name }}
- title: Shutdown {{ server.Name }}
```
Folders (Directories)
====================
Folders (Directories) are a good way to group up actions in the same way that you would organize files on your computer into directories.

You must first create a dashboard to use a directory, and then you "reference" actions that you want in that folder based on the action name. Anything without a "contents" property is treated as an action.
Let’s look at the example below with 4 actions, 2 top level folders and 1 subfolder.
`config.yaml`
```yaml
actions:
- title: Action 1
shell: echo "action1"
- title: Action 2
shell: echo "action2"
- title: Action 3
shell: echo "action3"
- title: Action 4
shell: echo "action4"
dashboards:
- title: My First Dashboard
contents:
- title: Fieldset 1
type: fieldset
contents:
- title: Folder 1
contents:
- title: Action 1
- title: Action 2
- title: Subfolder 2
contents:
- title: Action 3
- title: Folder 2
contents:
- title: Action 4
```
Displays
====================
Displays are a way of displaying text, values, variables and similar on a dashboard.
They are rendered as just a simple box, that shown alongside actions. You can add arbitary HTML to a display, which makes it useful for showing links, etc.

`config.yaml`
```yaml
dashboards:
# This the second dashboard.
- title: My Containers
contents:
# This is a fieldset, which is a way of dashboard items together actions together.
- title: Container {{ container.Names }}
entity: container
type: fieldset
contents:
# This is a display
- type: display
title: |
{{ container.Names }}
{{ container.State }}
# These are the actions that we want on the dashboard.
- title: 'Start {{ container.Names }}'
- title: 'Stop {{ container.Names }}'
```
## [](#%5Fcss%5Fclasses)CSS Classes
You can also add CSS classes to the display, which can be useful for styling.
```yaml
dashboards:
- title: My Containers
contents:
- title: 'Container {{ container.Names.0 }} ({{ container.Image }})'
entity: container
type: fieldset
contents:
- type: display
cssClass: '{{ container.State }}'
title: |
{{ container.Status }}
{{ container.State }}
- title: 'Start {{ container.Names.0 }}'
- title: 'Stop {{ container.Names.0 }}'
- title: 'Remove {{ container.Names.0 }}'
```
You can then use the following CSS to style the display;
```css
div.display.running {
color: green;
}
```
Most recent action output
====================
This is considered an advanced and experimental feature at the moment.
The `stdout-most-recent-execution` view is a way to display the most recent output of an action on a dashboard. This is useful for actions that are run on a schedule, or actions that are run on startup. This is a picture of what it looks like:

To set this up, here is the configuration you need to add to your `config.yaml` file;
```yaml
actions:
- title: Get status
id: status_command
shell: date
execOnStartup: true
execOnCron:
- "*/1 * * * *"
dashboards:
- title: Control Panel
contents:
- title: Status
type: fieldset
contents:
- type: stdout-most-recent-execution
title: status_command
```
Note that the output only refreshes with the browser, not when the button is clicked.
As this is an experimental feature, please look at options for [support](../troubleshooting/wheretofindhelp.html) if you need help getting it to work.
The "actions" section
====================
To make Olivetin easy to use, it generates a default "Actions" section for you, as many people don’t want the hassle of having to configure dashboards. This is fine, you absolutely do not need a `dashboards:` section in your `config.yaml` at all if you don’t want it.
However, some people prefer to put every action onto a Dashboard. If you so this, OliveTin will hide the `Actions` view for you on the sidebar.
Change component style
====================
You can change the style of any dashboard component by adding a `cssClass` property to the component. This is useful for styling actions, displays, fieldsets and folders. Here is an example of how to add a class to an action;
```yaml
themeName: my-theme
actions:
- title: My Action
shell: echo "Hello"
dashboards:
- title: My Dashboard
contents:
- title: My Fieldset
type: fieldset
contents:
- title: My Action
cssClass: big-button
```
You can then create a theme, and add the following CSS to style the action;
`custom-webui/themes/my-theme/theme.css`
```css
.big-button {
background-color: red;
color: white;
font-size: 20px;
grid-column: span 2;
grid-row: span 2;
}
```
Example Dashboard usage
====================
Check out the following examples of dashboards in several complete OliveTin solutions;
* [Container Control Panel](../solutions/container-control-panel/index.html)
* [Systemd Control Panel](../solutions/systemd-control-panel/index.html)
Dashboards
====================
OliveTin generates a default view of actions which is useful for simple OliveTin use cases - this is always called "Actions" and cannot be renamed. The Actions view also does not support entities, fieldsets or folders.
If you want to start organizing OliveTin actions more effectively, then **Dashboards** are for you!
One of the biggest reasons to use Dashboards as opposed to just the "Actions" section, is that dashboards allow you to use [Folders](3-folders.html), and dashboards really start to get exciting when you start using [entities](../entities/intro.html) and displays.

## [](#%5Fdashboards%5Fpull%5Factions%5Ffrom%5Fthe%5Fdefault%5Fview)Dashboards pull actions from the default view
Dashboards are a way of pulling actions from the default "actions" view, and organizing them into groups - either into folders, or fieldsets. Because dashboards literally do "pull" actions from the default view, you cannot use an action in multiple dashboards - and every action must have a unique title.
## [](#%5Fexample%5Fconfiguration)Example configuration
`config.yaml`
```yaml
# Actions MUST be defined in the actions section, not in the dashboards
# section. The dashboards only "link" to actions by their title.
actions:
- title: Ping All Servers
shell: echo "ping all..."
- title: '{{ server.name }} Wake on Lan'
shell: 'wol {{ server.name }}'
timeout: 10
entity: server
- title: '{{ server.name }} Power Off'
shell: 'ssh root@{{ server.name }} "poweroff"'
timeout: 10
entity: server
# Dashboards are a way of taking actions from the default "actions" view, and
# organizing them into groups - either into folders, or fieldsets.
#
# The only way to properly use entities, are to use them with a `fieldset` on
# a dashboard.
dashboards:
# Top level items are dashboards.
- title: My Servers
contents:
# On dashboards, all items need to be in a "fieldset". If you don't
# specify a fieldset, actions will be assigned to a fieldset with a title
# called "default".
- title: All Servers
type: fieldset
contents:
# The contents of a dashboard will try to look for an action with a
# matching title IF the `contents: ` property is empty.
- title: Ping All Servers
# If you create an item with some "contents:", OliveTin will show that as
# directory.
- title: Hypervisors
contents:
- title: Ping hypervisor1
- title: Ping hypervisor2
# If you specify `type: fieldset` and some `contents`, it will show your
# actions grouped together without a folder.
- type: fieldset
entity: server
title: 'Server: {{ server.hostname }}'
contents:
# By default OliveTin will look for an action with a matching title
# and put it on the dashboard.
#
# Fieldsets also support `type: display`, which can display arbitary
# text. This is useful for displaying things like a container's state.
- type: display
title: |
Hostname: {{ server.name }}
IP Address: {{ server.ip }}
# These are the actions (defined above) that we want on the dashboard.
- title: '{{ server.name }} Wake on Lan'
- title: '{{ server.name }} Power Off'
```
Example Entity Usage
====================
Check out the following [Solutions](../solutions/intro.html) which make good use of entities.
* [Container Control Panel](../solutions/container-control-panel/index.html)
* [Systemd Control Panel](../solutions/systemd-control-panel/index.html)
Entities
====================
An entity is something that exists - a "thing", like a VM, or a Container is an entity. OliveTin allows you to then dynamically generate actions based around these entities.
This is really useful if you want to generate wake on lan or poweroff actions for `server` entities, for example.
A very popular use case that entities were designed for was for `container` entities - in a similar way you could generate `start`, `stop`, and `restart` container actions.
Entities are just loaded from files on disk, OliveTin will also watch these files for updates while OliveTin is running, and update entities.
Entities can have properties defined in those files, and those can be used in your configuration as variables. For example; `container.status`, or `vm.hostname`.
```yaml
entities:
- file: /etc/OliveTin/containers.json
name: container
- file: /etc/OliveTin/servers.yaml
name: server
```
Entity Actions can only be used on [Dashboards](../dashboards/intro.html).
JSON entity files
====================
JSON files are parsed as if each line is a single JSON object. This can be super helpful for getting a list of containers, for example; `docker ps -a --format=json > /etc/OliveTin/containers.json`.
`/etc/OliveTin/containers.json`
```json
{"Command":"\"/opt/entrypoint.sh\"","CreatedAt":"2024-02-08 15:27:42 +0000 GMT","ID":"4bafe6f9f956","Image":"fedora","Labels":"?","LocalVolumes":"0","Mounts":"","Names":"media-indexing-container","Networks":"bridge","Ports":"","RunningFor":"13 days ago","Size":"0B","State":"exited","Status":"Exited (128) 13 days ago"}
{"Command":"\"/opt/entrypoint.sh\"","CreatedAt":"2023-12-17 20:58:03 +0000 GMT","ID":"d25f37c49c35","Image":"fedora","Labels":"?","LocalVolumes":"0","Mounts":"","Names":"media-playback-container","Networks":"bridge","Ports":"","RunningFor":"27 days ago","Size":"0B","State":"exited","Status":"Exited (137) 27 days ago"}
```
YAML entity files
====================
YAML files are the default expected format, so you can use .yml, .yaml, or even .txt - as long as the file contains a valid yaml LIST, then it will be loaded.
`/etc/OliveTin/servers.yaml`
```yaml
- name: server1
state: started
hostname: server1.example.com
ip: 192.168.0.1
- name: server2
state: started
hostname: server2.example.com
ip: 192.168.0.2
- name: server3
state: stopped
hostname: server3.example.com
ip: 192.168.0.3
```
BSD
====================
Using BSD? Good for you! :-)
binary tar.gz:
## [](#%5Fpost%5Finstallation)Post installation
You will need to write a basic configuration file before OliveTin will startup.
Edit the basic config file at `config.yaml` with the following contents;
The most simple `config.yaml` file.
```yaml
actions:
- title: "Hello world!"
shell: echo 'Hello World!'
```
Start OliveTin, preferably via a terminal. On Unix based systems (eg MacOS, BSD, Linux, etc) you can just run `./OliveTin`. On Windows you would run `OliveTin.exe` in windows terminal.
You should be able to browse to (or similar) to get to the web interface.
If you see the OliveTin page popup in your browser, you are good to go! Here are some helpful next steps;
* [Create your first action](../action%5Fexecution/create%5Fyour%5Ffirst.html)
* [configuration section](../config.html) for a list of all configuration options.
## [](#%5Ftroubleshooting%5Finstallations)Troubleshooting installations
If you are having problems, OliveTin will log it’s status on startup. Check the log messages in the terminal.
If you cannot understand the logs, or otherwise need help, see the [support page](../troubleshooting/wheretofindhelp.html).
Which download do I need?
====================
OliveTin can be run as a [service](#package) or a [container](container.html). If you are not sure which is best for you, read [containers vs services](container%5Fvs%5Fservice.html).
## [](#package)Packages (run OliveTin as a service)
This is a table that explains which package/download is best for each environment;
| Processor Type | Operating System | Distribution | File on [latest release page](https://github.com/OliveTin/OliveTin/releases/latest) |
| ------------------------------------------------------------------------------------------------------------------------------------------------------------- | ---------------------------------------------------------------------------------------------------------------------------------------------------------------------- | --------------- | ---------------------------------------------------------------------------------------------------------------------------------------------------------------- |
| AMD / Intel → amd64 | Linux | Other → .tar.gz | [OliveTin-linux-amd64.tar.gz](https://github.com/OliveTin/OliveTin/releases/latest/download/OliveTin-linux-amd64.tar.gz) [installation instructions](targz.html) |
| Red Hat, Fedora, etc → .rpm | [OliveTin\_linux\_amd64.rpm](https://github.com/OliveTin/OliveTin/releases/latest/download/OliveTin%5Flinux%5Famd64.rpm) [installation instructions](linux%5Frpm.html) | | |
| Debian, Ubuntu → .deb | [OliveTin\_linux\_amd64.deb](https://github.com/OliveTin/OliveTin/releases/latest/download/OliveTin%5Flinux%5Famd64.deb) [installation instructions](linux%5Fdeb.html) | | |
| Windows | [OliveTin-windows-amd64.zip](https://github.com/OliveTin/OliveTin/releases/latest/download/OliveTin-windows-amd64.zip) | | |
| macOS,macOS | [OliveTin-macOS-amd64.tar.gz](https://github.com/OliveTin/OliveTin/releases/latest/download/OliveTin-macOS-amd64.tar.gz) | | |
| 32bit ARM (Raspberry Pi 1, 2, or similar) → arm | Linux | Other → .tar.gz | [One of the OliveTin-linux-arm….tar.gz files](https://github.com/OliveTin/OliveTin/releases/latest) [installation instructions](targz.html) |
| Red Hat, Fedora, etc → .rpm | [One of the OliveTin\_linux\_arm…..rpm files](https://github.com/OliveTin/OliveTin/releases/latest) [installation instructions](linux%5Frpm.html) | | |
| Debian, Ubuntu → .deb | [One of the OliveTin\_linux\_arm….deb files](https://github.com/OliveTin/OliveTin/releases/latest) [installation instructions](linux%5Fdeb.html) | | |
| 64bit ARM (Apple M1, Raspberry Pi 3, 4, or similar) → arm64 **Note**: If you are running 32bit Raspberry Pi OS, choose the 32bit ARM download option instead. | Linux | Other → .tar.gz | [OliveTin-linux-arm64.tar.gz](https://github.com/OliveTin/OliveTin/releases/latest/download/OliveTin-linux-arm64.tar.gz) [installation instructions](targz.html) |
| Red Hat, Fedora, etc → .rpm | [OliveTin\_linux\_arm64.rpm](https://github.com/OliveTin/OliveTin/releases/latest/download/OliveTin%5Flinux%5Farm64.rpm) [installation instructions](linux%5Frpm.html) | | |
| Debian, Ubuntu → .deb \` | [OliveTin\_linux\_arm64.deb](https://github.com/OliveTin/OliveTin/releases/latest/download/OliveTin%5Flinux%5Farm64.deb) [installation instructions](linux%5Fdeb.html) | | |
| macOS | [OliveTin-macOS-arm64.tar.gz](https://github.com/OliveTin/OliveTin/releases/latest/download/OliveTin-macOS-amd64.tar.gz) [installation instructions](targz.html) | | |
A full list of **packages** can be downloaded from the [GitHub project releases](https://github.com/jamesread/OliveTin/releases) page.
## [](#container-images)Container images
| | OliveTin is supported when run as a Linux Container in many different ways, and lot of OliveTin users will assume that a Linux Container is the best way to install OliveTin because Linux Containers are really popular… However, it is very common that some OliveTin use cases become overcomplicated when a container is used, compared to running as a native service. Read the [\[install-container-vs-service\]](#install-container-vs-service) document to understand if a container or a service is right for your use case. |
| ----------------------------------------------------------------------------------------------------------------------------------------------------------------------------------------------------------------------------------------------------------------------------------------------------------------------------------------------------------------------------------------------------------------------------------------------------------------------------------------------------------------------------------------- |
The image is pushed to the following registries, pick the one that you prefer - the container images are identical so you only need one;
* Dockerhub container image: [docker.io/jamesread/olivetin](https://hub.docker.com/r/jamesread/olivetin/)
* GitHub container image: [ghcr.io/jamesread/olivetin](https://ghcr.io/olivetin/olivetin)
The following methods can be used to install the container;
* [Installation as a standalone container (podman/docker)](container.html)
* [Installation with Docker Compose](docker%5Fcompose.html)
* [Installation on Kubernetes with Helm](helm.html)
* [Installation on Kubernetes (manually)](k8s.html)
Linux Container
====================
## [](#%5Frepositories)Repositories
The OliveTin container images are hosted on both Docker Hub and the GitHub Container Registry.
The main OliveTin image is available at;
* **Docker Hub**: `docker.io/jamesread/olivetin` [View on Docker Hub](https://hub.docker.com/r/jamesread/olivetin/tags?page=1&ordering=last%5Fupdated)
* **GitHub**: `ghcr.io/olivetin/olivetin` [View on GitHub](https://github.com/OliveTin/OliveTin/pkgs/container/olivetin)
## [](#%5Ftags)Tags
* `latest-2k` \- This tag will always point to the latest OliveTin 2k version (eg 2025.11.11)
* `latest-3k` \- This tag will always point to the latest OliveTin 3k version (eg 3000.2.0)
* `latest` \- This tag will always point to the latest OliveTin version (currently 3k)
Read more about 2k vs 3k here: [OliveTin 2k vs OliveTin 3k](../upgrade/2k3k.html)
## [](#%5Fcontainer%5Finstallation%5Foptions)Container installation options
* [Docker or Podman](podmandocker.html)
* [Docker Compose](docker%5Fcompose.html)
* [Kubernetes with Helm](helm.html)
* [Kubernetes with Manifests](k8s.html)
Containers vs Services
====================
Linux Containers have become an incredibly popular method for running software. OliveTin supports every way of running Linux containers - spanning from homelabs up to enterprise environments. As a container, it can be used [standalone using Podman/Docker](container.html), through to [using docker-compose](docker%5Fcompose.html) or even on [Kubernetes](k8s.html).
**However**, a lot of OliveTin use cases, such as providing an interface to run scripts, rely on files on their local Linux filesystem - containers, by definition, have their own separate filesystem. It is of course possible to "bind mount" parts of your local filesystem into OliveTin, but sometimes this requires more effort, or introduces subtle problems that are more complicated to solve. If you have a good amount of experience with Linux containers, then this approach is absolutely fine - but if you are new to these types of problems - not seeing files you expect, file permissions errors, etc, then it might just be easier to [install using a Linux package](choose%5Fpackage.html) instead.
## [](#%5Fdont%5Fovercomplicate%5Fyour%5Fcontainers%5Fuse%5Fssh)Don’t overcomplicate your containers - use SSH!
Sometimes you just want to (or have to) use containers, but also want to use these local resources as well. Instead of bind-mounting lots of stuff into the Linux container and creating a really complicated container definition (which is hard to scale), consider a simple alternative: [SSH with OliveTin](../action%5Fexamples/ssh-easy.html). This allows you to easily SSH back into the container host and keep your container definition really simple. This approach works great and is popular for a lot of users.
## [](#%5Fwhich%5Fshould%5Fi%5Fchoose)Which should I choose?
| Use Case | Recommended Option |
| ---------------------------------------------------------------------------- | ---------------------------------------------------------------------------------------------------------------------------------- |
| You’re experienced with Linux containers, and know how to bind mount volumes | [Linux Container](container.html) |
| You’re new to Linux containers, or not very comfortable with them | [Linux service](choose%5Fpackage.html), or [Linux container](container.html) with [SSH action](../action%5Fexamples/ssh-easy.html) |
| Needs to use lots of different file paths on the host filesystem | Run as a systemd service, or bind-mount the filesystem into the container. |
| Needs to control processes, like systemd services | Run as a systemd service. |
Docker Compose install
====================
Docker compose is a popular way to define multi-container applications using a infrastructure as code approach.
If you personally prefer to use `docker compose`, then here is a sample to get you started;
`docker-compose.yml`
```yaml
services:
olivetin:
container_name: olivetin
image: jamesread/olivetin
volumes:
- OliveTin-config:/config # replace host path or volume as needed
ports:
- "1337:1337"
restart: unless-stopped
volumes:
OliveTin-config:
external: false
```
## [](#%5Fpost%5Finstallation%5Fcontainer)Post installation (container)
You will need to write a basic configuration file before OliveTin will startup.
Create a basic config file at `/etc/OliveTin/config.yaml` \- the exact path depends on what directory you specified in the bind mount container creation in the last step. Note that the file must be called `config.yaml`, and `config.yml` or `mystuff.yaml` would not work. You can download a sample configuration file like this if you like;
Download the sample config.yaml file to get you started.
```shell
user@host: cd /etc/OliveTin/
user@host: curl -O https://raw.githubusercontent.com/OliveTin/OliveTin/main/config.yaml
```
The file contents should look something like this;
The most simple `config.yaml` file.
```yaml
actions:
- title: "Hello world!"
shell: echo 'Hello World!'
```
If you are running a firewall on your server, like firewalld, you will need to open port 1337;
## [](#%5Fconfigure%5Fyour%5Ffirewall)Configure your firewall
* No Firewall
* FirewallD
If you don’t have a firewall, continue to the next section.
This is how you configure your firewalld firewall for OliveTin:
```shell
user@host: firewall-cmd --add-port 1337/tcp --permanent
user@host: firewall-cmd --reload
```
## [](#%5Fstart%5Fthe%5Folivetin%5Fservice)Start the OliveTin service
Now that you have a configuration file, and the OliveTin container created, you are now ready to start OliveTin!
```asciidoc
user@host: docker start olivetin
```
You should be able to browse to (or similar) to get to the web interface.
If you see the OliveTin page popup in your browser, you are good to go! Here are some helpful next steps;
* [Create your first action](../action%5Fexecution/create%5Fyour%5Ffirst.html)
* [configuration section](../config.html) for a list of all configuration options.
## [](#%5Ftroubleshooting%5Fpodmandocker%5Finstallations)Troubleshooting podman/docker installations
If you are having problems in starting OliveTin, or OliveTin is crashing on startup, then check the logs like this;
```asciidoc
user@host: docker logs OliveTin
```
If you cannot understand the logs, or otherwise need help, see the [support page](#support).
## [](#%5Fcontrolling%5Fother%5Fdocker%5Fcontainers%5Ffrom%5Fa%5Fdocker%5Fcompose%5Finstall%5Fof%5Folivetin)Controlling other docker containers from a Docker Compose install of OliveTin
If you want to use OliveTin running in a container to control other Docker containers, you will need to pass through the Docker sock in your compose file.
You will need to adjust your docker-compose file to include the docker socket, like this;
`docker-compose.yml` including docker socket
docker-compose.yml
```yaml
services:
olivetin:
container_name: olivetin
image: jamesread/olivetin
volumes:
- /docker/OliveTin:/config # replace host path or volume as needed
- /var/run/docker.sock:/var/run/docker.sock
...
```
You will probably need to tell this container to run as root as well, to control docker (see below).
## [](#%5Fcontrolling%5Fthe%5Fdocker%5Fuser%5Fwith%5Fdocker%5Fcompose)Controlling the docker user with Docker Compose
This is the correct way to tell the OliveTin container to run as root (or any other user);
```asciidoc
services:
olivetin:
container_name: olivetin
image: jamesread/olivetin
user: root
...
```
See [containers](../action%5Fexamples/containers.html) for alternatives to running as root.
| | [PUID and PGID are not used](../troubleshooting/puid-pgid.html) by the official OliveTin container image. |
| ------------------------------------------------------------------------------------------------------------ |
## [](#docker-compose-traefik)Using Traefik with Docker Compose
Traefik is a popular reverse proxy that seems to be used a lot in people’s Docker compose setups. See the [Traefik + Docker Compose](../reverse-proxies/traefik.html) page for more details.
Installation on Kubernetes with Helm
====================
Helm makes installing OliveTin on Kubernetes very easy, the official chart is hosted on Artifact Hub.
[](https://artifacthub.io/packages/search?repo=olivetin)
## [](#%5Frequirements)Requirements
### [](#%5Fprerequisites)Prerequisites
* A Kubernetes cluster setup and running
* Kubernetes client installed and authenticated
* An ingress controller configure for web traffic
* Helm installed and authenticated to the cluster
## [](#%5Finstallation)Installation
```shell
user@host: helm repo add olivetin https://olivetin.github.io/OliveTin-HelmChart/
user@host: helm install olivetin olivetin/olivetin
NAME: olivetin
LAST DEPLOYED: Tue Apr 1 23:19:09 2025
NAMESPACE: default
STATUS: deployed
REVISION: 1
TEST SUITE: None
```
## [](#%5Fconfigure)Configure
After a minute or two, check the pod status;
```shell
user@host: kubectl get pods
NAME READY STATUS RESTARTS AGE
olivetin-578b79766-4b8lg 1/1 Running 0 87s
```
Hopefully the pod is not crashlooping or anything like that. If it is, check the logs.
The helm chart should have created a basic ConfigMap for you;
```shell
user@host: kubectl describe cm/olivetin-config
Name: olivetin-config
Namespace: default
Labels: app.kubernetes.io/managed-by=Helm
Annotations: meta.helm.sh/release-name: olivetin
meta.helm.sh/release-namespace: default
Data
====
config.yaml:
--
actions:
- title: "Hello world!"
shell: echo 'Hello World!'
```
You should edit this ConfigMap to match your needs for OliveTin. Remember to restart the OliveTin deployment if you want the config changes to be picked up more quickly;
```shell
user@host: kubectl rollout restart deploy/olivetin
deployment.apps/olivetin restarted
```
You should be able to browse to (or similar) to get to the web interface.
If you see the OliveTin page popup in your browser, you are good to go! Here are some helpful next steps;
* [Create your first action](../action%5Fexecution/create%5Fyour%5Ffirst.html)
* [configuration section](../config.html) for a list of all configuration options.
## [](#%5Fincluded%5Ftemplates)Included templates
You can view the raw templates here:
* Deployment
* ConfigMap
* Service
* Ingress (optional)
## [](#%5Fsee%5Falso)See Also
* [Solution: Kubernetes Control Panel (Hosted)](../solutions/k8s-control-panel-hosted/index.html)
Installation guide
====================
## [](#%5Fpreparation)Preparation
You will need approximately **10 minutes** to install OliveTin on almost every platform, with root/system administrator access in most cases.
You probably will need about **10-20 minutes** to understand how OliveTin configuration works, and to be able to write your first action to make it do something useful.
## [](#%5Fwhere%5Fto%5Ffind%5Fhelp)Where to find help
To get relatively quick access to help, **Discord** is where the chat community for OliveTin is. Note that this project is a free community open source project, and it relies on volenteers to spare their free time to help you. Please be patient and polite.
 [Chat on Discord](https://discord.gg/jhYWWpNJ3v)
If nobody is online, or you’re not getting the right level of support, you can raise a ticket with the project’s developers on GitHub. Again, please be patient and polite.
 [Open a support request on GitHub](https://github.com/OliveTin/OliveTin/issues/new?assignees=&labels=support&template=support%5Frequest.md&title=)
## [](#%5Ffirst%5Fstep%5Fwhere%5Fare%5Fyou%5Finstalling)First step: where are you installing?
* Linux
* [Containers or Service?](container%5Fvs%5Fservice.html)
* Linux Service
* [Fedora Linux](linux%5Ffedora.html)
* [Alpine Linux](linux%5Falpine.html)
* [Manjaro Linux](linux%5Fmanjaro.html)
* [Arch Linux](linux%5Farch.html)
* [Generic .rpm based Linux](linux%5Frpm.html)
* [Generic .deb based Linux](linux%5Fdeb.html)
* [.tar.gz Install (manual)](targz.html)
* [Linux Container](container.html)
* [Docker or Podman](podmandocker.html)
* [Docker Compose](docker%5Fcompose.html)
* [Kubernetes with Helm](helm.html)
* [Kubernetes with Manifests](k8s.html)
* [FreeBSD](bsd.html)
* [Windows](windows.html)
* [MacOS](macos.html)
Kubernetes with Manifest files
====================
OliveTin works just fine on Kubernetes. The easiest way to deploy it is with a Kubernetes `ConfigMap`, `Deployment`, `Service` and finally `Ingress`. Like so;
## [](#%5Fconfigmap)ConfigMap
```yaml
apiVersion: v1
kind: ConfigMap
metadata:
name: olivetin-config
data:
config.yaml: |
actions:
- title: "Hello world!"
shell: echo 'Hello World!'
```
The main application config.yml for OliveTin is specified in the `ConfigMap`above. You will want to edit this later - see the "Configuration" section.
Next, we need a deployment;
## [](#%5Fdeployment)Deployment
```yaml
apiVersion: apps/v1
kind: Deployment
metadata:
name: olivetin
spec:
replicas: 1
selector:
matchLabels:
app: olivetin
template:
metadata:
labels:
app: olivetin
spec:
containers:
- name: olivetin
image: docker.io/jamesread/olivetin:latest
ports:
- containerPort: 1337
volumeMounts:
- name: olivetin-config
mountPath: "/config"
readOnly: true
livenessProbe:
exec:
command:
- curl
- localhost:1337
initialDelaySeconds: 5
periodSeconds: 30
volumes:
- name: olivetin-config
configMap:
name: olivetin-config
```
That should deploy OliveTin.
## [](#%5Fservice)Service
Now that OliveTin is deployed, expose it’s port as a service;
```asciidoc
user@host: kubectl expose deployment/olivetin
```
Lastly, create a Ingress rule for for that service;
## [](#%5Fingress)Ingress
```yaml
apiVersion: networking.k8s.io/v1
kind: Ingress
metadata:
name: olivetin-ingress
spec:
defaultBackend:
service:
name: olivetin
port:
number: 1337
rules:
- host: olivetin.apps.ocp.teratan.net
http:
paths:
- path: /
pathType: Prefix
backend:
service:
name: olivetin
port:
number: 1337
```
You should be able to browse to (or similar) to get to the web interface.
If you see the OliveTin page popup in your browser, you are good to go! Here are some helpful next steps;
* [Create your first action](../action%5Fexecution/create%5Fyour%5Ffirst.html)
* [configuration section](../config.html) for a list of all configuration options.
Alpine Linux
====================
Alpine Linux is supported by an upstream .apk package, or a manual .tar.gz install, or by [a container](container.html).
These instructions on this page are quite basic, because not many people have tried to use OliveTin on Alpine, or other OpenRC distributions. If you can help suggest improvements to these docs, or Alpine Linux support, it would be great to [hear from you](../troubleshooting/wheretofindhelp.html)!
## [](#%5Finstalling%5Fthe%5Fupstream%5Fapk)Installing the upstream `.apk`
```asciidoc
user@host: wget https://github.com/OliveTin/OliveTin/releases/latest/download/OliveTin_linux_amd64.apk
user@host: apk add --allow-untrusted OliveTin_linux_amd64.apk
```
## [](#%5Finstalling%5Fthe%5Ftar%5Fgz)Installing the `.tar.gz`
The standard [.tar.gz instructions](targz.html) should work just fine, replacing systemd for the OpenRC file.
Arch Linux (AUR)
====================
There are 3 packages available for Arch Linux;
1. [olivetin in AUR](https://aur.archlinux.org/packages/olivetin) \- This builds from source, using a release Git tag.This is officially maintained by the authors of the OliveTin project.
2. [olivetin-bin in AUR](https://aur.archlinux.org/packages/olivetin-bin) \- This re-packages the binaries built by the official binaries. This is not officially maintained by the authors of the OliveTin project, and might be a bit older - but it should work just fine.
3. [olivetin .apk built by the project](https://github.com/OliveTin/OliveTin/releases/latest/download/OliveTin%5Flinux%5Famd64.apk) \- This may be useful to have a package outside of AUR.
## [](#%5Finstallation%5Faur)Installation (AUR)
Install using `yay`;
```asciidoc
user@host: yay -Syu olivetin
```
| | One does not simply just do something with Arch without telling someone about it. Therefore, after you successfully install OliveTin on Arch, that you tell at least two people "I’m using OliveTin on Arch, btw". :-) |
| ------------------------------------------------------------------------------------------------------------------------------------------------------------------------------------------------------------------------- |
## [](#%5Fpost%5Finstallation)Post installation
You will need to write a basic configuration file before OliveTin will startup.
Create the following basic config file at `/etc/OliveTin/config.yaml` with the following contents;
The most simple `config.yaml` file.
```yaml
actions:
- title: "Hello world!"
shell: echo 'Hello World!'
```
Now that you have a configuration file, and OliveTin is installed, start it;
Start the service (only needed once)
```shell
user@host: systemctl enable --now OliveTin
```
If you are running a firewall on your server, like firewalld, you will need to open port 1337;
```shell
user@host: firewall-cmd --add-port 1337/tcp --permanent
user@host: firewall-cmd --reload
```
You should be able to browse to (or similar) to get to the web interface.
If you see the OliveTin page popup in your browser, you are good to go! Here are some helpful next steps;
* [Create your first action](../action%5Fexecution/create%5Fyour%5Ffirst.html)
* [configuration section](../config.html) for a list of all configuration options.
## [](#%5Ftroubleshooting%5Fsystemd%5Finstallations)Troubleshooting systemd installations
If you are having problems, you can check if OliveTin is running like this;
```shell
user@host: systemctl status OliveTin
```
If the service has failed, scroll through the logs;
```shell
user@host: journalctl -eu OliveTin
```
If you cannot understand the logs, or otherwise need help, see the [\[support\]](#support)page.
Generic .deb based Linux
====================
Running OliveTin as a systemd service on a Linux machine means it can use any program installed on your machine (you don’t have to add programs to a container). This is generally easier to use than a container, but containers can work just fine too with a bit more effort.
There are .deb packages published for OliveTin on each release page. If you distribution is not linked in this installation guide, and you use a .deb based Linux distribution, this package should work.
* [downloads page](https://github.com/jamesread/OliveTin/releases).
You can install these packages for .deb like this;
```bash
user@host: wget https://github.com/OliveTin/OliveTin/releases/latest/download/OliveTin_linux_amd64.deb
user@host: dpkg -i OliveTin_linux_amd64.deb
```
## [](#%5Fpost%5Finstallation)Post installation
You will need to write a basic configuration file before OliveTin will startup.
Create the following basic config file at `/etc/OliveTin/config.yaml` with the following contents;
The most simple `config.yaml` file.
```yaml
actions:
- title: "Hello world!"
shell: echo 'Hello World!'
```
Now that you have a configuration file, and OliveTin is installed, start it;
Start the service (only needed once)
```shell
user@host: systemctl enable --now OliveTin
```
If you are running a firewall on your server, like firewalld, you will need to open port 1337;
```shell
user@host: firewall-cmd --add-port 1337/tcp --permanent
user@host: firewall-cmd --reload
```
You should be able to browse to (or similar) to get to the web interface.
If you see the OliveTin page popup in your browser, you are good to go! Here are some helpful next steps;
* [Create your first action](../action%5Fexecution/create%5Fyour%5Ffirst.html)
* [configuration section](../config.html) for a list of all configuration options.
## [](#%5Ftroubleshooting%5Fsystemd%5Finstallations)Troubleshooting systemd installations
If you are having problems, you can check if OliveTin is running like this;
```shell
user@host: systemctl status OliveTin
```
If the service has failed, scroll through the logs;
```shell
user@host: journalctl -eu OliveTin
```
If you cannot understand the logs, or otherwise need help, see the [\[support\]](#support)page.
Fedora Linux (dnf)
====================
Fedora is included in the Fedora Project official repositories. For an overview of versions, see the Package Sources page;
## [](#%5Finstallation%5Fproject%5Fpackage)Installation (project package)
root@host: rpm -U https://github.com/OliveTin/OliveTin/releases/latest/download/OliveTin_linux_amd64.rpm
## [](#%5Finstallation%5Fdistribution%5Fpackage)Installation (distribution package)
WARN: The package included in the Fedora repositories is currently very old, and is not recommended. Please use the project package instead.
Install using `dnf` (or yum, on older versions of Fedora);
```asciidoc
user@host: dnf install -y OliveTin
```
## [](#%5Fpost%5Finstallation)Post installation
You will need to write a basic configuration file before OliveTin will startup.
Create the following basic config file at `/etc/OliveTin/config.yaml` with the following contents;
The most simple `config.yaml` file.
```yaml
actions:
- title: "Hello world!"
shell: echo 'Hello World!'
```
Now that you have a configuration file, and OliveTin is installed, start it;
Start the service (only needed once)
```shell
user@host: systemctl enable --now OliveTin
```
If you are running a firewall on your server, like firewalld, you will need to open port 1337;
```shell
user@host: firewall-cmd --add-port 1337/tcp --permanent
user@host: firewall-cmd --reload
```
You should be able to browse to (or similar) to get to the web interface.
If you see the OliveTin page popup in your browser, you are good to go! Here are some helpful next steps;
* [Create your first action](../action%5Fexecution/create%5Fyour%5Ffirst.html)
* [configuration section](../config.html) for a list of all configuration options.
## [](#%5Ftroubleshooting%5Fsystemd%5Finstallations)Troubleshooting systemd installations
If you are having problems, you can check if OliveTin is running like this;
```shell
user@host: systemctl status OliveTin
```
If the service has failed, scroll through the logs;
```shell
user@host: journalctl -eu OliveTin
```
If you cannot understand the logs, or otherwise need help, see the [\[support\]](#support)page.
Manjaro (pamac/AUR)
====================
Please see teh [Arch Linux](#install-archbtw) page for a description of the difference between `olivetin-bin` and `olivetin` in AUR. This page assumes you want to compile from source (`olivetin` package).
```bash
PATH=$PATH:~/go/bin/
pamac install buf
pamac install olivetin
sudo mkdir -p /etc/OliveTin/custom-webui/themes/
sudo mkdir -p /etc/OliveTin/entities/
```
## [](#%5Fpost%5Finstallation)Post installation
You will need to write a basic configuration file before OliveTin will startup.
Create the following basic config file at `/etc/OliveTin/config.yaml` with the following contents;
The most simple `config.yaml` file.
```yaml
actions:
- title: "Hello world!"
shell: echo 'Hello World!'
```
Now that you have a configuration file, and OliveTin is installed, start it;
Start the service (only needed once)
```shell
user@host: systemctl enable --now OliveTin
```
If you are running a firewall on your server, like firewalld, you will need to open port 1337;
```shell
user@host: firewall-cmd --add-port 1337/tcp --permanent
user@host: firewall-cmd --reload
```
You should be able to browse to (or similar) to get to the web interface.
If you see the OliveTin page popup in your browser, you are good to go! Here are some helpful next steps;
* [Create your first action](../action%5Fexecution/create%5Fyour%5Ffirst.html)
* [configuration section](../config.html) for a list of all configuration options.
## [](#%5Ftroubleshooting%5Fsystemd%5Finstallations)Troubleshooting systemd installations
If you are having problems, you can check if OliveTin is running like this;
```shell
user@host: systemctl status OliveTin
```
If the service has failed, scroll through the logs;
```shell
user@host: journalctl -eu OliveTin
```
If you cannot understand the logs, or otherwise need help, see the [\[support\]](#support)page.
Generic .rpm based Linux
====================
Running OliveTin as a systemd service on a Linux machine means it can use any program installed on your machine (you don’t have to add programs to a container). This is generally easier to use than a container, but containers can work just fine too with a bit more effort.
There are .rpm packages published for OliveTin on each release page. If you distribution is not linked in this installation guide, and you use a .rpm based Linux distribution, this package should work.
* [downloads page](https://github.com/jamesread/OliveTin/releases).
You can install these packages for .rpm like this;
```bash
user@host: rpm -U https://github.com/OliveTin/OliveTin/releases/latest/download/OliveTin_linux_amd64.rpm
```
## [](#%5Fpost%5Finstallation)Post installation
You will need to write a basic configuration file before OliveTin will startup.
Create the following basic config file at `/etc/OliveTin/config.yaml` with the following contents;
The most simple `config.yaml` file.
```yaml
actions:
- title: "Hello world!"
shell: echo 'Hello World!'
```
Now that you have a configuration file, and OliveTin is installed, start it;
Start the service (only needed once)
```shell
user@host: systemctl enable --now OliveTin
```
If you are running a firewall on your server, like firewalld, you will need to open port 1337;
```shell
user@host: firewall-cmd --add-port 1337/tcp --permanent
user@host: firewall-cmd --reload
```
You should be able to browse to (or similar) to get to the web interface.
If you see the OliveTin page popup in your browser, you are good to go! Here are some helpful next steps;
* [Create your first action](../action%5Fexecution/create%5Fyour%5Ffirst.html)
* [configuration section](../config.html) for a list of all configuration options.
## [](#%5Ftroubleshooting%5Fsystemd%5Finstallations)Troubleshooting systemd installations
If you are having problems, you can check if OliveTin is running like this;
```shell
user@host: systemctl status OliveTin
```
If the service has failed, scroll through the logs;
```shell
user@host: journalctl -eu OliveTin
```
If you cannot understand the logs, or otherwise need help, see the [\[support\]](#support)page.
MacOS
====================
Sorry that these instructions are so primitive, the main developer of OliveTin’s MacOS machine died :-( If you can help with instructions and screenshots that would be great.
1. There is a .tar.gz that you can download, extract. Link: [OliveTin-darwin-amd64.tar.gz](https://github.com/OliveTin/OliveTin/releases/latest/download/OliveTin-darwin-amd64.tar.gz)
2. Start a terminal and CD into the OliveTin directory.
## [](#%5Fpost%5Finstallation)Post installation
You will need to write a basic configuration file before OliveTin will startup.
Edit the basic config file at `config.yaml` with the following contents;
The most simple `config.yaml` file.
```yaml
actions:
- title: "Hello world!"
shell: echo 'Hello World!'
```
Start OliveTin, preferably via a terminal. On Unix based systems (eg MacOS, BSD, Linux, etc) you can just run `./OliveTin`. On Windows you would run `OliveTin.exe` in windows terminal.
You should be able to browse to (or similar) to get to the web interface.
If you see the OliveTin page popup in your browser, you are good to go! Here are some helpful next steps;
* [Create your first action](../action%5Fexecution/create%5Fyour%5Ffirst.html)
* [configuration section](../config.html) for a list of all configuration options.
## [](#%5Ftroubleshooting%5Finstallations)Troubleshooting installations
If you are having problems, OliveTin will log it’s status on startup. Check the log messages in the terminal.
If you cannot understand the logs, or otherwise need help, see the [support page](../troubleshooting/wheretofindhelp.html).
Docker or Podman
====================
| | OliveTin is supported when run as a Linux Container in many different ways, and lot of OliveTin users will assume that a Linux Container is the best way to install OliveTin because Linux Containers are really popular… However, it is very common that some OliveTin use cases become overcomplicated when a container is used, compared to running as a native service. Read the [\[install-container-vs-service\]](#install-container-vs-service) document to understand if a container or a service is right for your use case. |
| ----------------------------------------------------------------------------------------------------------------------------------------------------------------------------------------------------------------------------------------------------------------------------------------------------------------------------------------------------------------------------------------------------------------------------------------------------------------------------------------------------------------------------------------- |
The image is pushed to the following registries, pick the one that you prefer - the container images are identical so you only need one;
* Dockerhub container image: [docker.io/jamesread/olivetin](https://hub.docker.com/r/jamesread/olivetin/)
* GitHub container image: [ghcr.io/jamesread/olivetin](https://ghcr.io/olivetin/olivetin)
If you prefer to use docker-compose, then follow the [docker-compose](docker%5Fcompose.html) installation instructions>>.
The standard container setup just needs **port 1337** forwarded for web traffic, and a volume **to store the configuration file**. Note that OliveTin containers expect the config to be in `/config/` inside the container, but it doesn’t really matter where this directory is mounted from on the host. This documention uses the convention of `/etc/OliveTin` on the host, but `/dockerStuff/OliveTin/` or similar would be fine.
Create the container (but don’t start it yet)
```shell
user@host: mkdir /etc/OliveTin/
user@host: # ie: Your config file is /etc/OliveTin/config.yaml on the host machine. We'll create this in the post-installation step.
user@host: docker pull jamesread/olivetin
user@host: docker create --name olivetin -p 1337:1337 -v /etc/OliveTin/:/config:ro docker.io/jamesread/olivetin
```
| | The OliveTin container is built using fedora-minimal, which doesn’t use customizations that some people may be familiar with from popular projects like LSIO, or debian-based containers. The two top misunderstandings are [PUID and PGID are ignored](../troubleshooting/puid-pgid.html). Please see the instructions below if you’re not familiar with changing users or timezones. |
| ----------------------------------------------------------------------------------------------------------------------------------------------------------------------------------------------------------------------------------------------------------------------------------------------------------------------------------------------------------------------------------------- |
## [](#container-user)Container user
OliveTin does not need to be run as a root, and does not need any special capabilities. If you want to change the user that OliveTin runs as, use `--user` when creating the container. OliveTin ignores [PUID and PGID](../troubleshooting/puid-pgid.html).
## [](#container-timezone)Container timezone
To change the [changing the timezone requires a bound-mount](../advanced%5Fconfiguration/timezones.html) from the host. Olivetin ignores the TZ variable as it is non-standard.
## [](#%5Fpost%5Finstallation%5Fcontainer)Post installation (container)
You will need to write a basic configuration file before OliveTin will startup.
Create a basic config file at `/etc/OliveTin/config.yaml` \- the exact path depends on what directory you specified in the bind mount container creation in the last step. Note that the file must be called `config.yaml`, and `config.yml` or `mystuff.yaml` would not work. You can download a sample configuration file like this if you like;
Download the sample config.yaml file to get you started.
```shell
user@host: cd /etc/OliveTin/
user@host: curl -O https://raw.githubusercontent.com/OliveTin/OliveTin/main/config.yaml
```
The file contents should look something like this;
The most simple `config.yaml` file.
```yaml
actions:
- title: "Hello world!"
shell: echo 'Hello World!'
```
If you are running a firewall on your server, like firewalld, you will need to open port 1337;
## [](#%5Fconfigure%5Fyour%5Ffirewall)Configure your firewall
* No Firewall
* FirewallD
If you don’t have a firewall, continue to the next section.
This is how you configure your firewalld firewall for OliveTin:
```shell
user@host: firewall-cmd --add-port 1337/tcp --permanent
user@host: firewall-cmd --reload
```
## [](#%5Fstart%5Fthe%5Folivetin%5Fservice)Start the OliveTin service
Now that you have a configuration file, and the OliveTin container created, you are now ready to start OliveTin!
```asciidoc
user@host: docker start olivetin
```
You should be able to browse to (or similar) to get to the web interface.
If you see the OliveTin page popup in your browser, you are good to go! Here are some helpful next steps;
* [Create your first action](../action%5Fexecution/create%5Fyour%5Ffirst.html)
* [configuration section](../config.html) for a list of all configuration options.
## [](#%5Ftroubleshooting%5Fpodmandocker%5Finstallations)Troubleshooting podman/docker installations
If you are having problems in starting OliveTin, or OliveTin is crashing on startup, then check the logs like this;
```asciidoc
user@host: docker logs OliveTin
```
If you cannot understand the logs, or otherwise need help, see the [support page](#support).
.tar.gz Install (manual)
====================
Installing OliveTin from a .tar.gz file is considered advanced setup, and is provided for users who cannot use the .deb or .rpm packages, or who don’t want to use the Linux container.
## [](#%5Fmanual%5Fsetup%5Ftar%5Fgz)Manual setup (.tar.gz)
1. Copy the `OliveTin` binary to `/usr/local/bin/OliveTin`
1. Make sure it is executable: `chmod +x /usr/local/bin/OliveTin`
2. Make a directory for the configuration files: `mkdir -p /etc/OliveTin`
1. Copy the `config.yaml` file to `/etc/OliveTin/`
3. Copy the `webui` directory contents to `/var/www/olivetin/` (eg, `/var/www/olivetin/index.html`)
4. Copy the `OliveTin.service` file to `/etc/systemd/system/`
5. Files in the `var` directory are all considered optional.
1. `var/entities/` contains some example entity files used by the default config.yaml. You can copy these to `/etc/OliveTin/entities/` if you want to use them.
2. `var/helper-actions/` contains some helpers that are mostly useful for containers. These should be copied to somewhere on your path if you want to use them, such as `/usr/local/bin/`.
3. `var/initscript/OliveTin` is provided for init-based systems. You can copy this to `/etc/init.d/OliveTin` and make it executable if you want to use it.
4. `var/manpage/OliveTin.1.gz` contains the manpage for OliveTin. You can copy this to `/usr/share/man/man1/` if you want to use it.
5. `var/marketing` contains some marketing materials used by the repository. You can probably ignore these unless you’re writing a blog article or something.
6. `var/openrc/OliveTin` is provided for OpenRC-based systems. You can copy this to `/etc/init.d/OliveTin` and make it executable if you want to use it.
7. `var/tekton` is a directory that contains an experimental Tekton base image builder. You don’t need this.
## [](#%5Fpost%5Finstallation)Post installation
You will need to write a basic configuration file before OliveTin will startup.
Create the following basic config file at `/etc/OliveTin/config.yaml` with the following contents;
The most simple `config.yaml` file.
```yaml
actions:
- title: "Hello world!"
shell: echo 'Hello World!'
```
Now that you have a configuration file, and OliveTin is installed, start it;
Start the service (only needed once)
```shell
user@host: systemctl enable --now OliveTin
```
If you are running a firewall on your server, like firewalld, you will need to open port 1337;
```shell
user@host: firewall-cmd --add-port 1337/tcp --permanent
user@host: firewall-cmd --reload
```
You should be able to browse to (or similar) to get to the web interface.
If you see the OliveTin page popup in your browser, you are good to go! Here are some helpful next steps;
* [Create your first action](../action%5Fexecution/create%5Fyour%5Ffirst.html)
* [configuration section](../config.html) for a list of all configuration options.
## [](#%5Ftroubleshooting%5Fsystemd%5Finstallations)Troubleshooting systemd installations
If you are having problems, you can check if OliveTin is running like this;
```shell
user@host: systemctl status OliveTin
```
If the service has failed, scroll through the logs;
```shell
user@host: journalctl -eu OliveTin
```
If you cannot understand the logs, or otherwise need help, see the [\[support\]](#support)page.
Windows install
====================
Yes, OliveTin is supported on Windows, too!
You can instal install OliveTin as a Windows service, follow the instructions to [install OliveTin as a Windows service](windows%5Fservice.html).
## [](#%5Fdownload%5Fand%5Frun)Download and run
1. You can download the latest version of OliveTin here: [OliveTin-windows-amd64.zip](https://github.com/OliveTin/OliveTin/releases/latest/download/OliveTin-windows-amd64.zip)
2. Unzip and run "OliveTin.exe"
## [](#%5Fpost%5Finstallation)Post installation
You will need to write a basic configuration file before OliveTin will startup.
Edit the basic config file at `config.yaml` with the following contents;
The most simple `config.yaml` file.
```yaml
actions:
- title: "Hello world!"
shell: echo 'Hello World!'
```
Start OliveTin, preferably via a terminal. On Unix based systems (eg MacOS, BSD, Linux, etc) you can just run `./OliveTin`. On Windows you would run `OliveTin.exe` in windows terminal.
You should be able to browse to (or similar) to get to the web interface.
If you see the OliveTin page popup in your browser, you are good to go! Here are some helpful next steps;
* [Create your first action](../action%5Fexecution/create%5Fyour%5Ffirst.html)
* [configuration section](../config.html) for a list of all configuration options.
## [](#%5Ftroubleshooting%5Finstallations)Troubleshooting installations
If you are having problems, OliveTin will log it’s status on startup. Check the log messages in the terminal.
If you cannot understand the logs, or otherwise need help, see the [support page](../troubleshooting/wheretofindhelp.html).
Windows Service install
====================
This option is to install OliveTin as a Windows service, which allows it to run in the background and start automatically when the system boots up. This is useful for servers or systems that need to run OliveTin without user intervention. If you want to run OliveTin as a regular application, you can follow the [Windows install](windows.html) instructions instead.
## [](#%5Fdownload%5Fand%5Fextract)Download and extract;
| | There is no .msi installer for OliveTin yet, so you will need to download the .zip file and extract it in the desired location. |
| ---------------------------------------------------------------------------------------------------------------------------------- |
You can download the latest version of OliveTin here: [OliveTin-windows-amd64.zip](https://github.com/OliveTin/OliveTin/releases/latest/download/OliveTin-windows-amd64.zip)
* Create c:/Program Files/OliveTin/
* Copy **OliveTin.exe** into this directory.
* Copy the **webui** directory into this directory.
* Create c:/ProgramData/OliveTin/
* Copy the **config.yaml** file into this directory.
## [](#%5Ftest%5Folivetin%5Fstartup)Test OliveTin startup
Open a command prompt and make suer you are in the c:/Program Files/OliveTin/ directory, then run:
./OliveTin.exe
If everything is set up correctly, you should see the OliveTin service starting up and listening on port 1337.
## [](#%5Fswitch%5Fstartup%5Fmode%5Fto%5Fa%5Fwindows%5Fservice)Switch startup mode to a Windows service
Windows services require executables to run a "service host" thread, which is not started by default for OliveTin on windows. To run OliveTin as a service, you will need to set this in your configuration file;
`config.yaml`
```yaml
serviceHostMode: "winsvc-standard"
logLevel: info
actions:
...
```
## [](#%5Fregister%5Fthe%5Fservice)Register the service
Open a command prompt as Administrator and run the following command;
Make sure to run `sc.exe` and not just `sc`, as the latter is a PowerShell alias for `Set-Content` and does not display any output, which can be very confusing.
sc.exe create OliveTin binPath= "C:\Program Files\OliveTin\OliveTin.exe" start= auto
## [](#%5Fstart%5Fthe%5Fservice)Start the service
Start the service from the Microsoft Management Console (MMC) or by running the following command;
sc.exe start OliveTin
## [](#%5Fpost%5Finstallation)Post installation
You will need to write a basic configuration file before OliveTin will startup.
Edit the basic config file at `config.yaml` with the following contents;
The most simple `config.yaml` file.
```yaml
actions:
- title: "Hello world!"
shell: echo 'Hello World!'
```
Start OliveTin, preferably via a terminal. On Unix based systems (eg MacOS, BSD, Linux, etc) you can just run `./OliveTin`. On Windows you would run `OliveTin.exe` in windows terminal.
You should be able to browse to (or similar) to get to the web interface.
If you see the OliveTin page popup in your browser, you are good to go! Here are some helpful next steps;
* [Create your first action](../action%5Fexecution/create%5Fyour%5Ffirst.html)
* [configuration section](../config.html) for a list of all configuration options.
## [](#%5Ftroubleshooting%5Finstallations)Troubleshooting installations
If you are having problems, OliveTin will log it’s status on startup. Check the log messages in the terminal.
If you cannot understand the logs, or otherwise need help, see the [support page](../troubleshooting/wheretofindhelp.html).
Home Assistant (HACS Integration)
====================
Integrating OliveTin with Home Assistant allows you to control OliveTin from your Home Assistant dashboard. Using the HACS integration is the recommended way to integrate OliveTin with Home Assistant. It is easy to set up and provides a seamless experience.
If you are not familiar with HACs, it is a custom component for Home Assistant that allows you to install and manage custom integrations easily. It is similar to the Home Assistant Add-ons store but for integrations.
## [](#%5Fsetup%5Fguide)Setup guide
1. [Install HACS](https://hacs.xyz/docs/use/)
2. Go to HACS in your home assistant control panel. Click the "…" dropdown in the top right corner, and select "**Custom Repositories**".

3. In the dialog that pops up, add the custom repo as follows;

1. **Repository link**:
2. **Type**: Integration
4. Search for "OliveTin" in the HACS store, and download it. You will probably need to restart Home Assistant for it be registered correctly.


5. Go to "Settings" and open "Devices & Services"

6. Click "Add integration" and search for "OliveTin". Note that if it does not show up, you may need to restart Home Assistant.

1. Select "OliveTin"
2. Host:
3. Username:
4. Password:
7. Under "Configured", you should see OliveTin. Open it by clicking on the arrow.

8. After configuring it, you should see buttons appear in Home Assistant;

Home Assistant (REST)
====================
| | The recommended way to integrate HomeAssistant and OliveTin is via the [HACS integration](homeassistant-integration.html). |
| ----------------------------------------------------------------------------------------------------------------------------- |
Home Assistant is able to call REST API endpoints, making integration with OliveTin possible without any custom plugins or integrations in Home Assistant. This does require modifying your Home Assistant configuration.yml file though.
## [](#%5Fgive%5Fyou%5Factions%5Fan%5Fid)Give you actions an ID
First, you need to give your actions an ID. This is done by adding an `id` field to your action. This ID will be used by Home Assistant to call the correct action. Here is an example of an action with an ID:
```yaml
actions:
- id: "server_sleep"
title: "Server Sleep
icon: ping
shell: ssh user@server "sudo systemctl suspend"
```
You then need to know the URL to call to trigger this action. This URL is the OliveTin API URL, with the action ID appended to it. For example, if your OliveTin is running at ``, the URL to call to trigger the action above would be ``.
You can learn more about starting actions via the OliveTin API by reading the link [Starting Actions via the API](../api/start%5Faction.html) page, but the method "StartActionAndWait" is the one you will want to use for Home Assistant.
## [](#%5Fadd%5Fthe%5Frest%5Fapi%5Fcall%5Fto%5Fhome%5Fassistant)Add the REST API call to Home Assistant
Now that you have the URL to call to trigger your action, you can add this to your Home Assistant configuration. This is done by adding a `rest_command` to your configuration.yml file.
* [Home Assistant Configuration](https://www.home-assistant.io/docs/configuration/)
That page assumes you will use the Home Assistant File Editor addon to edit your configuration.yaml. Install it from the Home Assistant addon store if you have not done so already;

The addon is started and added to the sidebar;

Here is an example of a `rest_command` that calls the action above:
From the file editor now in your sidebar, browse the filesystem to the configuration.yaml file and add the following to the file:
```yaml
rest_command:
olivetin_sleep_mindstorm:
url: http://olivetin.webapps.teratan.lan/api/StartActionByGetAndWait/server_sleep
method: get
```
You save the file, and restart Home Assistant to pick up the changes.
## [](#%5Fadd%5Fa%5Fbutton%5Fto%5Fyour%5Fhass%5Fdashboard)Add a button to your HASS Dashboard
Now that you have a `rest_command` set up to call your action, you can add a button to your Home Assistant dashboard to trigger the action. This is done by adding a `button` to your dashboard configuration.

Set the "Tap Action" to "Call Service" and select the `rest_command` you created earlier. You can also set the icon and name of the button to whatever you like.
Good luck!
OliveTin Stream Deck Plugin
====================
| | Plugin has been developed, and is waiting for approval on the Marketplace. |
| ----------------------------------------------------------------------------- |
## [](#%5Fget%5Fthe%5Fplugin%5Fon%5Fthe%5Fmarketplace)Get the plugin on the Marketplace
Head over to the [Elegato Marketplace](https://marketplace.elgato.com/stream-deck/plugins), and search for "OliveTin".

Click "Get" on the plugin to install it onto your Stream-Deck.
## [](#%5Fconfigure%5Fa%5Fbutton)Configure a button
Here are some screenshots, and later documentation will follow when the plugin gets approved.
Add the OliveTin button;

Set the OliveTin API URL to;

Switch to the **Input** tab, and the enter an action ID:

If you don’t have IDs set on your action, then read [how to set action IDs](../action%5Fcustomization/ids.html).
Installing extra container packages
====================
The official OliveTin container image is based on Fedora Linux. Fedora has shown to offer a great mix of stability and support over two decades. The base container image for OliveTin is relatively lightweight, with not many tools installed by default. This keeps the download size small, but you may want to add additional packages.
## [](#%5Fquickstart%5Fusing%5Fdnf%5Fto%5Finstall%5Fadditional%5Fpackages)Quickstart - using DNF to install additional packages
You can of course create your own container image, but this is probably a lot of work for new users, or people who just want a few extra packages/commands. Instead of creating a whole new container image, you can simply run `microdnf` (the Fodora package manager) to install more commands.
1. Start the OliveTin container using one of the methods shown in the [container installation instructions](../install/container.html).
2. Then, on the same host that is running the container, spawn a root shell inside the OliveTin container, like this;
```asciidoc
user@host: docker exec -it olivetin -u root /bin/bash
[root@019d08ef95bd /]#
```
The important thing here is passing `-u root`. By default, OliveTin does not run as root.
3. Once you have a root shell in OliveTin, you can use the Fedora package manager - `microdnf` to install things that you might need. If you are used to Debian’s `apt-get` tool, it works in a very similar way;
```asciidoc
[root@019d08ef95bd /]# microdnf install -y nc
```
Note that if you upgrade the OliveTin container image, you will need to reinstall these packages.
Once you have finished installing these packages, just exit the root shell using `exit`. You don’t need to restart the container - and OliveTin does not need to run as root to use most commands.
## [](#%5Fsee%5Falso)See also
* [OliveTin container on Docker Hub](https://hub.docker.com/r/jamesread/olivetin)
* [Installing using a container](../install/container.html)
* [Installing using docker compose](../install/docker%5Fcompose.html)
* [Installing on Kubernetes with Helm](../install/helm.html)
* [Installing on Kubernetes (manually)](../install/k8s.html)
Contribute
====================
First of all, a huge, huge thanks for reading this page, and considering some form of contribution. Here are some suggestions below.
| | OliveTin does not accept [Donations and Sponsorship](donations%5Fand%5Fsponsorship.html). |
| -------------------------------------------------------------------------------------------- |
1. If you have 2 Minutes to contribute: **Share how you are using OliveTin**, on Reddit, Twitter/X, LinkedIn, Mastodon, or whatever - use the hashtag #OliveTin. Show a screenshot or blog about it. Tell people how OliveTin helped you. There is also #screenshot-showcase in the OliveTin Discord community. If you want to ping me directly, I really like getting email or PMs; jump on Discord and just say it, or contact me via one of the methods found at .
2. If you have 10 minutes to contribute: **Answer a call for support**: look for support issues in #support on discord, or tagged om GitHub issues, and help someone out! You don’t have to solve the problem, just point someone in the right direction.
3. If you have 15 minutes to contribute:
1. **Write up a feature request** on GitHub issues
2. **Improve the docs** \- I make a LOT of typos!
4. **If you have lots of time:** contribute code!
5. **If you have spare compute** \- spare server capacity where I can have a virtual machine with root access, then having more VMs to test OliveTin on is always very welcome indeed. I have a lot of sever capacity already though personally, so I’m probably just being greedy for CPU and RAM :-)
Donations & Sponsorship
====================
Sometimes I (James Read) get asked if people can donate money, or sponsor me for OliveTin. If you are reading this page, maybe you are thinking the same.
**I do not accept donations or sponsorship** for OliveTin, but I want to **thank you very much indeed** for thinking about the potential.
I have a job that pays me, where I don’t write code as part of my day job (very often) - I enjoy coding as a hobby in my spare time. If I get money for that, it somehow takes the pleasure or fun out of it, or makes it feel like a job. There are concerns that I might "prefer" to work on one user’s feature request if I am sponsored, or even feel compelled that I have to work on something because someone gave me money. I don’t want OliveTin development to go that way. There are also other little considerations, like being paid on the side out of my job then affects my job, and tax, and so on and so on. This is why I don’t take any form of money, donations or sponsorship.
Another way that you can show your appreciation for OliveTin, that actually means a lot more than money, is to [contribute to OliveTin](contribute.html). There are little ways and big ways to contribute - depends on if you have 2 minutes or 2 weeks to give!
Understanding exit codes
====================
OliveTin just runs commands. If the command exits with an unusual exit code (something other than 0), OliveTin will tell you. Many Linux commands will exit with code 1, 2, 3, etc to indicate different types of errors.
It’s important to understand that OliveTin is just reporting back what the command exited with, it’s very unusual for OliveTin to cause new types of errors!
For example, if `ping` exits with code 1 or 2, the documentation for ping says that this indicates either a name not found, timeout, or other similar error. The best thing you can do is `man ping` to read the ping manual page to find out more.
## [](#%5Fcommon%5Ferror%5Fcodes)Common error codes
* **Exit code 127** is used by the Linux shell to indicate "Command not found". Most often this means you need to install the command (often in the linux container image).
Includes
====================
OliveTin 3k supports including configuration files from other files. This is useful for organizing large configurations or reusing common settings across multiple actions.
## [](#%5Finclude%5Fsyntax)Include Syntax
To include another configuration file, use the following syntax in your main configuration file:
```yaml
include: config.d
```
This will include all config files in the /config.d/ directory.
## [](#%5Finclude%5Flogic)Include Logic
Files are included in alphabetical order based on their filenames. This allows you to control the order of inclusion by naming your files accordingly. For example;
* `01-setup.yaml` contains `logLevel: debug`
* `02-actions.yaml` contains `logLevel: info`
* Final `logLevel` will be `info` since `02-actions.yaml` is included after `01-setup.yaml`.
Everything under `actions` is merged into a single `actions` list after all files are included. This means you can define actions in multiple files and they will be combined into one list.
| | All other "lists" are overwritten by later files. For example, if you define dashboards, entities, accessControlLists or similar in multiple files, only the last definition will be used. |
| --------------------------------------------------------------------------------------------------------------------------------------------------------------------------------------------- |
Multiple instances on a server
====================
Several users will find themselves wanting to run multiple instances of OliveTin. Depending on how you’ve setup OliveTin depends on how easy it is to configure that. This page includes instructions for OliveTin installed as a container, and as a package (.tar.gz).
## [](#%5Fwith%5Fcontainers)With Containers
This is the easiest way to run multiple OliveTin instances. Follow the [Container Installation instructions](../install/container.html), or similar for [Docker Compose](../install/docker%5Fcompose.html), [Helm](../install/helm.html) or similar to get started.
1. Create a `config.yaml` file for each instance of OliveTin (instances cannot share the same config).
2. Choose a new external port for OliveTin and set it in the config file (by default that is `1337` is used). For example, set `listenAddressSingleHTTPFrontend: 0.0.0.0:2337` for your 2nd container’s config.
3. When creating the container, pass in the 2nd instance’s config, eg; `-v /opt/OliveTin_two/:/config/`
4. When creating the container, set the external port, eg: `2337:1337` \- 2337 is the external port)
You do not need to change the listenAddresses / ports for the other 3 ports that OliveTin uses, when you are running inside a container.
## [](#%5Fwithout%5Fcontainers%5Fusing%5Fa%5Fpackage%5Ftar%5Fgz)Without containers - using a package (.tar.gz)
If you are not using containers, then it is probably best not to use a `.deb/.rpm` installation, as those packages can only be installed for one instance.
Instead, follow the instructions for [installing from a .tar.gz](../install/targz.html) archive.
When you come to create the config.yaml file, OliveTin will look for this in it’s own startup directory. Therefore it is probably best to extract the .tar.gz file like this and change the paths;
* `/opt/OliveTin_one/`
* `/opt/OliveTin_two/`
* `/opt/OliveTin_three/`
Because you are running outside of a container, you will also need to change the "internal" ports used by OliveTin so they are separate for all instances. OliveTin listens on 4 addresses (1 external, 3 internal) and needs 4 ports. You can read about these in the [network ports documentation](network-ports.html).
| | OliveTin also supports reading the PORT environment variable, and will use this as a base port for the simgle frontend, will add 1 to start extra servers. For example of PORT is 2000, then the simgle frontend will start on port 2000, the REST API on 2001, and so on. |
| ----------------------------------------------------------------------------------------------------------------------------------------------------------------------------------------------------------------------------------------------------------------------------- |
You could end up with a setup that looks like this;
| Instance Name | Install path | Config file path | Single frontend point (listenAddressSingleHTTPFrontend) | REST Actions port (listenAddressRestActions) | gRPC Actions port (listenAddressGrpcActions) | WebUI Port (listenAddressWebUI) |
| --------------- | -------------------- | -------------------------------- | ------------------------------------------------------- | -------------------------------------------- | -------------------------------------------- | ------------------------------- |
| OliveTin\_one | /opt/OliveTin\_one | /opt/OliveTin\_one/config.yaml | 0.0.0.0:1337 | localhost:1338 | localhost:1339 | localhost:1340 |
| OliveTin\_two | /opt/OliveTin\_two | /opt/OliveTin\_two/config.yaml | 0.0.0.0:2337 | localhost:2338 | localhost:2339 | localhost:2340 |
| OliveTin\_three | /opt/OliveTin\_three | /opt/OliveTin\_three/config.yaml | 0.0.0.0:3337 | localhost:3338 | localhost:3339 | localhost:3340 |
Note that you will also need to adjust the default systemd service file to point to your install directory, if using that. Here is an example for `OliveTin_two`;
A modified systemd service file for a 2nd instance
```asciidoc
[Unit]
Description=OliveTin2
[Service]
WorkingDirectory=/opt/OliveTin_two/
ExecStart=/opt/OliveTin_two/OliveTin
Restart=always
[Install]
WantedBy=multi-user.target
```
Network ports
====================
OliveTin might surprise some people when they see it is listening on several ports when it starts up. Most of these ports are internal and localhost-only by default. It keeps the architecture of OliveTin clean and simple, and allows for a lot of flexibility if needed.
## [](#%5Fnetwork%5Fflow%5Fdiagram)Network flow diagram
Here is the default flow of traffic in OliveTin without any config changes.

Figure 1\. Flow of an inbound network request
1. Traffic comes into OliveTin over your network and hits the only port listening - 1337, which listens on all interfaces. This is a micro HTTP reverse proxy.
2. Traffic for `/` gets proxied to `localhost:1340` for the static web server.
3. Traffic for `/api/` gets proxied to `localhost:1338` for REST actions.
4. The REST API actually makes gRPC API calls internally, to port`localhost:1339`.
Below is a detailed reference table.
## [](#%5Fport%5Freference%5Ftable)Port Reference Table
__Port reference table__
| Config file reference (and Default Address:Port) | Purpose |
| --------------------------------------------------------------------------------- | ---------------------------------------------------------------------------------------------------------------------------------------------------------------------------------------------------------------------------------------------------------------------------------------------------------------------------------------------------------------------------------------------------------------------------------------------------------- |
| listenAddressSingleHTTPFrontend: 0.0.0.0:1337 (listen on all available addresses) | This is a "micro reverse proxy" built into OliveTin. It’s only purpose is to serve /ui and / (the web interface) from a single endpoint. This means that problems like CORSs and setting "external addresses" is not necessary. It does not do any caching or anything else. It can be disabled, but it makes life a lot easier for you. It’s common to put your own reverse proxy like haproxy, traefik, etc in front of this single micro reverse proxy. |
| listenAddressRestActions: localhost:1338 | REST - the protocol used by web pages to talk to web APIs. In the case of OliveTin, the API is used to get actions, and start actions. |
| listenAddressGrpcActions:localhost:1339 | gRPC - a very popular method of service-to-service API communication. This provides the "real" API for OliveTin. |
| listenAddressWebUI: localhost:1340 | Hosts a simple static web server with some HTML, stylesheets, Javascript etc for the web interface. |
| listenAddressPrometheus: localhost:1341 | Hosts a prometheus endpoint, which is disabled by default. See [Prometheus](../advanced%5Fconfiguration/prometheus.html) to learn more. |
## [](#%5Fsee%5Falso)See also
* [Running Multiple instances of OliveTin on the same server](#reference/multiple%5Finstances)
Snapshot builds
====================
It’s sometimes useful to test code changes in OliveTin that are still in development - and have not yet made it into an official version, yet. Thankfully, all code changes are automatically compiled into a "snapshot" builds and are saved in GitHub actions.
If you browse to GitHub actions page for OliveTin, you’ll find the "Build Snapshot" job, with a list of recent builds.
* [OliveTin’s Build Snapshot page](https://github.com/OliveTin/OliveTin/actions/workflows/build-snapshot.yml)

Most of the time you will want to select the top build, unless you’ve specifically been given a build link to use.
## [](#%5Fdownload%5Fthe%5Fsnapshot%5Farchive)Download the snapshot archive
On the job page, you will have a single "snapshot" file listed. In this screenshot, it is 109 MB.

Once downloaded, you can open the archive using any tool that you use to open .zip files. The contents should read something like this;

Extract the file you need, and off you go!
Themes (for theme developers)
====================
## [](#%5Fstep%5Fby%5Fstep%5Ftheme%5Fguide)Step by step theme guide
OliveTin themes are simply a directory of CSS and other assets. OliveTin looks for a directory called `custom-webui/themes/` in the same directory as your `config.yaml` file.
Start by creating a directory called `custom-webui/themes/` in the same directory as your `config.yaml` file. This is where you will put your theme files. A theme must also have a theme.css file, which is the main CSS file for your theme. This file must be called `theme.css` and must be in the same directory as your theme folder.
* OliveTin will by default only read theme.css once on startup. If you are intending to change theme.css while OliveTin is running, set `themeCacheDisabled: true` in your config.yaml. This will make OliveTin read theme.css on every request, and is useful for development.
* Go to and use this template repository to create your new theme repository on GitHub.
* Install OliveTin somewhere, and clone your new repository using `git clone` into your themes directory.
* Set `themeName: ` in your OliveTin config.yaml and restart OliveTin.
Write beautiful CSS to create your theme as you like it, commit your changes to git.
Note that OliveTin will load `/theme.css` depending on `themeName:` in your config file. Images and any other assets will be served at `/custom-webui/themes/mytheme/`.
## [](#%5Funderstanding%5Ftheme%5Furls)Understanding theme URLs
When you create a theme, OliveTin will serve your theme’s CSS at `/theme.css` and any other assets at `/custom-webui/themes/mytheme/`. This might be a little strange at first, as your theme.css file wil be in the `/custom-webui/themes/mytheme/` directory, but OliveTin will still serve it at `/theme.css`. Let’s explain why this happens;
OliveTin wants to make it easy for your reverse proxy, cache server, or browser, to cache as much content as possible. This means that if OliveTin had to inject a new CSS file into the HTML every time you changed your theme, then your reverse proxy, cache server, or browser would have to re-download the HTML every time you changed your theme. This is not ideal.
It is possible that OliveTin’s initial webUiSettings.json (that is loaded to setup the page), could include the theme name, and then the JavaScript could then add an extra stylesheet to load, but this is slow, and creates a horrible "page flash" effect as the theme is requested.
To make things fast, OliveTin will copy the content of your `/custom-webui/themes/mytheme/theme.css` file into memory when it starts, and then requests for `/theme.css` will load this file.
What this means for you, is that to get to files like `backgrond.png` from your CSS, you must write your CSS to point to the file in the `/custom-webui/themes/mytheme/` directory;
Correct example
```asciidoc
body {
background-image: url('/custom-webui/themes/mytheme/background.png');
}
```
Incorrect example
```asciidoc
body {
background-image: url('/background.png');
}
```
## [](#%5Fhow%5Fto%5Flist%5Fyour%5Ftheme%5Fon%5Fthe%5Folivetin%5Fthemes%5Fpage)How to list your theme on the OliveTin themes page
The OliveTin themes page is here;
When you are done with your theme, fork on GitHub and create a new page under the "content" directory for your new theme. Commit that to GitHub and then raise a pull request.
If you meed more help, please jump on our discord server!
Themes (for users)
====================
You can look for themes on the [OliveTin Theme Site](http://www.olivetin.app/themes/).
## [](#%5Finstalling%5Fa%5Ftheme)Installing a theme
There are 3 ways to install a theme;
If running inside a Docker container:
1. Use the `olivetin-get-theme` command to easily Git clone the theme into your `custom-webui/themes/` directory.
If running without using containers:
1. Download the theme .zip and copy it across to your `custom-webui/themes/` directory.
2. Git Clone the theme into your `custom-webui/themes/` directory.
## [](#get-theme)How to use the `olivetin-get-theme` command
The default OliveTin configuration comes with an action to get new OliveTin themes. If you deleted it from your configuration, you can add it back in by adding the following to your `config.yaml` file;
```bash
actions:
- title: Get OliveTin Theme
shell: olivetin-get-theme {{ themeGitRepo }} {{ themeFolderName }}
icon: theme
arguments:
- name: themeGitRepo
title: Theme's Git Repository
description: Find new themes at https://olivetin.app/themes
type: url
- name: themeFolderName
title: Theme's Folder Name
type: ascii_identifier
```
When you are browsing the OliveTin Theme Site, you can click on a theme and see it’s Git Repository URL. You can then copy this URL and paste it into the `olivetin-get-theme` command.
## [](#%5Fwhere%5Fdo%5Fi%5Ffind%5Fmy%5Fthemes%5Fdirectory)Where do I find my themes directory?
When OliveTin starts up, it will try to create a directory called `custom-webui/themes/` in your config directory. This directory is where you can put your own custom themes.
OliveTin will then serve this theme directory at ``, this means that all theme content should go into `/custom-webui/themes/mytheme/`.
Install Themes into your `custom-webui/themes/` directory, which should be in your config directory. If this directory does not exist, you can create it.
```yaml
├── config.yaml
├── custom-webui
│ └── themes
│ └── custom-icons
│ ├── icon.png
│ └── theme.css
├── entities
│ ├── containers.json
│ ├── heating.yaml
│ ├── servers2.yml
│ ├── servers.yaml
│ └── systemd_units.json
└── installation-id.txt
```
## [](#%5Fcreate%5Fyour%5Fown%5Ftheme%5Fwithout%5Fany%5Fintention%5Fof%5Fpublishing%5Fit)Create your own theme (without any intention of publishing it)
Create a sub-directory under your theme directory (eg `custom-webui/themes/mytheme`);
Set your theme in your config
`config.yaml`
```yaml
themeName: mytheme
```
Add your css into `custom-webui/themes/mytheme/theme.css`.
Your theme css will be loaded "on top" of the existing stylesheet.
To test it is working, set your theme CSS to something ridiculous like;
```asciidoc
body {
background-color: red !important;
}
```
Profit.
Check out [Themes for Developers](reference%5Fthemes%5Ffor%5Fdevelopers.html) for more information on how to develop themes.
Release Policy
====================
This page is a collection of notes around the policy for releases.
## [](#%5Fpackage%5Fand%5Ftag%5Fdeletions)Package and tag deletions
The OliveTin project **WILL** delete packages and tags in the following situations;
* A release went out accidently, or the package is broken in a way that prevents installation or use (something critical).
* A release went out with the wrong tag, or wrong tag format (eg 2025-11-06 instead of 2025.11.06) for OliveTin 2k.
* This is because registries that contain bag tag formats that do not match smever will cause issues for users trying to install or upgrade in the future.
It is understood that this can break some users workflows, but deleting packages occours rarely, and is only done to prevent further issues.
If this is really a concern that you want to guard against, it is recommended to run your own private registry/mirror of OliveTin packages.
Deleted packages will not be supported in any way;
## [](#%5Fhistory%5Fof%5Fdeleted%5Fpackages)History of deleted packages;
* **OliveTin 2025-11-06** \- deleted due to wrong tag format (2025-11-06 instead of 2025.11.06)
* GitHub releases page
* GHCR
* Docker Hub
* **OliveTin 2025-10-30** \- deleted due to wrong tag format (2025-10-30 instead of 2025.10.30)
* GitHub releases page
* GHCR
* Docker Hub
Update Checks
====================
| | This page is for OliveTin versions **2024.06.02** and afterwards. Previous versions of OliveTin used to have a form of tracking. To learn about how that worked, see [update tracking](updateTracking.html). |
| --------------------------------------------------------------------------------------------------------------------------------------------------------------------------------------------------------------- |
OliveTin has the ability to check for updates, which is now turned OFF if nothing is specified in your configuration file. To enable this feature, set the following in your `config.yaml` file;
`config.yaml`
```yaml
checkForUpdates: true
```
By enabling this feature, OliveTin will;
* Do a HTTP GET in plaintext (not HTTPS) to and download the contents of that file. While the server will see your IP address in it’s webserver logs, this information isn’t actively used, and the OliveTin project has no intention of actively parsing the logs to use that.
* Once OliveTin has that json file, it will compare the "latestVersion" attribute against the version it is running.
* If there is a later version, it is displayed in the page OliveTin footer.
Update Checks & Tracking (legacy)
====================
| | This page is for OliveTin versions **2022-01-06** to **2024.06.02**. To see the current behavior of update checking, go to [update checks](updateChecks.html) |
| ---------------------------------------------------------------------------------------------------------------------------------------------------------------- |
The OliveTin server will now check for updates on startup, and every 7 days after that. It will report those updates as a log message in the console. It does not apply any updates, because this is the choice and responsibility of whoever is running OliveTin to decide if, when, and how to apply any updates.
The information OliveTin sends to the update server is stored/saved., and this could be considered a form of tracking - that is tracking installations, not tracking people. This page hopefully helps explain what, how and why that information is used so you can be informed (and make changes if you wish).
## [](#%5Fdesign%5Fconsiderations)Design considerations
* The source code for the update check (client), and the update service are open and on GitHub, freely auditable.
* A generated installation ID (which is just a UUID), that is used to differentiate between installations [more info](#installation-id).
* The update request is sent and stored in plain text - easy to check/audit.
* The update request goes to an obvious domain name - update-check.olivetin.app
* The checkins can be freely viewed by anyone in the public log.
* The update check can be disabled.
## [](#update-sent)What is sent (and tracked)
When OliveTin checks for updates, it will send the following;
* CurrentVersion - eg: 1.0.0
* CurrentCommit - the Git commit used to build this version
* OS - The update check wants to know your OS, because it’s possible in the future that some versions and updates might not be available for all OSes at the same time.
* Architecture (x86\_64, ARM, etc)
* InstallationID - See below
Here is an example of a log entry that is sent/stored;
```asciidoc
{"CurrentVersion":"dev","CurrentCommit":"nocommit","OS":"linux","Arch":"amd64","InstallationID":"f232d115-255c-4728-ba7f-a8f8b2b10a1f"}
```
If you would like to audit the update code, look at the following directory;
## [](#installation-id)What is the OliveTin installation ID?
This is a randomly generated [UUID](https://en.wikipedia.org/wiki/Universally%5Funique%5Fidentifier) \- that is not based on your operating system, not on any of your data. OliveTin tries to create a random installation-id.txt in your config directory when it starts up.
The reason for creating a installation ID is to tell the differences between installations - without this identifier, we would not know if 10 instances, or 1 instances of OliveTin are running a specific version.
In older versions of OliveTin, the MachineID was used instead of InstallationID (see below).
## [](#machine-id)Why do you need my machine ID?
This was changed in OliveTin - the MachineID is no longer collected, and the project moved to InstallationID instead. The answer is kept here for old versions.
First of all, OliveTin only sends a hashed version of a unique identifier for your machine. OliveTin does not use your actual machine ID, because this is private, and potentially sensitive information in it’s original form. This hashed version of this ID is used, which should be considered safe - because it’s a hash, it’s not possible to get back to the original sensitive machine ID.
From a technical perspective, OliveTin uses the golang package `machineiid` to get as hashed version of your MachineId. OliveTin follows the security recommendations of that project by using the hashed MachineId;
The reason for getting the machine ID is to tell the differences between installations - without this identifier, we would not know if 10 instances, or 1 instances of OliveTin are running a specific version.
## [](#%5Fwhy%5Fdo%5Fyou%5Fneed%5Fto%5Fstore%5Fany%5Finformation%5Fat%5Fall)Why do you need to store any information at all?
This is incredibly useful information for project developers to know, because;
1. It helps the project developers know how long it takes for updates to be applied by users of OliveTin (ie, should updates be released more often / less often) - the installation ID helps track this.
2. This helps the project better understand what are the most popular operating systems and architectures (ie, so more testing can be done).
3. How many old versions of the project to support?
## [](#%5Fwhat%5Fis%5Fstored)What is stored?
The update service only stores the information that is sent - [explained with an example above](#update-sent).
You can audit the update service code here;
## [](#%5Fwhat%5Fis%5Fnot%5Fsentstored)What is not sent/stored
* No information about you, users of your system, no files, nothing else apart from what is mentioned above.
* Not your public IP address, or any information about your network
* Not any information about how you have configured OliveTin, or any actions.
## [](#%5Fwhere%5Fis%5Fthe%5Finformation%5Fsent)Where is the information sent
To . This is a virtual machine which stores the logs on the machine filesystem. The data is accessible to all who which to view it, in the interest of transparency.
## [](#%5Fwhy%5Fisnt%5Fthis%5Fopt%5Fin)Why isn’t this opt-in?
It seems the majority of software does perform update checks by default like this - Chrome, Firefox, most modern Operating Systems, etc. Because no information about people, or your data is being used, apart from your installation ID, this seems like a safe default.
Also, if this were to default off, many people probably would not think about turning it on.
## [](#disable-update-checks)How do I disable update checking?
If you are worried about privacy, or similar, please do make your concerns known. This is best if this is an open discussion.
But, simply, to disable this feature, add to your config file;
checkForUpdates: false
## [](#hide-news-versions)How can I hide version upgrades in the OliveTin web interface?
Set the following in your configuration file;
showNewVersions: false
OliveTin will need to be restarted for this change to have affect.
## [](#hsts)Why can’t I visit update-check.olivetin.app in my browser?
The root domain for OliveTin (OliveTin.app) has HSTS turned on - this forces your browser to use SSL (HTTPS - the little encryption padlock) for all subdomains - including www.olivetin.app and docs.olivetin.app. Although both of those websites don’t transmit anything that really needs encrypion, the web is certainly moving to having SSL turned on everywhere. It even has a positive impact on search engine rankings!
The update-check service - which is accessible from update-check.olivetin.app - is designed to be only accessed via the OliveTin app. Non-web browsers, like this OliveTin app, generally ignore HSTS (and therefore don’t try and access the update-check site via SSL/HTTPS.
If you use a non-web browser to try to access the site over HTTP, (eg, curl), you should find it works like normal.
As mentioned previously, the update-check site deliberately uses does not use SSL/HTTPS, to make it easy for people to audit what is actually being sent to the update site. Tools like tcpdump, wireshark, or others can verify that OliveTin is not sending more information than is described on this page.
Apache HTTPD
====================

Figure 1\. Flow of an inbound network request
This is an example of how to setup a DNS name based Apache HTTPD proxy for OliveTin. It assumes OliveTin is running on localhost, port 1337.
/etc/httpd/conf.d/OliveTin.conf
```apache
ServerName olivetin.example.com
ProxyPass / http://localhost:1337/
ProxyPassReverse / http://localhost:1337/
RewriteEngine On
RewriteCond %{REQUEST_URI} ^/websocket
RewriteRule /(.) ws://localhost:1337/websocket [P,L]
```
Note, you virtual host should **not** include a DocumentRoot directive - httpd is just proxying OliveTin, not serving it’s actual pages.
Caddy
====================

Figure 1\. Flow of an inbound network request
Caddy seems to work without any special configuration, so a simple `Caddyfile` works like this;
Caddyfile
```nginx
http://olivetin.example.com {
reverse_proxy * http://localhost:1337
}
```
## [](#caddy-path)Custom paths
Caddyfile
```asciidoc
....
handle {$GLOBAL_PORTAL_PATH}/olivetin* {
redir {$GLOBAL_PORTAL_PATH}/olivetin {$GLOBAL_PORTAL_PATH}/olivetin/
uri strip_prefix {$GLOBAL_PORTAL_PATH}/olivetin
basicauth {
{$GLOBAL_USER} HASH
}
reverse_proxy * localhost:1337
}
....
```
Note, because you are changing the default path (from `/` to `/OliveTin/`), you will need to tell the OliveTin webUI where to find the API.
You need to also set `externalRestAddress` in your config.yaml like this;
OliveTin config.yaml
```yaml
externalRestAddress: http://myserver/OliveTin
```
HAProxy
====================

Figure 1\. Flow of an inbound network request
This is a straightforward example of how to setup a DNS name based HAProxy setup for OliveTin.
/etc/haproxy/haproxy.conf
```python
frontend cleartext_frontend
bind 0.0.0.0:80
option httplog
use_backend be_olivetin_webs if { hdr(Host) -i olivetin.example.com && path_beg /websocket }
use_backend be_olivetin_http if { hdr(Host) -i olivetin.example.com }
backend be_olivetin_http
server olivetinServer 127.0.0.1:1337 check
backend be_olivetin_webs
timeout tunnel 1h
option http-server-close
server olivetinServer 127.0.0.1:1337
```
Reverse Proxies
====================
This section of the documentation has a few examples of reverse proxy configurations for popular reverse proxy servers.
Configuring a reverse proxy server for OliveTin is entirely optional. If you don’t want to use a reverse proxy, you can skip this section.
## [](#proxy-guide)Reverse Proxy general guide
It’s common to put OliveTin behind a reverse proxy, for authentication, customizing the OliveTin address/path, or for a variety of other reasons.
### [](#%5Fdns%5Fname%5Fvs%5Fpath%5Fbased%5Fproxies)DNS name vs Path based proxies
DNS Name based virtual hosts (eg: olivetin.example.com ) are easier to setup and configure than path based virtual hosts (eg: www.example.com/utils/OliveTin), because path based virtual hosts need to take care mangle OliveTin paths without breaking things.
* If using a path based reverse proxies, you may need to set `externalRestAddress` manually to something like; `` in the OliveTin config.yaml.
* If using DNS Name based reverse proxies, then you should not need to change anything in config.yaml
#### [](#%5Fwhich%5Fport)Which port?
If you look at OliveTin startup logs, you will see OliveTin starting services on several ports. For most users, even under reverse proxy configurations, just proxying port 1337 should be all that is needed. To better understand why OliveTin uses several internal ports by default, see [network-ports](../reference/network-ports.html).
### [](#%5Fhandling%5Fwebsockets)Handling websockets
OliveTin versions after 2023-08 use websockets instead of polling for updates. Taking care to re-pass the `Connection: Upgrade` and `Upgrade: websocket` headers for the `/websocket` path.
#### [](#%5Fgeneral%5Fchecklist)General checklist
* `olivetin.example.com/*` is all just HTTP traffic (port 1337)
* `olivetin.example.com/` should show the standard webui (port 1337)
* `olivetin.example.com/webUiSettings.json` should return a JSON file generated by OliveTin that sets up the web interface. (port 1337)
* `olivetin.example.com/api` should how the REST based API. (port 1337)
* `olivetin.example.com/websocket` should be a websocket connection upgrade.
Nginx
====================

Figure 1\. Flow of an inbound network request
This is an example of DNS based proxying with Nginx.
/etc/nginx/cond.d/OliveTin.conf
```nginx
server {
listen 443 ssl;
ssl_certificate "/etc/nginx/conf.d/server.crt";
ssl_certificate_key "/etc/nginx/conf.d/server.key";
access_log /var/log/nginx/ot.access.log main;
error_log /var/log/nginx/ot.error.log notice;
server_name olivetin.example.com;
location / {
proxy_pass http://localhost:1337/;
proxy_redirect http://localhost:1337/ http://localhost/OliveTin/;
}
location /websocket {
proxy_set_header Upgrade "websocket";
proxy_set_header Connection "upgrade";
proxy_pass http://localhost:1337/websocket;
}
}
```
## [](#nginx-path)Custom paths
These "custom path" instructions are for when you want to use OliveTin with a custom path like "apps.example.com/olivetin" instead of the root path + DNS name - eg: "olivetin.example.com". Generally it is **not recommended** to use a custom path for OliveTin. Instructions are provided below though, and it mostly-works.
nginx.conf
```nginx
....
location /OliveTin/ {
proxy_pass http://localhost:1337/;
proxy_redirect http://localhost:1337/ http://localhost/OliveTin/;
}
location /OliveTin/websocket {
proxy_set_header Upgrade "websocket";
proxy_set_header Connection "upgrade";
proxy_pass http://localhost:1337/websocket;
}
....
```
Note, because you are changing the default path (from `/` to `/OliveTin/`), you will need to tell the OliveTin webUI where to find the API.
You need to also set `externalRestAddress` in your config.yaml like this;
OliveTin config.yaml
```yaml
externalRestAddress: http://myserver/OliveTin
```
Nginx Proxy Manager
====================

Figure 1\. Flow of an inbound network request
This is an example of DNS based proxying with Nginx Proxy Manager.
This example assumes that you are trying to access OliveTin at **olivetin.npm.teratan.lan** and already have a DNS record pointing to the IP address of the Nginx Proxy Manager. This also assumes you are running Nginx Proxy Manager and OliveTin using Docker Compose.
docker-compose.yml
```yaml
services:
app:
image: 'jc21/nginx-proxy-manager:latest'
restart: unless-stopped
ports:
- '80:80'
- '81:81'
- '443:443'
volumes:
- ./data:/data
- ./letsencrypt:/etc/letsencrypt
olivetin:
container_name: olivetin
image: jamesread/olivetin
volumes:
- ./OliveTin:/config # replace host path or volume as needed
ports:
- "1337:1337"
restart: unless-stopped
```
Note that OliveTin needs a configuration file to run, see the [docker compose install instructions](../install/docker%5Fcompose.html) for a bit more detail.
Assuming you have Nginx Proxy Manager running, start by adding a new proxy host.
* **Domain Names**: olivetin.npm.teratan.lan (again, assume this is the domain you have set up in your DNS)
* **Scheme**: http (OliveTin does support HTTPS if you create your own certificates, but it is more normal to speak HTTP between Nginx and OliveTin, and just use HTTPS to the proxy).
* **Forward Hostname/IP**: 192.168.66.168 (change this to be the IP address of your docker host)
* **Forward Port**: 1337 (this is the default port for OliveTin)
* **Websockets Support**: Yes (OliveTin uses websockets for the Web UI)
That really should be all that you need to get OliveTin working with Nginx Proxy Manager. If you have any issues, please check the logs of both OliveTin and Nginx Proxy Manager for any errors, and look for ways of getting [support](../troubleshooting/wheretofindhelp.html).

Traefik + Docker Compose
====================

Figure 1\. Flow of an inbound network request
The following example is known to work well with Traefik and docker-compose.
```yaml
services:
olivetin:
container_name: olivetin
image: jamesread/olivetin
volumes:
- /docker/olivetin:/config # replace host path or volume as needed
ports:
- "1337:1337"
restart: unless-stopped
labels:
- "traefik.enable=true"
- "traefik.http.routers.olivetin.entrypoints=web"
- "traefik.http.routers.olivetin.rule=Host(`olivetin.example.com`)"
traefik:
image: "traefik:v2.9"
container_name: "traefik"
command:
#- "--log.level=DEBUG"
- "--api.insecure=true"
- "--api.dashboard=true"
- "--providers.docker=true"
- "--providers.docker.exposedbydefault=false"
- "--entrypoints.web.address=:80"
ports:
- "80:80"
- "8080:8080"
volumes:
- "/var/run/docker.sock:/var/run/docker.sock:ro"
```
Access Control Lists
====================
OliveTin uses Access Control Lists (ACLs) to implement it’s security model, which allows you to have fine-grained control over indivividual actions or groups of actions. This can be used to implement role based access control (RBAC), or other security models that you may need.
ACLs are built up of the following set of rules;
* `name` \- The name of the ACL. This is used to identify the ACL in the configuration file.
* `matchUsergroups` \- A list of usergroups that this ACL applies to. This is used to match users that are in the specified usergroup.
* `matchUserNames` \- A list of usernames that this ACL applies to. This is used to match users that are in the specified usergroup.
* `permissions` \- A set of permissions which are used with **actions**. eg: `view`, `exec`, `logs`, etc.
* `addToEveryAction` \- A boolean value that indicates if this ACL should be added to every action. This is useful if you want to apply the same ACL to all actions, without having to manually add it to each action.
* `policy` \- A policy is a set of rules that affect the **whole of OliveTin**.
## [](#%5Facls%5Fand%5Fpolicies%5Fglobal)ACLs and Policies (global)

**Policies** are a set of rules that apply to the whole of OliveTin ("global"), and not just to individual actions (like permissions are).
The **defaultPolicy** is special, in that all values are set to true by default. This means that if you do not set a `defaultPolicy`, then all policies will be set to `true` by default. This is effectively what the `defaultPolicy` is set to;
```yaml
defaultPolicy:
showDiagnostics: true
showLogList: true
```
You can override defaults using an ACL, like this;
```yaml
accessControlLists:
- name: admins
matchUsergroups:
- admins
policy:
showDiagnostics: true
showLogList: true
defaultPolicy:
showDiagnostics: false
showLogList: false
```
## [](#%5Facls%5Fand%5Fpermissions%5Ffor%5Factions)ACLs and Permissions (for Actions)

An action always starts with `defaultPermissions` (see below), and then then have one or more ACLs applied to it. This means that you can for example have an action that is only available to a certain group of users, or only to a single user.
Let’s say you have a user `james` and a usergroup `admins`. You can then create an ACL that only allows `james` and users in the `admins` group to view and execute an action.
You can specify default permissions for all actions by changing the `defaultPermissions` like this;
`config.yaml`
```yaml
defaultPermissions:
view: false
exec: false
logs: true
```
In the example above, all users will start off with the permissions to only see action logs - but will not be able to view or execute actions.
It is then possible to add an "admins" ACL on top of every action. In the example below, we define one extra ACL called "admins", which matches any users with the usergroup also called "admins". This ACL will then be applied to all actions, and will allow users in the "admins" usergroup to view and execute the action.
`config.yaml`
```yaml
defaultPermissions:
view: false
exec: false
accessControlLists:
- name: admins
matchUsergroups:
- admins
permissions:
view: true
exec: true
actions:
- title: Shutdown Reactor
acls:
- admins
```
### [](#%5Fadd%5Fan%5Facl%5Fto%5Fevery%5Faction)Add an ACL to every action
Sometimes you want to define an ACL that applies to all actions. It can be tedious and error prone to manually add the ACL under the "acls" list for every action, if you have several actions. Instead, there is a shortcut to add an ACL to all actions - `addToEveryAction: true`.
`config.yaml`
```yaml
accessControlLists:
- name: admins
matchUsergroups:
- admins
permissions:
view: true
exec: true
addToEveryAction: true
```
## [](#%5Facl%5Fmatching%5Fusernames%5Fand%5Fusergroups)ACL Matching - usernames and usergroups.
You can match users based on their usergroup which is the most common, but it is also possible to match based on the user’s username.
`config.yaml`
```yaml
accessControlLists:
- name: admins
matchUsergroups:
- admins
permissions:
view: true
exec: true
- name: james
matchUserNames:
- james
permissions:
view: true
exec: true
```
Security Concepts
====================
OliveTin implements a security model that covers **Authentication**, **Authorization** (via [ACLs](acl.html)) and **Accounting**.
## [](#%5Fauthentication)Authentication
To allow users to be Authenticated to OliveTin, there are several options to choose from;
* [Local Users](local.html) (ie: Login with Username and Password)
* [OAuth2](oauth2.html) (eg: Google, GitHub, etc)
* [Trusted Header](trusted%5Fheader.html) (eg: Nginx, Apache, etc)
* [JWT](jwt.html) (eg: Traefik, Organizr, etc)
## [](#%5Fauthorization)Authorization
OliveTin’s authorization system, or permissions, is built on [Access Control Lists](acl.html). This is a powerful mechanism that allows you to implement very fine grained access control, or your own role based access control (RBAC).
## [](#%5Faccounting)Accounting
OliveTin’s accounting is via it’s logs. This aspect of OliveTin’s security model is poorly documented at the moment.
Security Design & Hardening Recommendations
====================
| | OliveTin has not **yet** had a remote code execution vulnerability found in it. However, given what OliveTin does, it is possible, and likely that a security vulnerability will be found in the future. This document explains how OliveTin is designed so that you can make an informed decision about how to use OliveTin in your environment. It also provides hardening recommendations to help you secure OliveTin. |
| ---------------------------------------------------------------------------------------------------------------------------------------------------------------------------------------------------------------------------------------------------------------------------------------------------------------------------------------------------------------------------------------------------------------------------- |
## [](#%5Fsecurity%5Fdesign)Security Design
OliveTin has a few design choices that should help it’s general security posture.
* OliveTin does deliberate not have any web based control panel where commands can be typed in. This is try to avoid arbitary command execution vulnerabilities caused by authentication bypass attacks.
* Control over what commands are run is determined via the `config.yaml` alone. OliveTin does NOT write to the config.yaml in any way. This is to avoid any of arbitary command execution vulnerabilities caused by writing to the config.yaml.
* OliveTin listens on just 1 open public port by default (1337). The rest of the ports only listen on `localhost` so you don’t have to worry about them in your firewall.
* Standard Linux controls can be used to run OliveTin as non-root, with `sudo` permissions if needed. See the action customization section of these docs for more details.
* Robust code-scanning, code review, and dependency analysis at build-time. OliveTin uses many linters and code checkers, especially on new pull requests. Out dated dependencies are addressed quickly.
## [](#%5Fhardening%5Frecommendations)Hardening Recommendations
* Implement authentication on the OliveTin API using one of the many methods provided.
* Run OliveTin as a non-root user, or even better, run OliveTin in a container (as non-root).
* Use normal `sudo` permissions to elevate OliveTin to run privileged commands, and restrict the commands that OliveTin can run with `sudo` to only the ones you need.
* Place a reverse proxy in front of OliveTin, or better, a web application firewall.
Example: Force Login
====================
A common use case for OliveTin with security is to expose some dashboards that require login to be able to use. This page brings together the configuration options that are needed to achieve this. The most important configuration option is setting `authRequireGuestsToLogin` to `true`.
## [](#%5Ffull%5Fexample%5Fconfiguration)Full example configuration
```yaml
logLevel: "INFO"
authRequireGuestsToLogin: true
accessControlLists:
- name: "admins"
permissions:
view: true
exec: true
logs: true
matchUsergroups:
- "admins"
addToEveryAction: true
authLocalUsers:
enabled: true
users:
- username: "admin"
usergroup: admins
password: -- your password hash here --
actions:
- title: "Restart"
shell: echo "Restart"
dashboards:
- title: "Admin Dashboard"
contents:
- title: "Restart"
```
Note, to use this configuration, you will need to replace `-- your password hash here --` with a password hash. You can generate a password hash by looking at the options in the [local-users](local.html) configuration section.
## [](#%5Fimportant%5Fconfiguration%5Foption%5Fauthrequiregueststologin)Important configuration option: `AuthRequireGuestsToLogin`
The `AuthRequireGuestsToLogin` option is a helpful shortcut that sets all `defaultPermissions` to false, and makes it so that all guests are prompted to login before they can do anything with OliveTin.
Technically, you could achieve the same effect by setting `defaultPermissions` to `false` and setting up an ACL that allows access to the login page, but `AuthRequireGuestsToLogin` is a more convenient way to achieve the same effect.
## [](#%5Fper%5Faction%5Facls%5Fvs%5Faddtoeveryaction)Per-action ACLs, vs `addToEveryAction`
It is possible to specify one or more ACL per action, like so;
```yaml
actions:
- title: "Restart"
shell: echo "Restart"
acl:
- name: "admins"
```
However, this configuration is also a bit more verbose, and if you just have one main ACL, can save yourself some typing by using the `addToEveryAction` option in the ACL configuration.
Example: Some actions require admin
====================
A common use case for OliveTin with security is to expose some actions to guests, and have some actions that require login to be able to use. This page brings together the configuration options that are needed to achieve this. The most important configuration option is setting `authRequireGuestsToLogin` to `true`.
## [](#%5Ffull%5Fexample%5Fconfiguration)Full example configuration
```yaml
logLevel: "INFO"
accessControlLists:
- name: "noguests"
permissions:
view: false
exec: false
logs: false
matchUsernames: [ "guest" ]
- name: "admins"
permissions:
view: true
exec: true
logs: true
matchUsergroups: [ "admins" ]
authLocalUsers:
enabled: true
users:
- username: "admin"
usergroup: admins
password: -- your password hash here --
actions:
- title: "Date"
shell: date
- title: "Reboot"
shell: reboot" # Note that this won't work inside a container
acls:
- "noguests"
- "admins"
dashboards:
- title: "Guest Dashboard"
contents:
- title: "Date"
- title: "Admin Dashboard"
contents:
- title: "Reboot"
```
Note, to use this configuration, you will need to replace `-- your password hash here --` with a password hash. You can generate a password hash by looking at the options in the [local-users](local.html) configuration section.
Security Examples
====================
The following examples show you how to combine several security configuration options to setup common scenarios that people often ask for.
* [Example: Login Required](example%5Flogin%5Frequired.html)
* [Example: Some actions required admin](example%5Fsome%5Fadmin%5Factions.html)
## [](#%5Fsecurity%5Fsolutions)Security Solutions
* [Cloudflare Access & Tunnels](../solutions/cloudflare%5Faccess%5Ftunnel/index.html)
JWT Authorization
====================
One of the best ways to do authorization with OliveTin is to pass it a **JSON Web token (JWT)**, after first authenticating with a popular single sign on system, like Keycloak, CloudFlare Tunnels, Authentik or Organizr.
Two types of JWT mechanisms are supported;
* [JWT with Keys](jwt%5Fkeys.html) (eg: CloudFlare Tunnels, Authentik)
* X509 Certs/Keys on disk are supported
* **JWKS** is also supported
* [JWT with HMAC](jwt%5Fhmac.html) (eg: Organizr)
## [](#%5Fjwt%5Fflow)JWT Flow
The flow generally goes like this;
1. User browses to a website like Organizr and logs in, which sets a JWT Cookie for apps.example.com.
2. User browses to OliveTin.apps.example.com, and the cookie is sent to OliveTin.
3. OliveTin verifies the JWT token given the signing secret, and picks up on the `name` and `group` fields from the JWT claim.
4. OliveTin matches any relevant ACLs based on the claims.
5. If any ACLs are not matched, then the defaultPermissions are used.
JWT with HMAC
====================
You need to know your JWT **Cookie Name** and **Hash Secret**. Whatever tool you are using to authenticate users will probably have instructions on how to find this.
* [Organizr - Under "Validating the token"](https://docs.organizr.app/features/server-authentication#validating-the-token)
Adding JWT details to OliveTin config.yaml
Setup your config file so it has something like this;
`config.yaml`
```yaml
# It's often useful to turn logging to DEBUG when trying to work out authentication problems
logLevel: "INFO"
authJwtCookieName: "Organizr_token_1234..."
authJwtHmacSecret: "3l4jh23v_123!"
authJwtClaimUsername: "username"
authJwtClaimUsergroup: "usergroup"
```
Note that your `authJwtCookieName` and `authJwtSecret` will need to be set exactly as they appear in your Authentication software.
## [](#%5Fusable%5Fclaims)Usable claims
OliveTin currently can match Access Control Lists based on a **username** or **user group(s)**. You can see if these are being used properly turning on `DEBUG` logging and looking at the jwt claims.
If `authJwtClaimUsergroup` is any array, ACL groups will match any of the user groups in the array.
## [](#%5Fsetup%5Fdefault%5Fpermissions)Setup default permissions
OliveTin will assume that guests are able to View and Execute every action by default. When you are setting up authorization you probably want to limit this. You can do that by setting `defaultPermissions` like this;
`config.yaml`
```yaml
logLevel: "INFO"
defaultPermissions:
view: false
exec: false
```
## [](#%5Fsetup%5Folivetin%5Faccess%5Fcontrol%5Flists)Setup OliveTin Access Control Lists
Access Control Lists are a way to override the default permissions.
`config.yaml`
```yaml
logLevel: "INFO"
defaultPermissions:
view: false
exec: false
logs: true
accessControlLists:
- name: Admins
addToEveryAction: true
matchUsergroups:
- Admins
permissions:
view: true
exec: true
logs: true
- name: "Developers"
matchUsergroups:
- "developer"
permissions:
view: true
exec: false
logs: false
actions:
- name: Only visible to admins
shell: echo "I am a secret command only visible to admins"
- name: Restart database
shell: systemctl restart mariadb
acls:
- "developer"
```
In the example above, the `admins` ACL is automatically added to every action, because `addToEveryAction` is true.
Customizing field names
You may need to customize the field names for your JWT authentication.
`config.yaml`
```yaml
authJwtClaimUsername: "username"
authJwtClaimUsergroup: "usergroup"
```
JWT with Keys
====================
| | This page is marked as "earlydoc", which means that it more of a collection of notes and an early draft before this page turns into good documentation later on. It is hoped that this early form of documentation is useful to you, but please understand that most documentation pages are higher quality than this. If you have suggestions or comments, please do get in contact or consider contributing your suggestions to the OliveTin documentation. |
| ---------------------------------------------------------------------------------------------------------------------------------------------------------------------------------------------------------------------------------------------------------------------------------------------------------------------------------------------------------------------------------------------------------------------------------------------------------------- |
## [](#%5Fusing%5Fpublic%5Fkeys%5Fvia%5Fjwks)Using Public Keys via JWKS
OliveTin Supports **JSON Web Key Sets (JWKS)**. This approach is often used with services like CloudFlare.
`config.yaml`
```yaml
authJwtAud: "asdf1234"
authJwtCertsURL: "https://mydomain.cloudflareaccess.com/cdn-cgi/access/certs"
authJwtClaimUsername: email
authJwtCookieName: "CF_Authorization"
```
You may well want to set `logLevel: DEBUG` and `insecureAllowDumpJwtClaims: true` in your config when testing JWT for the first time.
## [](#%5Fusing%5Fwith%5Fteleportheaders)Using with Teleport/Headers
If you are using Teleport, you can use the `authJwtCertsURL` to point to the Teleport JWKS.
Teleport can only [inject the JWT into a header](https://goteleport.com/docs/enroll-resources/application-access/jwt/introduction/#inject-jwt), so you will need to set `authJwtHeader` to the header name that you have configured Teleport to use, e.g., `Authorization`.
`config.yaml`
```yaml
authJwtCertsURL: "https://teleport.mydomain/.well-known/jwks.json"
authJwtHeader: Authorization
```
Replace teleport.mydomain with the domain of your Teleport instance.
## [](#%5Fusing%5Fpublic%5Fkeys%5Fon%5Fdisk)Using Public Keys on Disk
This approach can be useful if your Authentication service does not support JWKS, or if you don’t want to use it. Public Keys should be available on disk in a file - which can have any filename or extension you like. The files need to be RSA keys in PEM format to be used by OliveTin, though. P12 is not supported.
`config.yaml`
```yaml
authJwtAud: "asdf1234"
authJwtPubKeyPath: "/opt/mykey.crt"
authJwtClaimUsername: email
authJwtCookieName: "CF_Authorization"
```
## [](#%5Fsee%5Falso)See Also
* [Cloudflare Access & Tunnels Solution](../solutions/cloudflare%5Faccess%5Ftunnel/index.html)
Local Users Login
====================
OliveTin supports just basic users defined with a username and password in the config.yaml file. This can be used when you do not want to use a full authentication system like LDAP, OAuth2 or a Reverse Proxy.
## [](#%5Fdefine%5Fa%5Fuser)Define a user
`config.yaml`
```yaml
authLocalUsers:
enabled: true
users:
- username: james
password: $argon2id$v=19$m=65536,t=4,p=6$LnNW4sw+jZfa5Ex3YjfuHQ$vl8pjUJhxNmBxScV4lI3cgAZPkNB1rSrnX6ibgoAP8k
```
## [](#%5Fdefine%5Fusers%5Fwith%5Fa%5Fuser%5Fgroup)Define users with a user group
OliveTin local users do not need to be part of a user group, and unless any user groups are added, they will not be in any user group. However, if you want to add a user to a user group, you can do so like this:
`config.yaml`
```yaml
authLocalUsers:
enabled: true
users:
- username: alice
usergroup: admins
password: $argon2id$v=19$m=65536,t=4,p=6$LnNW4sw+jZfa5Ex3YjfuHQ$vl8pjUJhxNmBxScV4lI3cgAZPkNB1rSrnX6ibgoAP8k
- username: bob
password: ...
usergroup: admins
- username: charlie
password: ...
usergroup: webmasters
```
## [](#%5Fget%5Fa%5Fargon2id%5Fhashed%5Fpassword)Get a Argon2id hashed password
You will notice from the configuration examples above that the password is hashed using Argon2id. You can use any of the following methods to generate a Argon2id hashed password;
### [](#%5Foption%5Fa%5Fusing%5Folivetin%5Fapi)Option A - Using OliveTin API
You can see from the example above that the config contains a single user called **james**, and the password is hashed using Argon2id. OliveTin provides a utility API to hash passwords using Argon2id which can be useful when you want to create new users. Simply run the following curl command to hash a password:
```bash
curl -sS --json '{"password": "myPassword"}' http://olivetin.example.com:1337/api/PasswordHash
```
| | Curl 7.82 added support for the \--json option, if you are using an older version of curl, see [this issue](https://github.com/OliveTin/OliveTin/issues/462). |
| ---------------------------------------------------------------------------------------------------------------------------------------------------------------- |
This will return a output like this, you can then copy and paste this hash into your config.yaml file;
```asciidoc
Your password hash is: $argon2id$v=19$m=65536,t=4,p=6$dlWTV1RL04/Nuvxzl94NAg$KsYXvCFE2Eu/jkXi/dbbZM3I/2b2VByTAwRIenUwdJk
```
### [](#%5Foption%5Fb%5Fusing%5Fthe%5Fargon2%5Fcommand%5Fline%5Ftool)Option B - Using the `argon2` command line tool
You can also easily hash the password using the `argon2` package:
```bash
echo -n "myPassword" | argon2 "$(openssl rand -base64 16)" -id -t 4 -m 16 -p 6 -l 32 -e
```
### [](#%5Fopption%5Fc%5Fusing%5Fthe%5Fhash%5Fdocker%5Fimage)Opption C - Using the `hash` docker image
Or using the [hash](https://hub.docker.com/r/leplusorg/hash) docker image:
```bash
docker run --rm -i --net=none leplusorg/hash sh -c 'echo -n "myPassword" | argon2 "$(openssl rand -base64 16)" -id -t 4 -m 16 -p 6 -l 32 -e'
```
Then simply visit the OliveTin web interface and browse to the login page, eg:
### [](#%5Fwhy%5Fdoes%5Folivetin%5Fuse%5Fargon2id)Why does OliveTin use Argon2id?
Argon2id is the password hashing algorithm that is [recommended by OWASP](https://cheatsheetseries.owasp.org/cheatsheets/Password%5FStorage%5FCheat%5FSheet.html) as of October 2024\. There doesn’t seem to be a good reason yet to provide configuration options for changing the password hashing algorithm, but if you have a good reason, please open an issue on the GitHub repository.
## [](#%5Fforce%5Flogin%5Fpage)Force login page
If you don’t want to allow guests to do anything in OliveTin, you can use the `authRequireGuestsToLogin` option to force all users to login before they do anything. This will redirect all users to the login page if they are not logged in, and it will also set `defaultPermissions` to `false`, meaning that permissions must be explicitly set for each user or user group.
`config.yaml`
```yaml
authRequireGuestsToLogin: true
authLocalUsers:
enabled: true
users:
- username: james
password: $argon2id$v=19$m=65536,t=4,p=6$LnNW4sw+jZfa5Ex3YjfuHQ$vl8pjUJhxNmBxScV4lI3cgAZPkNB1rSrnX6ibgoAP8k
```
OAuth2
====================
| | This page is marked as "earlydoc", which means that it more of a collection of notes and an early draft before this page turns into good documentation later on. It is hoped that this early form of documentation is useful to you, but please understand that most documentation pages are higher quality than this. If you have suggestions or comments, please do get in contact or consider contributing your suggestions to the OliveTin documentation. |
| ---------------------------------------------------------------------------------------------------------------------------------------------------------------------------------------------------------------------------------------------------------------------------------------------------------------------------------------------------------------------------------------------------------------------------------------------------------------- |
OliveTin supports OAuth2 for login with any OAuth2 compliant provider.
At the moment, username fetching is only supported on GitHub. More will be added soon, probably with the addition of OpenID Connect support.
```yaml
authOAuth2RedirectUrl: http://localhost:1337/oauth/callback
authOAuth2Providers:
github:
clientId: 1234567890
clientSecret: 1234567890
```
## [](#%5Fprovider%5Fconfiguration)Provider configuration
* `name` \- a "simple name" for the provider, used in the login redirect and internally in OliveTin, e.g. `github`
* `title` \- the human-readable name of the provider, e.g. `GitHub`
* `clientId` \- the client ID provided by the OAuth2 provider
* `clientSecret` \- the client secret provided by the OAuth2 provider
* `icon` \- the icon to use for the provider. Accepts any HTML, e.g. ``
* `scopes` \- a list of scopes to request.
* `authUrl` \- the URL to redirect to for authentication
* `tokenUrl` \- the URL to exchange the code for a token
* `whoamiUrl` \- the URL to fetch user information from
* `usernameField` \- the field in the user information response to use as the username
* `userGroupField` \- the field in the user information response to use as the group. This is a string containing one group name, e.g. `olivetin_group`
* `certBundlePath` \- the path to a certificate to add to the truststore for authentication requests, e.g. `/certs/internal.crt`
* `insecureSkipVerify` \- a boolean to disable certificate verfication
* `connectTimeout` \- an integer for seconds until the request will timeout, e.g. `10`
## [](#%5Fbuilt%5Fin%5Fproviders%5Fname)Built-in providers (`name`)
OliveTin comes with a few built-in providers for convenience. If you are using one of these with a `name`, then you don’t need to specify the various URLs, scopes, icon, usernameField, etc. It will be automatically configured for you. You will still need to provide the client ID and client secret.
* `github` \- GitHub
* `google` \- Google
OAuth2 - Authelia
====================
Notes contributed by a member of the OliveTin community - many thanks Phampyk!
Authelia code
```yaml
identity_providers:
oidc:
hmac_secret: "xxxxxx"
jwks:
- key_id: "primary"
algorithm: "RS256"
use: "sig"
key: |
-----BEGIN PRIVATE KEY-----
xxxxxxxxxxxxxxxxxxxxxxxxxx
-----END PRIVATE KEY-----
clients:
- client_id: "olivetin"
client_name: "OliveTin"
client_secret: "xxxxxxxxxxxxxxxxx"
redirect_uris:
- "https://olivetin.hostname.com/oauth/callback"
scopes:
- openid
- profile
consent_mode: implicit
```
* hmac\_secret generated with `openssl rand -hex 64 or can be authelia crypto rand --length 64 --charset alphanumeric` [Source](https://www.authelia.com/reference/guides/generating-secure-values/#generating-a-random-alphanumeric-string)
* Private key generated with `openssl genrsa -out oidc.key 2048 and openssl rsa -in oidc.key -pubout -out oidc.pub` but only used the oidc.key here
* client\_id olivetin is for the example, as per authelia docs the recomendation is a random string generated with `authelia authelia crypto rand --length 72 --charset rfc3986` [Source](https://www.authelia.com/integration/openid-connect/frequently-asked-questions/#client-id—identifier)
* consent\_mode I had to set this one up as implicit or every time I loged in it was an extra step where you had to authorize OliveTin to access profile and openid. [Source](https://www.authelia.com/configuration/identity-providers/openid-connect/clients/#consent%5Fmode)
* client\_secret is recommended in the docs to be generated with `authelia crypto hash generate pbkdf2 --variant sha512 --random --random.length 72 --random.charset rfc3986` and it gives you the password (Random password on the example) and the hash (Digest on the example). Olivetin needs the password and Authelia the hash [Source](https://www.authelia.com/integration/openid-connect/frequently-asked-questions/#client-secret)
```asciidoc
Random Password: JxMbHrQgmykaVm2n0p_5q6P_YoZG_YdRWvHxHbVJ5Alv.Ni3OJPVPHEJ6Tfw_AklrwayFl39
Digest: $pbkdf2-sha512$310000$yQogpMZvkHoAmOBGiIHVJQ$hxKuvar6Q6pOlkdzQBMWq1i5WjXcBA3rvuXxeylvLeTuKI/hLVeZsM43R5TWejZ6gBp/OH8yy1hWytiohLQh5w
```
## [](#%5Folivetin%5Fconfig)OliveTin config
```yaml
authRequireGuestsToLogin: true
authOAuth2RedirectURL: https://olivetin.hostname.com/oauth/callback
authOAuth2Providers:
authelia:
name: authelia
title: Authelia
clientID: olivetin #same as authelia
clientSecret: xxxxxxx #same as authelia but not hashed
authURL: https://authelia.hostname.com/api/oidc/authorization
tokenURL: https://authelia.hostname.com/api/oidc/token
whoamiUrl: https://authelia.hostname.com/api/oidc/userinfo
scopes:
- openid
- profile
usernameField: preferred_username
icon:
accessControlLists:
- name: john #same as authelia
matchUserNames:
- john
permissions:
view: true
exec: true
logs: true
addToEveryAction: true
```
## [](#%5Fnext%5Fsteps)Next steps
Once you have OAuth2 working, you will probably want to configure access control lists in OliveTin. This is described in the [Access Control Lists](acl.html) documentation page.
OAuth2 - Authentik
====================
OliveTin has been tested with Authentik. This documentation page describes how to configure Authentik for use with OliveTin and assumes you already have Authentik installed and running.
Login as an Authentik administrator and start by creating a new app as follows;

Click Next, and on the **Provider Type** page select **OAuth2**.

Click Next, and on the **Provider Configuration** page, fill in the following fields;
* **Authorization flow:** `default-authorization-eplicit-consent (Authorize Application)` (or similar)
* **Client Type**: `confidential` \- OliveTin requires a confidential client (it keeps it’s secrets on the server side).

Scroll down, and on the same page, copy the **Client ID** and **Client Secret** fields into a text file, a secret manager, or somewhere else safe. You will need these values later. These are used in the OliveTin configuration file later.
For the **Redirect URIs**, OliveTin requires that the URI ends with `/oauth/callback`. Therefore if your OliveTin instance is running on ``, you should add the following redirect URI: ``. Note that the URL must match the URL that you use to access OliveTin - so it is whatever you type in your browser address bar, with `/oauth/callback` appended to it.
| | That URL says oauth, not oauth2. OliveTin only supports OAuth2, not "OAuth\[1\]", but the path is oauth nevertheless. |
| ------------------------------------------------------------------------------------------------------------------------ |

If your Authentik instance has a "Configure Bindings" page, you can bind users to be able to access OliveTin like you would with any other application that you add to Authentik.
Submit this wizard to save the configuration.
## [](#%5Fgroup%5Fmapping)Group Mapping
OliveTin `2024.11.24` added support for OAuth2 group mapping for a single group. OliveTin `2025.7.29` added support for OAuth2 group mapping for multiple groups when passed as a commaa-separated list.
The examples below show various ways to map groups from Authentik to OliveTin.
### [](#%5Fmultiple%5Fgroup%5Fmapping%5Fcomma%5Fseparated%5Flist)Multiple group mapping: Comma-separated list
The below will match all groups the user is a member of and return them as a comma-separated list. If no groups are found then an empty string is returned (no groups)".
In Authentik: `Admin Interface > Customization > Property Mappings > Create > Scope Mapping`
* **Name**: `olivetin-group-mapping-multiple` (or similar)
* **Scope Name**: `olivetin-group-mapping-multiple` (or similar)
* **Description**: `map all groups to a comma-separated list for olivetin`
* **Expression**:
Multiple group mapping: Comma-separated list
```python
groups = [group.name for group in user.ak_groups.all()]
return {
"olivetin_group_list": ",".join(groups)
}
```
### [](#%5Fsingle%5Fgroup%5Fmapping%5Ffirst%5Fprefix%5Fmatch)Single group mapping: First Prefix Match
The below will match the first group the user is a member of that matches the prefix defined in `group_prefix`, which is set to `olivetin`. If no match is found, the group `guest` is returned by default. Both `group_prefix` and `returned_group` can be changed to your needs.
In Authentik: `Admin Interface > Customization > Property Mappings > Create > Scope Mapping`
* **Name**: `olivetin-group-mapping`
* **Scope Name**: `olivetin-group-mapping`
* **Description**: `map first group that starts with "olivetin"`
* **Expression**:
Single group mapping: First Prefix Match
```python
group_prefix = "olivetin"
returned_group = "guest"
groups = [group.name for group in user.ak_groups.all()]
for group in groups:
if group.startswith(group_prefix):
returned_group = group
break
return {
"olivetin_group_first": returned_group
}
```
| | If you use this multiple group mapping, you will need to set the AuthHttpHeaderUserGroupSep field to ,. This may sound like a strangely named field, but it is the correct one to use for this mapping. It was originally created for the HTTP Trusted Header authentication method, but it is also used for OAuth2 group mapping. |
| ------------------------------------------------------------------------------------------------------------------------------------------------------------------------------------------------------------------------------------------------------------------------------------------------------------------------------------- |
### [](#%5Fsingle%5Fgroup%5Fmapping%5Fspecific%5Fgroup%5Fmatch)Single group mapping: Specific Group Match
The below will match the specified group name to one of the groups the user is a member of. If no match is found, the group `guest` is returned by default. Both `olivetin_group` and `returned_group` can be changed to your needs.
In Authentik: `Admin Interface > Customization > Property Mappings > Create > Scope Mapping`
* **Name**: `olivetin-group-mapping-specific`
* **Scope Name**: `olivetin-group-mapping-specific`
* **Description**: `search and map specified group for olivetin`
* **Expression**:
Single group mapping: Specific Group Match
```python
olivetin_group = "olivetin-users"
returned_group = "guest"
groups = [group.name for group in user.ak_groups.all()]
if olivetin_group in groups:
returned_group = olivetin_group
return {
"olivetin_group_specific": returned_group
}
```
### [](#%5Fenable%5Fgroup%5Fmapping)Enable Group Mapping
After creating the scope mapping in Authentik, you will need to add it to your provider. For the your OliveTin config, use the `userGroupField` mentioned in the following section.
In Authentik: `Admin Interface > Applications > Providers > {Your Provider} > Edit`
* Open `Advanced protocol settings`
* Under `Scopes`, add `your_scope_map` to `Selected Scopes`
* Click `Update`
## [](#%5Folivetin%5Fconfiguration)OliveTin configuration
This section assumes that your authentik server is accessible in the browser at `` and that OliveTin is running on ``. Adjust the URLs as necessary to match your setup. The "path" part of the URL is important and should be common in all Authentik installations.
The necessary OliveTin configuration is as follows:
```yaml
authRequireGuestsToLogin: true # Optional - depends if you want to "disable" guests.
authOAuth2RedirectURL: "http://localhost:1337/oauth/callback"
authOAuth2Providers:
authentik:
name: authentik
title: Authentik
clientID: "1234567890"
clientSecret: "123456789012345"
authURL: "http://localhost:9000/application/o/authorize/"
tokenURL: "http://localhost:9000/application/o/token/"
whoamiURL: "http://localhost:9000/application/o/userinfo/"
usernameField: "preferred_username"
icon:
```
Optional configuration values to consider are:
```yaml
authHttpHeaderUserGroupSep: "," # Optional - only needed if you use the multiple group mapping
authOAuth2Providers:
authentik:
userGroupField: "olivetin_group_list" # or "olivetin_group_first" or "olivetin_group_specific" depending on which mapping you used
certBundlePath: "/path/to/mounted/certificate.pem"
insecureSkipVerify: true
connectTimeout: 15
```
You will need to restart OliveTin for the changes to take effect.
## [](#%5Ftesting)Testing
You should now be able to login to OliveTin using Authentik, on the OliveTin page, a "Login" link should be available in the top right corner. This will take you to the login form, where you can select the Authentik provider.

When clicking on the Authentik login button, you will be redirected to the Authentik login page which should look something like this;

Assuming that you have given permission to OliveTin to access your account, you should be redirected back to OliveTin and logged in. You can verify that you are logged in by checking the top right corner of the OliveTin page, where your username should be displayed.

## [](#%5Fdebugging)Debugging
OliveTin logs OAuth2 flows quite extensively. If you are having trouble with OAuth2, you should check your OliveTin logs.
You may see errors such as "OAuth2: Error getting user data" or "Failed to get field from user data".
Sometimes it can be infuriating to debug the user data mapping (username and usergroup), as you cannot easily capture the data that is being sent back from Authentik. To help with this, you can temporarily enable a debug log flag that is INSECURE (do not leave this enabled) to log the user data that is being sent back from Authentik. To do this, add the following to your OliveTin configuration file:
```yaml
logLevel: debug
insecureAllowDumpOAuth2UserData: true
```
Once you have this working, you can disable the `insecureAllowDumpOAuth2UserData` flag again. This is only meant for debugging purposes and should not be left enabled in production environments.
## [](#%5Fnext%5Fsteps)Next steps
Once you have OAuth2 working, you will probably want to configure access control lists in OliveTin. This is described in the [Access Control Lists](acl.html) documentation page.
OAuth2 - Pocket ID
====================
OliveTin has been tested with Pocket ID. This documentation page describes how to configure Pocket ID for use with OliveTin and assumes you already have Pocket ID installed and running.
## [](#%5Fconfiguration)Configuration
config.yaml
```yaml
authRequireGuestsToLogin: true
accessControlLists:
- name: admin
permissions:
view: true
exec: true
logs: true
matchUsergroups:
# Since you can't map properties in userinfo response from Pocket ID I am kind of cheating here:
# only I will be able to log in and so I return the "preferred_username" as the group, and I configure my
# own username as the "Usergroup" to mean "admin"
- myusername
addToEveryAction: true
authLocalUsers:
enabled: false
authOAuth2RedirectUrl: https://olivetin.example.com/oauth/callback
authOAuth2Providers:
pocket-id:
name: pocket-id
title: Pocket ID
icon: ''
authUrl: https://id.example.com/authorize
tokenUrl: https://id.example.com/api/oidc/token
whoamiUrl: https://id.example.com/api/oidc/userinfo
clientId: "[REDACTED]"
clientSecret: "[REDACTED]"
scopes:
- profile
- email
usernameField: preferred_username
userGroupField: preferred_username
insecureSkipVerify: true
actions:
- title: "Hello world!"
shell: echo 'Hello World!'
```
## [](#%5Fpocket%5Fid%5Fconfig)Pocket ID config

Trusted Header Authorization
====================
Trusted Header Authorization is useful if you have a proxy that handles authentication, and you just want OliveTin to trust HTTP Servers sent via that proxy.
This comes with the obvious security caveat that anyone who can set HTTP headers on requests to OliveTin can impersonate any user or usergroup. Therefore, you should only use this method if you are sure that requests to OliveTin are **only coming from trusted proxies**.
## [](#%5Fconfiguring%5Fyour%5Freverse%5Fproxy)Configuring your reverse proxy
You will need to configure your reverse proxy to set a header for the Username (eg `X-Username`) and optionally a header for Usergroup (eg `X-Usergroup`). How you do this will depend on your reverse proxy software. It is better that you check out the documentation for your reverse proxy software for how to set HTTP headers.
## [](#%5Fconfiguring%5Folivetin)Configuring OliveTin
To configure Trusted Header Authorization, set the following configuration options in your `config.yaml` file:
`config.yaml`
```yaml
authHttpHeaderUsername: "X-Username"
authHttpHeaderUsergroup: "X-Usergroup"
```
The value of `X-Username` and `X-Usergroup` can be whatever you like, as long as they match the headers set by your reverse proxy.
| | You **must** set AuthHttpHeaderUsername to some value, even if you only intend to use AuthHttpHeaderUsergroup, otherwise usergroups will be ignored. |
| ------------------------------------------------------------------------------------------------------------------------------------------------------- |
## [](#%5Fmultiple%5Fusergroups)Multiple usergroups
OliveTin will automatically detect multiple usergroups in the `authHttpHeaderUsergroup` header if they are separated by a space. You can also set a configuration option to use a different separator string with `authHttpHeaderUsergroupSep`. For example, if you set `authHttpHeaderUsergroupSep` to `,`, then the header `X-Usergroup: group1,group2` will be interpreted as two usergroups: `group1` and `group2`.
```yaml
authHttpHeaderUsergroupSep: ","
```
Solutions
====================
OliveTin was designed to be very simple, but sometimes OliveTin can get complex - especially if you are trying to do something where you need to jump between lots of different parts of the documentation!
This section of the docs is designed to bring everything into one place and present a scenario, with a single-page solution.
Advanced Troubleshooting
====================
Sometimes you need to really see what OliveTin is doing, especially when debugging entities. OliveTin has several built-in options for advanced troubleshooting, but enabling these output options can expose sensitive information, so they can be insecure.
| | OliveTin itself is not "insecure" by using these options, they would not let attackers execute different commands or anything like that. It’s just that using these options can expose data (like entity files) that maybe you don’t want an attacker to see. |
| ---------------------------------------------------------------------------------------------------------------------------------------------------------------------------------------------------------------------------------------------------------------- |
All these configuration options are `false` by default, and should be deleted from the config or reset back to `false` when you are not using them.
## [](#dump-sos)Dump SOS Reports
`InsecureAllowDumpSos: true` \- will allow dumping [SOS Reports](sosreport.html) as plain text when visiting ``
## [](#dump-action-map)Dump Action Map
`InsecureAllowDumpActionMap: true` \- will allow dumping all the actions (and those generated with entities) and their public IDs, eg: ``
## [](#dump-vars)Dump Vars
`InsecureAllowDumpVars: true` \- will allow dumping all the "string variables" from a map that is mainly used for entities, eg: ``
## [](#dump-jwt)Dump JWT Claims
`InsecureAllowDumpJwtClaims: true` \- will dump all the claims from a successfully parsed JWT token. This can be useful when trying to see how OliveTin is parsing the token, and what key fields are available.
Error Getting Buttons
====================
This is most often caused by not being able to get to /api/ properly - normally due to a bad proxy config, or your network was disconnected.
Error Fetching WebUI Settings
====================
This is a less common issue, but it means that the main web HTML has loaded, but it could not get \- most likely because of a 404 (Not Found) or JSON parse issue. You can see the exact reason if your browser as Web Developer Tools - look in the console. Firefox and Chrome both have great web developer tools, that can normally be opened with the F12 key, or from the developer tools menu.
The most common cause of this issue is a broken reverse proxy configuration. To debug this, browse to and adjust your reverse proxy configuration until the file loads properly. See [Reverse Proxies](../reverse-proxies/intro.html) for common configuration instructions.
An uncommon cause of this issue is if you are self-hosting the HTML outside of OliveTin. This is supported, but it means you will need to write the webUiSettings.json file manually. This is currently not documented as very very few people really need or want to do this. It’s very uncommon at the moment to self host the HTML outside of the OliveTin main server. Jump on the discord to discuss this if you want to do this, see [support](wheretofindhelp.html).
Error: JS Modules not supported
====================
This is most likely because you are using a very old browser, or have some Javascript disabled.
This page describes the compatible browsers for Javascript modules; .
There is no workaround for this apart from updating your browser / using a better browser, as OliveTin wants to be a progressive web app and doesn’t intend to support browsers without module support.
Error Connecting to WebSocket
====================
If OliveTin was working, but this error popped up, it’s most likely because your reverse proxy closed the connection due to a timeout.
If OliveTin is always displaying this error, it’s probably your reverse proxy not handling the websocket properly. Please check the Reverse Proxy documentation for more information.
Error: WebUI Version Mismatch
====================
This is most often caused by the WebUI Version not matching the server version.
Every release of OliveTin will change the version number for the server, and for the webui client - these versions should match. For example, version 2024.4.1 of the server should be paired with version 2024.4.1 of the webui client. It is unlikely that the release of the server and webui client will be out of sync, but it is possible if you are using a custom build of the webui client, but the most likely cause is **aggressive caching** of the webui client files in your browser, or proxy server.
There are cache-busting mechanisms built into OliveTin to try and avoid this error, but they don’t always work in every environment.
* Try forcing a refresh with "Ctrl+F5" in your browser.
* If that doesn’t work, try clearing your browser cache.
* If that doesn’t work, try using a different browser.
Exit code 127
====================
Exit code 127 on Linux typically means "command not found". This can be the case when you need to install command in a container image for example.
Debug Log Options
====================
```yaml
logDebugOptions:
singleFrontendRequests: true
singleFrontendRequestHeaders: true
aclMatched: true
aclNotMatched: true
```
PUID and PGID support
====================
The OliveTin container image does not use the PUID and PGID convention to specify which user the container should run as - this is a convention that was popularized by linuxserver.io, because their container images use supervisord. Instead, simply use the `--user` argument when defining the container, to change the user OliveTin runs as.
* [LSIO documentation for PUID and PGID, that says that \--user is the same thing](https://docs.linuxserver.io/general/understanding-puid-and-pgid)
An example is shown below;
Using --user
```shell
user@host: docker create --name olivetin -p 1337:1337 -v /etc/OliveTin/:/config:ro docker.io/jamesread/olivetin --user container:container
user@host: docker start olivetin
```
sosreport
====================
OliveTin has a useful feature to gather information about your installation that is useful when you’re asking for help - when you have a support request. If you are able to provide sosreport, this generally helps others help you a lot. The **sosreport** feature does NOT send any information to the developers or anybody else, it’s simply text - **copy and paste it** to where someone is trying to help you!
Example SOS Report
```yaml
### SOSREPORT START (copy all text to SOSREPORT END)
# Build:
commit: nocommit
version: dev
date: nodate
# Runtime:
os: linux
osreleaseprettyname: PRETTY_NAME="Fedora Linux 37 (Workstation Edition)"
arch: amd64
incontainer: false
lastbrowseruseragent: ""
# Config:
countofactions: 7
loglevel: INFO
### SOSREPORT END (copy all text from SOSREPORT START)
```
You can then copy and paste this text into a GitHub issue, discussion, Discord chat, or wherever else someone might be helping you.
## [](#%5Fhow%5Fdo%5Fi%5Fgenerate%5Fa%5Fsosreport)How do I generate a sosreport?
OliveTin needs to be able to startup and it’s API needs to be functional. Once OliveTin is started, simply browse to:
## [](#%5Foptional%5Fallow%5Finsecure%5Fbut%5Feasy%5Fdumping%5Fof%5Fsos%5Freports%5Fto%5Fthe%5Fbrowser)Optional: Allow insecure (but easy) dumping of SOS Reports to the browser
There is a configuration option you can set in your config.yaml that allows you to easily dump SOS Reports to your browser when visiting the API. This is turned off by default, as you should not allow anybody to request a sosreport at any time that they like, but you can enable this option temporarily to easily get access to the SOS Report.
`config.yaml`
```yaml
InsecureAllowDumpSos: true
```
## [](#%5Fdefault%5Fsos%5Freport%5Fdump%5Fto%5Flogs)Default: SOS Report dump to logs
You should get a simple JSON message saying something like;
```asciidoc
alert: "Your SOS Report has been logged to OliveTin logs."
```
If you see this, great! The actual contents of the sosreport are not returned to your browser for security reasons (guests could get info about your installation, etc).
To find the sosreport depends on how you are running OliveTin, if you are running in a container, then try `docker logs olivetin` (where "olivetin" is your container name). If you are running using systemd, then try `journalctl -eu OliveTin`.
## [](#%5Fwhat%5Fif%5Fi%5Fcannot%5Feven%5Fget%5Fto%5Fthe%5Folivetin%5Fapi)What if I cannot even get to the OliveTin API?
OliveTin’s web interface doesn’t need to be working to get a sosreport (as the web interface and the API are separate). However, if OliveTin won’t even startup, or you cannot seem to get to the API, then sadly a sosreport can’t help you. Please do specify that when you ask for help.
Where to find help
====================
To get relatively quick access to help, **Discord** is where the chat community for OliveTin is. Note that this project is a free community open source project, and it relies on volenteers to spare their free time to help you. Please be patient and polite.
 [Chat on Discord](https://discord.gg/jhYWWpNJ3v)
If nobody is online, or you’re not getting the right level of support, you can raise a ticket with the project’s developers on GitHub. Again, please be patient and polite.
 [Open a support request on GitHub](https://github.com/OliveTin/OliveTin/issues/new?assignees=&labels=support&template=support%5Frequest.md&title=)
Understanding OliveTin 2k vs 3k
====================
| | OliveTin 3k is basically "rebuilding OliveTin for the future" - and aims to have high compatibility with OliveTin 2k while people migrate. However, as we all know, stuff will break when 3k is new - so please be patient, and report issues as you find them! OliveTin 2k isn’t going anywhere anytime soon! |
| ----------------------------------------------------------------------------------------------------------------------------------------------------------------------------------------------------------------------------------------------------------------------------------------------------------------- |
## [](#%5Fquick%5Fsummary%5Fof%5Fkey%5Fpoints)Quick summary of key points
| Release Series | Versioning Scheme | Supported Until |
| --------------------------------------------- | ---------------------------- | ----------------------------------------------------------------- |
| **OliveTin 2k** eg: 2022.11.11 eg: 2023.04.15 | Calendar Versioning (calver) | At least 31st December 2028 (bug fixes and security updates only) |
| **OliveTin 3k** eg: 3000.0.0 eg: 3000.1.0 | Semantic Versioning (semver) | Ongoing - new features and updates |
Users who are upgrading are encouraged to try OliveTin 3k, but understand that it represents several major technology changes, so subtle things might change or break in the first few releases. The objective is to maintain as much compatibility as is pragmatically possible, and highlight any breaking changes clearly.
The main reason for OliveTin 3k is to allow for major technology changes inside the project that enable new features at a later date.
## [](#%5Funderstanding%5Fwhy%5Fa%5Fchange%5Fwas%5Fnecessary%5Ffrom%5Fcalver%5Fto%5Fsemver)Understanding why a change was necessary - from calver to semver
The original version of OliveTin was released in May 2021, and it used a versioning system called [calver](https://calver.org) (Calendar Versioning). For those of you unfamiliar with the calver standard, it means that instead of using 1.0.0 as the first version, the first version was actually called **2021-05-19**. One of the benefits of this approach is that you can determine how old the version is just by looking at the version number alone. Unfortunately this is the only real benefit.
However, this worked just fine for a while, but as OliveTin grew, it became clearer that most packaging systems and users were more accustomed to the more traditional [semver](https://semver.org) (Semantic Versioning) system. As a stopgap measure, OliveTin switched the format of it’s versioning to use dots (".") instead of dashes ("-") in an attempt to make it look more like a traditional semver version. This resulted in a change with version **2022.11.11** (November 11th, 2022 - what a cool date!).
As OliveTin continued to mature, and more features were added, it became clear that there were some major architecture and library choices that were no longer ideal. Switching these out (like the configuration library, Viper), is a really major change, and isn’t something that is good to do without a lot of users being very aware of it. In May 2025, a proposal was launched to switch OliveTin to a more traditional semver versioning system. You can view the detail of that proposal here:
In short, the benefits of switching to semver are;
* Easier to understand versioning for most users
* Allows for major technology changes without confusing users (like the Viper change)
* Better compatibility with packaging systems
* Better reflects the maturity of versions, and allows people to opt out of minor patches for example
This proposal seemed to be positively received by the community, and so the James (founder) decided to move forward with the change.
## [](#%5Fwhat%5Fwere%5Fthe%5Fmajor%5Freasons%5Ffor%5Fthe%5Ftechnology%5Fchanges%5Fin%5Folivetin%5F3k)What were the major reasons for the technology changes in OliveTin 3k?
OliveTin 2k has the following technology choices which limited it’s potential for stability, maintainability and growth;
* The communication between the client and the server uses gRPC, which is then fronted by a REST API and messages are very hackily wrapped in JSON. This has worked remarkably well, but the web has moved on to offer websockets and streaming in a far better way, and connectrpc solves many of these challenges neatly and elegantly.
* The configuration library, Viper, is a defacto standard in Go several years ago - big projects like kubectl and others use it. However the library is extremely heavyweight (lots of dependencies), it has lots of open issues, and doesn’t support some commonly requested features like configuration file splitting and inclusion - which would really help user’s manage large configurations.
* The entity management inside OliveTin was written in a weekend, and is just a large map of strings inside OliveTin2k, again this has worked surprisingly well, but there are lots of interesting use cases with entities that would be much easier to implement with a proper typed backend - and far better mapping between actions and entities (which is extremely horrible in OliveTin 2k).
* The javascript in OliveTin 2k is raw web components, based on the "new" (at the time) specs from 2011\. It’s fast and standards compliant, but it’s also resulted in a LOT of spaghetti code that is very hard to test and maintain.
## [](#%5Fwhy%5Fversion%5F3000%5F0%5F0%5Fand%5Fnot%5F3%5F0%5F0)Why version 3000.0.0 (and not 3.0.0)?
If you look through the original proposal, it was to create a new package called "OliveTin-semver", and start the versioning at 1.0.0\. However, after some more thought, it was decided that this would actually create a lot of confusion, as users would have to figure out if they were using "OliveTin" or "OliveTin-semver" - and it duplicates the package in in places like Linux distributions, which is not a good idea.
However, starting with version "2.0.0" after versions like "2022.11.11" would break the logic of lots of update tools and scripts that people use. This is because major version "2" is below "2022", and so the version ordering, and logic would always think that version 2022.x.x is newer than 2.x.x. This would be very confusing for users, and would likely lead to people not updating, or even downgrading by mistake.
To avoid this confusion, it was decided to jump straight to version "3000.0.0" - which is clearly above "2022.11.11" and any other 2k version. This way, users can easily see that 3000.x.x is newer than any 2k version, and it avoids any confusion with version ordering.
* OliveTin versions like 2022.11.11 and 2023.04.15 are part of "**OliveTin 2k**" (2000 series) and use a **calendar versioning** (calver) scheme. These versions are stable and will continue to receive updates and support but will not receive new features.
* There is no plan to stop supporting OliveTin 2k versions until **at least 31st December 2028** (and I’ll probably keep extending that date, but it’s good to have a cutoff somewhere).
* OliveTin versions starting from 3000.0.0 and onwards are part of "**OliveTin 3k**" (3000 series) and also use a **semantic versioning scheme**. These versions will receive new features, improvements, and updates.
## [](#%5Fshould%5Fi%5Fautomatically%5Fupdate%5Fto%5Folivetin%5F3k)Should I automatically update to OliveTin 3k?
Users are encouraged to try OliveTin 3k, but understand that it represents several major technology changes, so subtle things might change or break in the first few releases. Please remember that OliveTin 2k will continue to be supported and receive updates until at least 31st December 2028, so there is no rush to upgrade.
The developers of this project have quite a lot of test infrastructure around OliveTin 3k (more than was possible with 2k), and would like to **strongly urge problems with updates to be reported, so that they can be fixed when possible**.
### [](#%5Fhow%5Fdo%5Fi%5Fstop%5Fmy%5Folivetin%5F2k%5Fcontainers%5Ffrom%5Fupgrading%5Fto%5Folivetin%5F3k%5Fautomatically)How do I stop my OliveTin 2k containers from upgrading to OliveTin 3k automatically?
Change your `latest` tag to `latest-2k` in your container definitions.
3 tags now exist for container images and container registries;
* `olivetin/olivetin:latest-2k` \- This tag will always point to the latest OliveTin 2k version (eg 2025.11.11)
* `olivetin/olivetin:latest-3k` \- This tag will always point to the latest OliveTin 3k version (eg 3000.2.0)
* `olivetin/olivetin:latest` \- This tag will always point to the latest OliveTin version (currently 3k)
[More information about installing OliveTin in containers](../install/container.html)
### [](#%5Fwhat%5Fdoes%5Fgithub%5Flatest%5Fpoint%5Fto)What does GitHub "latest" point to?
GitHub’s "latest" release tag isn’t super helpful. It currently points to the "release that was pushed last". So sometimes this will be 2k, and sometimes this will be 3k. We’re trying to find a way to fix this.
## [](#%5Fwhat%5Fare%5Fthe%5Fchanges%5Fi%5Fneed%5Fto%5Fmake%5Fto%5Fupgrade%5Ffrom%5Folivetin%5F2k%5Fto%5F3k)What are the changes I need to make to upgrade from OliveTin 2k to 3k?
### [](#%5Folivetin%5Fconfiguration%5Ffiles)OliveTin Configuration files
To date, no changes are required to the configuration file (and configs are being automatically migrated internally to OliveTin 3k - without rewriting the original config file).
However, it is possible that some configuration changes will be necessary as we learn more about people’s setups with OliveTin 2k.
### [](#%5Freverse%5Fproxy%5Fconfigurations)Reverse Proxy configurations
If you are using a reverse proxy (like Nginx, Apache, Caddy, Traefik etc), then you will need to make some changes to your configuration. This is because OliveTin 3k uses websockets for communication between the client and the server, instead of gRPC over HTTP/2.
Please refer to the \[Reverse Proxies\](reverse-proxies/intro.adoc) section of the documentation for updated configuration examples for various reverse proxies.
* [Nginx: Updating your configuration from OliveTin 2k to OliveTin 3k](../reverse-proxies/nginx.html#upgrade3k)
Warning - GitHub Latest
====================
GitHub has a handy feature where releases can be marked as "latest". However, it does not understand that some projects, like OliveTin, have **two** active release streams, [2k and 3k](2k3k.html). Both of those individual streams can have a "latest" - the latest 2k version and the latest 3k version. Unfortunately, GitHub does not provide a way to mark a release at "latest-2k" or "latest-3k" - it only has "latest".
It often happens that a 2k release will come out AFTER a 3k release, and if we left GitHub to do what it does by default, the "latest" URL would be the 2k version - and then when a 3k release goes out, the "latest" URL would be point to a 3k version. This is probably not what you want - "latest" flipping between the "last release that went out". You want it to point to the latest 3k version.
Therefore, the OliveTin project has disabled "latest" releases for all the 2k versions, so that the GitHub "latest" URL will always be the latest 3k version.
This means that **GitHub "latest" URLs will now always point to a 3k version** (eg: `` \= 3k version).
| | If you have been using a script to download the latest version of OliveTin, **you will need to accept 3k, OR update your script to use the new workaround described below.** |
| ------------------------------------------------------------------------------------------------------------------------------------------------------------------------------- |
## [](#%5Fcontainer%5Ftags%5Fare%5Funaffected)Container Tags are unaffected
Container registries allow any number of arbitary tags, so containers DO have a "latest-2k" and "latest-3k" tags. The breaking change described above is only for GitHub release URLs. So, you can still pull the latest 2k or 3k version of the container if you want to. Learn more about available tags in the [Container Installation Guide](../install/container.html).
## [](#%5Fwhat%5Fif%5Fi%5Fwant%5Fto%5Fuse%5Fthe%5Flatest%5F2k%5Fdownload%5Furl%5Fin%5Fmy%5Fscripts)What if I want to use the "latest 2k" download URL in my scripts?
It is understood that some users will want to hard-code a "wget URL" for the latest 2k version into their scripts. Unfortunately the GitHub "latest" URL is now no longer a reliable way to do this. However, the OliveTin project has provided you with a workaround.
In the repository OliveTin/update-check.olivetin.app, there is a Python script that will return the latest 2k version number. You can use this to construct a URL for the latest 2k version. The file `versions.json` also contains the latest 3k versions, and provides download URLs and checksums for each package.
* [versions.json in the update-check.olivetin.app repository](https://raw.githubusercontent.com/OliveTin/update-check.olivetin.app/refs/heads/main/versions.json)
This repository is updated automatically whenever a new 2k or 3k version is released, so you can be sure that the URL you use will always point to the latest version. Please check this repository README for details on how to use this file in your scripts to get the relevant download URLs;
* [update-check.olivetin.app README](https://github.com/OliveTin/update-check.olivetin.app/tree/main)
Upgrade Notes
====================
OliveTin releases are published to GitHub, and the release notes are contained there. This page includes a summary of "Upgrade Notes" for breaking changes between releases.
## [](#%5F2024%5F08%5F14)2024.08.14
### [](#%5Fnavigation%5Fchange%5Fsubpaths%5Fno%5Flonger%5Fsupported)Navigation change - Subpaths no longer supported
In the past, OliveTin supported subpaths in the URL, for example, `` would load the OliveTin web interface. This was convenient for people who wanted to run OliveTin on a subpath of their domain for some reason, but it actually creates a lot of complexity in the code, and makes it harder to maintain. One particular change that was wanted was to be able to link to specific pages in OliveTin, for example, `` or `` \- this became incredibly difficult to implement with the subpath support.
Therefore, OliveTin no longer supports subpaths in the URL. If you have been using OliveTin with a subpath, you will need to change your configuration to use a subdomain or a different port.
## [](#%5F2024%5F04%5F09)2024.04.09
### [](#%5Fthemes%5Fdirectory%5Ffor%5Ftheme%5Fusers)Themes Directory (for theme users)
#### [](#%5Fbackground)Background
Until now, OliveTin has served the themes directory from the "webui" directory, normally `/var/www/olivetin/themes` on most installations. If you wanted to install a theme, you would put the theme in to that directory.
This was a bit cumbersome, because OliveTin treats the content of the "webui" directory as disposable / part of the system, whereas themes are much more like "user data" and "configuration". It also meant that people using Linux Containers had to bind-mount a separate directory for themes.
#### [](#%5Fupgrade)Upgrade
Now themes are stored in the "configdir" (wherever OliveTin finds it’s config file, eg `/config` in containers), under the subdirectory `custom-webui/themes`. OliveTin will try to create the `custom-webui` folder in your configdir if it doesn’t find it.
The advantage of this change is that themes are stored with your config, as part of your data.
To upgrade, simply move any themes you might have into your configdir, under `custom-webui/themes/`. eg:
```yaml
.
├── config.yaml
├── custom-webui
│ └── themes
│ └── custom-icons
│ ├── icon.png
│ └── theme.css
├── entities
│ ├── containers.json
│ ├── heating.yaml
│ ├── servers2.yml
│ ├── servers.yaml
│ └── systemd_units.json
└── installation-id.txt
```
### [](#%5Ftheme%5Fasset%5Fpaths%5Ffor%5Ftheme%5Fdevelopers)Theme Asset Paths (for theme developers)
#### [](#%5Fbackground%5F2)Background
OliveTin had to send the theme name to the browser, so that some javascript could then request ``, and load it as a stylesheet. This had the following problems;
1. This was slow (could take up to a second)
2. This creates a "flash" in the browser, as the new theme.css is loaded over the top of the existing stylesheet.
3. Browsers could not cache this theme.css with the page load.
#### [](#%5Fupgrade%5F2)Upgrade
The new behavior is that OliveTin will always try to load `` as part of the static HTML that is sent to the browser. This means that regular caching can cache the theme.css, and this effectively elliminates the slowness and "flashing" when the browser renders the page.
Internally, OliveTin maps `` to the `theme.css` of whatever the theme is set to with `themeName`, for example, it could map to `themes/myTheme/theme.css`.
As a theme developer, normally you would reference a background image, or similar using `./background.png`, but OliveTin is loading the theme.css as the directory root, and the themes' assets from the custom-webui theme directory. Therefore you need to update paths to be like; `background-image: "/custom-webui/themes/myTheme/background.png`.
Cloudflare Access & Tunnels
====================
| | This page is marked as "earlydoc", which means that it more of a collection of notes and an early draft before this page turns into good documentation later on. It is hoped that this early form of documentation is useful to you, but please understand that most documentation pages are higher quality than this. If you have suggestions or comments, please do get in contact or consider contributing your suggestions to the OliveTin documentation. |
| ---------------------------------------------------------------------------------------------------------------------------------------------------------------------------------------------------------------------------------------------------------------------------------------------------------------------------------------------------------------------------------------------------------------------------------------------------------------- |
Several uses use Cloudflare Access & Tunnels to grant access to OliveTin. There is no special configuration needed for OliveTin to work in this way, simply setup your Cloudflare tunnel to connect to OliveTin on port 1337.
## [](#%5Ftrusting%5Fthe%5Fcloudflare%5Fjwt%5Ftoken)Trusting the Cloudflare JWT Token
1. Get your **AUD** Tag (`authJwtAud`)
1. Login to your CloudFlare dashboard and go to [**Zero Trust**](https://one.dash.cloudflare.com/)
2. Go to **Access > Applications.**
3. Select **Configure** for your application.
4. On the Overview tab, copy the **Application Audience (AUD) Tag**.
2. Get your **Team Domain** (`authJwtDomain`)
1. Login to your CloudFlare dashboard and go to [**Zero Trust**](https://one.dash.cloudflare.com/)
2. Go to **Settings**
3. Go to **Custom Pages**
4. Your **Team Domain** is shown here
3. Get your Certs URL (`authJwtCertsURL`)
1. Simply add `cdn-cgi/access/certs` to your **Team Domain** for CloudFlare
4. CloudFlare gives you an `email` in the claim (`authJwtClaimUsername`) and the Cookie is always called `CF_Authorization` (`authJwtCookieName`)
5. Setup your OliveTin config.yaml like follows;
`config.yaml`
```yaml
authJwtAud: "asdf1234"
authJwtDomain: "https://mydomain.cloudflareaccess.com"
authJwtCertsURL: "https://mydomain.cloudflareaccess.com/cdn-cgi/access/certs"
authJwtClaimUsername: email
authJwtCookieName: "CF_Authorization"
```
You may well want to set `logLevel: DEBUG` and `insecureAllowDumpJwtClaims: true` in your config when testing JWT for the first time.
## [](#%5Ftrusting%5Fthe%5Fauthentication%5Fheader%5Fnot%5Frecommended)Trusting the authentication header (not recommended)
If you are using Cloudflare Access, and want to use the username given by Cloudflare in OliveTin ACLs, then you can use the Cloudflare cookie like this;
`config.yaml`
```yaml
authHttpHeaderUsername: "Cf-Access-Authenticated-User-Email"
defaultPermissions:
view: false
exec: false
accessControlLists:
- name: Admins
addToEveryAction: true
matchUsernames:
- contact@jread.com
permissions:
view: true
exec: true
actions:
- title: test apprise
shell: date
shellAfterCompleted: "apprise -c /config/apprise.yml -t 'notification: test' -b 'date is {{ stdout }}'"
```
| | OliveTin does support JWT cookies that Cloudflare uses, which is arguably more secure. It’s just that nobody in the Discord has worked out how to get the keys needed from Cloudflare to decrypt this cookie yet! See the [JWT](../../security/jwt.html) documentation for some starter points. If you figure this out, it would be most welcome to share your solution with the community. |
| ---------------------------------------------------------------------------------------------------------------------------------------------------------------------------------------------------------------------------------------------------------------------------------------------------------------------------------------------------------------------------------------------- |
Container Control Panel
====================
OliveTin is frequently used to create simple container control panels, this is one of the default examples that ships with the standard OliveTin config.yaml.

## [](#%5Fsetup%5Fif%5Frunning%5Finside%5Fa%5Fcontainer)Setup if running inside a container
You can control other containers, when running OliveTin inside a container itself, however you need to do some extra setup when creating the OliveTin container.
### [](#%5Fensure%5Fyour%5Fcontainer%5Fhas%5Fpermissions%5Fto%5Fcontrol%5Fdocker)Ensure your container has permissions to control docker
You have two alternatives to allow OliveTin (running inside a container) to talk to the Docker daemon through the bind-mounted socket. Pick one:
#### [](#%5Foption%5F1%5Fuse%5Fprivileged%5Fsimplest)Option 1 — Use `--privileged` (simplest)
| | Simplest for most users. Podman does not have this requirement. |
| ------------------------------------------------------------------ |
* Run the container with `--privileged` and as `root` (eg `--user root`).
* This avoids user/group permission issues on `/var/run/docker.sock`.
If you are getting "permission denied" errors it is probably because OliveTin runs as user UID 1000 by default, which is not allowed by your docker host. Running with `--user root` under `--privileged` resolves this quickly. Note that [PUID and PGID variables will not work](#no-puid-pgid).
#### [](#%5Foption%5F2%5Frun%5Fas%5Fnon%5Froot%5Fin%5Fthe%5Fhost%5Fdocker%5Fgroup%5Fno%5Fprivileged)Option 2 — Run as non-root in the host `docker` group (no `--privileged`)
Use the standard Docker guidance to manage Docker as a non-root user (becoming a member of the `docker` group) and match the group’s GID inside the container so the process can access the socket permissions.
* Docs: [Manage Docker as a non-root user](https://docs.docker.com/engine/install/linux-postinstall/#manage-docker-as-a-non-root-user)
* Find the `docker` group GID on the host, for example using `getent group docker`.
* Run the container with your user UID and the `docker` group GID, and bind-mount the socket. Using Compose:
docker-compose.yml
```yaml
services:
olivetin:
container_name: olivetin
image: jamesread/olivetin
user: ${UID}:${docker_group_id}
volumes:
- /var/run/docker.sock:/var/run/docker.sock
```
Where `UID` and `docker_group_id` are provided via your shell environment or a `.env` file next to your Compose file, for example:
env
```bash
UID=1000
docker_group_id=995
```
This allows you to run the container as a non-root user, while still allowing access to `/var/run/docker.sock`.
### [](#%5Fpass%5Fthe%5Fdocker%5Fsocket%5Finto%5Fthe%5Fcontainer)Pass the docker socket into the container
1. Pass `/var/run/docker.sock` as a bind mount to the container when creating it, eg:
```asciidoc
docker create --privileged --user root -v /var/run/docker.sock:/var/run/docker.sock ...additional args here...
```
Or, using the `docker run` syntax;
```asciidoc
docker run --privileged --user root -v /var/run/docker.sock:/var/run/docker.sock --name OliveTin jamesread/olivetin
```
2. The official x86\_64 docker container comes with the `docker` client pre-installed. If you are using `arm` or and `arm64` container, you will need to add Docker yourself.
[How to install additional packages in the container](../../reference/containerInstallPackages.html)
| | The reason that the arm and arm64 containers do not include docker, is that when these images are cross-compiled at build time, it takes FOREVER because we have to emulate arm. |
| ----------------------------------------------------------------------------------------------------------------------------------------------------------------------------------- |
After you have passed the socket into the container (and optionally installed docker), you should be able to setup docker actions like it’s shown in the example [above](#example-control-containers).
## [](#%5Fentity%5Ffile)Entity file
To build this Container Control dashboard, we use an [entity file](../../entities/intro.html) that stores and updates produced by `docker ps --format json > /etc/OliveTin/entities/containers.json`
`/etc/OliveTin/entities/containers.json`
```yaml
{"Command":"\"/bin/bash\"","CreatedAt":"2024-02-28 22:33:35 +0000 GMT","ID":"fcf468e18a0e","Image":"fedora","Labels":"maintainer=Clement Verna \u003ccverna@fedoraproject.org\u003e","LocalVolumes":"0","Mounts":"","Names":"minecraft","Networks":"bridge","Ports":"","RunningFor":"3 minutes ago","Size":"0B","State":"created","Status":"Created"}
{"Command":"\"/bin/bash\"","CreatedAt":"2024-02-23 23:18:57 +0000 GMT","ID":"442dd6fe316a","Image":"fedora","Labels":"maintainer=Clement Verna \u003ccverna@fedoraproject.org\u003e","LocalVolumes":"0","Mounts":"","Names":"brave_shirley","Networks":"bridge","Ports":"","RunningFor":"4 days ago","Size":"0B","State":"created","Status":"Created"}
```
You can generate this file yourself the first time, but the `config.yaml` below shows how OliveTin can run the `docker ps` command on startup, and on a schedule to update the file.
## [](#%5Fconfiguration)Configuration
Then use the following configuration file;
`config.yaml`
```yaml
# This config has two actions which are applied to all "container" entities
# found in the entity file.
#
# Docs: http://localhost/docs.olivetin.app/docs/entities.html
actions:
- title: Start {{ container.Names }}
icon: box
shell: docker start {{ container.Names }}
entity: container
triggers:
- Update container entity file
- title: Stop {{ container.Names }}
icon: box
shell: docker stop {{ container.Names }}
entity: container
triggers:
- Update container entity file
# This is a hidden action, that is run on startup, and every 5 minutes, and
# when the above start/stop commands are run (see the `triggers` property).
- title: Update container entity file
shell: 'docker ps -a --format json > /etc/OliveTin/entities/containers.json'
hidden: true
execOnStartup: true
execOnCron: '*/5 * * * *'
# Docs: http://docs.olivetin.app/entities.html
entities:
- file: /etc/OliveTin/entities/containers.json
name: container
# The only way to properly use entities, are to use them with a `fieldset` on
# a dashboard.
dashboards:
# This is the second dashboard.
- title: My Containers
contents:
- title: 'Container {{ container.Names }} ({{ container.Image }})'
entity: container
type: fieldset
contents:
- type: display
title: |
{{ container.RunningFor }}
{{ container.State }}
- title: 'Start {{ container.Names }}'
- title: 'Stop {{ container.Names }}'
```
Directory Actions
====================
Sometimes people want to use OliveTin to run standard commands on a directory, such a cleaning out a directory of logs.

## [](#%5Fconfig%5Ffile)Config file
This is a quick and simple way to build actions based on directories.
`/etc/OliveTin/config.yaml`
```yaml
actions:
- title: check log directory
hidden: true
shell: |
function addDirectory {
COUNT=$(ls -l $1 | wc -l)
echo "- directory: $1" >> /etc/OliveTin/entities/directories.yaml
echo " count: $COUNT" >> /etc/OliveTin/entities/directories.yaml
}
truncate -s 0 /etc/OliveTin/entities/directories.yaml
addDirectory /var/log/
addDirectory /home/xconspirisist/logs
execOnStartup: true
execOnCron: "* * * * *"
- title: clean {{ log_directory.directory }} ({{log_directory.count }} files)
shell: |
echo "Removing all files in {{ log_directory.directory }}"
entity: log_directory
entities:
- name: log_directory
file: /etc/OliveTin/entities/directories.yaml
dashboards:
- title: Log Actions
contents:
- entity: log_directory
type: fieldset
contents:
- title: clean {{ log_directory.directory }} ({{log_directory.count }} files)
```
Heating Control Panel
====================
This was inspired by a GitHub issue to control heating;

## [](#%5Fentity%5Ffile)Entity file
To build this, we use an [entity file](../../entities/intro.html) that stores and updates the status of a heater outside of OliveTin.
`/etc/OliveTin/entities/heating.yaml`
```yaml
- title: Main heater
temperature: 20 degrees
```
## [](#%5Fconfiguration)Configuration
Then use the following configuration file;
`config.yaml`
```yaml
logLevel: "INFO"
actions:
- title: Turn heating up
icon: '🔼'
shell: /opt/heating.sh up
- title: Turn heating down
icon: '🔽'
shell: /opt/heating.sh down
entities:
- file: /etc/OliveTin/entities/heating.yaml
name: heating
dashboards:
- title: Heating Control Panel
contents:
- title: "{{ heater.title }}"
entity: heating
type: fieldset
contents:
- type: display
title: |
🌡
{{ heating.temperature }}
- title: Turn heating up
- title: Turn heating down
```
Solution: Kubernetes Control Panel (Hosted)
====================
This solution gives you quick and easy buttons to run kubectl commands, when OliveTin is running on top of Kubernetes (this means OliveTin is "hosted" by Kubernetes). This can be very easy for quick debugging purposes when you cannot type (eg from a mobile phone), or to give junior sysadmins access to do basic predefined tasks.
This use case is enabled by simply providing the OliveTin pod access to talk to the kubernetes API, and using `kubectl` which is preinstalled with modern versions of OliveTin.

## [](#%5Frequirements%5Fassumptions)Requirements & Assumptions
### [](#%5Ftime%5Fskills)Time & skills
* This should take approximately **10 minutes** to configure if you are comfortable in using Kubernetes - using helm, kubectl, and editing basic YAML.
### [](#%5Fenvironment)Environment
* A Kubernetes cluster that is up and running.
* Kubernetes permissions to create a helm deployment, a `ClusterRole` and `ClusterRoleBinding`.
* A configured Ingress Controller, exposing the for web interface
### [](#%5Fsystem)System
* Approximately 128m RAM, 1vCPU to run the OliveTin pod.
## [](#%5Finstall%5Folivetin%5Fon%5Ftop%5Fof%5Fkubernetes)Install OliveTin on top of Kubernetes
* [Install OliveTin on Kubernetes with Helm](../../install/helm.html) (recommended)
* [Install OliveTin on Kubernetes with Manifests](../../install/k8s.html)
## [](#%5Fgrant%5Fpermissions%5Fto%5Fapi)Grant permissions to API
OliveTin needs a `ClusterRole` that allow it to access resources on your Kubernetes cluster. This is because by default, pods can communicate to the API using the credentials mounted in the pod by the default `ServiceAccount`, but they don’t have any permissions. This `ClusterRole` is being created to give permissions to the `ServiceAccount`. Create the `ClusterRole` like follows;
* kubectl cli
* manifest
```shell
user@host: kubectl create clusterrole --resource=pods --verb=get,list,watch olivetin-k8s-permissions
```
```yaml
kind: ClusterRole
apiVersion: rbac.authorization.k8s.io/v1
metadata:
name: olivetin-k8s-permissions
rules:
- apiGroups: [""]
resources: ["pods"]
verbs: ["get", "list", "watch"]
```
Now that the `ClusterRole` has been created, we need to associate it to a `ServiceAccount` with a `ClusterRoleBinding`. Create a cluster role binding;
* kubectl cli
```shell
user@host: kubectl create clusterrolebinding --clusterrole=olivetin-k8s-permissions --serviceaccount myolivetinnamespace:default --namespace myolivetinnamespace olivetin-crb
```
## [](#%5Fbuild%5Fa%5Fsimple%5Fkubernetes%5Fcontrol%5Fplanel)Build a simple kubernetes control planel
Add `kubectl` job to OliveTin config with `kubectl edit cm/olivetin-config -n olivetin`;
```yaml
apiVersion: v1
data:
config.yaml: |
defaultPopupOnStart: execution-dialog-output-only
actions:
- title: get pods
icon:
shell: kubectl get pods
- title: restart postgres deployment
icon:
shell: kubectl rollout restart deployment postgres
- title: evacuate node
icon:
shell: kubectl drain {{ NodeName }} --ignore-daemonsets --delete-emptydir-data
arguments:
- name: NodeName
choices:
- value: node1
- value: node2
- value: node3
kind: ConfigMap
metadata:
annotations:
meta.helm.sh/release-name: olivetin
meta.helm.sh/release-namespace: default
labels:
app.kubernetes.io/managed-by: Helm
name: olivetin-config
namespace: default
```
Don’t forget to restart the OliveTin deployment as good measure, because Kubernetes can be slow to update configmaps.
GitOps (run actions on Git Push)
====================

A really helpful thing to do with OliveTin is to have it run actions when you push to a Git repository. This is a great way to automate things like running tests, building your project, or deploying your code - this turns OliveTin into a powerful GitOps tool, or even a Continuous Integration tool.
This guide assumes that you are using a self-hosted Git repository, and uses a standard Git `post-receive` hook to trigger OliveTin actions. If you are using a hosted Git service like GitHub, GitLab, or Bitbucket, you will need to check their documentation for how to trigger actions on push.
To set up OliveTin to run actions on Git push, you will need to:
1. Create a new OliveTin action that you want to run on push.
2. Set up a Git `post-receive` hook to trigger the OliveTin action.
## [](#%5Fcreate%5Fa%5Fnew%5Folivetin%5Faction)Create a New OliveTin Action
First, you will need to create a new OliveTin action that you want to run when you push to your Git repository. This could be anything you like - for example, running tests, building your project, or deploying your code. The example below is a simple action that echoes a message to the console:
OliveTin `config.yaml`
```yaml
actions:
- title: Run on Git Push
id: gitops
icon:
shell: |
echo "You just pushed commit $COMMIT to git, running action..."
date
arguments:
- name: commit
type: ascii
```
Note that OliveTin will expose all arguments as environment variables in uppercase as shown in the example above. You can of course use the `{{ commit }}` syntax instead and it will do the same thing.
## [](#%5Fadd%5Fa%5Fgit%5Fhook%5Fscript)Add a Git hook script
The following below assumes that you have a Git repository initialized as a bare repository, at `/opt/myrepo.git`. If you have a different repository location, you will need to adjust the paths accordingly.
First, create a new file at `/opt/myrepo.git/hooks/post-receive` with the following contents:
Script: `myrepo.git/hooks/post-receive`
```bash
#!/bin/bash
read OLDREV NEWREV REFNAME
CHANGED_FILES=$(git diff --name-only $OLDREV $NEWREV)
commit_contains_path() {
local filename=$1
if echo "$CHANGED_FILES" | grep -q "$filename"; then
return 0 # True
else
return 1 # False
fi
}
function run_olivetin_action() {
local ACTION_NAME=$1
echo "Requesting OliveTin job $ACTION_NAME"
OLIVETIN_REQUEST="$(cat <`. Just before that code statement, add this code, save and close the file.
```html
```
You will need to this every time you upgrade OliveTin.
3. Create the `password.js` using the code below, at `/etc/OliveTin/custom-webui/password.js`.
`password.js`
```javascript
const myPassword = 'sekrit'
const domMain = document.getElementsByTagName('main')[0]
domMain.style.display = 'none'
const domPassword = document.createElement('input')
const domLogin = document.createElement('button')
function checkPassword () {
if (domPassword.value === myPassword) {
domMain.style.display = 'block'
domPassword.remove()
domLogin.remove()
} else {
window.alert('Incorrect password. Please try again.')
}
}
function setupPasswordForm () {
domPassword.setAttribute('type', 'password')
domPassword.addEventListener('keydown', (e) => {
if (e.key === 'Enter') {
checkPassword()
}
})
domLogin.innerText = 'Login'
domLogin.onclick = checkPassword
const domHeader = document.querySelector('header')
domHeader.appendChild(domPassword)
domHeader.appendChild(domLogin)
}
document.addEventListener('DOMContentLoaded', setupPasswordForm)
```
Systemd Control Panel
====================
OliveTin can be used to manage selected systemd units (services) as well. This is powered by OliveTin’s powerful [entity support](../../entities/intro.html). Here is a screenshot of what that can look like (dark theme preference enabled).

| | To control systemd, you will need the root user. If you are running OliveTin systemd service itself, then OliveTin should be configured to run as root. The alternative is to use OliveTin in a container, and use [SSH](../../action%5Fexamples/ssh-easy.html) to connect back to the host (as a user that can manage systemd -usually root). This is not an OliveTin limitation, it’s just how systemd security works. |
| --------------------------------------------------------------------------------------------------------------------------------------------------------------------------------------------------------------------------------------------------------------------------------------------------------------------------------------------------------------------------------------------------------------------------- |
## [](#%5Fentity%5Ffile)Entity file
To build this Systemd Control dashboard, we use an [entity file](../../entities/intro.html) that stores and updates produced by `systemctl list-units..`, output to a json format, and then filtered with jq (JSON Query). Here is the full command that we will use in our config later;
```asciidoc
user@host: systemctl list-units -a -o json --no-pager | jq -c 'map(select (.unit | contains ("upsilon", "podman", "boot.mount"))) | .[]' > /etc/OliveTin/entities/systemd_units.json
```
That command will generate a file (example shown below). Let’s break down that long command a little bit to explain what it is doing;
1. `systemctl list-units -a -o json --no-pager` \- will list units, regardless of status - started, stopped, etc (`-a`), in JSON format, and output the results
2. `jq` (JSON Query) will select units from that output that match "upsilon", "podman", "boot.mount", and of course you can change this expression to add your own services.
3. The `map()` and `.[]` parts of the expression basically just put those units line by line into the file
An example generated `/etc/OliveTin/entities/systemd_units.json` file
```json
{"unit":"boot.mount","load":"loaded","active":"active","sub":"mounted","description":"/boot"}
{"unit":"podman.service","load":"loaded","active":"inactive","sub":"dead","description":"Podman API Service"}
{"unit":"upsilon-drone.service","load":"loaded","active":"active","sub":"running","description":"upsilon-drone"}
{"unit":"podman.socket","load":"loaded","active":"active","sub":"listening","description":"Podman API Socket"}
```
You can generate this file yourself the first time, but the `config.yaml` below shows how OliveTin can run the `systemctl list-units …` command on startup, and on a schedule to update the file.
Note that if the file does not exist the first time OliveTin starts up, then OliveTin will will issue an error about not finding the file to monitor it. An easy way around this is to simply restart OliveTin a 2nd time, so that on the 2nd startup it will find the file (because it will be created the first time OliveTin starts up).
## [](#%5Fconfiguration)Configuration
Finally, here is the example configuration file to build the dashboard;
`config.yaml`
```yaml
actions:
- title: Stop {{ systemd_unit.unit }}
shell: systemctl stop {{ systemd_unit.unit }}
icon:
entity: systemd_unit
triggers:
- Update services file
- title: Start {{ systemd_unit.unit }}
shell: systemctl start {{ systemd_unit.unit }}
icon:
entity: systemd_unit
triggers:
- Update services file
- title: Update services file
shell: systemctl list-units -a -o json --no-pager | jq -c 'map(select (.unit | contains ("upsilon", "podman", "boot.mount"))) | .[]' > /etc/OliveTin/entities/systemd_units.json
hidden: true
execOnStartup: true
entities:
- file: /etc/OliveTin/entities/systemd_units.json
name: systemd_unit
dashboards:
- title: My Services
contents:
- title: '{{ systemd_unit.description }}'
type: fieldset
entity: systemd_unit
contents:
- title: 'Status: {{ systemd_unit.sub }}'
type: display
- title: Start {{ systemd_unit.unit }}
- title: Stop {{ systemd_unit.unit }}
```
Wake On LAN from a container
====================
This is a simple solution that provides wake on lan capabilities from inside a container. It uses the simple `ether-wake` command to send the magic packet. This can be incredibly helpful if you just need a simple button to click to wake up a machine on your network.
Docker containers will normally use a docker network, which is a separate network from the host network. This means that the container will not be able to send the magic packet to the host network. Therefore, we need to create the container with the `--network host` option, which will allow the container to send the magic packet to the host network (not the docker network).
The container is also created with the `--user root` option, which allows the container to send the magic packet as root. This is necessary because the `ether-wake` command requires root privileges to send the magic packet, and also to install the `ether-wake` command, which is bundled with `net-tools` in the container.
Create the container as follows;
```bash
user@host: docker create -u root --network=host --name olivetin_wol -v /etc/OliveTin/:/config ghcr.io/olivetin/olivetin:latest
```
Create your OliveTin `config.yaml` file in the `/etc/OliveTin/` directory on the host, with the following content;
```yaml
actions:
- title: WakeOnLan Server1
shell: ether-wake A8:5E:45:E4:FF:2A
icon: ping
- title: Install ether-wake on startup
shell: microdnf install -y net-tools
hidden: true
execOnStartup: true
timeout: 120
```
Obviously adjust the config file with your own MAC addressses, creating new actions to send WOL commands as needed.
Then start the container with the following command;
```asciidoc
docker start olivetin_wol
```
Then visit your OliveTin web interface at and you should see something that looks like this;

## [](#%5Fwake%5Fon%5Flan%5Fvia%5Fdocker%5Fcontainer)Wake on LAN via docker container
This is an alternative solution that provides WoL capabilities to the OliveTin container,
but has the advantage the OliveTin container does not have to run on the host network ( `--network host` ). This may be useful if your networking configuration relies on docker `bridge`networks (or other more complex networking configurations).
It requires that OliveTin is configured with permissions that allow it to control docker.
## [](#%5Fsetup%5Fif%5Frunning%5Finside%5Fa%5Fcontainer)Setup if running inside a container
You can control other containers, when running OliveTin inside a container itself, however you need to do some extra setup when creating the OliveTin container.
### [](#%5Fensure%5Fyour%5Fcontainer%5Fhas%5Fpermissions%5Fto%5Fcontrol%5Fdocker)Ensure your container has permissions to control docker
You have two alternatives to allow OliveTin (running inside a container) to talk to the Docker daemon through the bind-mounted socket. Pick one:
#### [](#%5Foption%5F1%5Fuse%5Fprivileged%5Fsimplest)Option 1 — Use `--privileged` (simplest)
| | Simplest for most users. Podman does not have this requirement. |
| ------------------------------------------------------------------ |
* Run the container with `--privileged` and as `root` (eg `--user root`).
* This avoids user/group permission issues on `/var/run/docker.sock`.
If you are getting "permission denied" errors it is probably because OliveTin runs as user UID 1000 by default, which is not allowed by your docker host. Running with `--user root` under `--privileged` resolves this quickly. Note that [PUID and PGID variables will not work](#no-puid-pgid).
#### [](#%5Foption%5F2%5Frun%5Fas%5Fnon%5Froot%5Fin%5Fthe%5Fhost%5Fdocker%5Fgroup%5Fno%5Fprivileged)Option 2 — Run as non-root in the host `docker` group (no `--privileged`)
Use the standard Docker guidance to manage Docker as a non-root user (becoming a member of the `docker` group) and match the group’s GID inside the container so the process can access the socket permissions.
* Docs: [Manage Docker as a non-root user](https://docs.docker.com/engine/install/linux-postinstall/#manage-docker-as-a-non-root-user)
* Find the `docker` group GID on the host, for example using `getent group docker`.
* Run the container with your user UID and the `docker` group GID, and bind-mount the socket. Using Compose:
docker-compose.yml
```yaml
services:
olivetin:
container_name: olivetin
image: jamesread/olivetin
user: ${UID}:${docker_group_id}
volumes:
- /var/run/docker.sock:/var/run/docker.sock
```
Where `UID` and `docker_group_id` are provided via your shell environment or a `.env` file next to your Compose file, for example:
env
```bash
UID=1000
docker_group_id=995
```
This allows you to run the container as a non-root user, while still allowing access to `/var/run/docker.sock`.
### [](#%5Fpass%5Fthe%5Fdocker%5Fsocket%5Finto%5Fthe%5Fcontainer)Pass the docker socket into the container
1. Pass `/var/run/docker.sock` as a bind mount to the container when creating it, eg:
```asciidoc
docker create --privileged --user root -v /var/run/docker.sock:/var/run/docker.sock ...additional args here...
```
Or, using the `docker run` syntax;
```asciidoc
docker run --privileged --user root -v /var/run/docker.sock:/var/run/docker.sock --name OliveTin jamesread/olivetin
```
2. The official x86\_64 docker container comes with the `docker` client pre-installed. If you are using `arm` or and `arm64` container, you will need to add Docker yourself.
[How to install additional packages in the container](../../reference/containerInstallPackages.html)
| | The reason that the arm and arm64 containers do not include docker, is that when these images are cross-compiled at build time, it takes FOREVER because we have to emulate arm. |
| ----------------------------------------------------------------------------------------------------------------------------------------------------------------------------------- |
After you have passed the socket into the container (and optionally installed docker), you should be able to setup docker actions like it’s shown in the example [above](#example-control-containers).
Now you can add actions to your OliveTin config file that use a separate docker container (on the `host` network) to send the WOL commands.
```yaml
- title: WakeOnLan Server1
# The r0gger/docker-wake-on-lan is a minimal container for WOL
# that can be run on the host network.
# It is not required to run the OliveTin container on the host network.
shell: |
docker run --rm --name wake-on-lan --net=host -e MAC='A8:5E:45:E4:FF:2A' r0gger/docker-wake-on-lan
```